Friday, 8 December 2023

Free Pattern Friday: Doll's Clothes by Fleece Fun


Welcome to my monthly 'Free Pattern Friday' feature, where I road test a free sewing pattern or tutorial: sometimes a children's one, sometimes an adult's one (or even a doll's one!). I try to publish these posts every first Friday of the month, timed to provide inspiration for those who plan to get their sew on over the weekend. I firmly believe that, if you pick your projects carefully, sewing doesn't have to be a crazy-expensive way to clothe yourself and your family. Thanks to all the amazing pattern designers who have offered up their hard work for us to enjoy for free.

At time of writing, Christmas is less than three weeks away. I do not condone panic sewing, but if you did find yourself with a couple of free hours and the energy to sew, and have some stockings to fill for someone who likes dolls, then this could be a great little project. Personally, I LOVE making doll's clothes. It can be super fiddly, but it's a fun use for fabric scraps and the results are almost always adorable. However, sadly (for me), my daughter has hardy played with her dolls all year, and it's been nearly two years since I posted on this blog about any free doll's clothes patterns. The last time I shared about a super versatile dress pattern by Ellie & Mac that included lots of styles options. Today I'm posting about a stash of free doll's patterns by Fleece Fun that I discovered at the beginning of the year through a lovely Instagram follower. Thanks to that follower, and thanks very much to Fleece Fun for their hardwork and for sharing this little treasure trove for free. 

Please note: I haven't road tested all of these little Fleece Fun patterns, so I can't vouch for every one of them. Plus, it needs to be highlighted that different dolls have different proportions. So, just like I'd advise with a human garment, only cut out one and make a (hopefully) wearable toile before going into full production mode! 

Remember: if the doll you wish to dress isn't the height the pattern is designed for, you can adjust the size of the pattern by adjusting the scale setting when printing it out. The patterns on this site are designed for 18" dolls. The doll I was dressing was 14" so I had to print these at about 77% scale. 


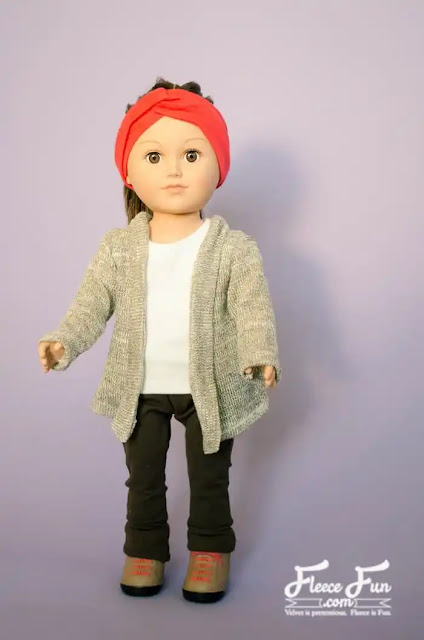
(image source: Fleece Fun)

Pattern type:

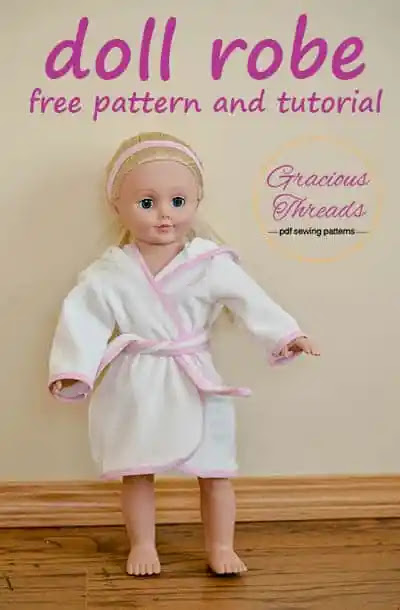
If you wanted to, you could create a pretty comprehensive feminine-styled wardrobe with this collection of patterns. I asked my daughter which of these patterns she'd like me to make, and she picked out the cuffed leggings, cardigan and robe (AKA dressing gown)


(image source: Fleece Fun)


Sizing info:

As mentioned above, the patterns on this site are designed for 18" dolls. The doll I was dressing was 14" so I had to print these at about 77% scale. However, the doll is portioned with comparatively longer legs and a narrower body than the patterns are designed for. So the leggings came out a bit cropped and the cardigan came out a bit wide. Hence my suggestion to make a trial version before cutting out a load from your favourite fabric scraps. I would also advise cutting any elastic to fit the actual doll in question (if possible) rather than following the pattern's suggested lengths to the letter. 


Fabric info:

So this is the fun bit: finding small bits of fabrics that are languishing in your stash and putting them to good use. Knits are particularly good for making doll's clothes because you don't need to worry about fraying and finishing tiny raw edges. For the cuffed leggings, I used a scrap of very stretchy, lightweight, loop-back french terry. For the cardigan, I used some zebra textured double knit. And for the robe, I used a scrap of fleece that was leftover from the backing of a floor quilt I made for my daughter whilst I was pregnant with her!! These days, I wouldn't buy fleece because it's made from synthetic fibres and will therefore stay on our planet for millennia, in some form or other. But finding uses for what already exists, especially uses that won't have to go through the wash and release microplastics into the waterways, is important and satisfying.


Findings:

Each of these patterns seemed to be well drafted and easily accessible to download in exchange for a sign-up to their newsletter (you can, of course, unsubscribe at anytime). The construction steps are all in the form of a blog post. The cardigan has illustrations to show key steps, the other two have photos to guide you. I have to warn you that it's one of those websites that is dripping in distracting and annoying ads. I understand that every one has bills to pay, but I don't have to like this way of doing it!

The garments came out very cute, despite the proportion issues. I could tweak the patterns and make more, better fitting versions. But as I say, my daughter isn't so into her dolls any more (sniff) so that seems like a waste of sewing time, as much as I enjoy making these. 


Customisation ideas:

Oh my goodness, you could go to TOWN using these patterns as the basis for many more versions. 


Would I make these again?

Are you trying to make me cry?!


Friday, 3 November 2023

Free Pattern Friday: Zipped Pouch AKA Pipa The Pouch!


Welcome to my monthly 'Free Pattern Friday' feature, where I road test a free sewing pattern or tutorial: sometimes a children's one, sometimes an adult's one. I publish these posts every first Friday of the month, timed to provide inspiration for those who plan to get their sew on over the weekend. I firmly believe that, if you pick your projects carefully, sewing doesn't have to be a crazy-expensive way to clothe yourself and your family. Thanks to all the amazing pattern designers who have offered up their hard work for us to enjoy for free.

No prizes for guessing why I'm posting about this particular free pattern at the beginning of November (hint: it begins with C). If you're scrabbling around for cute gift ideas for someone who appreciates handmade things, but won't take up a lot of your making time and fabric stash, Pipa The Pouch by Sewing Patterns by Masin is a great option. You can easily personalise them to the recipient and they have a variety of potential uses (make up, jewellery, toiletries, pencil case, small craft equipment, chess pieces, tampons, headphones, the random items that lurk at the bottom of your bag, snacks, I could go on.....). The pattern is accessible when you sign up for the free and not-at-all-spammy Sewing Patterns by Masin newsletter. Shortly after signing up, you will receive an email that includes a link to access the pattern. You can, of course, then choose to unsubscribe to the newsletter at a later date if you with. Big thanks to Jasmin from Sewing Patterns by Masin for sharing this pattern for free. 


Pattern type:

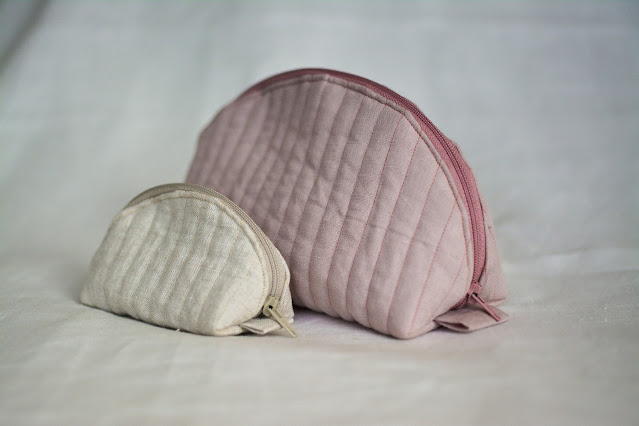
The website states that Pipa the Pouch is a little quilted pouch with a long rounded zipper allowing the pouch to open nice and wide. 

Sizing info: 

The download includes the patterns for two sizes of pouch. The larger results in a pouch that is approx. 21cm across and 12cm high. I didn't measure the smaller one before I sent it off to my mum, however measuring the pattern piece, it would end up approx. 15cm across and 8cm high. You could also adjust the settings of your printer if you wished to make a custom larger or small sized pouch.


(image source: Sewing Patterns by Masin)

Fabric info:


The pattern suggests that Pipa the Pouch will look pretty in any woven, non-stretch fabric. Jasmin's favourite Pipa is made with linen fabric, heavy weight fusible interfacing, and a light weight cotton fabric with flower print for the lining. This pattern gave me the opportunity to dig out some small but very precious scraps of fabric that have been dwelling in my stash for wayyyyyy too long.


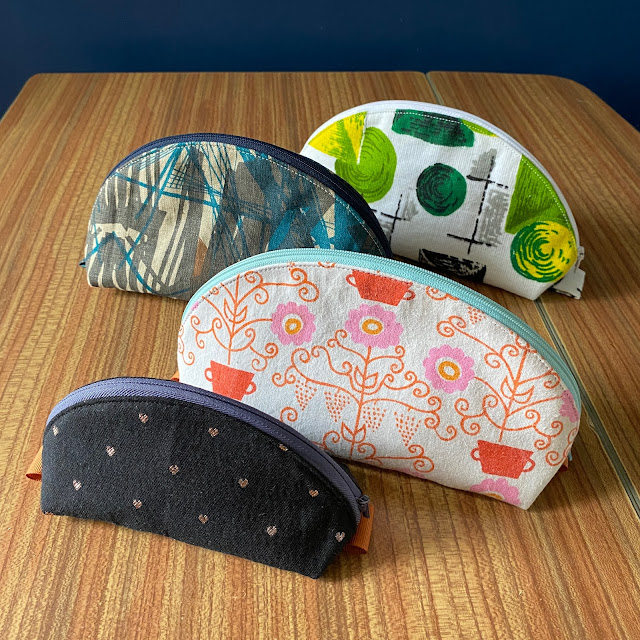
The green and white fabric is some 1950s vintage fabric (possibly barkcloth), the last bit leftover from when I used to make bags about twenty years ago. It makes my heart sing and that pouch is for me. The darker, geometric fabric was a scrap that I bought from a screenprinter/lampshade maker over ten years ago. That pouch was sent to my good friends Lee & Jiang in advance of a big trip they're about to make to the US. The floral print vintage cotton was a small hanky-sized piece that I picked up at a charity shop about five years ago. That pouch is also for a friend. And lastly, the small pouch made with a scrap of heart brocade that I found in the scrap bin at work has been sent off to my mum who really liked it when she came to visit.


Because of the limited size of most of the pieces I was using, I had to make a seam along the bottom, rather than cutting the pieces on the fold.


For all the larger pouches, I actually decided to avoid fusible interfacing. Instead, I cut an additional layer of thicker fabric from my stash, which I stitched to the main outer piece around the edge within the seam allowance. There was three reasons for this: 1) I'm trying to use less fusible interfacing in my sewing because I'm worried about the environmental impact of it, so I'm experimenting with replacing it with an alternative when I think that might be an option, 2) I don't have much interfacing left and can't buy more at the moment due to my participation in the Last Sewist Standing challenge, so I want to retain what I have for projects that really do need it, and 3) I wanted to bust more scraps from my stash!

All of them are lined with scraps of cotton lawn or viscose from my stash, and all the zips are also from my stash. I had to use an invisible zip for the small one because I'm running very low on regular closed end zips now too. When I didn't have enough of the outer fabric to make the tabs, I used some grosgrain ribbon that I once harvested from a box of chocolates instead!


Findings:

As you can see, I went on quite the Pipa the Pouch making spree! It was a much needed palette cleanser between garment projects and allowed me FINALLY find uses for some very old but very loved textiles. They're not super quick, but easy enough for a confident sewer to complete one in an afternoon. 

The pattern and instructions are very clear, with helpful diagrams illustrating the construction. The literal only thing I would say that could be improved or updated is the page numbering. The pages of the document are numbered, but the numbering excludes the cover page. So according to the page numbers, the pages with the pattern pieces are 3 & 4. However, because of the cover page, you actually need to print pages 4 & 5. But that's it. 

As you can see, I didn't actually add the row of 'quilting' stitching to my pouches. I tried it on one of them, but I found it distracted from the print too much and ended up unpicking it. It might be a nice addition on solid fabrics however.  


Would I make it again?

Absolutely! This pattern is such a great canvas for small but special pieces of fabric, and the usefulness of this items means you will get a lot of enjoyment from those fabrics. 

Friday, 6 October 2023

Free Pattern Friday: Avelia Bomber Jacket for Adults


Welcome to my monthly 'Free Pattern Friday' feature, where I road test a free sewing pattern or tutorial: sometimes a children's one, sometimes an adult's one. I publish these posts every first Friday of the month, timed to provide inspiration for those who plan to get their sew on over the weekend. I firmly believe that, if you pick your projects carefully, sewing doesn't have to be a crazy-expensive way to clothe yourself and your family. Thanks to all the amazing pattern designers who have offered up their hard work for us to enjoy for free.


Ok, so this probably isn't a very useful post because I didn't actually road test this free sewing pattern very thoroughly. The pattern is for a lined bomber jacket, but I wanted to use pre-quilted fabric, so I had to basically chuck the instructions out the window and make the construction up as I went along. What might be useful for you to know, however, is that the Avelia Bomber jacket pattern is one of 300+ free sewing patterns available via the Mood Fabrics website when you sign up to their newsletter. The Mood Sewsciety is the section of the Mood Fabrics website dedicated to supporting sewers with how to actually their fabrics and develop their skills. That's where you'll find all the patterns and the instructions that come in the form of supporting blog posts. Thanks to Mood for sharing all these patterns for free, the variety of the range is really impressive. 


(image source: Mood Fabrics)

Pattern type:

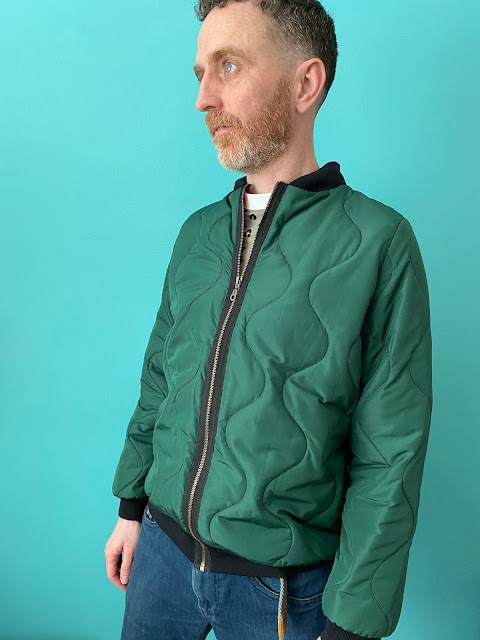
I promised Mr SoZo a new jacket for his birthday back in January (this was finished in February). Until that point his only outerwear garments were one puffy winter jacket and one incredibly flimpsy unlined jacket (I can hardly bring myself to describe that thing as a jacket, it's so thin!) and nothing inbetween. So I brought him to my work at Fabric Godmother at the end of an open day I was helping out at, and together we selected some cool reversible pre-quilted fabric.

He loves bomber style jackets, largely thanks to Karamo, but a thorough trawl of the internets didn't bring up as many options as you might expect. There's one excellent-looking one by a French (maybe Belgian actually) pattern company but they don't sell PDF versions. The shipping and taxes on goods coming from France these days is eye-watering ('thanks' to Brexit), so I decided to continue my search. 

When I chanced upon the Avelia Bomber jacket pattern, I thought it might give me some bones to work with. Mr SoZo is quite narrow in the shoulders, so a pattern drafted for a more feminine frame wouldn't require a huge amount of reworking, were my thoughts. The original pattern is for a fully lined, zip-up jacket with faux zip pocket, designed in particular to show case the futuristic, oil-effect, reflective fabric pictured above. 


Sizing info:

Here's where things get a bit tricky. The pattern is graded from a US 2 - 30, with sizes 7 and 9 thrown in for good measure. Body measurements are included in the blog post, however finished garment measurements are not. Word on the street, and by 'street' I mean this blog post, is that Mood's patterns' sizing and fit are all over the place. My assumption is that they have many different pattern makers creating patterns for them, seeing as they have so many on offer, and there isn't any consistency across the range. My recommendation would be to measure the pattern pieces themselves and compare with similar style pattern or garment you own before selecting a size. I ended up combining sizes and adding a significant amount of length to the body and some to the sleeves. 


Fabric info:

As I say, this pattern was created to promote this specific fabric, so the only fabric referred to in the list of materials required is that particular one. So you're kind of on your own with fabric choice, but my thoughts are a mid-weight woven with little-to-no-stretch, or even a hefty knit such as a very dense sweatshirting or scuba might work. It also suggests a polyester lining and a thick type of rib knit trim, with links to where you can buy it on their site. As I say, I was using a pre-quilted fabric so I didn't need lining, but I did have to buy some heavy jacket ribbing and found some fairly cheap on eBay. 

Because I lengthened the body, I half-made the garment before measuring for the length of zip I required. Annoyingly, the length I'd created was in between two lengths available on Zipper Station. I wasn't about to start trying to shorten a brass tooth zip, so I went for the longer one and tried to ease it in as best I could.   

I also had to buy a million metres of orange bias binding to finish all the seams. But I only have myself to blame for that. 


Findings:

I can say this because the whole process was several seasons ago and I now have some distance, but this was NOT an enjoyable sewing project. I love sewing for Mr SoZo, but this project was not fun. Obviously, choosing the pre-quilted fabric created a big headache because I had to created my own construction method. But also I disliked the drafting on this pattern. I didn't like the shapes and proportions for any body. Plus the zip being a bit long threw things off a bit, and I don't like how the neckline looks where the zip joins with the collar ribbing. Thankfully, after months of wear (and there HAS been months of wear), the neckline has softened a bit and doesn't look as stiff and awkward as it does in these pics that were taken when it was first made. 

I had to hand stitch the bias binding to cover the seams which took FOREVER. I'm still spotting places where the orange stitching is visible on the outside against the green where I made my stitches too deep. AGH!


Would I make it again?:

Would I make Mr SoZo a bomber jacket again? Yes. Would I use this pattern to do so? No. It was a bold move to use a fabric that was not prescribed for the pattern - a risk that partially paid off. However, I'd like to make another with a regular lining with a different pattern as the base. 

What worked out really well, however, were these tablet cases I made with some of the leftovers for my children! They've prevented a lot of scratches I reckon...


Friday, 8 September 2023

Free Pattern Friday: Hat and Leggings for Babies


Welcome to my monthly 'Free Pattern Friday' feature, where I road test a free sewing pattern or tutorial: sometimes a children's one, sometimes an adult's one. I publish these posts every first Friday of the month, timed to provide inspiration for those who plan to get their sew on over the weekend. I firmly believe that, if you pick your projects carefully, sewing doesn't have to be a crazy-expensive way to clothe yourself and your family. Thanks to all the amazing pattern designers who have offered up their hard work for us to enjoy for free.


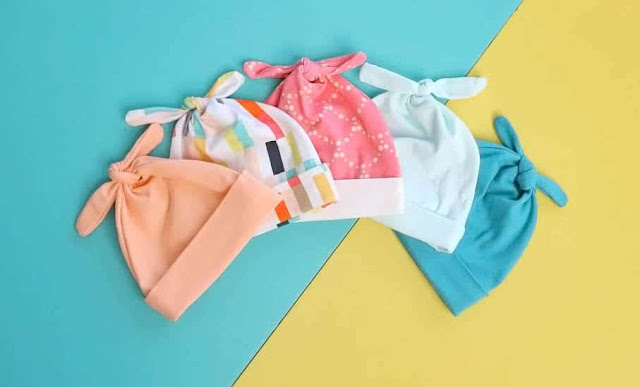
Today you've got a two free pattern reviews for the price of one! The reason why I'm posting both of these today is because they make such a sweet pairing: they can be worn together AND make a lovely set to give as a gift. If you don't have any babies in your life at this time, and no one you know is currently expecting a child or grandchild, I recommend you bookmark this post for the future. And if you're in that phase of life when it feels like everyone around you is having babies, you could make a few in advance to have on hand as gifts.

Big thanks to Sweet Red Poppy for creating the Double Top Knot Baby hat pattern for free, and to Patterns for Pirates for creating the Petite Pegs pattern for free. I really wish both of these patterns had been around when I was pregnant with my babies!


(image source: Sweet Red Poppy)


Pattern type: 

The Double Knot Baby hat pattern is ridiculously cute and consists of just two pattern pieces: the hat and the band. The Petite Pegs are a casual leggings style with knit waistband (no elastic), with a rise designed to easily cover a nappy. There are four leg lengths included: shorties, bike, capri and ankle. They also consist of two pieces: the legs and the waistband. 


(image source: Patterns For Pirates)


Sizing info:

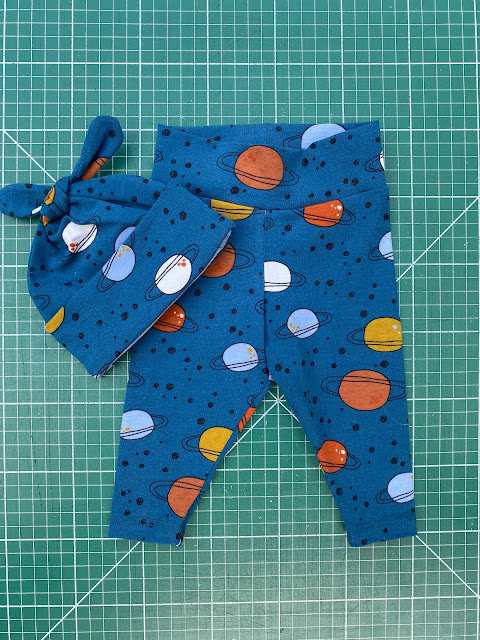
The hat pattern includes six sizes ranging from Newborn to 2Y, and the leggings from Premie to 12 months. After much debate, I created these two sets both using the 3-6 months size for the hat and Newborn for the leggings. I was scared of making the hat too small and them being useless, so I erred on the side of caution with that. I felt more confident going with the Newborn size for the leggings. As you might be able to tell from the tiny feet in the pic below, my friend's child was just a couple of weeks old, to give you a sense of the fit. 

As well as the age of the baby, you should also pick your pattern sizing in relation to the amount of stretch in your fabric: going for a smaller size for super stretch knits, or a larger size if the stretch percentage is much lower. 


Fabric info:

For the hat pattern, it is recommend that you use a medium-weight knit fabric with a content of 95% Cotton, 5% Lycra/Spandex. But then a couple of paragraphs down includes a greater list of other types of knit that could be suitable. I'd probably stick to the cotton/spandex (AKA Lycra or elastane) jerseys because I would be concerned that the other suggestions might be a touch too thick for that tight curve at the top of the knots, or quite slippery and therefore a challenge to work with. 

For the Petite Pegs pattern, they recommend a four-way stretch fabric with at least 50% stretch and good recovery. They also emphasise Lycra or spandex in the content, which is particularly important for this pattern so they stay in place and don't fall down, seeing as the pattern doesn't use elastic at the waist. 


The space print fabric (leftover from these men's PJs - another free sewing pattern!) I used here is exactly on spec for these patterns: cotton/elastane with a good four-way stretch. The mustard fabric for the second hat wasn't quite as stretchy, and more of a two-way stretch, than a true four-way. But I've also used this fabric for making undies and they hold up fine so I was confident in my choice, particularly because I wasn't making the smallest size of hat. The grey jersey I used for the second pair of leggings was probably more like a viscose/elastane jersey. I got this from a charity shop many years ago and it was unlabelled so I can't be sure. It's quite drapey and lighter in weight than the other two but it's really soft, so I knew it would feel particularly nice against the skin. 

Of course, with both of these patterns, I'm going to emphasise what excellent potential scrap busters they are! They take so little fabric, and you can play around using different constrasting fabrics for the bands and the main parts. For the leggings, you could even use two different fabrics for the two legs. And with the hat, you could use different fabrics for the front and back hat pieces. But as always with combining different fabrics, just make sure they have the same amount of stretch and a similar weight. 


Findings:

Downloading the print-at-home pattern for the hat was easy enough. The instructions are in the form of a blog post that you read directly on their site. There's also a YouTube video to support you if you'd like, but I didn't watch it. The instructions on the blog post are good, however it's one of those sites that is dripping with distracting ads. Which I accept because that how this person's business models works in order for them to offer free patterns, including this one. 

Generally speaking, I think the instructions (when you can find them between the adverts) are great. However, there's one step of the process that I did differently and I'm glad I did. The last step gets you to attach the band to the hat with the band on the right side of the hat. You then press the seam allowance up into the hat. My feeling is that the seam allowance would not stay put and probably poke out the bottom because it's not stitched in place. To prevent that, I stitched the band to the WRONG side of the hat, so when you flip the band out to the right side, the seam allowance will always be hidden. I would also recommend tacking the band in place with a few invisible stitches. 


The leggings pattern, by contrast, is accessible via the shop and cart on the Patterns for Pirates website. You have to create an account and go through more steps (you don't need to input any payment details). However, you then have a downloaded file that includes the pattern AND instructions - no ads. 

The construction process was a breeze. The only thing, and this is very minor and personal, is that I dislike a 1/2" seam allowance! It's not one I have to use very often, so I can't visually easily where to position a project on my overlocker so I'm trimming off the correct amount. Oh, and one point I'd make that I think they missed is to add some kind of tag or label so the back is easily identifiable. When parents are trying to change a wriggly baby whilst sleep deprived, they need all the help they can get! But honestly, that's it. I could make these leggings all day.


Would I make them again?

Hell yes! I've really whittled down my stash of jersey fabrics over the last couple of years, but if some more suitable fabric came my way, I'd definitely be making more of the leggings in particular. I do really like the two of these patterns together as a set, so if there are any new babies on the horizon, I'd love to do this again. 

Wednesday, 30 August 2023

Viscose Scraps Patchwork Trousers


Hello! First up, apologies for these terrible, dark photos. We tried to take some pics just before we went on holiday but clearly the light levels were too gloomy. So even after some editing you still can't see what's going on too well. Anyway! 

I tend to find my projects largely fall into one of two camps: 
  1. A garment or accessory I really want to wear or use
  2. An idea or thought experiment or that I want to see come to fruition 
This project was definitely from the second camp. In my experience, when it comes to working with scraps, slinky woven fabrics such as viscose and Tencel are the hardest to find uses for. I've tried piecing them together to make a garment from previously, but it didn't hold up very well because of my choice of seam finishing, plus I wasn't in love with the outcome stylistically. So I wanted to see if I would have more success by using a similar piecing technique to the one I adopted for my patchwork quilted denim jacket project. 


Piecing:

I started by getting all my slinky woven scraps out and selecting some that formed a nice colour palette. As you can tell, I'm really into autumnal shades such as mustard, rust, teal and forest green. It's fun seeing my previous garment projects represented in this selection! There's leftovers here from a dress that I still wear a fair bit, a Vali top that I love, a rust coloured tank that didn't work for me that I gave to a friend, my slinky Luna pants, plus a couple of bits from the scraps bin at work. 


The next step was to dissect larger scraps and trim everything up into rectangles. I find my rotary cutter, cutting mat and set square make this part of the process pretty quick. Then with the rectangles laid out, I started to find a pair that each have an edge about the same length. I pined, stitched and overlocked them together, then pressed the seam allowances to one side (I do this in batches to save time and energy). 

I would then add another shape to that joined pair, or another pair of shapes, with an edge a similar length and so on. The shapes then started to come together to make larger 'islands' of fabric. You'll often get to a point where you need to cut some 'custom' shapes to make the design work, so I kept some of the original scraps back for that. The main piece of advice is to not overthink the piecing process. It's super easy to spend too long questioning the position of each rectangle in relation to the rest and drive yourself insane!


Pattern:

It took quite a long time to eventually land on what I was actually going to make from these pieced together scraps. At first I thought a top, then I realised that I'm in far shorter supply of bottoms and I thought a wide-legged pair of culottes might look good. Then I realised I had enough scraps to make full-length, palazzo-style trousers, so I went with that plan. The pattern I created for this project is a hybrid of two other patterns. I used the top part of the trouser section from the Peppermint magazine/Ready to Sew Valley jumpsuit (then lengthened the rise in both the front and back). Plus I used the leg width and shape of the Wide-leg jumpsuit pattern by The Assembly Line, but eliminated the side seam as per the Valley jumpsuit. Having no side seam was going to result in less waste and fewer awkward shapes of pieced fabric at the side seams. 


Construction:

The 'fabric' I was creating by piecing scraps together slowly continued to grow until I could see that it had become big enough to fit the pattern piece on top. Obviously, I needed two of these large shapes of fabric. Then I cut out a pair of the pattern piece and constructed then garment as if I had cut it out of a flat piece of virgin fabric. The waist is elasticated, the channel constructed by simply turning down the top edge twice and edge stitching. 


Thoughts:

I LOVE that I managed to make an entire garment from leftovers from other projects, the scraps that would so often just go into the bin. I'm not sure if I'm super into the finished look, but I'm certainly into how they feel! Tencel and viscose fabrics usually have a wonderful drape to them anyhow, but all the additional seaming on this project has given the fabric some extra weight and made them somehow feel extra luxe. I do notice the seams on the reverse side a little against my skin, but I wouldn't describe it as unpleasant or annoying. 

I really hope that more sewers/sewists develop the habit of saving their scraps and leftovers where possible to use for other things. It's a good way to extract more value from the natural resources and the financial costs that went into the fabric in the first place, and it can keep textiles out of landfill for a bit longer. 


Friday, 4 August 2023

Free Pattern Friday: Siem Shorts for Kids


Welcome to my monthly 'Free Pattern Friday' feature, where I road test a free sewing pattern or tutorial: sometimes a children's one, sometimes an adult's one. I publish these posts every first Friday of the month, timed to provide inspiration for those who plan to get their sew on over the weekend. I firmly believe that, if you pick your projects carefully, sewing doesn't have to be a crazy-expensive way to clothe yourself and your family. Thanks to all the amazing pattern designers who have offered up their hard work for us to enjoy for free.

This month I'm returning to a pattern that I have made and loved previously. It's a unisex shorts pattern designed for knit fabrics called the Siem shorts pattern (pronounced 'seam') by Bel'Etoile patterns. I reviewed it two years ago, and I have been wanting to make it again ever since. I really love the retro stylings, plus it's a fantastic way to use up smaller amounts of knit fabrics that aren't suitable for undies making. Let's get into my experience this time round....
 

Pattern type: 

The Siem shorts pattern is a retro style designed for knit fabrics. The pattern consists of three pieces: front, back and waistband. Plus you need binding (preferably stretchy) to finish the edges. 

Sizing info:

This pattern is graded between a generous 98cm (approx. 3 years) and 164cm (approx. 14 years) which I really appreciate it. I made the size 152 this time, going by my daughter's hip measurement as opposed to her height, and the sizing is pretty perfect. 


Fabric info:

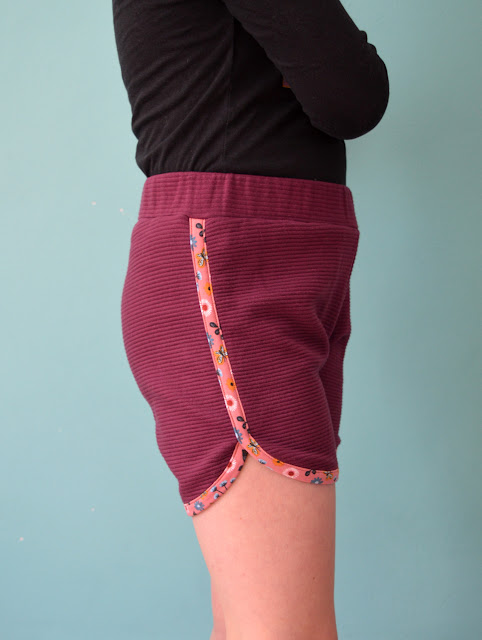
Fabric types that are listed as suitable for this pattern include jersey, ponte roma, french terry and sweatshirt knits. This is such a fantastic pattern for using up scraps and leftovers from other projects, so as long as the knit is pretty stable and isn't too light-weight it's probably worth a try. Last time I made and reviewed this pattern, I declared that I'd love to make these in a classic retro towelling or velour knit. My wish was granted when I found this discarded small remnant of pink velour at work. The burgundy pair are made using scraps of ponte roma that have been hanging around in my stash for a couple of years. 

The pattern calls for 'stretch bias binding' for finishing the edges. That's not a super common item to find in fabric shops or haberdashers, plus I'm still participating in the Last Sewist Standing challenge so I can't buy new sewing supplies at the moment anyway. So for the pink pair I used strips of white cotton ribbing (the kind that's sold for cuffs and neckbands). For the burgundy pair, I chanced my arm with something a bit thicker, and used a strips of printed french terry. I cut the strips along the DOGS (direction of greatest stretch) rather than on the bias.


Findings:

The pattern and the instructions come in separate PDF files. The pattern is easily obtained via the Bel-Etoile website, with no sign-ups to anything required. I was super happy to find that the pattern file includes the layers function which is great for saving ink, particularly when the pattern is graded to such a generous number of sizes. 

The instructions document was equally user-friendly. The only thing I felt was missing was some advice on making your own binding. It is an easy enough process to do, but the lack of that step in the instructions may cause a beginner sewer/sewist to have a bit of a head-scratch. This time I did remember that SEAM ALLOWANCE IS NOT INCLUDED IN THIS PATTERN. However, it did take me a while to work out that it's not necessary to add allowance to the curved edges. 


So I kind of messed the fit up a bit on these. When I made this pattern for my daughter two years ago, she found them to sit too high on her waist for her liking. This time, I made the burgundy pair as per the pattern and she experienced the same problem again. As before, she kept pulling them down to sit on her hips which resulted in a bunching of excess fabric at the front. So I unpicked the waistband and lowered the waist, particularly at the front. I made the same change to the pattern before cutting out the pink pair (see above for the pattern pieces with the new cutting line drawn in). Except now, as you can see from the picture below, that has resulted in the front rise being too short and a whole world of ugly tightness (*major eye roll*!). 

I think I've also stitched the side seam down too far on the burgundy pair as there's some tightness where the curve begins. I'll probably unpick it a bit at some point. 

But these things are my mistake! Don't let that put you off this super cute pattern. 


Customisation ideas:

Stealing my own ideas from last time:

  • Adding patch pockets to the back
  • Adding front pockets with curved pocket openings and matching bound edges like these 
  • Lengthening or shortening the legs if the wearer has a different preference
  • Applying a cute patch or decal for extra vintage coolness

Would I make it again?

YES! I have to work out how to alter where the waist of these shorts sit on her body without messing up the rise length. But I'd love to make these again in the future if she still likes the style in a year or so. 


Related Posts Plugin for WordPress, Blogger...