Sunday 28 March 2021

The Joy of Sewing for Children: Guest Post on Moonbow Fabrics

I recently wrote a guest blog post for online fabric shop, Moonbow Fabrics, all about why I love to sew kids' clothes. In the post, I discuss the joys of creating with jersey, and the advantages of handmade clothing. If you're on the look out for some fantastic fabric that will appeal to kids of all ages, then visit Moonbow Fabric's site. The donate one item of food to their local foodbank for every order they receive. My current favourite is their exclusive finger puppets print cotton/Lycra jersey. And if you'd like to hear more about my love of sewing kids' clothes, please read on...


I’ve been sewing most of my own clothes and blogging about it for about 13 years now. I had

my daughter seven years ago, and then a little boy a few years after that.

I LOVE sewing clothes for them, as well as for me, and although sewing processes are the

same, no matter the size of the garment, I find that the rewards are slightly different.


Sewing Satisfaction


Watching your kids running around and playing, completely care-free, whilst wearing clothes

that you’ve made, is a really wonderful feeling. I’m not exactly sure why it brings so much

satisfaction and joy, but it does.

The kids don’t even need to be your own. I’ve received just as much satisfaction from

making something for someone else’s child, as long as the garment was appreciated and

actually worn.


Making, Re-using, Recycling


These days, it’s very unlikely that those of us with kids who like to sew for them will make

all of our children’s clothes. My children have always been dressed in a combination of hand-

me-downs, charity shop finds and mum-made garments.

There are times when you fall into the slipstream of another family with an older child, and

the hand-me-down clothes flow steadily in your child’s direction.


However, when that flow slows down or dries up, and gaps in your child’s wardrobe appear,

adding some handmade items can be really pleasing. 


Advantages of Knit Fabrics


Most of the garments I make for my children are from knit fabrics. Comfort and lack of

restriction are my priorities when it comes to their clothing.

Luckily, the kids’ garments that receive the most use/abuse, and are therefore harder to come

by second-hand (I’m looking at you T-shirts, leggings, joggers) take relatively little time and

energy to sew.

I love that there are so many fantastic, fun prints available on kid-friendly base cloths such as

Jersey, French Terry and Sweatshirting.

With a handful of tried-and-tested basic patterns in your arsenal, you can whip up a fabulous-

looking new garment in the space of a nap time or evening. 

And if, like me, your sewing budget is limited and/or you like to consider the environmental

impact of buying new fabric, it’s good to remember that a little can go a long way.

Combining fun printed fabrics with plain/solid fabric within the same project can give a

really cool, unique finished item.

I also often harvest fabric from unwanted adult garments and use up my leftover jersey from

other sewing projects when making kid’s clothes too.


Home-sewn vs Shop Bought


Unlike for previous generations, affordable, mass-produced, children’s clothes are easy to

come by these days. But I invariably find that my handmade contributions, made with care

from good quality fabric, tend to look better for longer.

The fabrics I use don’t rapidly become brittle and scratchy, or start to pill as quickly. Neither

do the colours fade after just a couple of washes. My home-sewn leg and sleeve seams don’t

twist as readily as their factory-made counterparts tend to either.   


Sizing and Fit


And whilst we’re on the topic of comparing shop-bought to handmade, I can’t avoid

mentioning sizing.

My experiences of mass-manufactured kids’ clothes sizing range from confusing to

maddening. What is written on the label frequently bears little resemblance to the actual size

the garment will fit.

Many garment manufacturers seem set on labelling all their products at least one size smaller

than they actually are, and who has the strength or patience to get their kid to try something

on before buying it?!

When we make clothes for our kids, we can take their measurements in the comfort of our

own home (when they are distracted by Peppa Pig perhaps).

By comparing their measurements to the pattern size charts, we have a much clearer idea of

how that garment is going to fit. 


Custom Fitting


Plus once we have their measurements, we can easily combine sizes as necessary for a

custom fit, just as so many adult-garment sewers have to.

For those dressing children with a skinnier or stockier frame than the ‘average’, this can be a

game changer.

When my daughter was a toddler, she was very long and thin. I was able to combine different

sizes for the width and length, thus making her leggings and joggers that both fit properly at

the waist and reached her ankles AT THE SAME TIME. 


Developing Personal Style


My final and favourite reason for sewing my children’s clothing is so I can make things that

align with my children’s personalities and preferences.

For my four-year-old son, that currently means just keeping the fabric within the orange-and-

red spectrum.

However, my seven-year-old daughter already has VERY clear ideas on personal style. These

days, garment projects for her are more of a collaborative effort.

While I must admit that relinquishing complete control of the decisions was hard at first, I am

the first to acknowledge the benefits of bringing kids on-board.

For one, garments are less likely to be rejected when kids get a say in what we make for

them. And secondly, by allowing them choice in the way their clothes turn out, we are

helping them to see themselves as designers, not merely consumers.

I hope that by the time my children become adults, they will be finding fun, escapism, joy

and value in the process of making, whatever form that takes… although sewing is best!

Friday 5 March 2021

Free Pattern Friday: Kid's Clementine Nightie


Welcome to my monthly 'Free Pattern Friday' feature, where I road test a free sewing pattern or tutorial: sometimes a children's one, sometimes an adult's one. I publish these posts every first Friday of the month, timed to provide inspiration for those who plan to get their sew on over the weekend. I firmly believe that, if you pick your projects carefully, sewing doesn't have to be a crazy-expensive way to clothe yourself and your family. Thanks to all the amazing pattern designers who have offered up their hard work for us to enjoy for free.


This pattern has been on my 'Free patterns to try' list for yonks. Designed as a nightie, the Clementine pattern by Sewpony can also be the basis for a great Summer dress (or even colder-weather pinafore if made in a thicker fabric and worn with a top underneath). There was snow on the ground here when I started prepping this project. And even though we're a long way from Summer warmth, I thought other Northern-hemisphere dwellers might also like a dose of warm-weather sewing inspo, and Southern-hemisphere dwellers might have time to squeeze this project in. Thanks heaps to Suz from Sewpony for sharing this pattern for free. It is easily acquired via the checkout on the Sewpony website (no payment required). 

(image source: Sewpony)

Pattern type:

The Clementine nightie (or dress) features a lined bodice with tie straps, and a gathered skirt with optional hem ruffle. There are no fastenings: it pulls on and off over the head. 


Sizing info:

The pattern is graded between 12 months and 12 years, equating to 80cm to 152cm in height. There is no layer function to avoid printing out sizes that you don't need. However, you can avoid printing unnecessary pages by only printing the ones that include the bodice and strap pieces, and using the measurements in the instruction document to draw the skirt and ruffle pieces directly onto the fabric.  

Going my the height of my model, I used the size 8 pattern pieces for my first version (the coral one). It came out wayyyyyy too big, however that does have a lot to do with my fabric choice (see below). 


Fabric info:

This pattern could be suitable for a wide range of fabrics, including most lightweight wovens and knits. I love that Sewpony recommend using an old duvet cover to make it, which would be lovely and soft if it's been well used and washed multiple times. 

I didn't have any suitable woven fabrics in my stash, so I turned to some very lightweight, very slinky jersey instead. I'd been scratching my head over what I should use this jersey for for at least eight years ever since my lovely friend Claire gave it to me. It's super thin so would most likely highlight lumps and bumps, but because the bodice of the Clementine is lined, I thought it just might work for this. As you can see, the finished garment ended up very wide and the armholes are very deep. I feel that the pattern should have included the suggestion to size down if using a knit, particularly those with quite a lot of stretch. 

This pattern would also be very sweet if made up in a needlecord or denim and worn as a pinafore.


Findings:

As with every Sewpony pattern I've tried, the instructions and the pattern itself were a joy to use. Both are so clear and unfussy, with just the right amount of explanation included in the instructions. A beginner with a couple of previous sewing projects under their belt would have little trouble following along. 

As I mentioned above, my coral version ended up way too big. It's possible that my slinky is on the outer limits of suitability, but I also feel that sizing down if using knits should be recommended. However, it did feel that the slinky jersey did look really good in the gathered skirt and ruffle by providing fantastic drape and movement. 

I decided to try another slinky jersey version because I've been trying to find a use for my scraps and leftovers of that type of knit. I sized down two sizes but kept the bodice length the same as the size 8. I also raised the armholes by about 3cm. I wanted more drama for this version, so lengthened both the skirt and ruffle pieces at bit, but kept the widths the same. I cut sections of knit (observing the grainlines as far as I could) of differing widths but the same length which I seamed together to form the skirt and ruffle. I think the result is pretty awesome and I've busted a masses amount of my slinky jersey scraps by making this dress. Dolores loves it, however, she does liken it to something Cinderella might be found in!


Customisation ideas:
  • Experiment with shortening or lengthening the bodice, skirt and/or ruffle pieces to create different looks and proportions.
  • Create a V at the neckline on the front and/or back.
  • Use three different fabrics, one each for the bodice, skirt and ruffle. A tonal effect would look amazing!
  • Shorten the skirt piece a lot and omit the ruffle to make a peplum top (I plan to try this).
  • Make it in needlecord or denim and add cute patch pockets to the skirt, or even one on the front of the bodice.


Would I make it again?

Absolutely! I definitely want to try making a peplum top based on my adapted version of this pattern. I can also see other versions for sleep and day wear, it's a great basic shape. 

Tuesday 2 March 2021

Josie Bra Experiment

Bras. The final frontier. Well, MY final frontier, anyway. I've been sewing for over twenty years, making my own clothes for about thirteen, yet until this weekend I had never made a bra. Catherine from Clothes and Sewing blog (sorry, can't find the link ATM) even challenged me to make a bra a couple of years ago! (And who can resist a challenge?!) Yet, I still hadn't made one. 

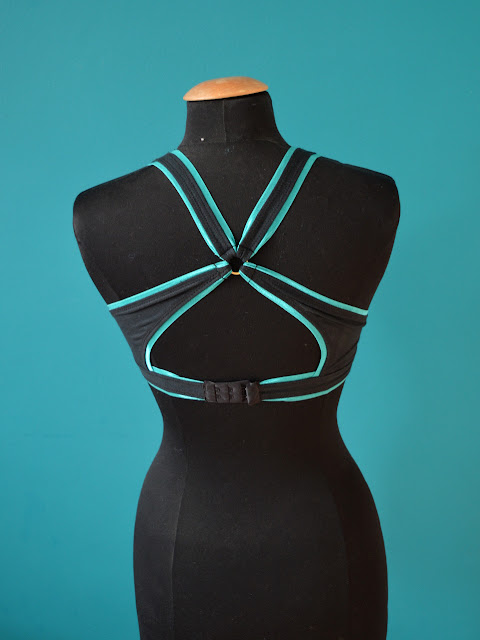
Let me explain why. You see, my body has been through two pregnancies and breastfed two babies (the second one for 19 months). My once-pretty-nice-if-I-say-so-myself boobs are now somewhat deflated. They need structure to give them a decent shape, and to keep them from resting on my stomach! Having tried a few different RTW bra styles, I always end up going back to basically the same style of bra from M&S. It's a super plain, T-shirt bra with underwires and moulded foam cups. My boobs seem to have specific requirements so I never thought I could sew myself a decent bra that would give me a good fit and be comfortable. At least not without spending a lot of time, effort and money on several failed attempts first. But the fact that this post includes photos of a bra on my dress form would indicate that something changed my mind and I have, in fact, made my first bra. 

(image source: Made My Wardrobe)

Over lockdown I noticed that my regular bras were cutting in to me in various places and just don't feel as comfortable as they used to. I'm not sure if they always felt like this and lockdown has just made me super sensitive to anything uncomfortable, or if my body has changed in some way. Certainly my bras are no longer brand new, but if anything, I expect age would make them looser and I'd feel them less rather than more

I love the Made My Wardrobe patterns, and I started eyeing up the beautiful, comfy-looking, jersey confections made using the Josie bra (and pants) pattern. I always thought that jersey-type bras (rather than moulded foam type bras) were for women with smaller, perter busts. However, some of her models are full-busted and look quite supported in the images (see above). Then Lydia, owner/designer of Made My Wardrobe, announced a free workshop supporting the pattern and it just felt like the stars were aligning for me to make a damn bra...

Fabric and haberdashery:

Made My Wardrobe stock some beautiful kits including everything you need to make a lacy bra and pants set. However, I couldn't justify shelling out for the whole set when I wasn't entirely convinced this plan was going to work out. Then a recent sort out of my jersey scraps led me uncover some really thick, stable jersey leftover from some jogging leggings I made a while ago. If ever there was a jersey that could give my saggy boobs sufficient support, I felt that it was this stuff! The Josie pattern can be made with a combo of jersey and lace, or jersey alone. I'm not massively into lacy undies, so taking the more simply jersey-only option whilst using what I already had suited me fine. 

Several months ago, I bought some lovely teal/peacock coloured fold over elastic from Plush Addict whilst I was ordering my rainbow webbing. I've been really happy with their FOE in the past, and wanted to make my webbing order more worth the postage. I ordered the metal ring and bra closure from Made My Wardrobe whilst buying the PDF version of the pattern. 

Pattern and workshop:

Having never made bras before, I was super interested to discover what all the pattern pieces looked like and how they went together. This particular bra pattern consists of just four pattern pieces, including a choice of narrower or deeper under band. The narrower option fastens with a hook and eye bra closure; the deeper is simply seamed together to form the band. I knew the deeper option wouldn't work with my high natural waist, plus I wanted the adjustability of the bra closure. As well as the under band options, whether or not you use lace and which type of elastic you go for all combined gives you the ability to make heaps of different variations from the same pattern. 

I never usually take part in sewalongs or follow online pattern workshops, at least not at the time that they are released.  However, I felt that the timing of this one was auspicious, so even when Lydia had to delay the workshop by a couple of weeks, I prevented myself from jumping ahead and did another little sewing project whilst I waited for it to begin. The workshop is free (you can make a donation) and is still available to access via the website . It's split into four parts and was released over four days. For me, the most useful section was the first where she demonstrated the various techniques for applying fold over and plush/picot elastics. I'm no stranger to either, but it was interesting to learn a new-to-me application method.

For my bra, I used only fold over elastic (rather than plush elastic or a combo of the two), and I ended up having to unpick parts where applying the FOE (which is wider than plush/picot) was causing problems. For example, the front strap pattern pieces just seemed too narrow to be able to stitch the FOE to both sides as per the method described in the video and pattern instructions. I was able to fudge it a bit and it looked ok in the end. 


The videos are beautifully produced, and Lydia talks through the steps in a clear and relaxed way. It was all very visually appealing and inspiring. There were a couple of times when I wished she'd have gone into a little more detail, and I found not being able to ask questions during the video frustrating! Plus, it would also have been good to have got some really clear, close-up shots of the pieces after some of the steps and technique demos. But it really was nice to feel the additional support of the designer as you embarked on the project. 

The bra itself came together surprisingly quickly, and before long I had a finished item in my hands. I feel that some of the steps could have used a bit more explanation, for example, what to do if you find the ends of the under band too wide for your bra closure. But it you've been sewing for a while, you can probably figure out some solutions yourself. After an initial trying on session, I went back and made a couple of adjustments. I unpicked the bra closure on both sides and reduced the length of the under band by 1cm at each end to make it tighter. I also shortened the front straps by a small amount to make it feel more supportive.


Thoughts and result:

It probably doesn't need pointing out, but this dress form in no way resembles my actual body, so the fit on this dress form is very different to how it looks on my body. I'm not really loving my body very much at the moment, and I didn't feel comfortable modelling the bra myself and having pictures of it on the interwebs. So I'm sorry that I was unable to give potential-Josie bra makers a more accurate idea of how it might look on an actual person. 

Well, after my first 'bra-making-journey', did I end up with a wearable bra? No. Sadly, I didn't. I wore it all Sunday, and aside from the initial vague discomfort that I reckon is caused by simply wearing a new shape of bra, the shape of it just isn't right for my boobs. As I mentioned at the top, my boobs are a bit deflated from breast feeding, and a bit 'spongey' compared to their previous fullness. The front edge of the straps/cups pushes along each boob, giving a kind of double-boob effect that neither looks nor feels nice. If I had applied the elastic more loosely along these edges, they wouldn't give me sufficient support, so I must conclude that this shape just doesn't work for the boobs that I'm currently sporting. It's also worth noting that the straps sit closer to your neck than most bras, which means the straps will be visible if you are wearing a top that doesn't have a tight crewneck or high neck.  

However, I DID love making it! My IRL sewing pal, Naida, is obsessed with making bras and I now see why. She's tipped me off to some other patterns that might work better for my shape, so when I have sufficient funds, I think I'll dive in again and hopefully have something useful at the end of it. So even though this bra didn't work out, I got the first non-functioning bra under my belt that I always predicted that I'd have to make, and it didn't cost too a lot in time and money. 
Related Posts Plugin for WordPress, Blogger...