Thursday 30 July 2020

Crew Neck Sweatshirt Update


Like many parents, I try to keep an eye on my kids' clothing selection to avoid getting caught out when a growth spurt occurs. I think this is particularly necessary if, like me, you don't buy new clothing for your kids, because getting what they need can take a bit more time and planning. My children's wardrobes are comprised of handmade, hand-me-downs, thrifted and the odd new item given to them as a present from someone else. 


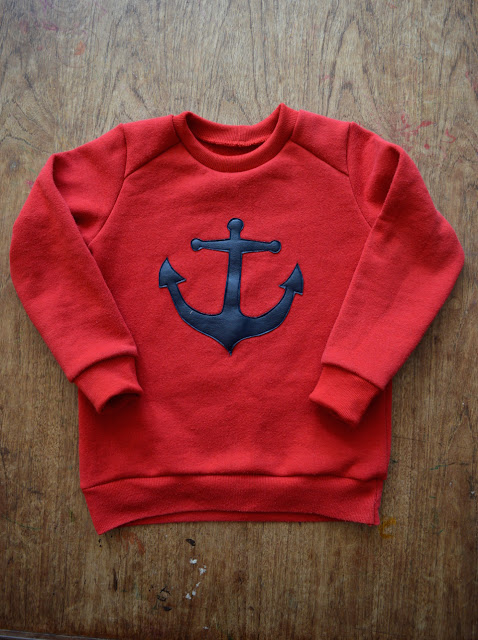
A recent sort through of Frankie's future-selection of clothes showed me that he has very few items for the next size up (aged 4/size 98+), which he is rapidly hurtling towards. I had a rummage in my clothes-to-upcycle/reuse pile and found a couple of sweatshirts, the first being a sweatshirt that has already had a number of incarnations! I made it (see below) when I worked for Traid about 8 years ago by combining a couple of red, donated sweatshirts and adding a leather anchor applique.   


Adding the navy leather shape was a gamble because I had no idea how it would wash, but actually it came out perfectly well from each wash cycle. Obviously I have no idea how much wear the original sweatshirts received, but I wore mine a lot over the years. 


I used the Brindille & Twig crew neck sweatshirt pattern for these upcycles, as I already had it in my stash and have enjoyed using it previously. I had to make seams at the shoulder for Frankie's version, just as I had to when making my adult-version. I like the additional detail that it brings. 


The second sweatshirt started out as a plain, turquoise, Damart sweatshirt that I picked up in a charity shop for 50p a few years ago. I really liked the colour but it was too small for me so it had been hanging around waiting for a purpose.  


I took the opportunity to finally bust out my Bobbinhood screen printing kit that I had got for my 40th birthday last October. I'd wanted one of these kits ever since I got to have a play with my friend Emily's last summer. But as soon as I got one of my own, all my print ideas seem to evaporate! 


Just to finally give my kit a go, I decided to use someone else's design as a starting point. I found this awesome Octopus design in one of my kids' copies of DOT magazine (which I highly recommend, BTW). I obtained permission from the designer (@annalisedunn) via Instagram, explaining that I was only going to use the design for my son's sweatshirt, and got going. Cutting the stencil out of the special plastic-y paper was the trickiest and most time-consuming part. The actual printing took literally 10min, including prepping the screen! The Bobbinhood kits are designed for stencils, so there's no exposing the screen or anything like that required.


Thoughts:

I love how both these sweatshirts came out! The journey the red sweatshirt has been on reminds me how good quality fabric can have many incarnations. Hopefully I can pass this on to someone else when Frankie eventually grows out of it. And I'm thrilled to have been able to have found an opportunity to break the seal on my awesome printing kit! I can't wait to get some new inks (I currently only have black) to give me more options for customising my clothing projects. 


Friday 24 July 2020

Scallop-hem Ashton Top Hack


During Me-Made-May this year I saw a lot other participants wearing lovely tops made using the Ashton Top pattern by Helen's Closet. I've always got one eye out for a great-looking woven tank pattern because they are almost as comfy to wear as a T-shirt and only require a small amount of fabric. I remembered that I already own this pattern, having been sent it for free shortly after its release (with no expectation of making or reviewing it, I may add). And with some nice pieces of woven cotton fabric in my stash itching to be used, this project was asking to be made!

(image source: Helen's Closet)

Pattern:

This pattern is a shift style, with a simple rounded neckline and hem facing. Included are two bust size options, two length options and two neck-and-armhole finishing options (bound or faced). I chose to start with the longer length and according to the size chart, my measurements made me a size 10 at the bust and size 12 at the waist and hips. 


I dutifully blended between the sizes and folded out 2cm from the length on the torso, as I always do. Because I was planning to use some fairly precious fabric, I made a quick toile (muslin). That first toile came out too big, so I started again with a size 8/10 combo which a second toile told me was much better. 


The basic pattern is lovely as it is, but I felt that it would also be a great basis for some pattern hacks. So I decided to have some fun and try making a scallop hem, which is something that I've been thinking about trying in a project for a while. To make a scallop hem, you need to create a facing, but seeing as this pattern already includes hem facings, that was one less step to take. 


I also wanted to play around with the neckline a little, so I drafted a V shape at the back (and altered my facing piece accordingly). I love the V shape detail of the Peppermint magazine peplum top, and what better way to expose a ropey, faded early-2000's star tattoo?!


Fabric:

For yonks I've been the owner of two small-ish lengths of lovely Atelier Brunette printed poplin. I put them both in my #2020makenine sewing plans (which you can see in this post) because they've been in my stash for years and really should be enjoyed out in the world. This cute little Paris print on a grey background came from M is for Make at least five years ago. I bought the end of the bolt, which I think was about 90cm. Although it's a bit cuter than anything I'd buy for myself these days, however I still really love the print and TBH I couldn't think of anything else to do with it.  


Thoughts:

I'm very pleased with how this top came out and I've worn it a couple of times since completion. Making the scallops added an extra level of challenge to the project, and I had a lot of fun working out how to make them as neat as possible (the key is A LOT of perilous clipping into the curves). I'm not sure if the V-shape is a total success: it looks nice but I'm not sure if it quite fits with the scallop hem detail. The only actual annoyance I feel with this project is that, as you can see in these pics, one of my bra straps is almost constantly visible. Next time I use this pattern, I'll probably build up that area a bit, as I'm never going to wear a strapless bra. Ultimately, it's a win. The overall fit is great and I'm so pleased I was able to find a use for this crisp poplin after so many years of hoarding it. 

Wednesday 15 July 2020

They Said it Could Never be Done: A Hawaiian Zadie Jumspuit


I appears that most manifestations of the Zadie Jumpsuit pattern are made in lovely, earthy, solid-coloured linens. And whilst I fully agree that those look incredibly, I decided to head towards the other end of the taste spectrum for this, my second version of the Zadie pattern. 


My first version, if you recall, was made in some wonderful lock-and-key print African wax fabric (AKA Ankara). I adore that jumpsuit and it's one of my very favourite garments to wear. I love both the way it looks, and the way it feels. The only pattern alteration I made was to fold out 2cm from the bodice pieces to account for my short-waistedness, which I feel was a success. 


This Hawaiian print cotton poplin has been in my stash for almost six years. It came from Fabric Godmother, before I worked for them in any capacity. I've long been a big fan of Hawaiian print fabric, so it's a surprise to me that I hadn't used it sooner. I nearly used it a number of times during my several-year-long Rockabilly phase, yet I came out the other side of that phases with the fabric remaining unused, so I put it into my #2020makenine plans (you can see the full nine in this post).

The most head-scratching part of this project for me came at the beginning, trying to position the pattern pieces onto my limited amount of fabric. Not only was my length of cotton shorter than the pattern called for, but I wanted to cut the back piece on the fold (rather than in two halves) so as not to break up the print. In general I had to be very careful about print placement, positioning two sections of the print too close to each other, for example, would be super noticeable. To make it work, I ended up omitted the hip pockets, which was a shame but a necessary sacrifice. I also made the length shorter, but I had wanted to do that anyway.  


I constructed this jumpsuit mainly through the recent, very excellent, online Sewing Weekender event (organised by Charlotte from English Girl at Home along with Kate and Rachel from the Foldline), which I was very proud to contribute, adding my own little talk about saving money and resources whilst sewing. I hadn't expected to the chance to enjoy any of the content (basically due to the kids being around), yet I managed to watch quite a bit of it. Because I had already made this pattern before, I didn't need to concentrate on my project too much which really helped. 

As for this jumpsuit, I really like it! The print and colours are a bit intense, but when the sun is shining, I think it works well. I can definitely see yet more Zadie's in my future. Maybe a subtle, earthy-toned linen one should be next...

Wednesday 8 July 2020

Jill Jumpsuit: It's Officially Summer!


It's unlikely to come as a shock to learn that I do not shop at Primark. (For readers who haven't hear of Primark, it's a fast fashion, high street clothes shop selling cheap, low-quality clothing for adults and children. The company is regularly accused of using garment factories whose workers have few rights, receive very low wages and work in unpleasant and dangerous conditions.) However, last summer Primark displayed a child's playsuit in the window that my daughter loved. No, I didn't buy it for her. I made vague noises about how I would make her one similar, and I counted on a rapid turnover of window display to help her forget about it and get me off the hook. 


Pattern:

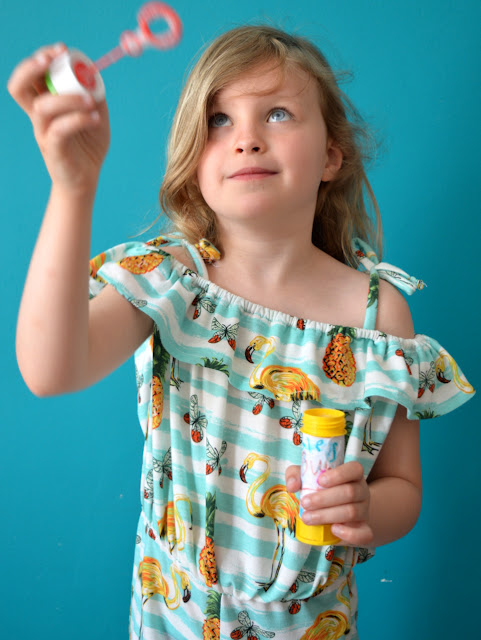
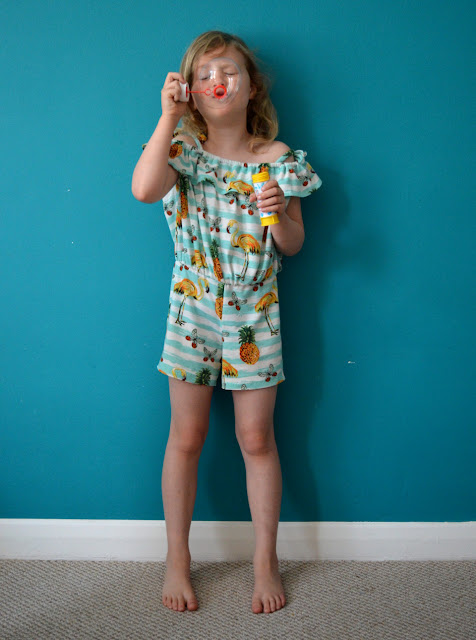
Shortly after, the sewing pattern company, Rebecca Page, released the Jill Jumpsuit pattern for women and children. The style is the spit of the playsuit that we saw in the Primark window: same ruffle round the shoulders, same shoulder ties, same blouson top. Actually, I think that the Primark version was made from something woven and the Jill jumpsuit is designed for knits. Anyway seeing as I had a couple of lengths of suitable slinky jersey in the stash, I had no excuse not to make it for her! 

(image source: Rebecca Page)

For this, my first attempt at this pattern, we went for the short length option and size 7-8 (she's 6.5 years old at the moment), hoping that she'll get two summer's worth of wear from it. I constructed it during a series of small windows of opportunity using both my regular machine and overlocker and it was easy enough. I wasn't keen on the method they suggested for binding the armholes but did it anyway, and in hindsight I don't think they look the greatest, not that you can see them really when its being worn. The pattern also includes pockets in the side seams, but I hate the way in-seam pockets tend to look in jersey (in fact in general), so I left those out. 


Fabric:

My lovely friend Lisa had a recent clear out of her fabric stash, and I was the very grateful recipient of lots of kid-friendly pieces, including this one. This summery jersey with a flamingos/pineapples/butterflies print on a stripe-y background is perfect for this hot weather style garment, and there was just enough for the short length version. I'm really pleased that this pattern was designed for knits rather than woven fabrics, because there are few garments less comfortable than an ill-fitting playsuit!


Thoughts:

Honestly, I wouldn't have chosen to make this style of garment for her if I had full control. I was a little concerned initially that this style could be viewed as 'flirty', which is not an adjective I want applied to my 6yo's clothing. But I feel strongly that children should be given an age-appropriate amount of autonomy on certain decisions that apply to them, and clothing is an important method of self-expression and experimentation. I'm hoping that this particular playsuit falls on the side of 'cute' rather than 'flirty', but either way, it cannot be denied that she LOVES it. During the recent heatwave she wore it almost every day, and drew pictures of herself wearing it, which were eye-wateringly adorable (to me). 

Finding a middle ground between what I'd like to make her/dress her in, and what she'd like to wear is important, and something that we're evolving with time. I can see a time in the very near future where she helps with the actual construction, and will, no doubt, play a bigger role in selecting styles and fabrics. 


As for this pattern, I plan to use it again, but with some tweaks. There's a slight bit of pulling/tightness at the side seams, and I need to have a look at the pattern pieces to work out if it's the shorts/trousers side seams that need elongating, or if it's the side seam at the top that's creating the issue. I'll also lengthen the rise on the front and back by a small amount, and possibly remove some of the fullness of the top section. In this version, I ended up removing and repositioning the shoulder ties further in because they kept falling off her shoulders (they still do on occasion), and I think that reducing the volume in the top will allow me to make a ruffle-free version more easily also. 

Friday 3 July 2020

Free Pattern Friday: Kids' Woodstock Swing Tee


Welcome to my monthly 'Free Pattern Friday' feature, where I road test a free sewing pattern or tutorial: sometimes a children's one, sometimes an adult's one. I publish these posts every first Friday of the month, timed to provide inspiration for those who plan to get their sew on over the weekend. I firmly believe that, if you pick your projects carefully, sewing doesn't have to be a crazy-expensive way to clothe yourself and your family. Thanks to all the amazing pattern designers who have offered up their hard work for us to enjoy for free.


One of my favourite things about making clothes for my kids is that it offers a great way to make use of small pieces and scraps of fabric leftover from adult projects. But something I've struggled with is finding uses for leftovers of light-weight, slinky jerseys. I made a few Celestial tees by Figgy's patterns when Dolores was about 2yo, which looked nice worked well in drape-y jersey. However, I wanted another option up my sleeve, plus the grown-on/dolman sleeves didn't give as me much small piece-busting opportunities as a style with more seams might allow. Enter: the Woodstock Swing tee by Hey June Handmade, which I stumbled upon when looking for something else entirely. Big ol' thanks to Hey June Handmade for sharing this, and some other great-looking patterns for free.  

(image source: Hey June Handmade)

Pattern type:

The website says it best: 'The Woodstock Swing Tee is a casual trapeze-hem top for Juniors.  It features a wider neckline and short cap sleeves as well as a slight high-low hemline.' My daughter hasn't owned a garment this shape before, so I wasn't sure how she'd take to it. However, she loves wearing leggings and leggings-shorts (is there a word for those? Cycle shorts maybe?), and I felt that this type of garment would work really well with those, as well as feeling nice and breezy on warm days. 


Sizing info:

As I've discussed previously, many free sewing patterns for children's wear are only graded up to five or six years old. It's kind of annoying that the free patterns dry up a bit just as your kids become independent enough to allow you some extra sewing time! To highlight some great-looking free pattern options for 6 years and up, I compiled this blog post. I love that the Woodstock Swing tee is graded form 6 years all the way up to 16 years. Plus, I really think it's a style that would look good on both a 6 year old AND a 16 year old, opposed to looking too grown up for a 6 year old, or too childish for a teenager. 

The sizing goes up in twos, so ages/sizes 6, 8, 10, 12, 14 and 16 are included. On my first try (the stripe-y version pictured above) I made my 6yo the size 6, and although she wears it, it looks a little small, particularly across the shoulders. For my second attempt (the pink/white/birds combo), I made the size 8 which I think fits her better, and will possibly see her through two summers. 


Fabric Info: 

Designed for knits with at least 30% stretch, I would go a step further and suggest that it is most suitable for lighter weight jerseys that drape well.  

Findings:

This pattern was really enjoyable to use. Accessing it through the Hey June Handmade online shop was easy, and the pattern is very professionally produced. The instructions and pattern pages are all in one PDF, and the pattern pages span ten sheets. Allegedly this pattern features the layers function, which allows you to save printer ink by only printing the size/s you need, but for some reason I couldn't get that option to work for me on this pattern. 

The instructions are clear and simple with each step demonstrated with an illustration. As with most free sewing patterns, I'd say this one is beginner friendly, and an enjoyably speedy make for more experienced sewers. You could easily whip up one of these the evening before going on holiday for example, without breaking into much of a sweat. 
I'm really pleased with the finished garments, bar the slight sizing issue as mentioned above. Finally using up some of my slinky-knit scraps was very satisfying, and she has worn both of them a number of times since it became warm enough. 


Customisation ideas:

I had every intention of actually making a few of the pattern-hack ideas I had for this pattern. But I'm afraid any different versions have yet to happen as other sewing patterns have been lining themselves up, crying out to be tried instead.
  • Use another slim-fit knit pattern with a long sleeve (like the Ester & Ebbe top pattern by Thread by Caroline perhaps) to make this into a long-sleeved top pattern also.
  • Extend into a dress
  • Add a ruffle around the hem, possible shortening it also so the final length remains similar to the original.
  • Add a ruffle into the sleeve seams (again, like the Ester & Ebbe top pattern perhaps). 
  • Add a patch pocket on the chest
  • Apply decals, screen prints or appliques to the front.
  • Create seam lines within the front and back pieces to create even more scrap-busting and colour-blocking opportunities. 


Would I make it again?

Yes, I'm sure I will when my daughter reaches the larger sizes. As I said above, useful free patterns for older kids, and in particular teens, are hard to come by so I think this one is pretty valuable. I'm still committed to trying out a hack or two also. Extending the hem length into a dress might make a great warm-weather nightdress option.  
Related Posts Plugin for WordPress, Blogger...