Showing posts with label me-made. Show all posts

Friday, 7 March 2025

Free Pattern Friday: Duffle Bag


Welcome to my monthly 'Free Pattern Friday' feature, where I road test a free sewing pattern or tutorial: sometimes a children's one, sometimes an adult's one. I try to publish these posts every first Friday of the month, timed to provide inspiration for those who plan to get their sew on over the weekend. I firmly believe that, if you pick your projects carefully, sewing doesn't have to be a crazy-expensive way to clothe yourself and your family. Thanks to all the amazing pattern designers who have offered up their hard work for us to enjoy for free.

This month I'm sharing a pattern and tutorial that I'm hoping will have fairly broad appeal. I mean, who couldn't use a variety of different sized and shaped bags?! This project was born out of wanting to use up this remnant of pre-quilted fabric. The remnant was rectangular but not very big, so it took me some time to find a project/pattern that would make the most of what I had with very little leftover. Eventually I landed on this duffle bag tutorial by Free-Tutorial.net. Thanks to them for sharing this pattern and tutorial for free. 


(image source: Free-Tutorial.net)

Pattern type:

This project makes a basic, barrel-shaped duffle bag, AKA holdall. The measurements, quantities and step-by-step instructions are found in the blog post, and there's downloadable pattern pages for the circles that form the ends of the bag. There are no sign-ups or checkouts required to access this pattern, just a million distracting adverts and annoying pop-ups to navigate. Thus is the way with some free patterns...

Sizing info:

This bag comes with two sizes for you to choose from: Medium - 13” wide and 8.5” high and Mini – 11” wide and 6” high. I made the medium. However, if you're up for a bit of maths, you could alter the scale on your printer setup when printing the circle pattern pieces, and work out the ratio to alter the rest of the measurements to make different sizes of bag. However, if you wanted a different volume bag but didn't fancy doing the maths, you could simply alter the width of the side panel pieces to make it more or less roomy. 

I'm not sure how useful the mini version would be, although it would be very cute. The medium size seems ok as an overnight bag, or possibly for taking a change of clothes to a dancing class or similar. Although I didn't specifically make this for her, I envision my daughter using this to go to a sleepover at a pal's. 


Fabric info:

The choice of recommended exterior fabric is pretty broad (quilting cotton/canvas/vinyl) because you can then add fusible interfacing if necessary, and you're advised to use a layer of fusible fleece or foam stabiliser for structure. Those more experienced in bag making will probably know more about these products than I! There's no specific recommendation for what to use for the lining. 


For my bag, I was determined to only use what fabrics I already had. As I say, my exterior fabric was pre-quilted, so had a bit of bulk to it already. However, it wasn't very stiff, so I used some plasticised table cloth vinyl to form the lining. I didn't have enough of this in right size so I had to piece together what I had. I'm pretty sure that the table cloth vinyl gives the bag a similar structure to how the fusible fleece or foam stabiliser might work. I'm not sure how it'll hold up long-term, but it works pretty well right now. I also like that it makes the inside somewhat waterproof in case a water bottle or shampoo bottle or something leaks. 

Webbing of non-specified width is recommended for the straps. I bought some organic cotton webbing from James Tailoring. But you could also just make straps from long rectangles of fabric folded twice (like you would double-fold bias binding) and stitched down the edges. 


Findings:

I spent one evening prepping and cutting out my pieces, and another evening actually stitching the bag together. I haven't made a bag like this before, so it was fun to see it come together, which is did pretty quickly. In hindsight, the table cloth vinyl might not have been the best choice for the lining. It was pretty tricky to wrestle into place and can't easily be pinned, and I had/have a fear that it's going to tear. 

As for the pattern itself, the instructions were pretty good with fairly clear photographs showing the various steps, but not for every step that I thought could use one. One thing I found was that the seam allowances were a bit all over the place, 1/4" in some places, 1/2" somewhere else and 3/8" somewhere else. It's a pretty simple make, but a little bit more guidance would make it more beginner friendly. 

The finished bag looks super cute, and this style of bag is a great canvas for lovely fabric. My only real gripe, design-wise, is that I wish there was a tab to hold on to when I unzip the bag. I didn't realise I'd miss that until the bag was complete, and now I can't really be arsed to unpick it and add them. 

Will I make this pattern again?

Possibly! I'd definitely make a similar style bag if not this exact one, simply because I'd like to learn some other methods of bag construction.

Friday, 2 August 2024

Free Pattern Friday: Cabana Tie Playsuit for Adults


Welcome to my monthly 'Free Pattern Friday' feature, where I road test a free sewing pattern or tutorial: sometimes a children's one, sometimes an adult's one. I try to publish these posts every first Friday of the month, timed to provide inspiration for those who plan to get their sew on over the weekend. I firmly believe that, if you pick your projects carefully, sewing doesn't have to be a crazy-expensive way to clothe yourself and your family. Thanks to all the amazing pattern designers who have offered up their hard work for us to enjoy for free.


As I type this, my part of the UK is experiencing its hot and sticky phrase of the year. I'm so happy I had the foresight/luck to make this playsuit in advance, because it's all I want to wear right now. If your part of the world has its own hot and sticky phase, I recommend you download this pattern. In fact, even if your area doesn't really have a phase like that, download this anyway because it looks cute worn with a T-shirt underneath. You can access the Cabana Tie Playsuit pattern via the Matchy Matchy Sewing Club website by going through their cart and check out process, as you would with any other order. This pattern is available on a sliding scale, pay-what-you-can situation, from $14 to free. If you have the means to pay for this pattern, please choose a paid option. If you don't, then I really hope you access this pattern for free, and enjoy making and wearing it. Big thanks to Matchy Matchy Sewing Club for sharing this accessible sewing pattern with the sewing community. 


Pattern type:

The website says it best: 'The Cabana Tie Playsuit is an easy to sew, effortless jumpsuit. The fit is slightly oversized and relaxed with wide, voluminous legs and a dropped crotch. It includes inseam pockets and a drawstring style shoulder strap that can be adjusted to your desired length and finished off in a large bow or knot.' The original pattern is ankle length, however, I cropped mine by about 20cms because I prefer the proportions of calf length with this type of garment. 


Sizing info:

As with all MMSC patterns, this one is generously graded. It includes sizes XXS - 6XL, which corresponds to Bust 31” - 64” / 79cm - 162cm. The loose, gathered nature of this pattern gives you lots of wiggle room, so you don't need to stress too much if you find yourself in between sizes. 


Fabric info:

The one downside of the MMSC website is the don't give much recommendation for suitable fabrics. They link to some fabrics that they sell, so you can to read between the lines a bit for fabric advice. For the Cabana they link to their linens, however, I would really recommend looking for very drape-y fabrics. I used a light-weight woven viscose with slightly slubby texture that I got at the London Destash Fabric Swap earlier this year. I'm not massively into wearing prints, but this garment could be a great canvas for a large-scale print. 


Findings:

This is my second experience sewing a Matchy Matchy pattern, and it was just as enjoyable as my first. The instructions are super clear, with excellent illustrations to guide you through. Even though this is a free/low-cost pattern, it produces a garment that is anything but basic. It feels really nice to wear, both in terms of comfort and in terms of feeling stylish. I don't have a well-fitting strapless bra at the moment, so in these photos you can see I'm wearing a regular bra which should give you an idea of the coverage of this pattern. Today I'm wearing it with  slim-fitting T-shirt underneath because it's a little (only a little) cooler. 


Customisation ideas:
  • Mess around with the leg lengths to get the perfect level for you. 
  • Try turning it into a dress or top
  • Rather than using self-fabric for the tie, use a contrasting fabric, or wide ribbon or rope. 

Would I make this again?

I would absolutely consider using this pattern again if the right fabric came my way. A slinky, solid black version would be lovely...

Friday, 5 July 2024

Free Pattern Friday: Wide Strap Maxi Dress for Adults


Welcome to my monthly 'Free Pattern Friday' feature, where I road test a free sewing pattern or tutorial: sometimes a children's one, sometimes an adult's one. I try to publish these posts every first Friday of the month, timed to provide inspiration for those who plan to get their sew on over the weekend. I firmly believe that, if you pick your projects carefully, sewing doesn't have to be a crazy-expensive way to clothe yourself and your family. Thanks to all the amazing pattern designers who have offered up their hard work for us to enjoy for free.

I'm guessing that most sewers who have been at it for a while are aware of the wonderful treasure trove that is Peppermint Magazine's sewing pattern collection. With each edition of the Australia-based magazine, they work with an independent pattern designer to produce a sewing pattern that gets included with that issue. All the previous patterns are also available via their website. They all used to be free, but more recently they have introduced a pay-what-you-can system, which I love. 


(image source: Peppermint Magazine)


The Wide-Strap Maxi Dress pattern, produced by Lauren Boyle from pattern brand Elbe Textiles, caught my eye some time ago but I wasn't really sure if it was 'me'. But at some point I realised that it could be worn like a pinafore with a T-shirt underneath, plus I could shorten it so I wouldn't feel like I was drowning in fabric. I am in the lucky position to be able to afford sewing patterns, so I picked one for the paid options. I would really like to encourage anyone who can afford to pay to do so. It helps keep this wonderful magazine, and it's collection of fantastic patterns, afloat. But if you really can't afford to pay for the pattern, don't feel guilty for accessing it. See if you can support them in other ways, for example by posting about the pattern and magazine on social media. Massive thanks to both Peppermint Magazine and Lauren Boyle for creating and making this pattern available for the community to enjoy. Also, big thanks to Ruby for taking these pro photos of me in my dress!


Pattern type:

The pattern is for an A-line maxi dress with side splits and a elasticated back. I shortened the length by about 20cm so mine isn't quite as 'maxi'.


Sizing info:

The pattern is graded from 30" bust to 51" bust. My measurements put me in the 'D' size, but when I tried it on near the end of construction, I found it very loose around the bust. Thankfully, this is very easy to adjust, you just need to make the elastic tighter at the back. 


Fabric info:

There isn't much guidance given on fabric selection. There's nothing on the webpage, other than a link to the particular linen they've used for the sample photographed. In the instructions PDF is specifies 'Midweight woven fabrics – linen, cotton, hemp, rayon'. For my version, I used the Riviera viscose & linen blend in 'Olive' from Fabric Godmother (not sponsored but I get a staff discount). Aside from needing to be ironed every two minutes, I think it was a great choice for this pattern. My initial fear was that it might be too lightweight, but it has such a nice drape and feels very breezy on hot and sticky days. 


I bought a cone of Tencel thread from James Tailoring. So aside from the elastic at the back, this garment is, theoretically, biodegradable. 


Findings:

As with the other Peppermint Magazine patterns I've tried, I found this pattern to be very well produced. I love that the pattern file includes the layers function so I could specify which size I wanted when I got it printed in A0 format. The instructions are lovely and clear, with very helpful diagrams to illustrate the steps.  

The construction method for this project is really fun. It looks like a really simple garment, but the designer walks you through creating a really lovely finish with french-seamed everything! To my surprise, I didn't use my overlocker to finish a raw edge once. It makes this simple-looking garment really elevated. That said, there is a down-side with the method: there are practically no opportunities to assess and adjust the fit or length until it's practically finished. You're going to have to make a toile/muslin (I did not) or baste/tack everything together first to be able to assess the fit and length. 


As mentioned above, the saving grace is that the elastic that brings the top back in can be easily adjusted, which will effect the closeness and volume to some degree. But if you've cut a size that turns out to be too small, there's not much you can do about it, plus you won't be able to change the overall length. I would very much advise you study the finished garment measurements before selecting your size/s, and hold the paper pattern pieces up to your body to decide on your preferred length before any scissors slice any fabric. 


Customisation ideas:

Here's some ideas to get more from this pattern:

  • cut the length even shorter for a mini-dress or top
  • ignore the in-seam pockets and add patch pockets at the thigh, and even to the front bib area, for a more utilitarian look
  • make the straps narrower for a more delicate look
  • cut the bodice around the waist and add a gathered skirt or gathered peplum
  • insert gathered frills into the seams of the straps


Would I make this again?

I'm low-level keeping my eyes peeled for a drape-y lightweight denim type fabric to make another in. It'd be tempting to add gold/orange top-stitching to give a nod to classic denim garment. 


Tuesday, 12 March 2024

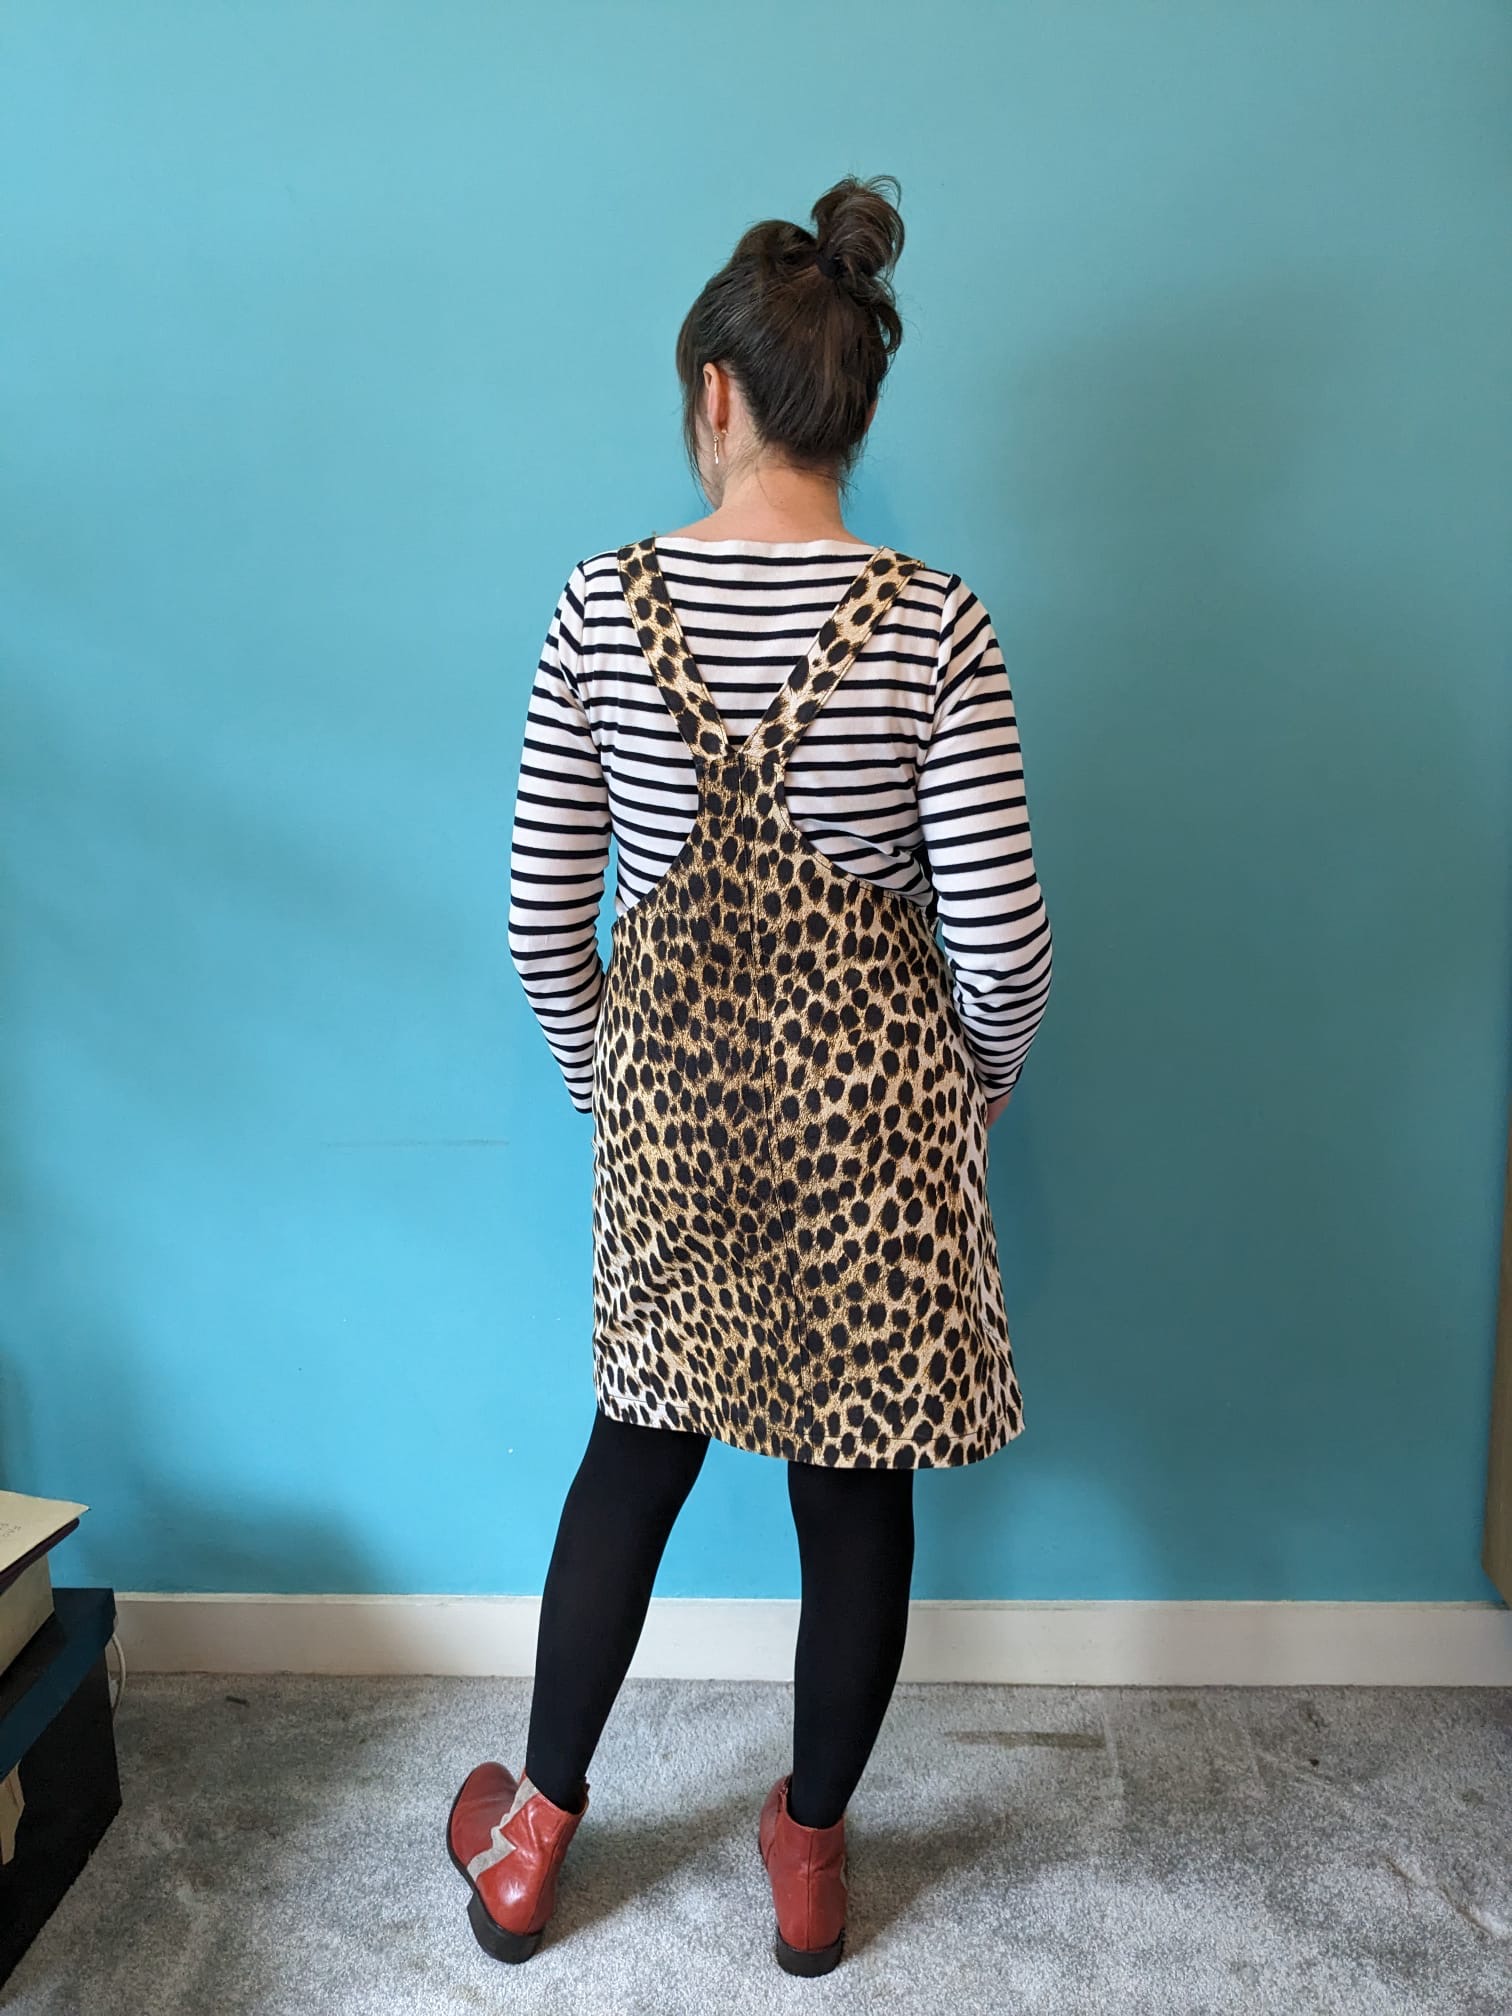
Honeymoon Leopard Twill Pinafore


Over the last few months, I've been doing a lot of thinking about the fabric that lives in our stashes. A lot of the thoughts have become podcast episodes, including Fabric Goals for 2024, Seasonal Stash Organisation, and Sew the Precious with Stephanie Canada from Backroom Finds. I'm more convinced than ever that leaving our fabric sitting on a shelf or inside a tub or drawer, is an enormous waste. Participating in the Last Sewist Standing challenge led me to face some of my own long-term stash residents, and a clear out in advance of attending a fabric swap in London helped me address what I genuinely wanted, and what needed to be passed on to another sewer. 


Fabric:

I took my two oldest stash dwellers (and my pal Catherine!) to the London Fabric Destash Swap, and I have no regrets. The were both amazing quality, deadstock fabrics from Burberry that had been in my stash for about thirteen years. I'd used half of both of them and I just couldn't see myself using the rest. Well, with those lengths out of there, this length of leopard print twill took on the status of oldest stash dweller!

I bought about yard or so of this stretch twill from Mood Fabrics in New York during our honeymoon in 2012! I had a very Rockabilly-inspired look at the time, and I bought it with the intention of making a knee-length pencil skirt. However, soon after our return, I became pregnant, and that skirt never got made. I continued to enjoy the fabric, even as my personal style shifted away from Rockabilly, but the limited quantity made it tricky to find a use for it. 


(image source: L. F. Markey)

Pattern:

A couple of months ago, lightning eventually struck and the idea of a pinafore emerged! I'd recently had to declare my much-loved and often-worn black denim Cleo pinafore unwearable due to body changes, so I was missing a pinafore in my wardrobe. Then I saw an advert for the L. F. Markey dungarees pictured above, and found the shape of the bib really inspiring. So I unearthed my Tilly and the Buttons Cleo pattern pieces and drafted a new bib shape, and new pocket shape for it for good measure. 


The project: 

Cutting the pinafore from the limited fabric was a challenge. The leopard print fabric had two darker sections running parallel down the length of the fabric, and it required a bit of Tetris-ing to get the front pieces, back pieces, pockets and straps out of the fabric in a way that suited the darker and lighter parts of the design. The facings were cut from a remnant of dark blue stretch denim because there was no way to squeeze those out of the main fabric as well. 

I decided to alter how the garment was constructed. I wanted to future-proof this garment and make it as easy as possible to let it out if necessary as and when I change shape again. I learnt so much from making the two Sewing for Body Changes episodes (Part 1 and Part 2), and I've tried to apply those lessons where possible. During a mid-way fit session, it became clear that I had to take it in at the side seams a lot, so I now have very generous side seam allowances, which is great!


Thoughts:

I'm soooo happy that this pinafore now exists! I've worn it quite a bit since completion, and it's so nice to have the fabric on my body rather than in my stash. I figured out that that length of fabric has moved homes with us five times in those twelve years! I'm hoping it'll soften up a tiny bit through wear and washing, and I have no reason to suspect that it won't. 

Monday, 5 February 2024

Corduroy Remnants Backpack


Here's a recent project that has already put to daily use: my new backpack! I became a backpack convert when my kids were tiny. When my son came along, it became very useful to have both hands free. Plus backpacks aren't likely to swing round and hit a small child in the face! However, my kids are no longer tiny, so when my last backpack died (after years of service), I thought I'd make a crossbody shoulder bag next. It was fine, and I used it for quite a while, but I started to develop the suspicion that it's not great for my posture. Time for another backpack...


Inspiration:

The feeling that I should make a backpack switched from being a feeling to an actual plan when I found the above photo on Pinterest. There weren't any links attached to the image, but my pal Julia did a reverse image search for me and discovered it's by Zara. Corduroy is, of course, usually used for making garments. And seeing it used for a style of bag that you'd usually see made from canvas or something synthetic really appealed to me. I also loved the mix of colours, and I'm always drawn to styles that could be recreated using scraps, leftovers and remnants of fabric. 


Fabric:

I had a rummage around and unearthed my collection of corduroy scraps. A couple of them are leftover from previous projects, the rest came from the scrap bin at work. Very spookily, the colours of my selection are incredibly similar to the colours of the Zara bag! I decided to put the leopard print cord aside for now, and work with the solid coloured pieces. They are all different colour ways of the Fabric Godmother 5 wale cord: super soft but also pretty robust. 


I also used some quilting-weight cotton from my stash for the lining (the same fabric that I used to line my previous version, actually). Plus the gold bias binding that I got in the Fabric Godmother advent calendar was put to use to finish the inside raw edges. These days I struggle to find the motivation to make my own matching binding. The interfacing required to give the bag some body was frankensteined-together random pieces from my stash. I'm trying to move away from synthetic interfacing where possible, but this bag won't get washed much, so won't release microplastics into the waterways too often. Therefore, I felt this was a good opportunity to use up a lot of what I still own.


Pattern:

I wasn't desperate to recreate the exact shape of the Zara bag, it was more the combining of the corduroys that was inspiring me. Therefore, my main criteria when selecting a pattern was that it could be cut from different pieces of fabric easily enough. In the end, I used the Sarah Kirsten Raspberry Rucksack pattern that I made previously three years ago. It worked because all the pattern pieces could be cut from the different fabrics, and I already owned it! Which was another plus because I'm still challenging myself as part of Last Sewist Standing, so wouldn't have to wait to get this project underway until I could buy a pattern. In this vein, I realised that I could also harvest the zips and hardware from my now-dead previous version. I'm glad I hadn't got round to chucking it out yet!


Using the pattern, fabric and zips already in my possession meant I could get cracking straight away. However, for a while I was thinking that I would have to wait until my self-imposed buying ban came to an end to buy some webbing for the straps to be able to finish it off. But then I realised that I never actually liked the webbing straps that the pattern specifies. Amy from Craft and Thrift came to the same conclusion when making her versions. So I had a play around and realised I could cut the straps from the corduroy as well, as long as I made them slightly shorter. Pushing the corduroy straps through the sliders was NOT easy, and I'm not sure how these straps will hold up over time, but they feel good at the moment. 


Conclusion:

I gave this bag a finishing touch with the Handmade label by Little Rosy Cheeks, also from my Fabric Godmother advent calendar. You have no idea how satisfying it was to put this project together using only stuff I already owned. And I've been really enjoying using it every day since. It's a great size for my day-to-day requirements, and feels really comfy to wear. 


Friday, 2 February 2024

Free Pattern Friday: Women's T-shirt


Welcome to my monthly 'Free Pattern Friday' feature, where I road test a free sewing pattern or tutorial: sometimes a children's one, sometimes an adult's one. I try to publish these posts every first Friday of the month, timed to provide inspiration for those who plan to get their sew on over the weekend. I firmly believe that, if you pick your projects carefully, sewing doesn't have to be a crazy-expensive way to clothe yourself and your family. Thanks to all the amazing pattern designers who have offered up their hard work for us to enjoy for free.

If you've been a reader of the Free Pattern Friday posts for a while, it'll be clear to you that I only ever review patterns for items that my family has a genuine use for. That means the patterns I pick won't always have mass appeal. So I'm happy to have found one for today that it both useful to me AND probably a lot of other people! It's the Free T-Shirt pattern by Closet Core Patterns. A useful basic with some cute options that's graded to a wide size range, woo hoo! To access it, you will need to sign up to their newsletter, but you can unsubscribe at any time. Big thanks to Closet Core for sharing this pattern with the world for free. 


(image source: Closet Core Patterns)


Pattern type:

The Closet Core T-shirt is a standard crew neck style with set in sleeves. The fit is gently boxy, if that's a thing. View A is a slightly cropped length with short sleeves, and View B is hip-length with 3/4 length sleeves. Throw in a patch pocket piece, and with these options you can mix and match to your heart's content. The pattern files are split into two size ranges, and the larger range features a bust dart. 

Sizing info:

One of the reasons I'm super happy to be shining a light on this pattern is because it includes an impressive range of sizes, from 31" to 60" bust. Sizes 0-20 (full bust 31" - 46") are grouped together and sizes 14-32 (full bust 42" - 60") are grouped in together with the addition of a bust dart. 

Based on the size chart cross-referenced with the finished measurements charts, I decided to make a size 8 at the top, blended to a size 10 for my waist downwards. I made the cropped version, so I didn't need to worry too much about the hip measurement. My fabric is very drape-y which obviously effects the fit, but I think my decision on sizing was good. I'd be interested to see what it looks like in a more stable knit. 


Fabric info:

As per the listing: 'This pattern can be made in a variety of knit fabrics with at least 30% crosswise stretch. For a more structured look, choose 100% cotton interlock and jersey. For a drapier effect, choose cotton/spandex blends, ribbed or rayon knits.' I have nothing to add to that in regards to suitable fabrics. 

My fabric is a lightweight, slightly sheer, slubby jersey of unknown fibres (although I suspect it's a poly-blend of some type). It was leftover from this Lou Box Top kit that was given to me by Amy from Craft and Thrift, back when she sold deadstock fabric. I wear that black Lou Box top ALL THE TIME during the summer, so I'm pleased to have another option that will feel similarly slinky, but with a different silhouette and garment pairing suitability!

Findings:

As you suspect from a major, well-established indie pattern brand, this pattern was a dream to work with. The downloads included A4/letter sized as well as A0/copyshop pattern files. I treated myself to some A0 printing because my home printer is close to death, and was able to specify which size layers I wanted. That saved the printers some ink and sparing me from loads of confusing, unnecessary lines. 

The instructions include diagrams to illustrate the steps. I liked the option they included to bind and reinforce the shoulder and back neck seam. I chose not to do it for this version because my fabric was so thin, but I would definitely include that as a cute, contrast feature in future versions. 

The fit of the finished item is exactly how they described. It's a great basic that I can image using heaps in warmer months with high waist trousers and shorts.  


Customisation ideas:
  • use a different colour or printed fabric for the front, or for the sleeves, or for each piece
  • cut the backneck/shoulder stabilising band from contrast fabric
  • create seamlines and colourblock scraps and leftovers of jersey
  • cut the neckband from a contrast colour to the rest of the garment for a 90s indie-kid look
  • shorten the length of the body for an exaggerated crop, or lengthen the top to create a tunic length garment
  • shorten the sleeves for a cap sleeve look, or lengthened them for full length sleeves

Would I make this again?

Absolutely! I will definitely keep this pattern in my arsenal for when I come across a suitable length of nice jersey. I'd like to try it in a more stable cotton or cotton/elastane jersey or interlock. 

Friday, 3 November 2023

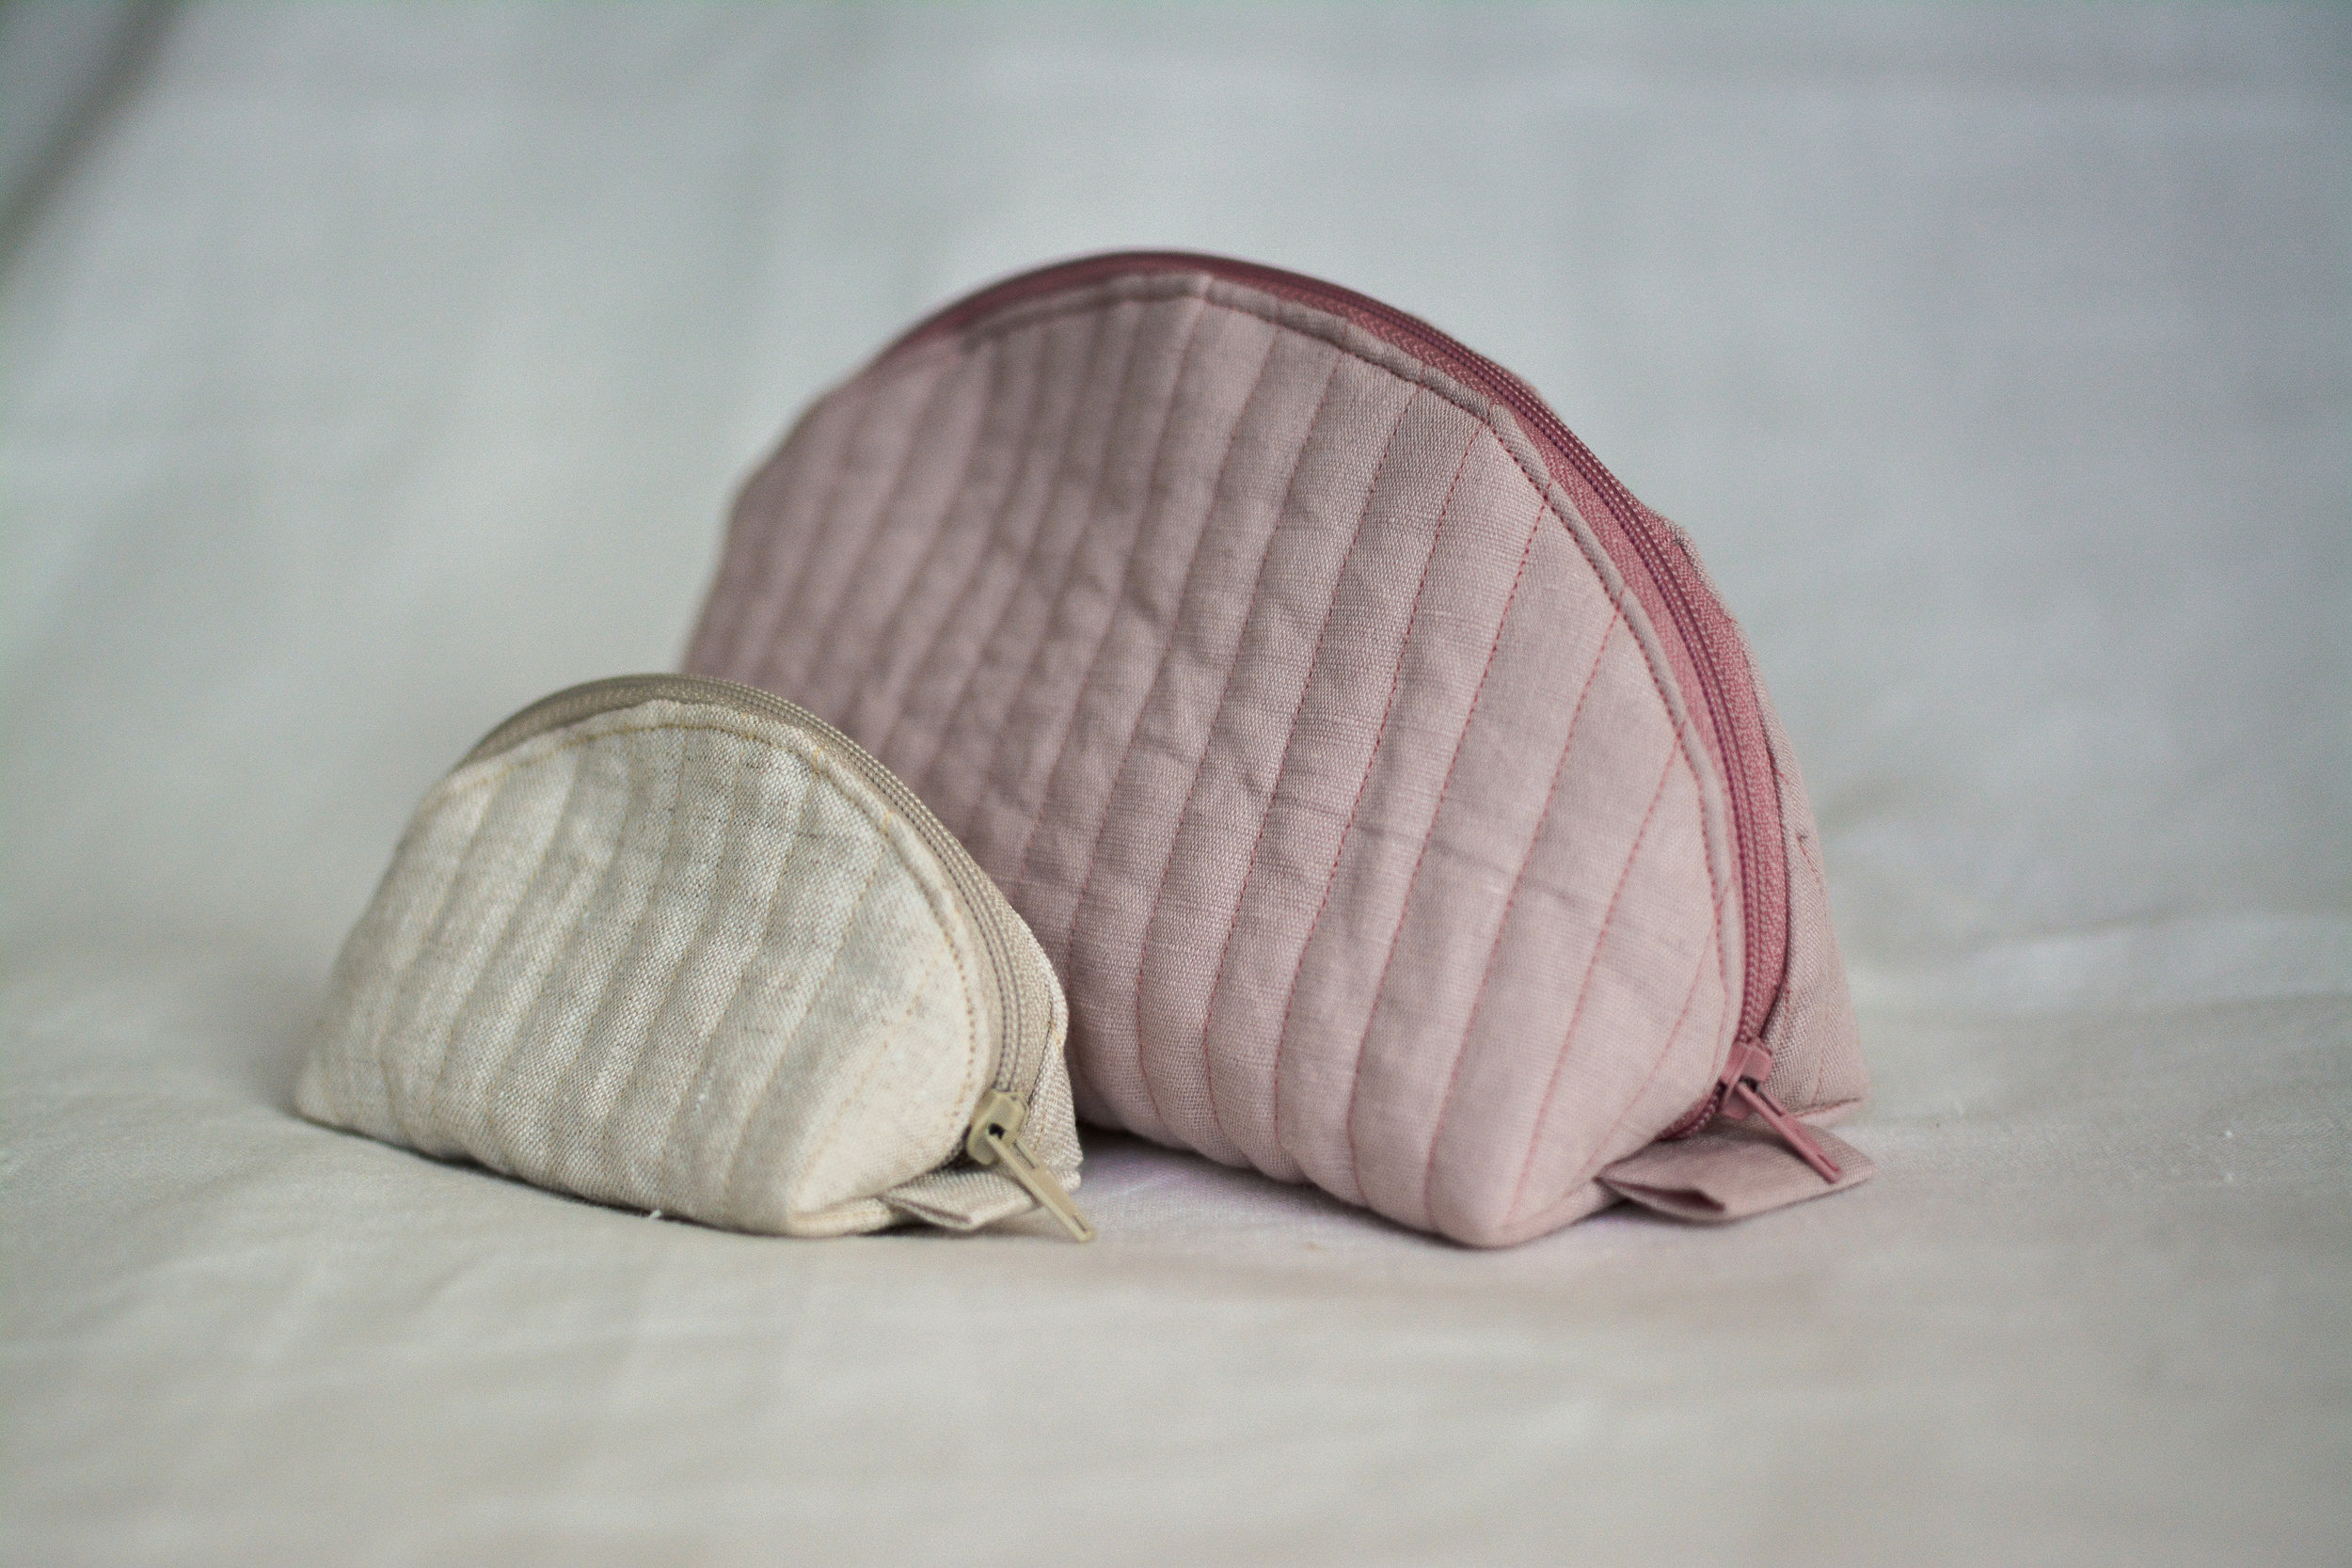
Free Pattern Friday: Zipped Pouch AKA Pipa The Pouch!


Welcome to my monthly 'Free Pattern Friday' feature, where I road test a free sewing pattern or tutorial: sometimes a children's one, sometimes an adult's one. I publish these posts every first Friday of the month, timed to provide inspiration for those who plan to get their sew on over the weekend. I firmly believe that, if you pick your projects carefully, sewing doesn't have to be a crazy-expensive way to clothe yourself and your family. Thanks to all the amazing pattern designers who have offered up their hard work for us to enjoy for free.

No prizes for guessing why I'm posting about this particular free pattern at the beginning of November (hint: it begins with C). If you're scrabbling around for cute gift ideas for someone who appreciates handmade things, but won't take up a lot of your making time and fabric stash, Pipa The Pouch by Sewing Patterns by Masin is a great option. You can easily personalise them to the recipient and they have a variety of potential uses (make up, jewellery, toiletries, pencil case, small craft equipment, chess pieces, tampons, headphones, the random items that lurk at the bottom of your bag, snacks, I could go on.....). The pattern is accessible when you sign up for the free and not-at-all-spammy Sewing Patterns by Masin newsletter. Shortly after signing up, you will receive an email that includes a link to access the pattern. You can, of course, then choose to unsubscribe to the newsletter at a later date if you with. Big thanks to Jasmin from Sewing Patterns by Masin for sharing this pattern for free. 


Pattern type:

The website states that Pipa the Pouch is a little quilted pouch with a long rounded zipper allowing the pouch to open nice and wide. 

Sizing info: 

The download includes the patterns for two sizes of pouch. The larger results in a pouch that is approx. 21cm across and 12cm high. I didn't measure the smaller one before I sent it off to my mum, however measuring the pattern piece, it would end up approx. 15cm across and 8cm high. You could also adjust the settings of your printer if you wished to make a custom larger or small sized pouch.


(image source: Sewing Patterns by Masin)

Fabric info:


The pattern suggests that Pipa the Pouch will look pretty in any woven, non-stretch fabric. Jasmin's favourite Pipa is made with linen fabric, heavy weight fusible interfacing, and a light weight cotton fabric with flower print for the lining. This pattern gave me the opportunity to dig out some small but very precious scraps of fabric that have been dwelling in my stash for wayyyyyy too long.


The green and white fabric is some 1950s vintage fabric (possibly barkcloth), the last bit leftover from when I used to make bags about twenty years ago. It makes my heart sing and that pouch is for me. The darker, geometric fabric was a scrap that I bought from a screenprinter/lampshade maker over ten years ago. That pouch was sent to my good friends Lee & Jiang in advance of a big trip they're about to make to the US. The floral print vintage cotton was a small hanky-sized piece that I picked up at a charity shop about five years ago. That pouch is also for a friend. And lastly, the small pouch made with a scrap of heart brocade that I found in the scrap bin at work has been sent off to my mum who really liked it when she came to visit.


Because of the limited size of most of the pieces I was using, I had to make a seam along the bottom, rather than cutting the pieces on the fold.


For all the larger pouches, I actually decided to avoid fusible interfacing. Instead, I cut an additional layer of thicker fabric from my stash, which I stitched to the main outer piece around the edge within the seam allowance. There was three reasons for this: 1) I'm trying to use less fusible interfacing in my sewing because I'm worried about the environmental impact of it, so I'm experimenting with replacing it with an alternative when I think that might be an option, 2) I don't have much interfacing left and can't buy more at the moment due to my participation in the Last Sewist Standing challenge, so I want to retain what I have for projects that really do need it, and 3) I wanted to bust more scraps from my stash!

All of them are lined with scraps of cotton lawn or viscose from my stash, and all the zips are also from my stash. I had to use an invisible zip for the small one because I'm running very low on regular closed end zips now too. When I didn't have enough of the outer fabric to make the tabs, I used some grosgrain ribbon that I once harvested from a box of chocolates instead!


Findings:

As you can see, I went on quite the Pipa the Pouch making spree! It was a much needed palette cleanser between garment projects and allowed me FINALLY find uses for some very old but very loved textiles. They're not super quick, but easy enough for a confident sewer to complete one in an afternoon. 

The pattern and instructions are very clear, with helpful diagrams illustrating the construction. The literal only thing I would say that could be improved or updated is the page numbering. The pages of the document are numbered, but the numbering excludes the cover page. So according to the page numbers, the pages with the pattern pieces are 3 & 4. However, because of the cover page, you actually need to print pages 4 & 5. But that's it. 

As you can see, I didn't actually add the row of 'quilting' stitching to my pouches. I tried it on one of them, but I found it distracted from the print too much and ended up unpicking it. It might be a nice addition on solid fabrics however.  


Would I make it again?

Absolutely! This pattern is such a great canvas for small but special pieces of fabric, and the usefulness of this items means you will get a lot of enjoyment from those fabrics. 

Related Posts Plugin for WordPress, Blogger...