Showing posts with label Elbe Textiles. Show all posts

Friday, 5 July 2024

Free Pattern Friday: Wide Strap Maxi Dress for Adults


Welcome to my monthly 'Free Pattern Friday' feature, where I road test a free sewing pattern or tutorial: sometimes a children's one, sometimes an adult's one. I try to publish these posts every first Friday of the month, timed to provide inspiration for those who plan to get their sew on over the weekend. I firmly believe that, if you pick your projects carefully, sewing doesn't have to be a crazy-expensive way to clothe yourself and your family. Thanks to all the amazing pattern designers who have offered up their hard work for us to enjoy for free.

I'm guessing that most sewers who have been at it for a while are aware of the wonderful treasure trove that is Peppermint Magazine's sewing pattern collection. With each edition of the Australia-based magazine, they work with an independent pattern designer to produce a sewing pattern that gets included with that issue. All the previous patterns are also available via their website. They all used to be free, but more recently they have introduced a pay-what-you-can system, which I love. 


(image source: Peppermint Magazine)


The Wide-Strap Maxi Dress pattern, produced by Lauren Boyle from pattern brand Elbe Textiles, caught my eye some time ago but I wasn't really sure if it was 'me'. But at some point I realised that it could be worn like a pinafore with a T-shirt underneath, plus I could shorten it so I wouldn't feel like I was drowning in fabric. I am in the lucky position to be able to afford sewing patterns, so I picked one for the paid options. I would really like to encourage anyone who can afford to pay to do so. It helps keep this wonderful magazine, and it's collection of fantastic patterns, afloat. But if you really can't afford to pay for the pattern, don't feel guilty for accessing it. See if you can support them in other ways, for example by posting about the pattern and magazine on social media. Massive thanks to both Peppermint Magazine and Lauren Boyle for creating and making this pattern available for the community to enjoy. Also, big thanks to Ruby for taking these pro photos of me in my dress!


Pattern type:

The pattern is for an A-line maxi dress with side splits and a elasticated back. I shortened the length by about 20cm so mine isn't quite as 'maxi'.


Sizing info:

The pattern is graded from 30" bust to 51" bust. My measurements put me in the 'D' size, but when I tried it on near the end of construction, I found it very loose around the bust. Thankfully, this is very easy to adjust, you just need to make the elastic tighter at the back. 


Fabric info:

There isn't much guidance given on fabric selection. There's nothing on the webpage, other than a link to the particular linen they've used for the sample photographed. In the instructions PDF is specifies 'Midweight woven fabrics – linen, cotton, hemp, rayon'. For my version, I used the Riviera viscose & linen blend in 'Olive' from Fabric Godmother (not sponsored but I get a staff discount). Aside from needing to be ironed every two minutes, I think it was a great choice for this pattern. My initial fear was that it might be too lightweight, but it has such a nice drape and feels very breezy on hot and sticky days. 


I bought a cone of Tencel thread from James Tailoring. So aside from the elastic at the back, this garment is, theoretically, biodegradable. 


Findings:

As with the other Peppermint Magazine patterns I've tried, I found this pattern to be very well produced. I love that the pattern file includes the layers function so I could specify which size I wanted when I got it printed in A0 format. The instructions are lovely and clear, with very helpful diagrams to illustrate the steps.  

The construction method for this project is really fun. It looks like a really simple garment, but the designer walks you through creating a really lovely finish with french-seamed everything! To my surprise, I didn't use my overlocker to finish a raw edge once. It makes this simple-looking garment really elevated. That said, there is a down-side with the method: there are practically no opportunities to assess and adjust the fit or length until it's practically finished. You're going to have to make a toile/muslin (I did not) or baste/tack everything together first to be able to assess the fit and length. 


As mentioned above, the saving grace is that the elastic that brings the top back in can be easily adjusted, which will effect the closeness and volume to some degree. But if you've cut a size that turns out to be too small, there's not much you can do about it, plus you won't be able to change the overall length. I would very much advise you study the finished garment measurements before selecting your size/s, and hold the paper pattern pieces up to your body to decide on your preferred length before any scissors slice any fabric. 


Customisation ideas:

Here's some ideas to get more from this pattern:

  • cut the length even shorter for a mini-dress or top
  • ignore the in-seam pockets and add patch pockets at the thigh, and even to the front bib area, for a more utilitarian look
  • make the straps narrower for a more delicate look
  • cut the bodice around the waist and add a gathered skirt or gathered peplum
  • insert gathered frills into the seams of the straps


Would I make this again?

I'm low-level keeping my eyes peeled for a drape-y lightweight denim type fabric to make another in. It'd be tempting to add gold/orange top-stitching to give a nod to classic denim garment. 


Friday, 3 December 2021

Cheap Pattern Friday: Adult's Sorrento Bucket Hat (Winter Edition)

Welcome to my monthly 'Free Pattern Friday' feature, where I road test a free sewing pattern or tutorial (or in today's case, a cheap pattern). Sometimes I post about a children's one, sometimes an adult's one. I publish these posts every first Friday of the month, timed to provide inspiration for those who plan to get their sew on over the weekend. I firmly believe that, if you pick your projects carefully, sewing doesn't have to be a crazy-expensive way to clothe yourself and your family. Thanks to all the amazing pattern designers who have offered up their hard work for us to enjoy for free (or cheap!).

I posted about the Sorrento bucket hat by Elbe Textiles about a year and a half ago, back when it was a no-cost pattern. Since then it's become a very reasonably priced pattern. I have used it a number of times since I last posted about it and continue to recommend it. I recently had an idea to use the pattern in a slightly different way to my other versions: as a winter hat rather than a summer hat. In this post I'm including some of the information from my original post, plus some extra bits that relate to this version. 

Of course, this monthly feature is usually about free patterns and tutorials. Therefore, if you wish to try a bucket hat and are looking for a free pattern, you could try one of the following patterns:

(image source: Elbe Textiles)

Pattern type:

The website says it best: 'The Sorrento Bucket Hat is a unisex design featuring a downwards sloping brim with optional top stitching detail. This hat is fully lined, with the ability to be reversible.'

Sizing info:

The hat pattern is graded to four sizes, 21"-24" head circumference

Fabric info:

It is suggested that medium to heavy weight woven fabric like drill, canvas and denim work best for this pattern, as they hold their structure. I completely agree, however, I would stretch that to include linen and linen-blends, which might not hold their shape so well, but might be more pleasant to wear in the heat. 

For my winter version, I decided to try a look that I've seen around a bit lately. I've seen some sheepskin-esque bucket hats knocking around on advertising and Instagram, and remembered that I have some leftovers of faux-sheepskin from a cardigan project I made last winter. For the lining, I used scraps of black sweatshirt fleece, fleece-side out. 


Findings:

Working with this pattern is a real pleasure. I've made a lot of bucket hats in the past, so I must admit that I didn't refer to the instructions constantly, but when I did, they were clear and easy to follow. This would make a great, confidence boasting project for a beginner, and a satisfying make for those more experienced with a scrap stash to burn. 

Because of the bulky, springy fabric, I didn't bother to do any topstitching for this version, which made it a really speedy make. I probably should have sized up though, to get that real, casual bucket hat look. 


Customisation ideas:

  • Extend the brim for extra sun protection
  • Test the accurracy of your stitching by using contrast thread
  • Make a decorative strip for the band, either with contrasting fabric, grosgrain ribbon or some other trim
  • Insert eyelets to the band for some ventilation
  • Add straps to tie under the chin if it gets windy where you live/holiday!

Would I make it again?

Yes, for sure. I have plans to make myself a summer version next year. Plus I'll most likely to turn to this pattern in future years for Frankie, as the sizing of the Sorrento seems to start roughly where the Oliver + S bucket hat pattern leaves off. 

Friday, 5 June 2020

Free Pattern Friday: Adult's Sorrento Bucket Hat


Welcome to my monthly 'Free Pattern Friday' feature, where I road test a free sewing pattern or tutorial: sometimes a children's one, sometimes an adult's one. I publish these posts every first Friday of the month, timed to provide inspiration for those who plan to get their sew on over the weekend. I firmly believe that, if you pick your projects carefully, sewing doesn't have to be a crazy-expensive way to clothe yourself and your family. Thanks to all the amazing pattern designers who have offered up their hard work for us to enjoy for free.

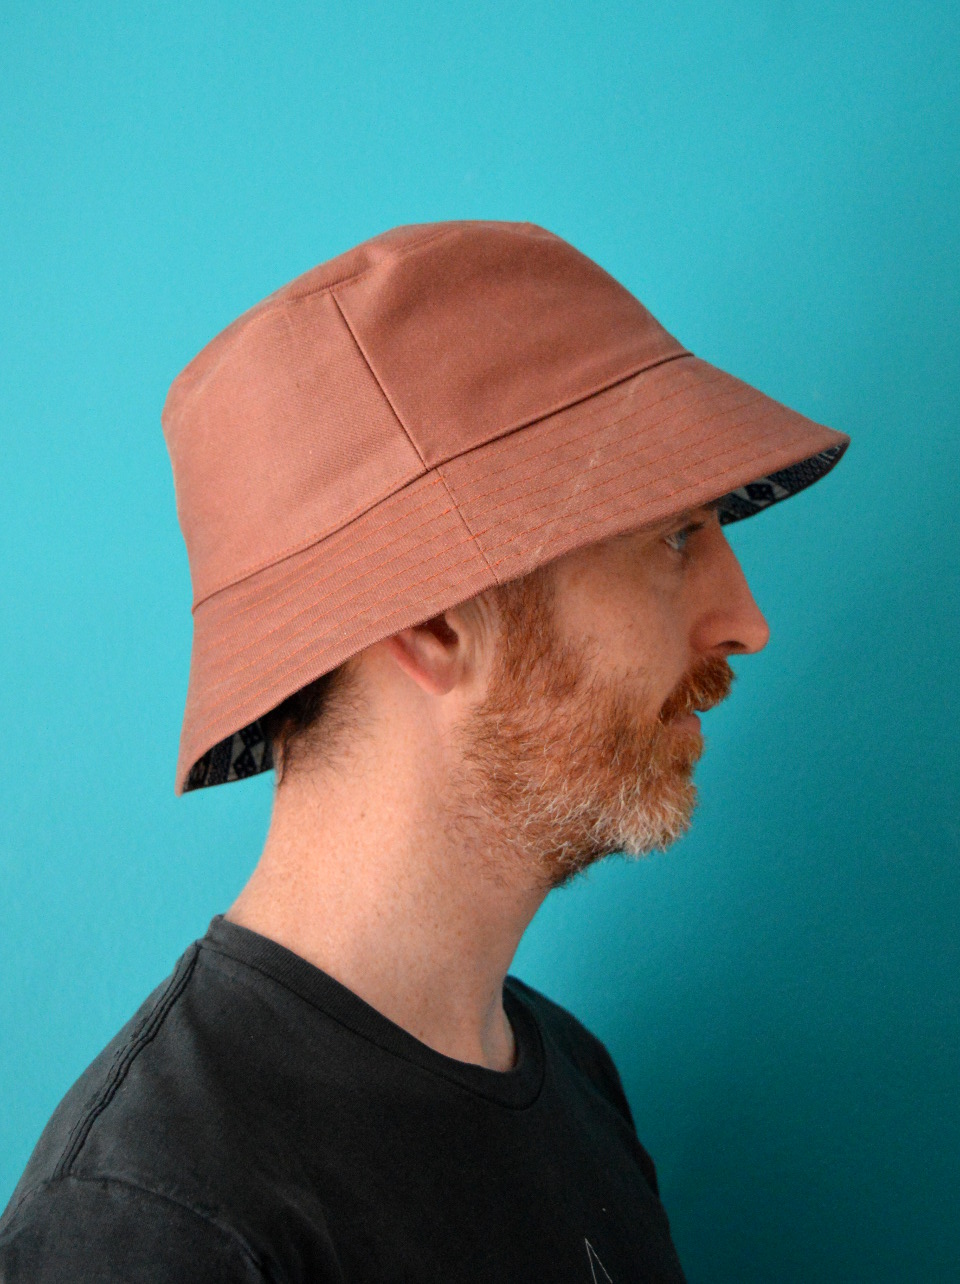
Well, I've done it. I've finally made good on my threat to make Pat (AKA Mr SoZo) a sunhat. He's long been convinced that neither hat nor shorts are for him. However, it can get pretty hot here in the south of England at times, so I personally believe that he needs both. Every summer he regularly suffers from sunburn, and this year I decided that enough was enough and made him a sunhat anyway. Now all four of us can go to the allotment or the beach in our me-made hats! Even though someone will undoubtedly take theirs off within two seconds.... Massive thanks to Lauren from Elbe Textiles for her hard work and sharing the Sorrento bucket hat pattern for free. It is easily accessible through the shop and check out on her site, no sign ups required.  

(image source: Elbe Textiles)

Pattern type:

The website says it best: 'The Sorrento Bucket Hat is a unisex design featuring a downwards sloping brim with optional top stitching detail. This hat is fully lined, with the ability to be reversible.'

Sizing info:

The hat pattern is graded to four sizes, 21"-24" head circumference. Based on his measurements, I made the largest size for Pat, although I never considered him to have a particularly big head. My 6.5yo daughter's head measures 20", so I think this pattern might work for kids from approx. 8 years and up also. If you required sizes larger or smaller, you could try adjusting the scale on your printer settings. I did this with success when making Elbe Textile's other hat pattern, the Serpentine hat pattern, for my daughter last year


Fabric info:

It is suggested that medium to heavy weight woven fabric like drill, canvas and denim work best for this pattern, as they hold their structure. I completely agree, however, I would stretch that to include linen and linen-blends, which might not hold their shape so well, but might be more pleasant to wear in the heat. 

I'm also very interested in making an adult hat pattern such as this in some waterproof fabric, like this child's bucket hat I made a few years ago. I think that having a waterproof hat stuffed into my bag would be preferable to having to carry a brolly around. These days are nearly over for me, but brolly carrying and pushing pushchairs don't mix, so a waterproof hat for those occasions could also be a game changer when it's raining. 

One of the things I really love about making hats is that you can use up leftovers and smaller pieces of fabric that might be tricky to use up otherwise. For Pat's, I used some brick-coloured denim, leftover from his Quadra jeans, which definitely has the body required for this hat. I chose some fun African wax print cotton scraps leftover from my Zadie jumpsuit for the lining. I love the contrast the print brings to an otherwise pretty utilitarian item. 


Findings:

Working with this pattern was a real pleasure. I've made a lot of bucket hats in the past, so I must admit that I didn't refer to the instructions constantly, but when I did, they were clear and easy to follow. This would make a great, confidence boasting project for a beginner, and a satisfying make for those more experienced with a scrap stash to burn. 

I chose to up the ante slightly and add the optional rows of top stitching around the brim. I really like both the look and stability that extra step brings to the party.

Despite his general misgivings about hats, Pat has really embraced this one. He's happy with the fit, and it must be comfortable as he has worn it numerous times in the month since I made it. Much of the back of his neck still remains exposed, but it does a great job of protecting his forehead and face.  


Customisation ideas:

  • Extend the brim for extra sun protection
  • Test the accurracy of your stitching by using contrast thread
  • Make a decorative strip for the band, either with contrasting fabric, grosgrain ribbon or some other trim
  • Insert eyelets to the band for some ventilation
  • Add straps to tie under the chin if it gets windy where you live/holiday!


Would I make it again?

Yes, for sure. If Pat needs another, or a gift is required, then I'd be very happy to whip up another. Plus I'll most likely to turn to this pattern in future years for Frankie, as the sizing of the Sorrento seems to start roughly where the Oliver + S bucket hat pattern leaves off. 

Friday, 7 February 2020

Free Pattern Friday: Women's Carine Tee


Welcome to my monthly 'Free Pattern Friday' feature, where I road test a free sewing pattern or tutorial: sometimes a children's one, sometimes a women's one. I publish these posts every first Friday of the month, timed to provide inspiration for those who plan to get their sew on over the weekend. I firmly believe that, if you pick your projects carefully, sewing doesn't have to be a crazy-expensive way to clothe yourself and your family. Thanks to all the amazing pattern designers who have offered up their hard work for us to enjoy for free.

Right, at the top of this post I should say that I've sort of messed it up this month. When I was deciding which pattern to write about, I figured it was high time I shared an adult's garment, as I suspect they are the ones that more of my readers are interested in. So I planned to review a free pattern that I used last year to make to my lovely friend Harriet a garment. Because she lives in Spain and I'm not sure of her current measurements, I tried the Carine tee pattern by Elbe Textiles, my thinking being that the loose-ish style made from knit fabric was likely to create a garment with fewer potential fit issues.


EXCEPT, now that I'm trying to write about this pattern, I discover that it is no longer available (*face palm!*). I messaged the designer to check that this was the case, and she confirmed that yes it was no longer downloadable as that pattern didn't reflect the unisex/menswear style she wanted to take her brand in. Fair enough. I discovered all this very recently, so didn't have time to make and photograph a different free pattern for this month. So I'm going to share pics of it anyway, but not go into all the usual details I put into a review. Therefore, I'm sorry if you like this T-shirt but didn't download the pattern when it was available! However, you could get a similar look by taking a basic T-shirt pattern with close fitting shoulders and sleeves then straightening and slightly flaring the side seams, and then drawing in a curved hem (the below flatlay pic gives you a clearer idea of the pattern's attributes). 


I was given this fun zigzag print jersey from my lovely friend Claire (@clairesews) a year or two ago. I'm assuming it is 100% cotton, and has reasonable stretch and recovery, but not enough for a more fitted garment style, so I thought it would work well for a garment such as this that it quite a boxy shape. I had enough leftover to squeeze out a pair of sleep shorts for Dolores (see below), which have been worn a lot. 


See you next month for another free pattern review that actually is available, and hopefully before then with more tales of my sewing shenanigans. 

Related Posts Plugin for WordPress, Blogger...