Sunday 29 July 2018

Pauline Dress Perfection


Despite being a very active and fearless little girl, my daughter likes to wear dresses or skirts whenever it's an option, and the girlier the better. Ever since I compiled the blog posts listing heaps of independent children's pattern companies, I've been keeping an eye on the output of Elegance & Elephants. I think most of the patterns hit the sweet spot between 'classic' and 'modern', with a decent dose of 'girly' if that's what you're looking for. Until recently, the free Retro Sweatpants pattern was the only one of theirs that I'd actually made, then they released the Pauline dress/tunic pattern. You know me, I've got a weakness for ruffles, plus I felt confident that it was generally a style that Dolores could also get behind. So when the pattern's release was shortly followed by a handily timed sale, I splashed the paypal-cash quicker than you can blink.  


Pattern:

The Pauline dress is an A-line shaped garment with a nicely-proportioned, rounded yoke and ruffle detail. There is some gathering at the centre front and centre back where the lower sections are joined to the yoke. This gathering adds a bit more fullness and volume, making this woven garment very easy to wear and move around in. Most of the versions pictured on the site, including the pattern testers' versions, are sleeveless, but there is also a sleeve pattern piece included for long or three-quarter sleeves.

Dolores is presently a couple of months away from her fifth birthday, so I made the size 5 but the size 6 length. I'm pleased to report that it fits her well at the moment, but should see her through next summer as well. 

(image source: Elegance & Elephants)

In general, the construction was fun and the steps were explained well, with clear photos for each. However, there were two bits that I didn't love that I would probably change for future versions. The first concerns the back neck fastening. I was surprised to find that the back yoke and facing are cut on the fold. A small piece of elastic forms a button loop, and ends up being inserted at the edge of the key hole/slit. To be honest, I couldn't really visualise how it was going to work, but I bumbled along ok. The key hole/slit is created by stitching a very tight V shape that you then are meant to snip into and turn the whole through with the right side facing out. I found the instructions for how not to get the elastic caught up in the V stitching were a bit lacking. As for the V shaped stitching and turning through, I have no idea how the samples on their website look so neat, because I definitely couldn't! I ended up stitching a narrow rectangle that could be snipped into more easily, and the result looks pretty good. 


The second part I didn't like was related to the facing. The instructions for the sleeveless version have you stitching the facing to the armhole by encasing the whole top part of the garment and turning though. It's not a method I have used before, and the instructions includes a handy link to a more detailed Youtube video tutorial (which you can see here). Here's the rub: once complete, I found the facing ended up too large and peeped out through the neck hole. I fixed the issue later by stitching-in-the-ditch through the ruffle seam. I'm not blaming the method used for attaching the facing, and in fact it was fun to try something new, however I think trying this less-known-to-me method meant I wasn't able to spot a potential problem until it was too late. It's possible that the facing wouldn't be too large or peek out if I simply pressed rather than understitched-then-pressed the neckline, which creates a neat neck hole but essentially pushes the facing further inside. In the future, I would trim the facing away at the armholes by about .75cm before applying it to the outer garment. 


Fabric:

Let it be known, this is NOT the fabric I would have chosen if I had given myself free rein. However, Dolores has made it clear a number of times how much she likes this ditsy floral cotton lawn, which has been lurking in my stash for about six years. It's the same fabric I used to line these bubble shorts and there's still over 1m left, so you'll probably see it again at some point. It's a kind of faux-Liberty print and is really nice to work with, and most likely very pleasant to wear in the heat wave we've been having of late. 

I have found in the past that details, particularly gathering, can get really lost in a small, dense print like this. Therefore, I picked some contrast white fabric that was residing in my scraps tub for the ruffle instead.  


Thoughts: 

Although I wouldn't have chosen this fabric, it is undeniably pretty and I think she looks lovely in this dress. It's been a winner so far and she wore it a couple of times on our recently holiday to France. I'm excited to make more versions of this pattern; next up will hopefully be an autumn blouse using the tunic length with long sleeves. I'll definitely be trimming the facing piece down a touch. The lawn worked really well, but I'd like to try it in lighter and slightly heavier (but drapey) weight fabrics. What type of fabric would you try making this dress in?

Thursday 19 July 2018

Bombshell Swimming Costume


Two things. Firstly, I must explain, I find it difficult and a bit uncomfortable to refer to a swimming costume as a 'swimsuit', even though I'll be the first to admit that the latter is much quicker to type. Secondly, no, neither do I feel entirely comfortable posing in the aforementioned garment and publishing those pictures on my blog. However, in the spirit of body positivity, I've done it anyway. 

I've been sewing for a long time now, but there are still a few types of garments I have yet to try to make for myself. Swimming costumes are one of those garments because I rarely go swimming, and, therefore, the hand-me-down costume my best friend gave me about ten years ago is still fine. However, earlier this year we had a holiday booked to visit a friend who lives in Madrid, along with other old school friends and their families. During that holiday, we planned a trip for all the laydeez to visit these amazing Hamman Arab baths, and I just didn't fancy going to them in my old, rather sporty-looking costume.  


Pattern:

I decided to opt for the Closet Case Pattern Bombshell Swimsuit pattern because, A) I liked the coverage the retro cut gave around the lower part (including the front 'skirt' section), B) I already owned it, and C) with both thorough-looking instructions AND a series of helpful sewalong blogposts, I knew my hand would be sufficiently held throughout the preparation and construction. I already owned this pattern because it came as part of a Perfect Pattern Parcel I was sent to review years ago, and although I didn't choose this particular pattern to make from the parcel at that time, I'd kept it in mind as a potential future project. 

Truth be told, I made this swimming costume many months ago now, so this isn't going to be the most detailed review I've ever written. However, I do recall being surprised in a number of ways; by how much fabric this pattern required, by how many pattern pieces there were, by how many construction steps were involved, and in the end, by how much the finished thing weighed! I really like how this pattern offers different design options. As you can see, I opted for the gathered bust top and decided to include the option of adding foam cups to (hopefully) give a smooth line over the bust. Instead of buying special swimwear compatible cups, I unpicked a bra that I decommissioned around the same time. 

(image source: Closet Case Patterns)

Size-wise, I attempted to blend between the size 8 for the top part, and the size 10 for the waist and hip area. This was a tricky task because of how the sizes were grouped, and sadly wasn't as simple as blending between sizes at the side seams. I also folded out a bit of length from the front and back lining pieces to account for my short-waistedness. I didn't attempt any kind of toile/muslin to determine this, I just went for it and hoped for the best. 

I found the gathering of the side and centre back seams of the front and back pieces my least favourite part of the construction process. Gathering up all that fabric on both sides was tricky, and then I decided to add rows of basting stitches to keep the gather in place. Then I thought that the basting stitches were messing with the measurements and stretchiness of the side seams, so I attempted to remove them. Then I realised that taking them out had stretched the gathered sections so I needed to redo all the freaking gathering again. In the end, the side and back seams are pretty ridged with no stretch, but thankfully it doesn't seem to be an issue or affect the fit. 

I also recall having trouble inserting and working around the foam cups. The top edge is not very neat because of that and my topstitching is pretty shocking. A fact that I mentioned several times to my friends, none of whom gave a shit, and rightly so.  


Fabric:

After seeing the name 'Funki Fabrics' popping up on blogs as a source of swimwear fabric, I lost many happy hours combing their site. I was sorely tempted by this amazing, solid jade green, semi-eco fabric, but in the end, for my first attempt at making swimwear, I decided to find a cheaper alternative (as you can imagine, the ruching on this swimming costume makes it fairly fabric-hungry). Whilst doing more research into my options, Helen from Helen's Closet's stunning solid black version inspired me to opt for something darker, and I ended up finding some inexpensive solid navy swim/dancewear fabric and matching navy net lining on eBay. 


Thoughts:

When I first put this swimming costume on, I felt sexy and sophisicated. I LOVE the coverage and how held-in I feel around my lower half. I also love its structure in general that's created from all that ruching (my version is more ruched than most, probably because I shortened the lining pieces but didn't alter the outer pattern pieces, resulting in more gathering of the outer fabric to match up with the lining). However, the top half doesn't feel so secure. The bra cups have been added in (thankfully) roughly the correct position for my boobs, but without the back band that holds a bra in place, the cups are not supportive and the top edge doesn't always remain against my skin when I'm splashing about in the water. I considered removing the cups altogther, but I can't face that faff, nor am I sure my droopy ol' post-breastfeeding bust look very nice without them. 

If we're nit-picking here, I may as well also highlight the side seam's weird wibble. I've figured out that that's been created by the tension of the leg hole elastic where it joins the side seams. I've noticed this wibble on some other people's bombshells, and general I'm able to overlook it on my own. 

Even though my feelings about this particular swimming costume are mixed, it was a fun and engaging (read: lengthy) process and a great introduction to making swimwear: to the needles, fabric and elastic that's involved. Eventually, I'd love to have another whirl at making a swimming costume, although most likely one that's a far simpler style and corresponding construction, and with a bust area that definitely won't flap about!

What about you? Have you made swimwear? What do you like about it? Or what has put you off from trying?

Thursday 12 July 2018

Retro Cardigans Revisted


When I'm reading blogs or catching up on my Instagram feed, I'm fascinated to see which patterns sewers return to and make multiple times. Some people may feel reluctant to post projects made with TNT patterns, instead of some completely fresh new pattern/project perhaps, maybe thinking that their readers don't want to see a repeat, or not knowing what fresh thing to say about it. As a reader/follower/viewer though, I feel the opposite; I really want to see which garments clearly got so much use IRL that more versions were called for, and therefore which patterns other sewers have found to be excellent value for money.


Pattern:

Having recently posted (again!) about the Made by Rae Geranium dress pattern, today I'm going to share another kids' pattern that I've posted about previously that had another outing on to my sewing table. So, tell me, who doesn't love a cardigan?! They're a useful layer all year round; they give extra warmth when it's cold and are a jacket substitute in the summer. The Retro cardigan pattern by Brindille & Twig is such an easy project and can be made in a variety of fabrics. I went on this particular cardigan making binge in the spring to hoover up some fabric scraps that were floating around in my stash, and turned them into useful garments for both Frankie and Dolores.


As I've mentioned before, I've found that B&T patterns come up large if you use the age to pick a size. If you use their height guidelines instead, or just pick a size/age smaller, I personally find you get a more successful fit (e.g. in the picture at the top of the post Frankie is 18 months old but wearing the size 12-18 months).

As for alterations to the pattern, after the first four I made (the three from the previous post and Dolores's anchor cardigan in this post), I decided to make the cuffs and waistband deeper. Whilst making the last of this batch of four (Frankie's anchor cardigan pictured above), I decided to make the curve of the front piece where it joins the neckband less exaggerated, and the result is a neckband that sits much flatter than the others (check out Dolores's anchor cardigan above that one for a comparison). I'll definitely make this small alteration a permanent one going forwards.


Fabrics:

As I say, these cardigans can be made in a variety of knits to create garments with different degrees of warmth. The fleece backed sweatshirt fabric version I previously made Frankie was great for winter, and the lighter interlock (like a thick jersey) provided a great layer for milder weather. Ponte de Roma hits the spot in between. When I 'accidentally' ended up with both the navy and white colour ways of the anchor ponte that I used to make this Cabernet cardigan, these joggers and this Freya top, the leftovers were screaming out to be combined into one garment. I pieced together Dolores's cardigan (the version with the white sleeves) and used some gold buttons from my stash. Shortly after, I realised I could squeeze another Frankie-sized one out of the remains-of-the-remains if I used some solid navy ponte (also from my scraps tub) for the sleeves and back piece. I love that these two garments are similar but not exactly the same. Much like the kids themselves!


I made the black version pictured above (apols for the blurry image) using the size 5-6 (proving my point about this pattern's age-based sizing coming up large!) for Dolores to wear in a year or two's time. It's made from the leftovers of my quilted/embossed ponte Kinder cardigan, which I've found to be very snuggly and soft. I hate buying buttons for projects when I have such a large button stash already. I picked out this set of red fabric-covered buttons, but I may change them in the future if something better shows up.  


And the final version I have to share with you started life as this mint green, faux-wrap, loop-back French terry top I bought in a charity shop for 50p (pictured above). The colour IRL looks in between the above pic and the finished cardigan pictured below. I bought this top because the fabric felt incredibly soft, and had excellent stretch and recovery. I wished I'd smoothed off the curve of the front piece (as described above) on this version, because, as you can see, the neckband doesn't sit very flat when it's buttoned up. I had to cut-n-shut the sleeves together because of the restricted fabric I could harvest from the original garment. However, I like the additional seams on the sleeves. I think it gives the garment a sportier vibe, although I never would have thought to add the extra seams unless I was creating a colour blocking effect. It may not surprise you to learn that Dolores helped pick out the buttons and the unicorn patch from my stash. 


Thoughts:

These projects have made me so happy because A) they were almost free in terms of financial cost, B) they used up some leftover fabric that I might have otherwise have chucked in the textile recycling bin (better to reuse than recycle), and C) they have already seen a lot of wear, keeping my babies warm without restricting their movement at all. 

What are your favourite patterns for kids that you have made multiple times? Have you discovered any that are also useful scrap busters, either woven or knits? Spill the beans...

Friday 6 July 2018

Free Pattern Friday: Women's Boxy Top


Welcome to my monthly 'Free Pattern Friday' feature, where I road test a free sewing pattern or tutorial: sometimes a children's one, sometimes a women's one. I publish these posts every first Friday of the month, timed to provide inspiration for those of you who plan to get their sew on over the weekend. I firmly believe that, if you pick your projects carefully, sewing doesn't have to be a crazy-expensive way to clothe yourself and your family. Thanks to all the amazing pattern designers who have offered up their hard work for us to enjoy for free.

I'm not sure what's up with the weirdly orange tone of these photos, hopefully it doesn't distract too much from what's going on with the top. The Peppermint magazine website is small treasure trove for those seeking free garment sewing patterns. The magazine teams up with pattern designers to release a pattern alongside each magazine issue. I'm sure I'll return to their selection for future editions of my 'Free Pattern Friday' feature, but today I'm checking out the Boxy Top (AKA Harvest top) pattern designed by Pattern Runway. Thanks to both Pattern Runway and Peppermint magazine for offering this pattern up for free. 


(image source: Peppermint magazine)

Pattern type:

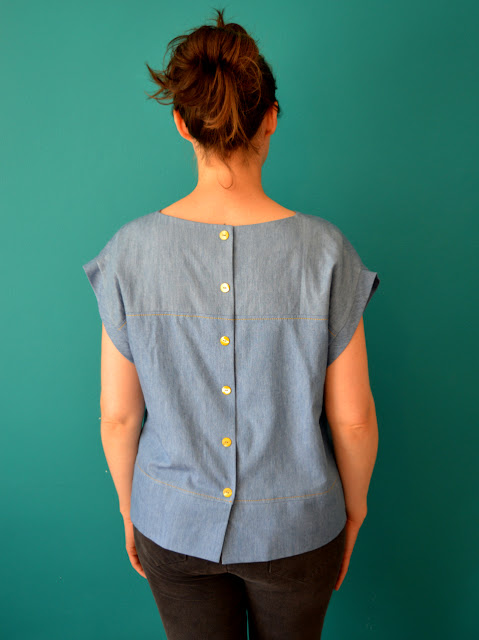
This top (called the 'Boxy top' on the website, but the 'Harvest top' on the actual pattern pieces and instructions documents) has a square silhouette formed of three panels and a bias-cut sleeve band detail. It buttons up the back, but is loose enough to take on and off without unbuttoning (I stitched the buttons through both layers after reading this review of the same pattern). 

Sizing info:

The pattern has been graded to span five sizes: 36 to 44 (bust sizes 33" to 39.5"). Based on my measurements, I picked the size 38 for the bust and shoulder area, grading out to the 40 for the waist and hips. I also folded out 2cm from the centre panels to account for my short-waistedness. 


Fabric info:

The fabric suggestions for this pattern are 'lightweight to medium weight fabrics with a soft drape; cottons, cotton blend, shirtings, light weight linen'. I think this pattern could potentially also handle  rayon, silk or double gauze. I decided to bust out a lovely piece of light-weight, 4oz, washed denim from Fabric Godmother. I bloody love this stuff, it's what I used to make my beloved denim Tova top that I wore almost constantly for years. The softness and slight drape worked well for this pattern. 

Findings:

Downloading this pattern and the instructions was very easy, with no subscribing to newsletters or signing in to a website required. Pattern Runway patterns are printed on top of an inch grid, which makes some pattern alterations you might need to do (like my short-waisted adjustment) nice and easy. The instructions were easy to follow with very clear illustrations for each construction step. I found the construction of this top was really enjoyable. In part that was thanks to the lovely, clear instructions, and also because the construction method itself is both simple enough for a beginner to try, but not so simple that a more experienced sewer would switch on to auto-pilot. 

As for the garment itself, there were a couple of points that made me like the finished top rather than love it. I'm not mad keen on the sleeve bands/cuffs. I think they stick out in a slightly odd way and I'm not sure what value there is to cutting them on the bias. This next point is super pernickrty but I'll add it in here anyway; seeing as the top can easily be taken on and off without undoing the buttons, it would have been nice if the instructions mentioned this to give the option of avoiding making the button holes. Personally, I felt the suggested five buttons looked a bit sparse, and opted for six instead. 

And then there's the shape. I knew the fit of this pattern was going to test the limits of my boxy-silhouette comfort zone, but I found that the fit is more boxy and loose than both the modelled version and the spec (line) drawings led me to expect. 


Customisation ideas:

With those panels, you've got heaps of options for making your own unique version. You could:
  • Make a feature of the topstitching along the panel lines. I've emphasised the denim fabric here by using jeans-style thick topstitching thread. You could add an additional row of topstitching for a faux twin needle effect, or use a decorative stitch if your sewing machine has any in a contrasting colour
  • Take inspiration from the brown and white striped version and monkey around with grain lines on directional print fabrics
  • Use entirely different fabrics for each of the panels to create a scrap-busting, quirky patchwork or classy tonal look. 
  • Topstitch the edge of the facings so their shape is visible through the outside of the top. I think that can be a really nice detail on fairly plain, simple garments like this
  • Use contrast fabric for the facings, perhaps a print if your outer fabric is a solid. That always looks cool and fancy, even if it's only you that sees it when you're getting dressed!
  • Use self-covered buttons up the back
  • Add a patch breast pocket, or even a subtle and clever inseam pocket set into the seam between two of the panels
  • Leave off the sleeve bands and finish with bias tape turned under to the wrong side instead


Would I make it again?

I would definitely make another Pattern Runway pattern again if one caught my eye, but although I thoroughly enjoyed making this top, I won't be making this particular pattern again. I decided it really was too shapeless and boxy for me personally (the Grainline Scout tee pattern is the outer limit of woven boxiness for me!), and gave it to my awesome friend Sophie instead. She is one of my favourite people in the world, and passing something on to her that I made myself has probably given me more pleasure than stuffing my adequately filled wardrobe with another garment, so it's all good. 

Sunday 1 July 2018

Return of the Geranium Dress


Back in the winter, I decided to bust some of my fabric stash to make a couple of summer dresses for Dolores. It was fun to dream of warmer weather during chilly greyness, and because this is a TNT pattern and I felt confident in the sizing, I knew that I was making garments that would get lots of wear when it eventually got warm enough. 


Pattern:

Both this white dress, and the orange African wax fabric version pictured at the bottom of the post, have been made using the Geranium dress pattern by Made by Rae. If you have a child in your life who likes to wear dresses, I kind of feel that you owe it to yourself to get this pattern. It has a number of neckline, armhole, skirt style, skirt length and pocket variations included which can help you create a multitude of different looking garments and gets you your money's worth. And Rae's released an expansion pack that gives you even more design options, totalling an insane number of mix and match options. 

These dresses represent at least the 8th and 9th times I've sewn this pattern. I've previously made four for Dolores (thisthisthis and this), as well as at least two for window displays at the Village Haberdashery, and one as a birthday present for Dolores's friend, Naomi. Plus I've taught a couple of Geranium dress classes at VH in the past, so I feel I know this pattern pretty well now!


Dolores is now 4.5 years old, so I made the size 5 (the biggest size in the smaller pattern size range), hypothesising that they'd see two summer's worth of use. For the white dress, I used the sleeveless armhole option with notched neckline and gathered skirt. For the orange one, I chose the faux cap sleeve option with simple scoop neckline and, again, the gathered skirt. I like the pleated skirt option too, however the gathered skirt option has the perfect amount of fullness, IMO. Enough to satisfy a child with 'girly' clothing preferences, but not so much as to make it unsuitable for everyday wear. 

After cutting out the white version, I realised that I had enough fabric left over for a matching bucket hat. So out came my fave: the Oliver + S free bucket hat pattern. The hat is looking a little battered in these pictures because it's already seen MASSES of wear this year, by both Dolores and Frankie. 


Fabric:

Part of the popularity of the Geranium pattern is down to the fact that it works well in quilting cotton, and fabrics with that type of weight and handle. In fact, when I tried making this pattern in a drapier fabric (by accident), it definitely didn't hold its shape as well and looked tatty after fewer wears than the stiffer stuff. Quilting cotton can come in such amazing, beautiful and fun prints, and it's so often crying out to be made into children's wear.

The white-background fabric above has a beautiful circus acrobats print in lovely subtle colours that I found in the spring of 2017 at the Ditto fabrics closing-down-their-warehouse-space sale. Initially, I felt the dress looked a bit plain, and I planned to add some pompom trim or something to it somehow. However, I struggled to find anything in a suitable scale and it started to get worn, so it's remained plain. It's a firm favourite with Dolores, and even though these photos were only taken a couple of weeks ago, it's now sadly (but inevitably) stained with pasta sauce and lord knows what else.


The insane eyeball print African wax fabric found its way into my stash via a fabric swap I hosted in Brighton a trillion years ago. She's modelling it here, appropriately, in the African section of the anthropology museum in Madrid when we visited in April. It's the same fabric I used to make her this Geranium dress three years ago. I loved her wearing the initial version, and it's made me really happy to see her wearing this reboot!


Thoughts:

This pattern has been the very definition of a TNT pattern for me. I've relied upon it to make fantastic, well fitting and perfectly proportioned dresses in the type of fabric (quilting cotton and similar) that often doesn't lend itself well to garment sewing. Now that Dolores is at the top of range of sizes of the pattern I own, I have to debate whether or not to buy the size 6-12 range pattern. Perhaps it's time to hang up my Geranium making hat and venture into the unknown with some of the other amazing kids patterns that are out there.  


Related Posts Plugin for WordPress, Blogger...