Showing posts with label Fabric Godmother. Show all posts

Friday, 6 February 2026

Free Pattern Friday: Onil Square Neck Blouse for Adults

Welcome to my monthly 'Free Pattern Friday' feature, where I road test a free sewing pattern or tutorial: sometimes a children's one, sometimes an adult's one. I try to publish these posts every first Friday of the month, timed to provide inspiration for those who plan to get their sew on over the weekend. I firmly believe that, if you pick your projects carefully, sewing doesn't have to be a crazy-expensive way to clothe yourself and your family. Thanks to all the amazing pattern designers who have offered up their hard work for us to enjoy for free.

You might have noticed that I've been reviewing a ton of underwear patterns lately, which is a reflection of my current sewing interests and wardrobe needs. But I know that won't be the same for everyone, so this month I've picked a non-underwear pattern to road test. In fact, it's what I would consider a 'proper pattern': not a quick basic that pattern companies often put out to gain interest but doesn't require them putting in a ton of development time. This pattern would be a great, fairly quick win for a confident sewer, and likely a satisfying challenge for a more beginner maker. 

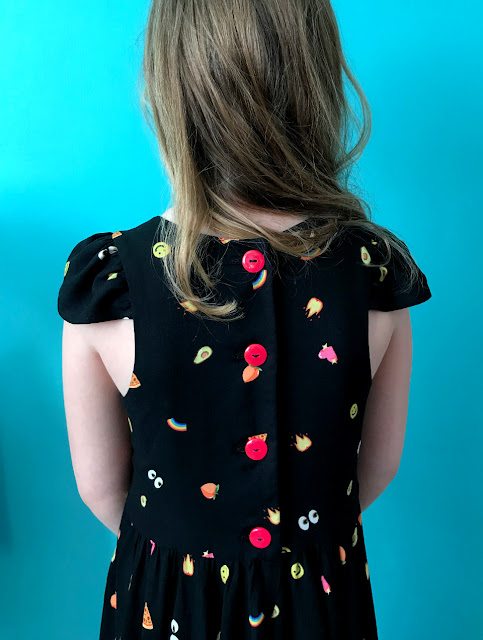
Huge thanks to designer Pauline Alice for sharing the Onil Blouse pattern for free, which is easily accessible by adding it to the cart on their website. There are also some excellent blog posts on hacking this pattern to create different looks including an asymmetric button front, a dress with gathered skirt, lengthening the sleeves and an A-line dress with shorter sleeves. That is a lot of potential bang for your (zero) buck. It's also translated into Spanish, French and English. How cool is that?!


(image source: Pauline Alice)

Pattern type:

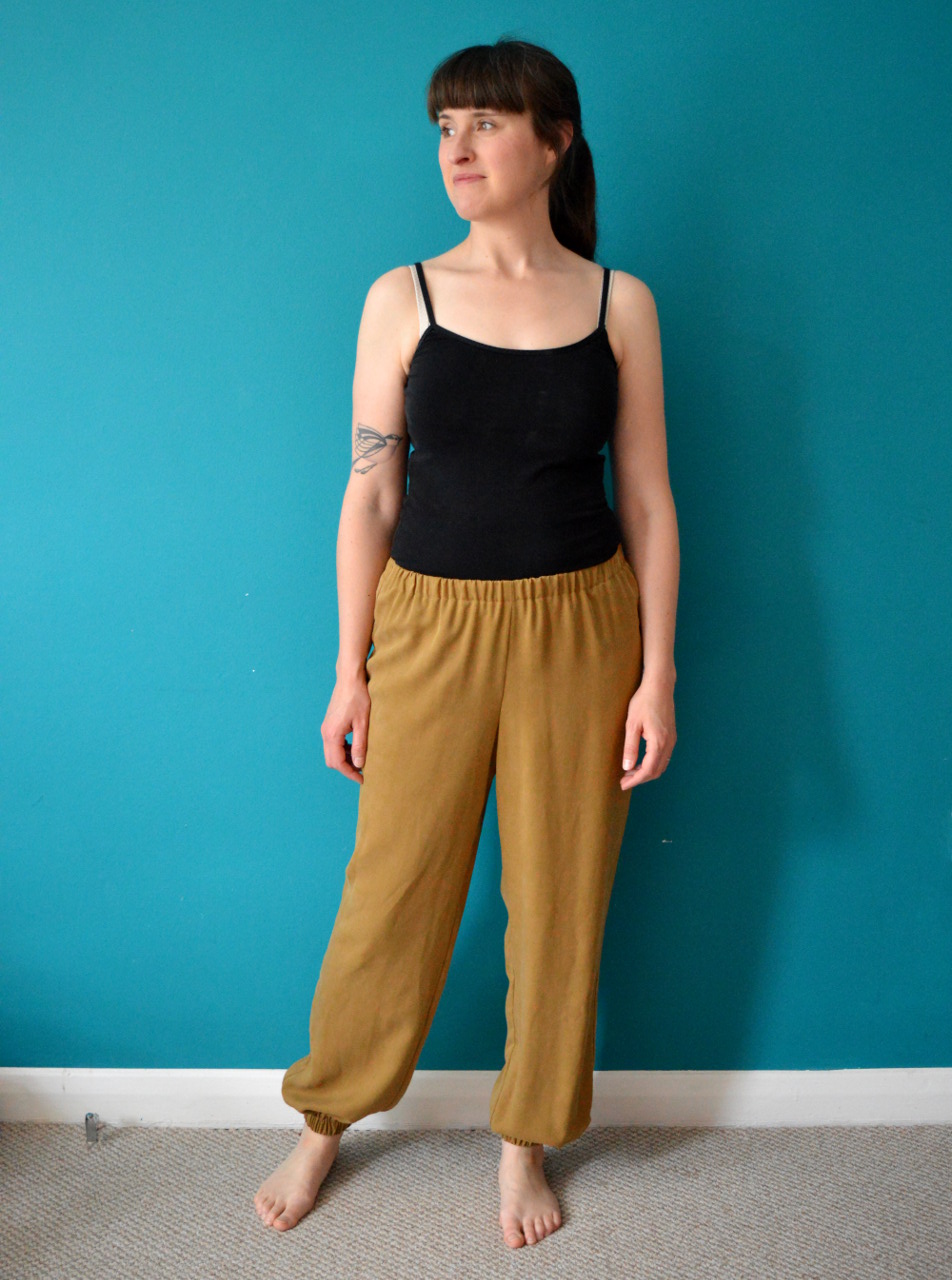
The Onil blouse pattern has a square neckline with elasticated sleeves above the elbow, and a curved hem. There are also bust darts for subtle shaping, which can, of course be adjusted if necessary to accommodate different bust sizes. As mentioned above, there are also tutorials on the blog to use this pattern to create different styles of garment. 

Sizing info:

This pattern, by current sewing pattern standards, is somewhat size inclusive but not quite as inclusive as many designers strive to be these days. It has been graded for busts measuring 31.5" - 47" (approx. EU 34 - 52). Helpfully, finished garment measurements are listed to guide you when selecting your size/s. My body measurements put me as a size 38 for my bust, and size 40 for my waist and hips. However, having checked the finished garment measurements, I decided not to grade out and make a straight size 38. More on how I found that below. 

Fabric info:

It is suggested that you use light to medium weight fabrics, such as cotton poplin, linen, viscose, chambray. I used a embroidered cotton voile from Fabric Godmother. They no longer have the white but it is available still in other colours, the closest being ecru. Because of the bulky embroidery, I used a scrap of white cotton lawn for the facing. 

As you can see, I decided to add some broderie anglais trim that my mum recently donated me, having had it her stash for probably around forty years! 

Findings:

As I say, this is a 'proper' pattern: well drafted and professional with good instructions. However, there was a couple of parts in the instructions that I felt could have been described in more detail to make this project more beginner friendly, particularly around the trimming of the neckline and facing. 

Because my fabric was pretty special, I decided to make a toile to check the sizing and fit before cutting into it. I found that the fit across the bust was fine, but the shape was way too dramatically A-line for my liking. I ended up removing 10cm in total from the width of the hem. I might have decided not to do that if my fabric was very drapey. I'd definitely recommend making a toile in a fabric with a similar behaviour to your final fabric choice as I don't think the line drawing on the website is very representative of the actual, finished garment. I also decided the finished length was a bit short, another reason to add the trim at the hem, to gain a tiny bit of extra length. 

Would I make this again?

Possibly, if the right piece of fabric came along. Speaking of fabric, in the size I made at least, I found I didn't need as much as was stated. Anyway, I'd definitely consider making a buttoned version of this blouse, and lengthen it so I can tuck it into trousers, jeans or skirts. 

Thursday, 22 June 2023

Fabric Godmother's Peony Dress Pattern


Try to suppress your surprise at the fact that I've made a dress! This is my version of a brand new sewing pattern that isn't even available just yet. Fabric Godmother, where I've been working part time for nearly five years, has had this pattern in the works for yonks. It's named the Peony dress pattern and it'll be available to buy on 29th June. I have been only lightly involved in its production, however it's been super interesting watching its development behind the scenes. 


Pattern testing:

The point at which I got involved was when FG invited us members of staff to have a sewing day to test the pattern out. This was a very clever move on their part, because it gave them an opportunity to see how sewers with different levels of experience found the instructions, and how the pattern worked on a variety of bodies. We got to choose our fabric in advance, then we picked which view of the pattern we wanted to make and got cracking. We were asked to make notes on anything we found tricky or confusing with the instructions and pattern itself. About a week later, once we'd had a chance to finish up our garments, we each had a lengthy debrief to share our findings. 


Fabric:

Very generously, we were able to choose any fabrics we liked to make up our versions. However, because I didn't want to feel I was cheating my Last Sewist Standing challenge pledge, I chose a fabric that had a flaw in that wasn't actually on sale to the public. This is the Joni ECOVERO crepe, which looks and behaves a lot like viscose. The particular roll I cut mine from has a problem with the selvedge, which was totally fine to use for this project, but couldn't be sold as is. 

Despite florals really not being my thing, I have used a Joni print fabric previously to make this well-used Vali top. Therefore, I knew I was going to have to allot extra time and fabric to making a well considered print placement. I'm really pleased with how the print sits on this dress. I actually had to make the sleeve ruffles slightly narrower than the pattern, and the hem ruffle slightly deeper to fit with the dimensions of the print design.


Thoughts:

It was a really interesting experience to be part of the production of this pattern. Despite it not being particularly 'me', I do love my finished dress. I have even managed to wear it already, to a talk I gave at the social sewing event at Fabric Godmother earlier this month about sewing more sustainably


Monday, 17 October 2022

Denim V-Neck Jumpsuit: Adult Babygro?


For yonks I've been coveting a denim jumpsuit. A kind of 'uniform' item that I can throw on whenever I can't really be bothered, and just look put-together and casually cool. My main role at Fabric Godmother is ordering sewing patterns, so I'm well positioned to judge the merits of the various options. The question remains however: have I made the most comfy garment ever, an adult babygro, or both?!


Pattern:

After a long hard think which involved a lot of hashtag stalking, I landed on the V-neck Jumpsuit pattern by The Assembly Line to make my jumpsuit dreams a reality. I liked the modern, casual style, but I decided to make some tweaks. Like others before me, I decided to go with buttons to fasten it rather than concealed press studs. I also shortened the bodice length by about 3 or 4cm because I heard it's very long in the body/low in the crotch. I didn't make a toile, but I did muster the patience to baste/tack the main garment together (minus sleeves) before final construction to check the fit. Based on my findings, I chose to make the top part smaller, and slightly closer fitting. I also added patch pockets to the front instead of inseam side pockets to break up the expanse of fabric a bit. 


Fabric:

The fabric I chose for this project is a 9oz mid blue denim made from recycled cotton fibres from Fabric Godmother (not sponsored but I get a staff discount). It also has some stretch content to really double down on the comfort factor. I did a bit of additional top stitching here and there on this garment because I love how after laundering denim fades a bit and the ripples start to show. I absolutely love this fabric and am now eyeing it up in the other colour ways. 


Thoughts:

Yes it is comfy. Yes it looks like a giant babygro. It's not quite the sleak, modern mum-uniform I envisaged but there you go. I've still been wearing it heaps, and having fun layering it under and over other garments. 

Tuesday, 26 July 2022

Hula Leftovers Marcel Top


Honestly, I don't know exactly when I made this top, but I know it's taken me at least 18 months to get some photos of it. I haven't worn it much either, probably because it doesn't usually feel very tropical here in the UK, plus we haven't been abroad for three years. However, in advance of our trip to Italy next week during which I predict I'll wear this a lot, I thought I'd share this project. 


I also want to highlight a sewing pattern that is a great potential scrap buster. I had some weird-shaped leftovers of Hula viscose crepe from my Helios dress. The tank top view of Chalk and Notch's Marcel pattern was a great basis for making a casual, hot-weather top from those leftovers. It's formed from panels, although this busy fabric print obscures the seam lines so it's hard to tell. The volume is created by gathers into the front and back yoke, and this, combined with the flow-y nature of the fabric, will hopefully make it a breezy top to weather in the hot, Italian summer. 


I love how making your own clothes means you can customise details you might otherwise not think to alter on a RTW garment. I have one shoulder lower than the other. This means that one of the straps of shop-bought clothing (and a few handmade ones also before I realised this about myself!) would repeatedly, and annoyingly, slide off my shoulder. To correct this, I made one of the straps considerably shorter than the other. I also took care to fix the strap to the back yoke to follow my bra strap position to provide almost-complete bra coverage. 

This project might also look cool using different scraps of viscose for each of the pieces and panels. 

Tuesday, 2 November 2021

Tadah! I Made Birthday Outfits!


My kids' birthdays are ridiculously close together. In fact, their special days are only one day apart. To date, our family more or less treats the situation like they're twins that are three years apart, and the celebrations kind of overlap and get all smooshed together.  I guess this will change as they get bigger when their friendship groups get more defined and separate, and perhaps as soon as next year the events will be more distinct. I also feel that the clock is ticking for how long I can get away with making them matching clothes! To make the most of this fleeting opportunity, I decided to make these coordinating garments for them to wear as they turned eight and five. 


Fabric:

When I first laid eyes on this fun emoji print viscose lawn from Fabric Godmother, I knew I had to get some for my kids. To be honest, I rarely buy fabric to make clothes for my kids. I mainly use leftovers from other projects and fabric harvested from existing garments when making things for them, with the occasional new purchase or gifted length that's more specifically 'kiddie'. I love how this print is more subtle than a fabric designed for kids though. In fact my colleague Kerry has also bought some to make a dress for herself. Full disclosure: this is not a paid ad or freebie, I bought this fabric myself but with a staff discount.


The fabric is lovely, but as with most viscose fabrics, it's light-weight, slippery and a big fan of developing creases. Having decided to make Frankie a shirt and Lola a dress, I knew I'd be pushing the limit of fabric suitability for the styles I had in mind with this fabric selection. I think I just about got away with it though!

(image source: Tadah! Patterns)

Dress Pattern:

I'll start with Lola's dress. Around the time that I was gearing up to buy the fabric, I was contacted via Instagram by Sewing Gem, a UK-based online sewing shop, asking if I'd like to try out a pattern by Tadah! Patterns, an Aussie brand that they stock and were hoping to promote. It was an obligation-free offer, and the timing was just right considering I was on the hunt for a pattern to make a part dress. When I looked through their selection of Tadah! Patterns, I clocked the Tea Party Dress pattern (pictured above) straight away as one that I've had on my Pinterest board for years. 

(image source: Tadah! Patterns)

In essence, it's a fairly traditional fitted bodice-and-full skirt dress style. However, it includes a crazy amount of style options (see above). It allows you to make a ton of different looking garments all from the one pattern. I let Lola choose her own style variations. She selected the V-neck, classic back (she was going to be wearing this in October after all!), regular arm height, gathered cap sleeve and circle skirt options. 


The pattern is graded between 6-12 months to 8 years. Lola is a touch larger than the measurements that correspond with the size 8, so I lengthened both the bodice and skirt by about 5cm each (also so she'll be able to get more use from it as she gets bigger still). I also made the bodice a tiny bit wider at the centre front and back. I wish I'd had this pattern from when she was much smaller so I could have made many more garments from it over the years!


The construction was pretty simple and suitable for someone who has made a few other garments previously, particularly if you choose to make it in a more stable fabric. The bodice is fully lined and back fastens with buttons, which makes this a slightly more time consuming project, so I wouldn't recommend making it the same day your child is due to attend a party! The only part of this project that gave me pause was trying to work out whether the top edge of the circle skirt should be gathered into the bottom of the bodice, or if it should be sewn flat. The instructions mention creating gathers, however the illustrations look like it should be sewn flat with no gathers (spoiler alert: it should have gathers). 


For future versions, I would also prefer to make the bodice and skirt separately and the join them at the waist seam, instead of attaching the skirt pieces to the front and back bodice pieces and THEN stitching the side seams in one. But that's just a preference of construction order and wouldn't change the look of the finish garment particularly. 

(image source: Fibre Mood)

Shirt Pattern:

I love making shirts for Frankie, and mercifully he enjoys wearing them also! I recently made him a shirt using my regular little-boy shirt pattern with a camp collar, so I was on the look out for something different this time. I found the Rupert shirt pattern (pictured above) in Edition 14 of the Fibre Mood magazine, but you can also buy it separately here. It's got a different silhouette and collar to the others I made for Frankie so decided it was worth the tracing out for some variety! 


I ended up combining sizes for this garment to prevent it being too wide. I used the size 4 for the width and size 5 for length. I altered the sleeve pattern so it wouldn't have the turn up because I didn't want to reverse of the viscose to be visible. I also made a regular hem instead of the facing around the bottom edge because I felt the latter wouldn't be suitable for the slinky viscose. I also added two pockets to the front rather than one upon Frankie's request.


With the bottom hem facing eliminated, this shirt was pretty quick to put together. I like the look of the collarless neckline, and the wider fit is a nice variation to Frankie's current clothing selection.


Thoughts:

My main conclusion is: viscose isn't the ideal fibre for making kids clothes, but it is do-able! Both kids seem to enjoy the slinkiness of the fabric in their respective garments, even if I don't enjoy the ironing! They both chose to wear these garments multiple times over their extended birthday celebrations, and I've put them aside for a month so they'll be in decent enough condition to wear to a wedding in December. 

Monday, 9 August 2021

Washed Denim Nia Trousers Remake


I'm a big fan of Belgian sewing pattern brand Bel' Etoile. They have a lovely range of patterns for women and children available in Dutch and English. Previously I've bought the Isa sweatshirt pattern and used the free Siem shorts pattern (which I reviewed here), and recently I tried the Nio/Nia pattern to make these trousers for my daughter. 


Pattern:

I'd had my eye on the Nia trousers for some time because the style is very similar to a thrifted pair of trousers that Lola used to love to wear but has since grown out of. Amusingly, it's also very similar to the Helen's Closet Arden pants pattern that I'm currently working on for myself! 


(image source: Bel' Etoile)


The Nio/Nia pattern is good value because it includes a trousers/shorts pattern as well as a top pattern, both of which include a number of style options and variations for kids of all genders. I can image I'll use the bottoms pattern a lot for both my kids over the decade or so. 


Fabric:

The fabric I used for these trousers is the 4oz washed denim from Fabric Godmother, although I can't remember if it was the blue or indigo colour way because I bought it several years ago and the dye batches vary quite a lot. I used the same type of washed denim to make a Tova top and a Block Tee (formerly Kabuki tee)

About two years ago, I used this fabric in an attempt to make some 'summer jeans' using the trouser version of the Tilly and the Buttons Marigold jumpsuit pattern. I got very close to finishing, but a mid-way fitting indicated that they were going to look terrible on me, so I abandoned the project! Thankfully, I kept hold of the half-made item and was able to finally reuse it to make these. 


If you look closely, you may notice that the fabric on the inside of the pocket mouth on one side is a slightly paler colour. That's because I made a mistake when cutting the pocket pieces, so had to use another remnant of the same type of washed denim instead, which happened to be a lighter colour. I know that this fabric tends to fade with washing (in a really lovely way), so I expect the difference will be less noticeable over time. 


Thoughts:

I wasn't sure Lola would accept these trousers because her beloved pair that was a similar style was made from viscose, and she noted that these don't feel as slinky. However, she's worn them a couple of times with some light suggestion, and today I noticed that she chose to wear them without any input from me at all! If they look ok by the time Lola is done with them, I'll hold onto them for Frankie. I already have another pair planned for Lola in a printed cotton, plus a shorts version for Frankie for next year from some leftover slub linen that I'm currently working with. 

Friday, 14 August 2020

Hawaiian Helios Dress


I'll be honest with you, I don't remember too much about the construction of this sewing project. These photos were taken a year ago, shortly after I made this dress, and my memory of the blow-by-blows is hazy. The reason I waited a year to blog about it is because this week was the first time I got to wear it. The dress was made to showcase a new fabric design (more on this in a sec), and was on display at a couple of fabric and sewing shows. Seeing as large-scale shows (both trade and public) are not happening for the foreseeable future, the dress resurfaced and I got to give it a whirl during this week's heatwave. 


Fabric:

I was given the opportunity to sew with some of the first batch of fabric produced by Fabric Godmother. All their prints have been developed using vintage pattern designs derived from textiles, wallpaper and even floor tiles. They were all lovely, but this amazing Hawaiian design called 'Hula' sung out to me the loudest.

The base cloth is a viscose crepe, which is a fabric type that I have little experience using. As you'd expect with a viscose, it can be quite slippy, so I really had to take my time cutting out the pattern pieces. Stitching it wasn't too challenging, but pressing flattens the texture somewhat, hence the slight fluted appearance of the sleeve hems in these pictures. They'll lay flatter once the dress has been washed, I have no doubt. 


One of the things I love about this fabric is the scale of the print. The designer has clearly thought about it carefully, and with garment sewing firmly in mind. It's large enough for the images to be recognisable from afar, but not so large that it limits the types of garments you can make from it. 

The colours are great too. As a lover of Hawaiiana and Hawaiian-inspired fabric, I'd be the first to admit that the colours are usually very bold. But the colour palette in this feels more wearable, and makes me think of vintage postcards sent from holidays long passed. 


Pattern:

Fabric Godmother also allowed me to choose a pattern to use to try out their fabric. Historically, I don't gravitate towards flow-y fabric to sew with, so I had to give my pattern selection a lot of thought. I have, however, experienced many hot days, both on abroad and in the UK, when I wished my warm-weather clothing selection was a bit bigger. A floaty dress that skimmed my body would have been very welcome. 

Eventually I opted for the Atelier Scammit Helios dress pattern, because it had the breezy style that would suit a viscose, plus it had a cinched-waist silhouette that I feel my body needs. As with most Atelier Scammit pattern designs, the Helios dress pattern offers multiple style possibilities (see below). There are two sleeve variations and three lengths. I went for the less dramatic sleeves, and picked the tier-free skirt shape but lengthened it to hit just below my knee. 

(image source: Atelier Scammit)

Elastic is inserted into the back half of the waist, and the front is pulled in with a drawstring, meaning that although it defines the waist, it's still really comfy and can be adjusted easily. Of course, I had to position the waist channel higher than the pattern recommended to account for my short-waistedness. 

As you can see, the neckline is a deep V-shape. I normally dislike V-shaped necklines on me (unless it's at the back!), but I think the width and depth of this one looks nice.


Thoughts:

As you can tell, this project and garment took me out of my comfort zone. Sewing with an unfamiliar fabric pushed me, and since this project I have taken on a number of viscose and slinky fabric projects. The style still isn't something I'm immediately drawn to, but when I wore it during this week's heatwave, it felt fantastic. This also raises the dress-tally of my wardrobe to two (discounting two shorter ones that I now wear as tunics over jeggings)!


Friday, 29 May 2020

Tencel Twill Luna Pants


I'm sitting at my desk and should really be writing something else, however I'm going to quickly tell you about my new Tencel twill Lina pants instead....


Fabric:

This is the same Tencel twill from Fabric Godmother that I used to make a Wiksten Tank top last month. This is the mustard colour way, but I'd describe it as 'ochre-of-my-dreams'. It was kindly sent to me for free by Josie, essentially to cheer me up about being in lockdown. As I mentioned previously in my tank post, it has incredible drape, with an almost rubbery handle, which sounds odd but is great! 


I've been wearing these trousers all day, so I can attest to some creasing, but not as much as you'd probably get from a viscose. As with any slippery fabric, cutting out and handling it whilst sewing was a challenge. But it doesn't fray too badly, and presses really well. 


Pattern:

I bought the Made by Rae Luna pants pattern a few years ago, and made the pattern up twice, first in a light-weight, washed denim, and then in cotton lawn. The fabric of the denim pair disintegrated, but, although very faded, the cotton lawn pair have stood the test of time surprisingly well. This garment style is so comfy to wear, in no small part because the elasticated waist sits on the hips rather than higher up on the natural waist: the former being my preferred position. 


Rae reworked the Luna pattern last year and re-released it. I received the updated file but haven't printed it out, so I'm not sure how the pattern pieces differ from the original. For this pair, I wanted a slightly looser, less tapered look through the legs. To do so, I added about 2cm to the outer leg seam at the hem of the front and back leg pattern pieces, blending it into the original seam by the lower hips. I also made this pair a few centimetres longer, as I found my other pair have shrunk a bit over the years, and I'm not sure how this Tencel will behave over the long term.


Label:

I'd seen these cool Isewlation garment labels popping up on Instagram during lockdown, and eventually their designer, Sally (@modistasewing), got in touch with me to request some help in promoting them during Me-Made-May. All the profits she receives from their sale goes to the National Emergencies Trust, which supports local charities in helping the victims of disasters and emergencies. I bought some myself, and they are awesome. I held off finishing this project until they arrived, because they are the perfect colour and shape for these trousers.


Thoughts:

I'm so happy with these trousers! I'm wearing them right now with my washed denim Kabuki tee. I feel comfy and breezy on this warm day, but somehow I'm also looking pretty stylish, if I say so myself. I love how this pattern hits a sweet spot of being loose but not baggy, which I think is particularly important around the bum! I doubt this will be my last pair of Lunas. The next time a super-fluid, woven fabric that I adore crosses my path, I'll be ready to deploy this pattern.

Monday, 25 May 2020

Endless Summer Dorothie Blouse


A year ago I made one of my very favourite me-made garments of all time. It was a sweet little blouse made using the Dorothie Blouse pattern by Slow Sunday Paris, in some mustard viscose twill. I loved it so much and wore it a lot. But sadly it started to literally come apart at the seams along the collar/lapel in a way that was not repairable. 


Later that year I made another Dorothie blouse with longer sleeves, but it didn't work out quite how I pictured it would. My mum has that one now, after virtually remaking the whole thing because she's much smaller than me! 


Pattern:

So, third time lucky? This time, I went back to those gathered, mid-length sleeves that drew me to this pattern in the first place. I omitted the weird split, bias-finished hem of the original pattern, and hemmed the whole bottom edge with a simple double turn. I also raised the armholes by 1.5cm, which was a faff but totally worth it. I would have raised them even more but that would have risked messing with the yoke seams.


Fabric:

Oh, this fabric. I cannot properly explain how much I love it. If you could reach inside my head and pull out the most perfect fabric design for me, it would likely be something just like this. I adore the kitsch Americana, the nod to vintage postcard designs and visions of exciting road trips.  


I bought it from Fabric Godmother last summer. It also came in a navy background version, but both have long sold out. The 1.5m length had been sitting in my stash for many months whilst I tried to figure out how best to use it. 


I included it in my #2020makenine plans (which you can see in this post), because I didn't want it to become one of *those* fabrics that live in my stash so long that eventually my tastes change and I end up not being all that into it. The little red plastic buttons are vintage ones that have been in my stash forever. I was careful this time not to position them too far away from the front edge, like I did with my original mustard Dorothie. 


Thoughts:

There are definitely things I could point to on this blouse to prove its imperfection. But that would be silly, because, overall, I've made a lovely blouse and I'm very excited to wear it. Although my style is far less vintage/retro inspired these days than it used to be, this somehow still feels very 'me'. I can't wait to wear it with my Romero trousers and some sandals and go somewhere that isn't my home! 


Related Posts Plugin for WordPress, Blogger...