Sunday 18 December 2022

Scrap Busting Apollon Sweatshirt

I can't remember precisely where the idea for this project came from, but it has served to solve two issues. The first was Mr SoZo running low on clothes, and the second was my own excess of sweatshirt scraps. In many ways, it's an extension of the scrap busting jersey T-shirts I made for him and our daughter last year. This project follows the same principles and largely the same technique. 

I was becoming aware that my collection of sweatshirt scraps was taking up a sizeable chunk of space in my fabric stash. I started out by getting all my sweatshirt scraps and remnants out and getting Mr SoZo to pick out any that particularly appealed to him. We then messed around with combinations until we had developed a pleasing colour palette. Some of the scraps came from sweatshirts I'd made for him previously, so were already within his existing wardrobe colour scheme. However, having made him the very wild scrap T-shirt that he is happy to wear, I knew I could push the combination further than many people might be comfortable with!

Here's some things I've learned about scrappy garment projects:

  • Make sure you're using a TNT pattern. You need to know that the fit will be spot on: now is not the time to try something new that may require tweaks. The pattern I used for this is the Apollon sweatshirt for men by I Am Patterns that I have used at least six times for him previously.
  • Limit your colour palette, unless you're really doubling down on the scrappy look.
  • Keeping the scraps large results in a bold look, reduces the amount potentially-annoying seams in the inside, and makes the process of piecing MUCH quicker.
  • For this project I kept an eye on the direction of the grain line of each piece, and tried to keep them vaguely in line with each other. However, with sweatshirt fabric you can probably get away with ignoring grain lines altogether.
  • Keep joining scraps until you have shapes large enough to fit your pattern pieces on. Keep your pattern pieces to hand so you can keep checking. 
  • Be aware that the additional seams create additional bulky bits inside. It doesn't bother Mr SoZo at all, but when I made a pieced sweatshirt fabric cardigan for my daughter, she refused to wear it because she found the seam allowances on the inside uncomfortable. If making tighter fitting garments, or garments for kids or sensitive folk, top stitch down the seam allowances as you go to reduce the bulk. 
  • When you have made sections large enough to fit your pattern pieces on, try flipping them 180 degrees to see which way looks best. I tried this and found the upside down version of what I'd been creating looked way cooler. 
  • If your combination of scraps is pretty bold, using one colour for any neckbands, cuffs and waistbands can create a nice 'frame' and make the whole garment look more intentional. 


If you're interested in creating something along similar lines, I hope these pointers helped. And above all, have fun!!!!! Pieced fabric garment projects are more time consuming than 'regular' sewing projects that use a length of virgin fabric, but can be so much more creatively fulfilling. 

Friday 2 December 2022

Free Pattern Friday: Bowl Cover Tutorial


Welcome to my monthly 'Free Pattern Friday' feature, where I road test a free sewing pattern or tutorial: sometimes a children's one, sometimes an adult's one. Or in today's case, something for the home. I publish these posts every first Friday of the month, timed to provide inspiration for those who plan to get their sew on over the weekend. I firmly believe that, if you pick your projects carefully, sewing doesn't have to be a crazy-expensive way to clothe yourself and your family. I also firmly believe that pattern designers deserve to be properly paid for their work, so if you enjoy using a pattern and can afford to do so, make sure you support that designer. Some designers' websites offer the option to make a donation, alternatively you can buy one of their paid-for products. If you can't afford to do so, you can support the designer by sharing your project via social media to help draw more attention to their work. Thanks to all the amazing pattern designers who have offered up their hard work for us to enjoy for free.


(image source: Hearth and Vine)

I've had my eye on this tutorial for yonks, and have mentioned it a couple of time in my podcast Check Your Thread. This project is a great potential scrap-buster (tick), quick to make (tick), could be used to make cute and useful gifts (tick tick) AND helps you to be more sustainable in your everyday life (TICK!). Bowl covers can be used instead of single-use cling film or tin foil to keep food covered in the fridge, on the table, on the kitchen counter or at picnics. You can chuck them in the washing machine and use over and over again instead of frequently adding to landfill. They obviously doesn't provide a vacuum seal, but they certainly will help to keep things fresher for longer and keep insects or animals (and perhaps even small kids!) off the contents of the bowl. I'm posting about this now in case you're on the look out for quick stocking filler/gift ideas to make for friends and family, but equally these might be lovely as a home warming gift. Thanks so much to Patti from Hearth and Vine for sharing this tutorial for free. 


Pattern type:

This tutorial shows you how to make cute, reusable, washable bowl covers to protect your food. 


Sizing info:

The awesome thing about this project is that you can make custom covers for the bowls you already own. I make homemade pizza dough and usually use a tea towel to cover my bowl whilst the dough is rising. However, this is a better option because I was able to make a cover to exactly fit the mixing bowl I always use. I also made a smaller one that fits the cereal-sized bowls we own to protect leftovers and such. 


Fabric info:

The tutorial recommends using quilting cotton for this project. You really want to use something with a tight weave to keep the food as fresh as possible, and that can withstand high temperatures when washing, so woven cotton is likely to be your best bet. Although, I think you could expand the recommendation to include cotton lawn, poplin and shirtings. Obviously, I'm always going to urge you to use what you already own, however, if you had nothing suitable in your stash or you really wanted to personalise the bowl covers, particularly if making them for a gift, you could buy fat quarters that represented the style of the recipient and their home. The red sailboat fabric used in these pics is a scrap of Atelier Brunette cotton poplin leftover from some pyjama shorts I made myself earlier this year. The pinup cowgirl fabric was a piece of quilting cotton I got in a fabric swap years ago. It had already been cut into a circle for making wax wraps, but I never got round to it. You will also need 1/4" elastic and making thread. 


Findings:

This was an incredibly quick and satisfying project! Within an incredibly short amount of time I had made two super useful bowl covers from fabric and elastic I already had in my possession. The explantion was clear and very easy to follow. 

The post/tutorial also includes a small Q&A section answering any queries you might have about making or using these covers. That was very helpful, however, I disagreed with one point. The tutorial recommends washing these in cold water. Cold water is not as effective at killing bacteria as hot water, so I wash mine in a 60 degree wash along with my tea towels and surface cleaning cloths, and they've held up perfectly well so far. 

My ongoing findings revolve around discovering different uses for them. For example, I was recently given a large bag of figs which I planned to make into jam (pictured above). I processed the figs, many of which were already soft and mushy, and used the bowl cover to keep the fruit flies (which my kitchen is plagued with) at bay until I had time to make the actual jam. 


Would I make these again?

Absolutely! It was a very pleasing project and the outcome is genuinely useful. 

Friday 4 November 2022

Free Pattern Friday: Kid's Raglan Hoodie


Welcome to my monthly 'Free Pattern Friday' feature, where I road test a free sewing pattern or tutorial: sometimes a children's one, sometimes an adult's one . I publish these posts every first Friday of the month, timed to provide inspiration for those who plan to get their sew on over the weekend. I firmly believe that, if you pick your projects carefully, sewing doesn't have to be a crazy-expensive way to clothe yourself and your family. I also firmly believe that pattern designers deserve to be properly paid for their work, so if you enjoy using a pattern and can afford to do so, make sure you support that designer. Some designers' websites offer the option to make a donation, alternatively you can buy one of their paid-for products. If you can't afford to do so, you can support the designer by sharing your project via social media to help draw more attention to their work. Thanks to all the amazing pattern designers who have offered up their hard work for us to enjoy for free.


This is a pattern that I've been harping on about a lot lately whilst making the Sewing and Saving mini series of podcast episode (in particular Sewing on a Budget and Sewing to Keep Warm). This pattern is a fantastic resource to have if you want to sew some cosy layers for kids. I first reviewed this pattern for the Free Pattern Friday series when my little boy was just a year old. And before that I posted about it when my daughter was equally tiny. But since then, Brindille & Twig have started producing patterns for larger kids and with that have released a larger version of this pattern for free download also. I was looking for a pattern to make for my son for his birthday, so I decided to give this new, larger version a whirl and test out its new hood option as well. Massive thanks to Melissa from Brindille & Twig for sharing her hard work for free.


(image source: Brindille & Twig)


Pattern type:

A classic, gender neutral, raglan sleeved, hooded sweatshirt style with front kangaroo pocket and two hood types (scuba and crossover). 


Sizing info:

The original, smaller version of this pattern (with only one style of hood) is sized between 0 months and 6 years. This version is sized between 6 and 14 years. I usually find that B&T patterns come up a bit large, so I'd really recommend going by the height measurements when selecting which size to make, particularly if you need it for immediate use. My son has just turned 6, but I knew the 6-7 years size would be too big for him. I probably could have used the largest size of the smaller version of the pattern, however I really wanted to try the new crossover hood variation. Subsequently, I printed out the size 6-7 but changed to scale to about 95% as opposed to 100%. 


Fabric info:

B&T suggest medium weight jersey, interlock or stretchy French Terry for the main fabric, but warn that using regular sweatshirt fleece may make it difficult to get over head. The hood and pocket can be lined in jersey, and and the cuff and waistbands require ribbing. 

For Frankie's birthday version, I used some stretchy towelling that was donated to me years ago after a sewing friend had a destash. I used some scraps of ribbing for the cuffs, but didn't have enough for a waistband also so left that off. The hood is lined with very lightweight slubby single jersey. It might look better if it were more opaque, but at least it doesn't weigh the hood down too much. 


Findings:

As ever, this B&T was a great pattern to use. There's a really simplicity and clarity to their patterns that make them very user, including beginner, friendly. Also, I love the layers function so you're not printing out heaps of unnecessary lines in particular. 

The instructions are pretty good. The only real flaw I found was that many of the images of garments with the crossover hood show that the hood has been lined, however, the instructions show how to make it unlined only. It's not a big deal of course, but it did throw me off a little. 

The finished garment came out just as I'd hoped. I'd left off the pocket which made construction quicker, choosing to add a Pokemon patch (Frankie's current obsession) instead. As mentioned before, I also left off the waistband and simply hemmed the bottom edge instead. The length of the body was sufficient to not need to add addition length. If I make another version in the future that includes a waistband, I'll consider shortening the body a bit. 


Customisation ideas:

There are a number of customaisation ideas shown in the images on their website, but they are not explicitly mentioned as far as I can tell. Here are their's and some of mine:
  • add eyelets or button holes and thread a drawstring through the front edge of the hood
  • leave the edges of the kangaroo pocket raw 
  • leave off the waistband and simply hem
  • lengthened the sleeves a bit, then leave off the cuffs and hem instead
  • insert piping into the sleeve seams
  • use contrasting fabrics for each pattern piece, or for just the sleeves
  • add patches, embroidery, decals, prints or appliqué designs to the front
  • insert triangles of fabric into the central hood seam, and possibly down the back, to make a dinosaur hoodie
  • lengthen the whole hoodie to make a hoodie dress
  • make in a lighter weight fabric and shorten the sleeves for a warmer weather version


Would I make this pattern again?

Most definitely. In fact, I'm quite enamoured with some of the customisation ideas above so I might give them a try! I'm so happy that they have created this pattern in a larger size so that I can continue to make hoodies for my kids for many years to come. 

Tuesday 1 November 2022

Ermine + Norma = A Fibre Mood Blouse Mashup


Another of my Autumn sewing plans is a wrap! I'm a big fan of a blouse. Just type 'blouse' into the search box on this blog and you'll see how many of the damn things I've made over the years! They make my usual jeans or dungarees look a bit more grownup and me generally more put together. 


Fabric:

I'd had my eye on this awesome printed viscose for well over six months before I finally gave in and bought some. I bought it from Fabric Godmother (not sponsored but I get a staff discount), but I can't link to it sadly because it has sold out now. 

I'm not a natural print wearer, I guess in part because I predict I'll get bored of a particular one before long. Prints can tie you, stylistically, to a time and place in your life in a way that solids don't seem to. And that can limit the amount of use a garment will see. Which is why I approached this fabric with caution. I had to wait to check that I really did adore it enough to want to put it on my body, rather than to just enjoy like you might a poster on your wall for a while. 

What I particularly enjoy about it the indoors theme of this print! Many prints are floral-based, but I really enjoy the domestic setting and mid-century vibes going on here. It's not dissimilar to my own home! And the design includes lots of colours that I enjoy wearing (rust, mustard, navy and possibly even emerald green). But whilst I'm suitably convinced that I won't for out of love with the design any time soon, I'm not entirely convinced the peachy-pink background colour does anything for my skin tone. 


Patterns:

As I say, I love a good blouse. Fibre Mood magazine invariably has at least one I like in every issue. I missed the availability period of the issue that included the Ermine blouse pattern, however we started to stock it at work as a standalone product. My boss, Josie, decided it was a good candidate for a Dream Wardrobe box. I made the sample garment for that month, so I got to test out the construction and even try it on before committing to making my own. 

My conclusions were: I liked the delicate gathering into the yoke, the size M was too big and the sleeves could be more exciting. So I decided to go ahead with it but made the size S and swapped Ermine's sleeve pattern for the more voluminous piece from the Norma blouse pattern (also by Fibre Mood). 
 

Conclusion:

This blouse, as with anything of course, is not perfect. I don't like how there are two green chairs on the front yoke pieces, and the neckline feels a little too wide, despite picking a size smaller than my measurements would have led me to make. And as I said above, the main colour isn't great against my skin tone. But I do really like this blouse and have enjoyed wearing it a number of times since completion. I think it's going to have a long and happy life in my wardrobe. 

Monday 17 October 2022

Denim V-Neck Jumpsuit: Adult Babygro?


For yonks I've been coveting a denim jumpsuit. A kind of 'uniform' item that I can throw on whenever I can't really be bothered, and just look put-together and casually cool. My main role at Fabric Godmother is ordering sewing patterns, so I'm well positioned to judge the merits of the various options. The question remains however: have I made the most comfy garment ever, an adult babygro, or both?!


Pattern:

After a long hard think which involved a lot of hashtag stalking, I landed on the V-neck Jumpsuit pattern by The Assembly Line to make my jumpsuit dreams a reality. I liked the modern, casual style, but I decided to make some tweaks. Like others before me, I decided to go with buttons to fasten it rather than concealed press studs. I also shortened the bodice length by about 3 or 4cm because I heard it's very long in the body/low in the crotch. I didn't make a toile, but I did muster the patience to baste/tack the main garment together (minus sleeves) before final construction to check the fit. Based on my findings, I chose to make the top part smaller, and slightly closer fitting. I also added patch pockets to the front instead of inseam side pockets to break up the expanse of fabric a bit. 


Fabric:

The fabric I chose for this project is a 9oz mid blue denim made from recycled cotton fibres from Fabric Godmother (not sponsored but I get a staff discount). It also has some stretch content to really double down on the comfort factor. I did a bit of additional top stitching here and there on this garment because I love how after laundering denim fades a bit and the ripples start to show. I absolutely love this fabric and am now eyeing it up in the other colour ways. 


Thoughts:

Yes it is comfy. Yes it looks like a giant babygro. It's not quite the sleak, modern mum-uniform I envisaged but there you go. I've still been wearing it heaps, and having fun layering it under and over other garments. 

Friday 7 October 2022

Free Pattern Friday: Neck Warmers for All


Welcome to my monthly 'Free Pattern Friday' feature, where I road test a free sewing pattern or tutorial: sometimes a children's one, sometimes an adult's one . I publish these posts every first Friday of the month, timed to provide inspiration for those who plan to get their sew on over the weekend. I firmly believe that, if you pick your projects carefully, sewing doesn't have to be a crazy-expensive way to clothe yourself and your family. I also firmly believe that pattern designers deserve to be properly paid for their work, so if you enjoy using a pattern and can afford to do so, make sure you support that designer. Some designers' websites offer the option to make a donation, alternatively you can buy one of their paid-for products. If you can't afford to do so, you can support the designer by sharing your project via social media to help draw more attention to their work. Thanks to all the amazing pattern designers who have offered up their hard work for us to enjoy for free.

You may or may not know that I recently made a two-part mini series on my podcast, Check Your Thread, about sewing and saving. In it I explored both how sewing might save us money AND how we might save money with our sewing. It soon became clear that two episodes weren't enough, and another specific theme of how we might use sewing to keep us warm started to emerge. You can hear that episode from Monday 10th October. So many people in the UK plan to keep the heating off as much as possible this winter in reaction to the dramatic hike in fuel and energy costs. So I looked at garments, accessories and homeware projects we can create to hopefully keep the chills at bay. In the show notes you'll be able to find all the links to everything I mentioned. 

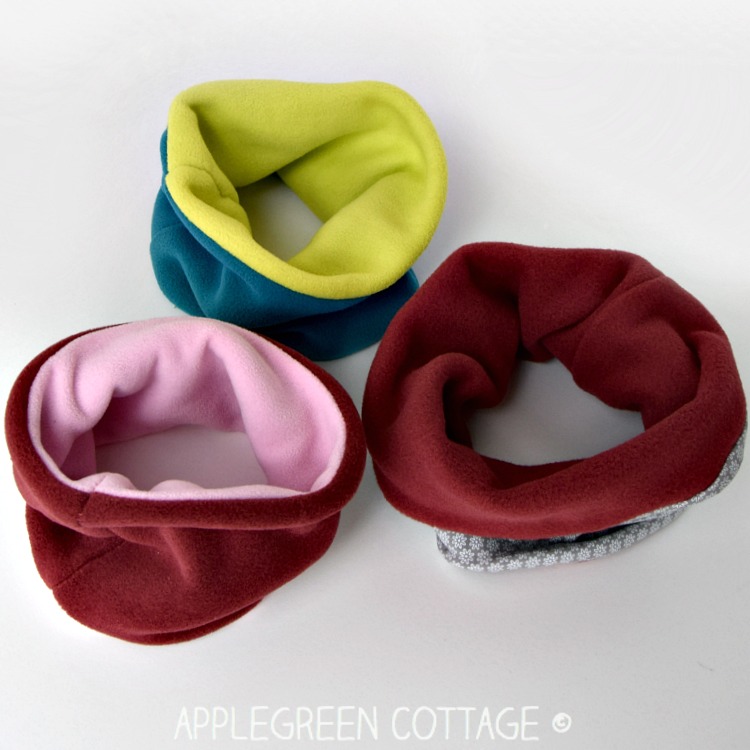
Preparing the episode gave me the nudge I needed to try a project I've had in mind for a while: neck warmers made from upcycled knitwear and sweatshirt scraps. Sometime ago awesome sewing lady Kerry, AKA @kestrelmakes on Instagram, helpfully sent me the link to a template and tutorial that she's previously used with success. It's by Applegreen Cottage, and the tutorial part is in the form of a blog post, but if you sign up their newsletter, you get access to the template (also in the form of dimensions so there's no need to print anything out). Thanks to Damjana at Applegreen Cottage for sharing their work for free. 


(image source: Applegreen Cottage)


Pattern type:

Designed specifically for fleece, this is billed as a basic, reversible neck warmer that is suitable for beginners that can be sewn on a regular sewing machine.

Sizing info: 

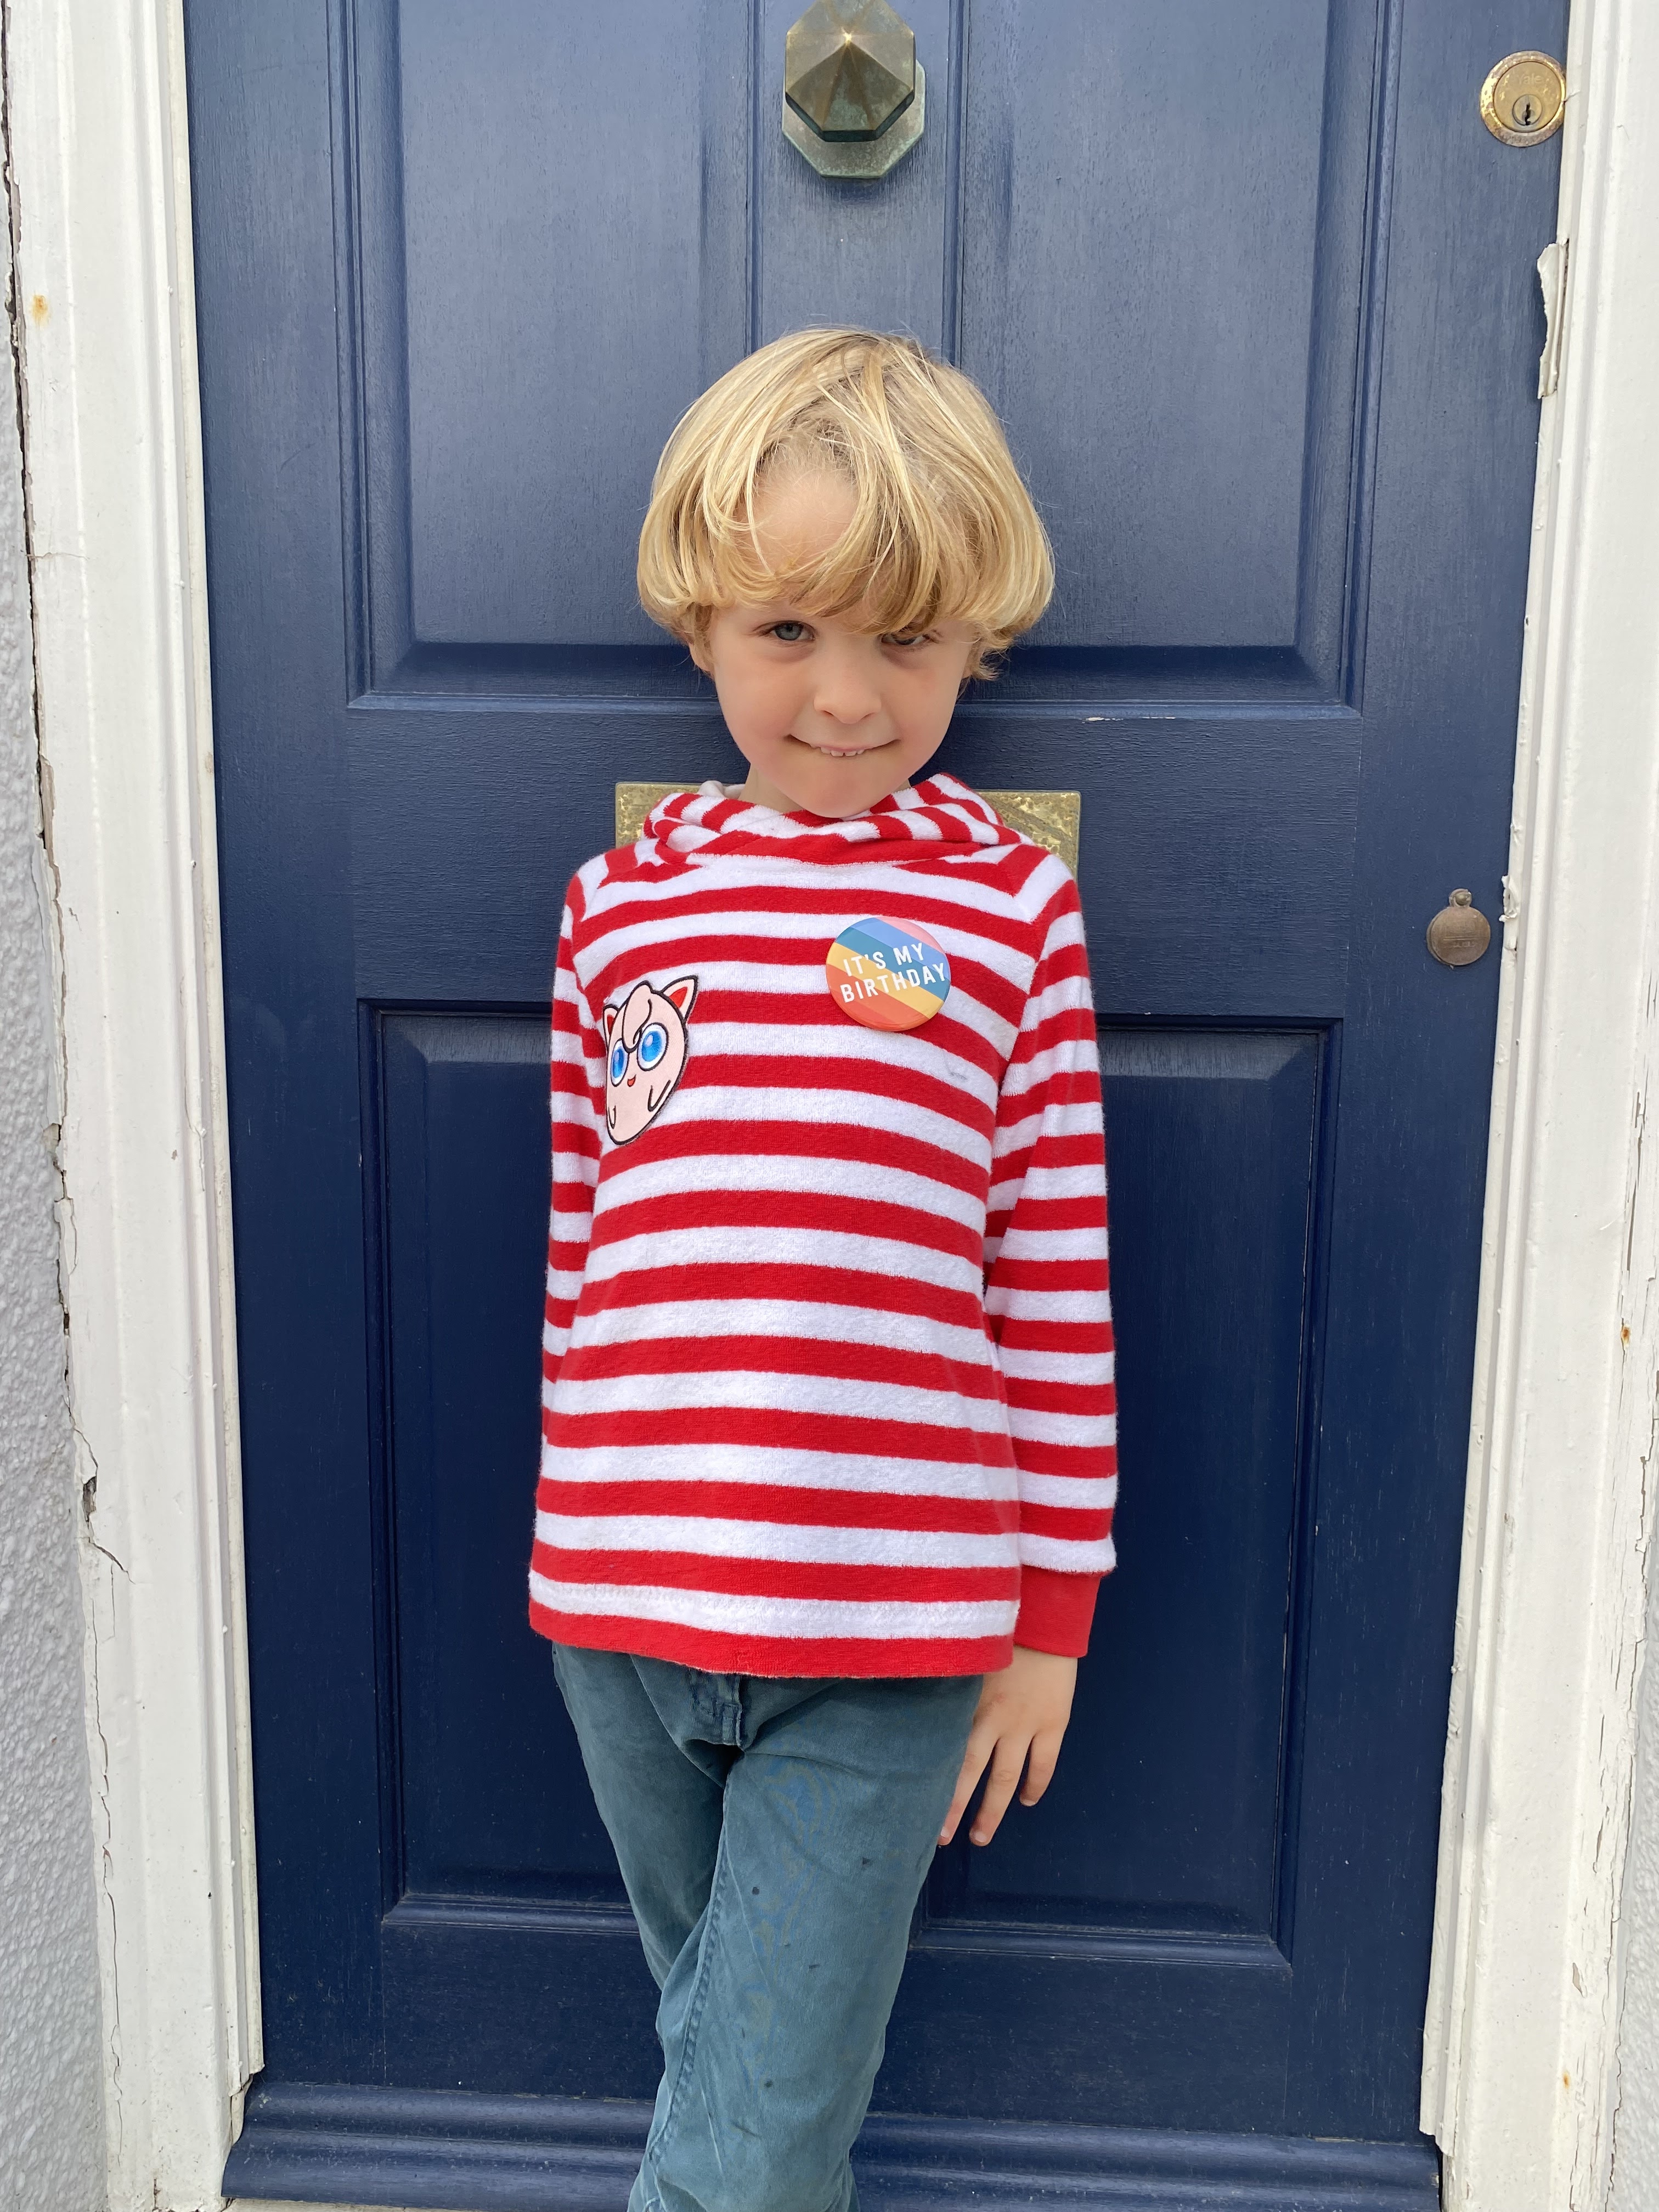
There are three measurements/templates included: Toddler (1T - 3T), Child (4 - 10 years) and Teen/Adult. I made the child size for my daughter (who is nine) and it fits her well. I tried it on my son (who just turned 6) before cutting his out, and decided the Child size would be a bit big, so I made his the midway between Toddler and Child sizes. My own is the Adult size. I haven't managed to get a photo of me wearing mine yet, but it's fine, if a little loose, which I think is related to the just of fabric I used. 


Fabric info:

The supplies list for this project specifies fleece fabric for this project, but one of the versions photographed on the site used jersey for one half which they recommend for not so chilly days. I've been seeking out uses for my stash of moth-eaten and felted knitwear and scraps of sweatshirt fleece, so that's what I used for mine. Plus, I want to encourage people to find uses for their own unworn knits and scraps as a more sustainable approach. In the same vein, I want to discourage people form buying new polar fleece because it is made from synthetic fibres (i.e. fossil fuel extraction plus lack of biodegradability). But if you have some unwanted, tatty fleece garments, this could be a good way to extend the use of the fibres already in existence. 

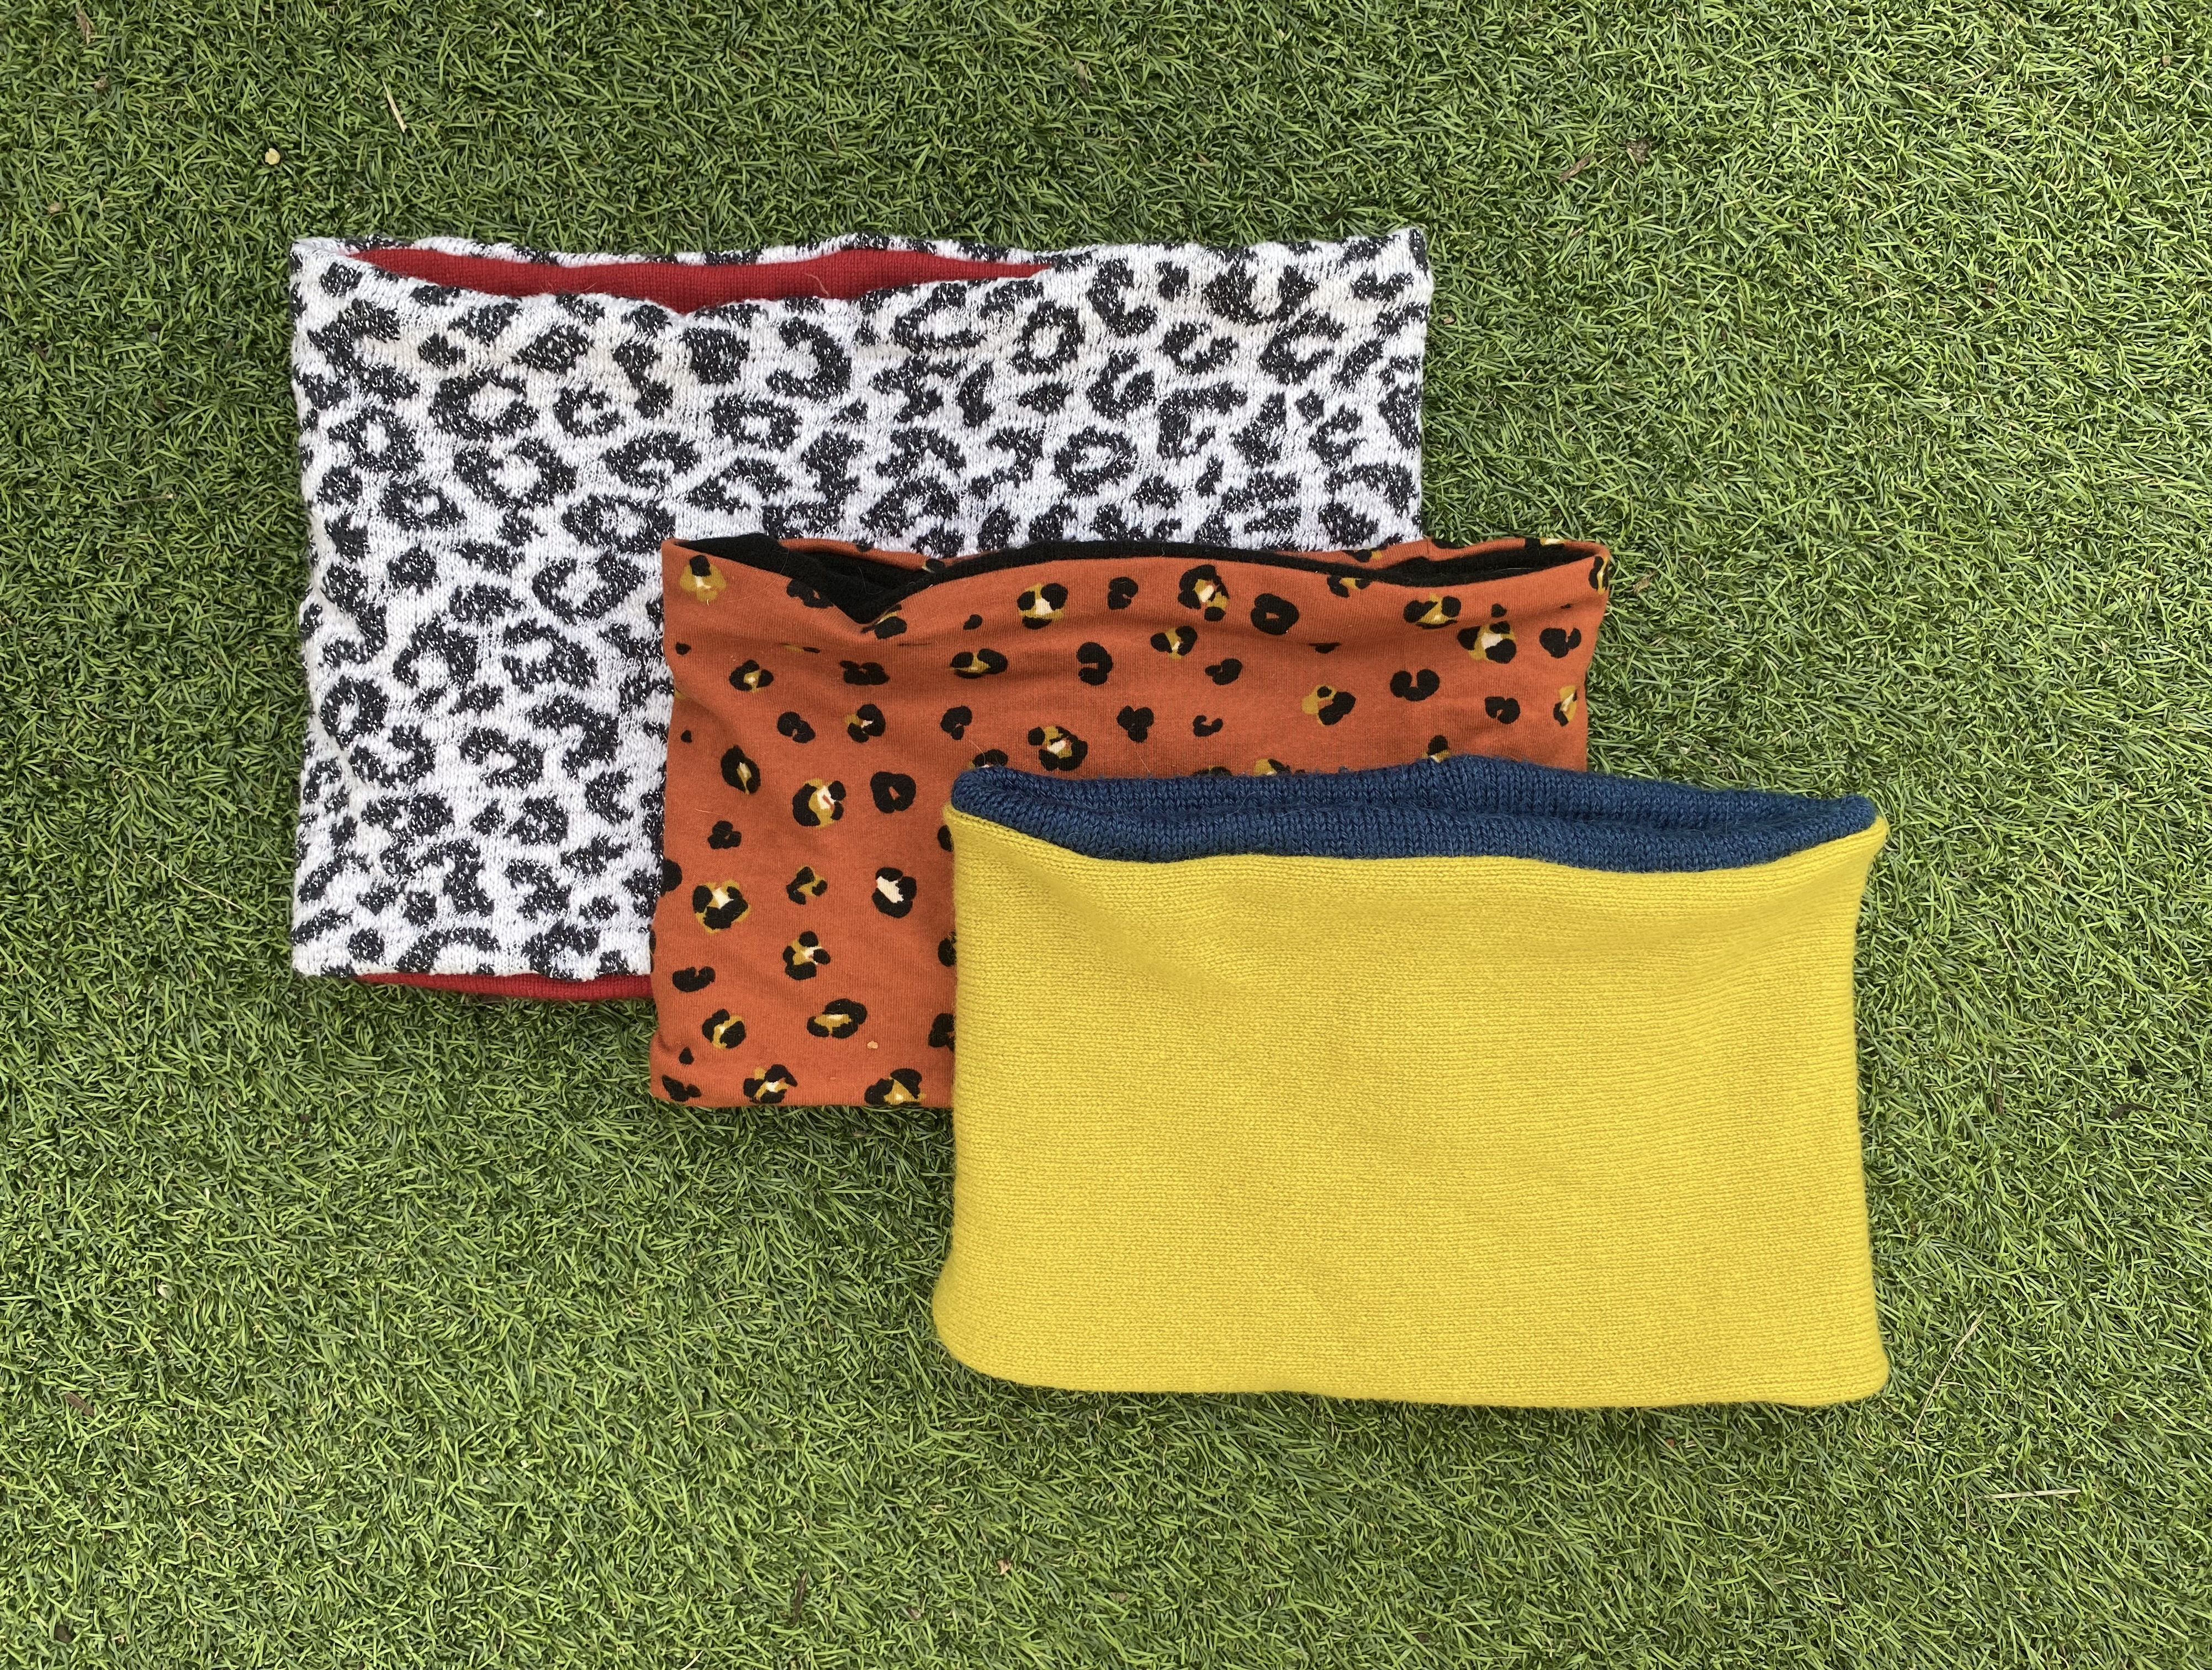
I encouraged my kids to pick their own materials from my stash. Lola chose a scrap of leopard print sweatshirt fleece and plain black knit harvested from a misshaped old wool jumper. Frankie chose blue knit harvested from a felted old wool jumper of his dad's, and chartreuse knit harvested from a moth-eaten wool jumper I've been slowly dissecting for years. For mine, I used some leopard knit from a damaged jumper donated to me by my friend Ilana, and some red knit harvested from another moth-eaten jumper. I had to cut sections of the red and piece them to avoid the holes. I could have cut it in one piece and stitched up the holes, but moth holes really creep me out. I once discovered a knitted hat that basically disintegrated in my hands due to moth larvae...

Unsurprisingly, the looser knits create more drape-y and looser neck warmers, and the tighter knits (particularly the sweatshirt fleece, and I imagine polar fleece) stretch the least and retain the original dimensions better. 

Findings:

The tutorial is simple and well explained, albeit on one of those blogs that bombards you with ads from ever angle. Getting access to the template was a bit pointless, because the finished dimensions are given in the tutorial, plus the seam allowances, so working out the dimensions to cut for the pieces wouldn't exactly be difficult to calculate, and the download offers nothing else. However, I understand that this is a transaction: free tutorial in exchange for joining their mailing list. 

The finished neck warmers are great and very useful. Both kids wore theirs repeatedly during the chilly week that followed the creation of these. I think they make a lot of sense for kids because they can't get unwound, caught up in some way, or dragged along the floor like kids' scarves so often seem to. I've been wearing mine a lot around the house, which has been great since I got my hair cut short and I can no longer rely on it to keep my neck warmer. 

This project has great scrap busting potential, and I love how you can easily tailor these to the recipient with the choice of colour, pattern, fibre and fabric choice. They would also make wonderful gifts that are super speedy to make. 


Customisation ideas:

  • Alter the dimensions to make them deeper/narrower or looser/tighter. 


Would I make this pattern again?

Absolutely. I'd consider changing the dimensions a bit to either exaggerate the cowl or create a tighter, less draft-y warmer, but I'm already thinking about who I know that might need one of these to get them through the winter...


Friday 2 September 2022

Free Pattern Friday: Walk The Plank PJ Bottoms for all!


Welcome to my monthly 'Free Pattern Friday' feature, where I road test a free sewing pattern or tutorial: sometimes a children's one, sometimes an adult's one . I publish these posts every first Friday of the month, timed to provide inspiration for those who plan to get their sew on over the weekend. I firmly believe that, if you pick your projects carefully, sewing doesn't have to be a crazy-expensive way to clothe yourself and your family. I also firmly believe that pattern designers deserve to be properly paid for their work, so if you enjoy using a pattern and can afford to do so, make sure you support that designer. Some designers' websites offer the option to make a donation, alternatively you can buy one of their paid-for products. If you can't afford to do so, you can support the designer by sharing your project via social media to help draw more attention to their work. Thanks to all the amazing pattern designers who have offered up their hard work for us to enjoy for free.


(image source: Patterns For Pirates)

Right. This is now the third time I've posted about the Walk The Plank PJ bottoms pattern by Pattern for Pirates. The first time was having used the pattern to make PJ bottoms in a variety of lengths for my little cuties. The second time I used it to make sleep shorts for my daughter, but highlighted in that post that this pattern is also available in adults' sizing. Well, today I'm posting about both the adults' and kids' versions, now that I've just used both. A big thanks is due to Patterns for Pirates for sharing this awesome, useful pattern for free. 


Pattern type:

These loose and comfy PJ bottoms are described as a super easy, pull-on style with elasticated waist and no side seams. This is basically a one-piece pattern! Both the kids' and adults' versions come with three length options: shorts, knee-length and long. The adult version also includes different leg measurements for the long length, and two waist heights/rise lengths according to preference.


Sizing info: 

The kids' version of this pattern is graded between 3 months and 14 years (17.5" to 34" hip), and the adults' goes from XXS to 3XL (33" to 58" hip). My hip measurement is about 40" but I chose to make the L (41"-43" hip) because my current jammie bottoms are feeling a bit tight and I didn't want to risk recreating that with these pairs. Unsurprisingly, they have come out about a size too big! My daughter is currently between the sizes 8 and 10, so for the tie-dyed versions pictured here that I made the 10 so she has plenty of room to grow into them. 


Fabric info:

The pattern specifies non-stretch, woven fabrics such as flannel (AKA brushed cotton) and cottons. I really think you want to stick with 100% natural fibres for these. Quilting cottons on the softer end of the scale (like these food print and anchor print fabrics), or cotton lawn would work really well. My daughter's were made from an old cotton bed sheet that we tie-dyed at home. Some parts of the bedsheets fabric are more worn, and therefore thinner, than others!


Findings:

As I concluded in my previous post, this is a simple sewing pattern that would be suitable for beginners, or a pleasingly quick and useful make for more experienced sewers. The instructions are clear with photos for each step. The only parts of this pattern that I would change are based mainly on personal preference rather than any faults or flaws. For example, in the instructions for this pattern the waist elastic is attached by zigzagging or overlocking it to the raw edge around the waist, then turning the elastic under and zig-zag stitching through all the layers to secure it in position. My preference is to create a channel to feed the elastic through, with the elastic overlapped at the ends, which is what I did instead. I like to do this for a number of reasons, but mainly because I can let the elastic out a bit at a later date when my kids' waist measurements increase.

Now that I have made both kids' and adults' versions, I can also conclude that the sizing is accurate for comfy PJ bottoms! In fact, the long length might be the comfiest jammie bottoms I've ever owned. I would say, however, that the shorts version for adults came out quite balloon-y, and not just because I got the size wrong. I think the wide legged style doesn't work so well in that length, so I'll probably use a different pattern for adult PJ shorts in the future. 


Customisation ideas:
  • Disregard the specified length of short-shorts, knee or full lengths, and try board-shorts or capri lengths too (or just make them as long as your fabric will allow!). 
  • Applique contrast knee patches.
  • Use jersey fabric instead of woven to push the comfy factor off the chart!
  • Spilt the pattern piece to include a side seam and add in-seam pockets, or to fit the pattern pieces on an awkward shaped piece of fabric. 
  • Add patch pockets to the front and/or back. 
  • I'm sure you don't need me to suggest this, but download the adults' pattern too and make matching PJs for everyone in your family. 


Would I make this pattern again?

Absolutely! For both myself and my kids. 


Related Posts Plugin for WordPress, Blogger...