Monday 25 July 2016

Cordelia Maternity Camisole Pattern: On Sale Now!!!!


It's here! My latest PDF sewing pattern which has been designed to help women who are in one of the trickiest points in their lives to dress for: the third trimester of pregnancy! The Cordelia maternity camisole is a potentially invaluable addition to a maternity wardrobe. Suitable for wear in hot weather, as a layer in cooler weather, to sleep in or to wear to pregnancy yoga, this simple strappy top accommodates your bump with side gathers but feels super secure with a snug hem band. AND the pattern includes an optional bust support panel!


As a pregnant lady currently in the third trimester, I know first-hand how useful these camisoles are! During the heat wave the UK is having at the moment, a Cordelia camisole is pretty much the only thing I can stand to wear. In fact, I'm wearing one as I type this.


This sewing pattern comes in a digital format. When you buy the Cordelia maternity camisole pattern, you will receive both print-at-home and copy shop versions of the pattern, the print-at-home version consisting of just 14 pages, as well as detailed instructions on all aspects of how to use this pattern and make the garment.


The Cordelia maternity camisole pattern is suitable for almost all levels of sewing experience. It is recommended that you have a couple of garment projects under your belt already, however the clear instructions include lots of tips for using both knit fabric and fold over elastic (which is used for the straps and binding the top edges) if those elements are new to you. A handy single-page version of the instructions has also been included for those with a lot of sewing experience, or as a reminder for when you make your second and third etc. versions. For further information, including how to purchase it, please head to the Cordelia Maternity Camisole page!


Enormous thanks to Claire for all her help making this pattern into a product, both Cordelia and Sian for fit-modelling, and Cordelia for final product modelling also, a host of amazing pattern testers, and to Girl Charlee for sending me fabric to make samples from. I used their white stitched arrow on blue jersey (pictured above) and red and blue triangle stag jersey (pictured below).

Wednesday 20 July 2016

Tame Your Fabric Stash!

(image source: Cora)

For anyone who is interested in taming their fabric stash, help has arrived! I've been a bit out of the loop recently due to moving house and Dolores deciding she no longer needs to nap, so I have no idea how widely reported the new fabric stash app, Cora, has been amongst the sewing community to date. So I'm going to pretend that you haven't heard about it yet. Its developer, Hélène Martin, contacted a number of sewers including myself earlier this year about her new fabric stash app project. She was asking if we had any ideas about what we'd like from such a thing, and also if we'd like to trial her beta version. Well, trialling, feedback and a couple of rounds of updating have now taken place, and now it is on sale for use on iPhones, iPods and iPads for $6.99.

I'll be honest, if I hadn't been offered the opportunity to play about with it for free, I probably wouldn't have bothered. Although I love the idea of getting my stash into some semblance of order so I can get some serious stash busting done, I'm not the most technically minded and pretty time-poor these days, so I might have assumed that it wasn't worth investing the time to working it out. If that scenario had played out then it totally would have been my loss. First up, Cora is SUPER easy to use, barely any investment in time was required to get it up and running even though I'm in no way an avid app collector or user. And secondly, I have genuinely found it to be awesome in a number of ways.

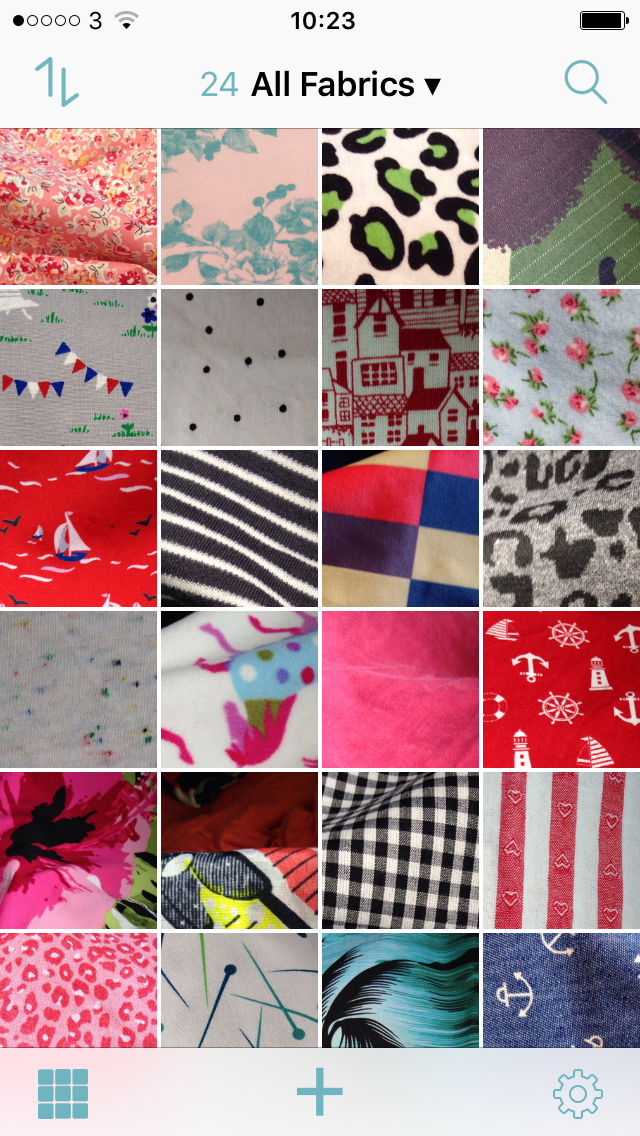
But I'm getting ahead of myself, I should explain a bit more about what Cora actually is. This app allows you to catalogue your lengths of fabric by taking a photo and inputting information about them like width, length, if it's pre-washed, fibre content, main colour and lots more. All the info you add, as well as being potentially useful references, can also be used as filters to help you search through it all. You can add a lot of info (including super detailed stuff like where you bought it and on what date) or barely anything if the visual is the most important thing for you, and I really like that you can add 'Notes' on each piece which I have been using to add a reminder to myself about what I intended to use each piece for. Aside from knowing how much I have of the damn thing, remembering what I had planned for it is my biggest stumbling block when trying to use my stash.

(A tiny chunk of my fabric stash. Don't judge.)

I'm not going to lie, the initial inputting of your fabric is a bit time consuming. But once it's in there you can update it easily, for example, if some of it gets used or you have a new idea for what to do with it. Whilst I was packing up my fabric stash for my recent move I added about one bin bag's-worth of fabric into the app, which took quite a while and only amounted to 24 pieces (see image above), about one tenth of my total stash of fabric, scraps and refashionable garments! However, I'm some happy to have those catalogued, and I regularly go into the app to look at them and mull over what they should become. Even with that small chunk catalogued (along with recently having to pack and unpack it all!), I feel much more in touch with what fabric I own.

I can imagine that many people might find the app useful when shopping for sewing patterns to see if they already have something suitable to make it in. Me? I'm finding that it's making me feel more accountable for the vast amount of fabric I own, even though I've only catalogued a small section of it so far. If I'm serious about busting my stash and deploying the lovely pieces I own to make useful garments for myself and my children, then I have to actually start using the damn stuff. And I really think that this tool will help me actually do that. Currently, the app doesn't have a function for telling you how much you've used up in a given period of time, but just knowing that I have 24 pieces of fabric catalogued is making me think that I need to use at least two pieces of stash fabric per month if I'm ever going to make the smallest dent.

As you may have noticed, I feel pretty strongly about everyone, myself firmly included, using existing materials where possible over buying new stuff every time in every aspect of life. I just don't think our planet can support the level of consumption of goods and materials that most Western people (once again, sadly, myself firmly included) are currently engaged in. And fibre growth then fabric production, processing, dying and transportation is a real damaging industry. Aside from being heaps of fun, I really hope that this app will help many of us who like to sew to increasingly turn to what we already own more often than we currently do.

What about you? Have you tried Cora? Do you have any other successful method for tracking your fabric stash? If so, are you diligent at updating it? How has tracking and/or cataloguing your fabric stash altered your relationship to it?

Friday 15 July 2016

Refashion Friday: The Refashioners 2016!!!

(The Refashioners 2016! image source: Makery)

Ohmygoodness! SUCH exciting times. The Refashioners challenge, brain child of the wonderfully creative Portia, is back this year with a new theme: JEANS. A quick explanation: a selection of amazing sewing bloggers (and me) have been asked to refashion/rework/remake/reinvent some jeans, and their creations will be revealed on Portia's Makery blog throughout August. There is also a community challenge where anyone can submit a jeans refashion, and may well snag an ENORMOUS bounty of sewing-related prizes.


My part in this challenge is pretty much done: I've refashioned my heart out and submitted my blog post and images to Portia. My post will appear with the rest at some point in August, but I'll blog about it and link to it over here once it's gone live in case you'd like to take a look. Obviously, those of us taking part in the blogger challenge are pretty much sworn to secrecy until our posts publish, but I don't think I'm spoiling anything by saying that the above three pairs of jeans don't look like that anymore! It's going to be beyond exciting to see what the other bloggers AND THEN the whole damn sewing community come up with. There's going to be some seriously interesting, creative and inspirational projects being shared, of that I have no doubt. The unwanted denim of this world is no longer safe!

What about you? Are you going to be taking part in one form or another this year? Have you refashioned jeans before? What did you make and was it a success? Have you seen any other fabulous jeans refashions IRL or on the interwebs that've inspired you? 

Saturday 2 July 2016

Five Genuinely Useful New Baby Makes #5: Knit Hat


Here’s the final (sniff) instalment of this legendary series of blog posts. I may well have saved the best for last as well. This project is insanely cute but it can be whipped up in the last half an hour before you need to leave for the baby shower! As with all these projects (check out the previous ones #1, #2, #3 and #4), it’s a chance for you to pick some fabric that reflects the style preferences of the parents (or just yourself!), rather than having to opt for the ubiquitous pastel pink or blue that’s found in most baby sections of a department store. I'd just like to thank The Village Haberdashery for allowing me to repost this blog post, as well as the others, over here. On with the tutorial…


Step 1: Cut a rectangle of knit fabric (we used the Andover jersey knits in Peony) 42cm wide X 38cm high.


Step 2: Fold the rectangle in half so that the shorter sides match up, with the right sides of the fabric facing each other. Pin round the three raw edges (there’s no need to pin the folded edge) whilst leaving a gap of approx. 6cm along one of the shorter edges (see the chalk marks in the image above).


Step 3: Stitch round the three edges where you just pinned with a 1cm seam allowance. Pivot at the corners so you get nice sharp right angles (see image above). Don’t forget to leave that gap!


Step 4: Trim away the two corners where you pivoted to within 2mm of the stitching.


Step 5: Turn the rectangle through the gap so that the right side of the fabric is now facing outwards. Use pin or something pointy to tease or poke the four corners out so they are nice and neat. By hand, slip stitch the gap closed.


Step 6: Push one of the short edges up inside to meet the other.


Step 7: Turn up the bottom edge to make a brim of approx. 4cm deep. Optional: make a couple of stitches at either side at the top of the brim to keep it in place.


Step 8: Pinch each corner to make ‘ears’. Push the needle through each ‘ear’ (see image above) then wrap the thread tightly round it a few times before knotting the thread.


Ta daaaaaa! Now, quick, get to the baby shower or you’ll be late and there’ll be no cake left. 
Related Posts Plugin for WordPress, Blogger...