Showing posts with label The Village Haberdashery. Show all posts

Monday, 29 May 2017

Ice Cream Cranes


So now that I think of it, this dress is already about 18 months old. When I made it, Dolores seemed to have a sufficient amount of dresses so I made it in the size above what she wore at the time. Now that she fits it, her wardrobe seems to be even larger. Note to self: stop making Dolores clothes for a while.
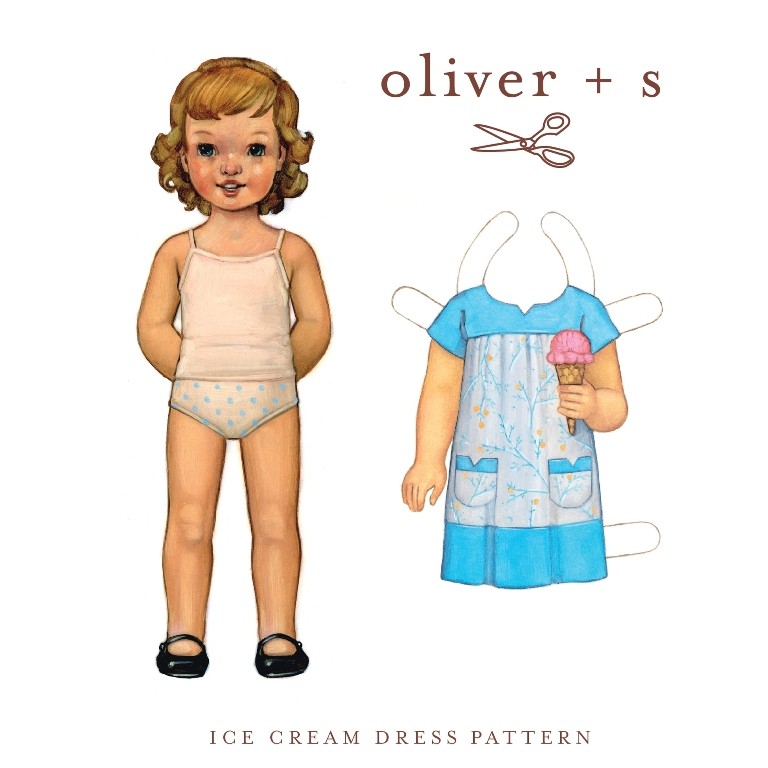

Pattern:

As an adult, I find the question 'What would you like for Christmas?' really tricky to answer. Well, fairly recently I realised I could just respond 'sewing stuff'. A couple of years ago, that 'sewing stuff' took the form of a couple of Oliver + S children's sewing patterns, including this one. Oliver + S patterns are beautiful things, always very well designed with excellent instructions, but also quite pricey so not something I'm flush enough to buy regularly myself. I chose this one because, unsurprisingly, I'd seen lots of lovely versions on the interwebs. 


Like all Oliver + S patterns, I think the Ice Cream dress one has some lovely proportions and details, like the gathers joining with the yoke running along the kimono sleeves and the little notch at the neckline. Also, like all Oliver + S patterns I've tried so far, this one took a bit longer to make than I think a children's garment should take, but I felt like I'd had a little sewing lesson and picked up a new technique or two by the end of it. I made the size 3, and I decided to not bother with the contrast yoke or hem band as my fabric was already busy enough.


Fabric: 

Do you ever have a piece of fabric that's burning a hole in your stash? By which I mean: you love it and it's totally something you'd use, but for some reason, the right project for it evades you for ages. I think this is some fancy Cloud9 quilting cotton that was everywhere for a while a couple of years ago. The Village Haberdashery had a garment made from it in their window display one day when I was teaching there, and I mentioned that it I thought it was amazing. That class I was there to teach was the last one before I went on maternity leave to have Dolores, and Annie (owner of VH) was incredibly sweet and gave me a metre or so as a gift when I said goodbye. 


Like most quilting cottons, it was very easy and enjoyable to sew with. I'd say that its stiffness is at the outer limits in terms of what is suitable for this sewing pattern though. If I were to make this pattern again I'd probably choose something a little softer and more flowy. 

I choose a scrap of white and navy polka dot cotton from my stash for the cute pockets, which I think looks more fun and unusual than a solid contrast. 


Thoughts:

When we took these pictures, it was too chilly to wear summer dresses, so we were layering it with tights and long-sleeved t-shirts underneath. I love that, despite being made of cotton, this dress is versatile enough to be worn 3/4 of the year! I'm also a big fan of the tiny pink button I found in my stash that echoes the pink moons in the fabric print. If Dolores didn't have too many clothes already, I'd be very tempted to make lots more of these. I'll probably make another in the next size up...

Cost:

Fabric: £0 (a gift from VH, sadly no longer available)
Pattern: £0 (also a gift, but can be bought in PDF form here for $15.95, approx. £12.45)
Total: £0

Saturday, 2 July 2016

Five Genuinely Useful New Baby Makes #5: Knit Hat


Here’s the final (sniff) instalment of this legendary series of blog posts. I may well have saved the best for last as well. This project is insanely cute but it can be whipped up in the last half an hour before you need to leave for the baby shower! As with all these projects (check out the previous ones #1, #2, #3 and #4), it’s a chance for you to pick some fabric that reflects the style preferences of the parents (or just yourself!), rather than having to opt for the ubiquitous pastel pink or blue that’s found in most baby sections of a department store. I'd just like to thank The Village Haberdashery for allowing me to repost this blog post, as well as the others, over here. On with the tutorial…


Step 1: Cut a rectangle of knit fabric (we used the Andover jersey knits in Peony) 42cm wide X 38cm high.


Step 2: Fold the rectangle in half so that the shorter sides match up, with the right sides of the fabric facing each other. Pin round the three raw edges (there’s no need to pin the folded edge) whilst leaving a gap of approx. 6cm along one of the shorter edges (see the chalk marks in the image above).


Step 3: Stitch round the three edges where you just pinned with a 1cm seam allowance. Pivot at the corners so you get nice sharp right angles (see image above). Don’t forget to leave that gap!


Step 4: Trim away the two corners where you pivoted to within 2mm of the stitching.


Step 5: Turn the rectangle through the gap so that the right side of the fabric is now facing outwards. Use pin or something pointy to tease or poke the four corners out so they are nice and neat. By hand, slip stitch the gap closed.


Step 6: Push one of the short edges up inside to meet the other.


Step 7: Turn up the bottom edge to make a brim of approx. 4cm deep. Optional: make a couple of stitches at either side at the top of the brim to keep it in place.


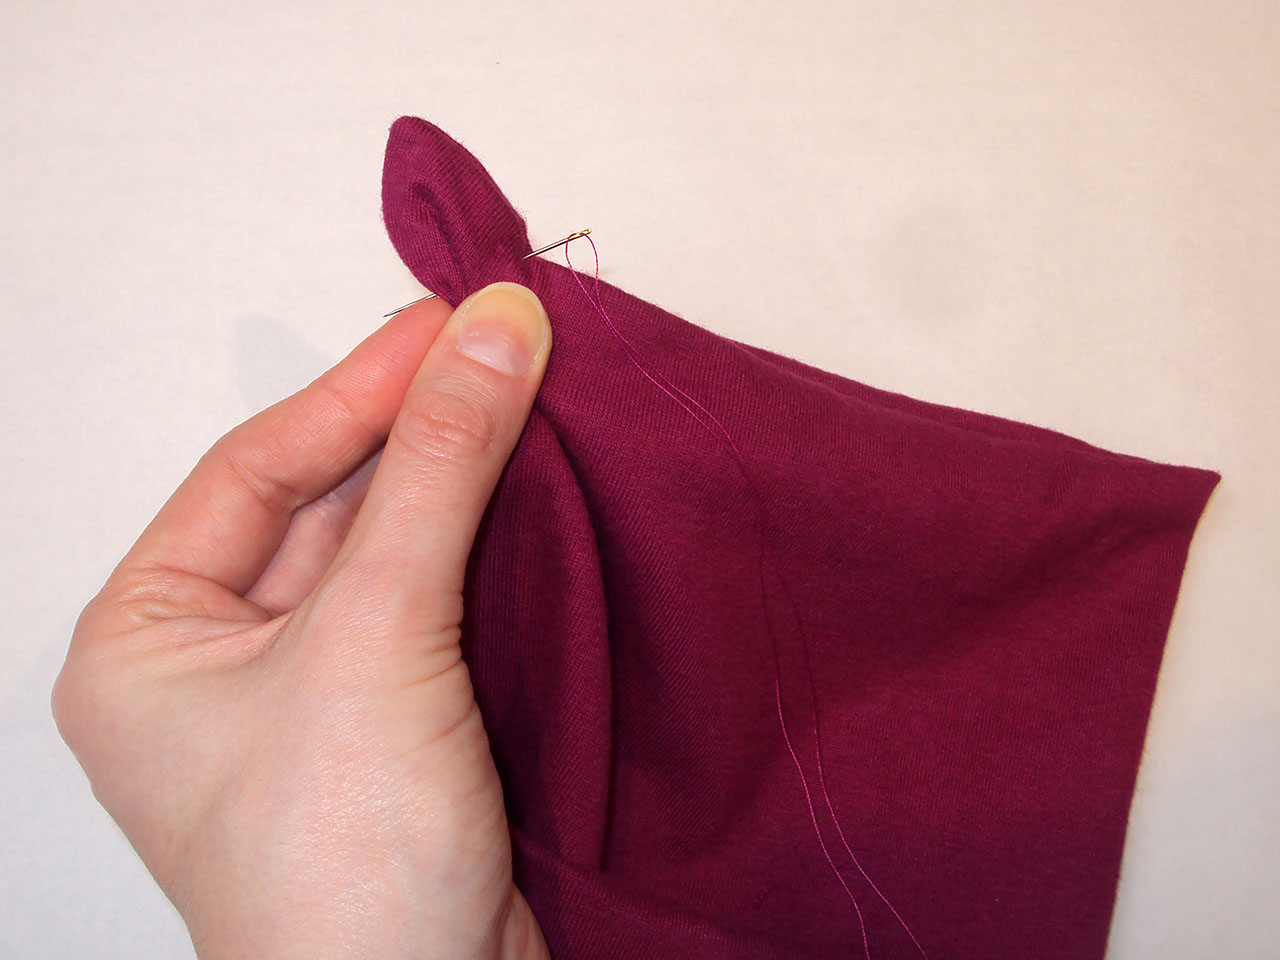
Step 8: Pinch each corner to make ‘ears’. Push the needle through each ‘ear’ (see image above) then wrap the thread tightly round it a few times before knotting the thread.


Ta daaaaaa! Now, quick, get to the baby shower or you’ll be late and there’ll be no cake left. 

Tuesday, 7 June 2016

Five Genuinely Useful New Baby Makes #4: Dribble Bibs


Now that the fun of Me-Made-May is over for another year, it's high time I got back to my mini series of blog posts offering ideas for those wishing to make some cute gifts for a new baba. This post first appeared on the Village Haberdashery blog 'The Daily Stitch'. Thank you to them for allowing me to repost it here. 

My fourth project suggestion is dribble bibs. These natty neck accessories are designed to catch some of the crazy-amount of dribble and small possets that will come from a baby’s mouth. These are not the same as the kind of bibs that babies wear to catch the mess when they start to eat solid foods at around six months of age. Dribble bibs are needed much earlier in the baby’s sartorial life and play a major role in cutting down the number of outfit changes the baby will require throughout the day. 

Why should you make dribble bibs? Because it may feel to the parent that, even if they owned all the bibs in the world, they still might not have enough. My daughter could get through eight a day when at her dribbliest, and in fact still wears one most days now she’s 2 years old. I’m going to show you how to make a cute neckerchief-style dribble bib that is both super-absorbent, and is adjustable in size so it’ll be useful for a long time. And once you get the knack of making them, you can set up a little production line and make a stack in different fun fabrics.

You will need:
Paper and pencil to draft a basic pattern
30cm knit fabric (jersey or interlock), which tends to be more absorbent than woven fabric (this rainbow plush jersey can be found here)
30cm medium weight cotton (brushed cotton/flannel are ideal), for adding body to the bib
30cm soft, fluffy fabric (micro fleece, toweling or velour), as a further barrier and feels nice if the bib touches the baby’s skin
matching thread
2 X press studs/poppers (poppers that attach with a clamp have been used here, but sew-on press studs are fine as long as they are securely stitched on)


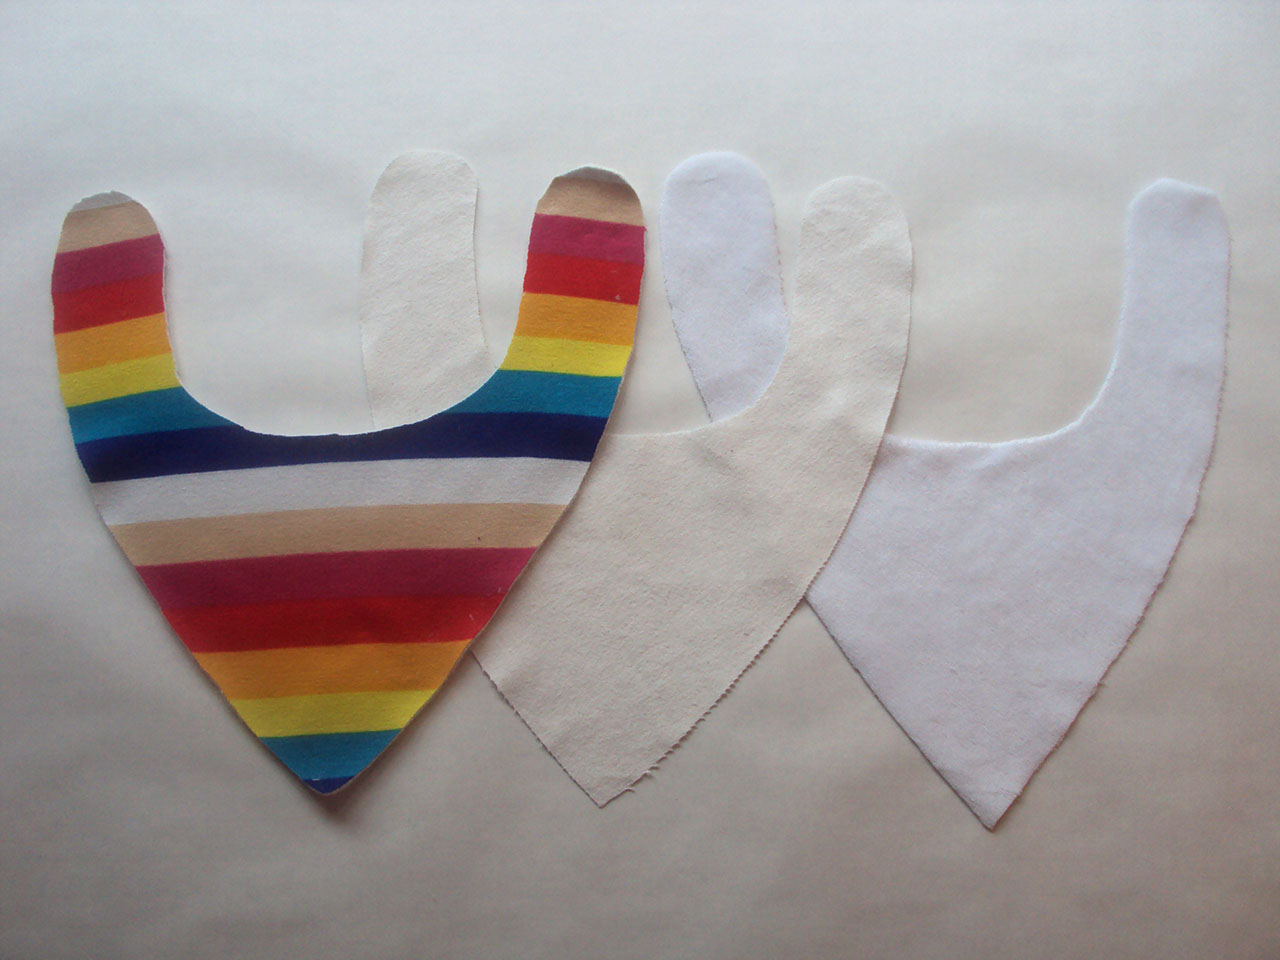
Draft a simple bib pattern shape like the one above. Mine is 28cm long and 12cm wide (which will be doubled when cut on the fold) including 6mm / ¼” seam allowance. (pic3)


Cut out three bib shapes on the fold:
1 X top layer in knit,
1 X middle layer in cotton,
1 X bottom layer in fleece, toweling or velour


Place the middle/cotton layer down on the table. Next, position the top/knit layer on top of it, right side facing up. Finally, position the bottom/soft layer on top of that, right side facing down. Pin the three layers together.


Stitch round the edge, leaving a gap of approx. 4cm / 1½” for turning the bib through. (PLEASE NOTE: I have used a contrasting coloured thread here for clarity, however it is advised that matching thread is used). Check that you have stitched through all three layers all the way round (excluding the gap). Re-stitch over any areas where one or more of the layers didn’t get stitched through initially.


Trim the seam allowance leaving 3mm / ⅛” all the way around, except at the gap. This is particularly necessary around the tight curves. Trim away the seam allowance at the point of the bib close to but not through the stitching. This reduces bulk inside the bib when it is turned through.


Turn the bib through so the knit fabric and the soft fabric are on the outside and the cotton layer is hidden inside. Use a pin to gently tease out the fabric at the point.


Tuck the seam allowances inside the gap and pin it closed.


Top-stitch round 3mm / ⅛” from the edge. Give the bib a press.


Apply two sets of press studs/poppers at the ends, 4cm / 1½” apart.


Ta dahhhh! One jazzy dribble-catcher complete.

Thursday, 24 March 2016

Five Genuinely Useful New Baby Makes #3: Drawstring Bag

(image source: The Village Haberdashery)

Hi everyone! I’m a little late in my monthly instalment of my 'Five Genuinely Useful New Baby Makes' series of posts (originally published on the Village Haberdashery's beautiful blog 'The Daily Stitch').  But fear not, I'm back to state my case for another genuinely useful new-baby sewing project. 

This one, at first glance, may not scream ‘new baby’ to you, but hear me out. When my daughter was almost brand new, a friend (blogger Handmade Jane, to be precise) gave us a drawstring bag similar to this that she had made. We have used it, in one way or another, almost every day since she gave it to us. Almost every day for two years! That’s a lot of days. Nothing we were given or bought for Dolores has been used so consistently, which is why I suggest you make one the next time someone you know reproduces.


‘Well, how is a drawstring bag useful for a baby then?’ you may be asking. Well, from my experience, the use of ours has changed a bit, as Dolores has got older. This next sentence requires a graphic description warning: when babies are tiny, they do lots of wees and runny poos, which oftentimes leak onto their clothes. A parent attempting to leave the house with their baby for more than an hour without at least one entire outfit change is, quite frankly, a fool. We used to keep our drawstring bag loaded with a change of clothing at all times. It was useful to keep the change of clothing in a separate bag, as the changing kit would sometimes get transferred between the main changing bag that lived on the pushchair and her dad’s backpack for when more outward bound type travels were being attempted.


Now that Dolores is a toddler, the drawstring bag is still useful for changes of clothes that are, thankfully, these days usually required due to mud or food-based mess. It is also really useful for chucking in just a nappy, pack of wipes, a drink and snack for mini trips out.


Convinced of their worth as a new-baby sewing project?! Good! Well, I guess the next question is how to make one. For this one, I decided on what the final dimensions should be and kind of made it up as I went along. I was pretty pleased with my efforts because all the seam allowances are enclosed which gives a nice neat finish. But there are heaps of tutorials and how-to’s out there each with their own variation. This tutorial by Quilting Bees looks like a good contender, IMO, but a simple Google search for ‘lined drawstring bag tutorial’ will bring up heaps of other options.


Perhaps even more so than the baby trousers or baby shoes, with this project you can really go to town with your fabric choices. We used some 100% organic Cloud9 cotton called Whimsical Wood  from the Sweet Autumn collection, which was complimented by some solid lilac cotton for the lining. And you needn’t hold back with the trims either, as the simple addition of a row of ribbon, ricrac or braid like this neon pom pom trim used here, are easy to apply and can really make your project pop. I’ve seen some fantastic garments and craft projects via Pinterest recently that combine delicate ditsy floral fabrics with a POW! of neon, which was the inspiration behind this bag. What fabric and trims would you pick?


Saturday, 6 February 2016

Five Genuinely Useful New Baby Makes #2: Elastic-back Shoes


Hello! If you’ll indulge me, it’s time to have a look at my second monthly suggestion for something to make for a new baby that will actually get used. Massive thanks again to the Village Haberdashery for allowing me to repost this that was originally posted on The Daily Stitch.


Let’s face it: there are few things cuter on this earth than a pair of baby shoes. No doubt, the new parents will be given a clutch of baby shoes (what is the collective noun for shoes, anyway?), but if you heed my advice, yours make will stand out from the rest. How so? Because the ones you make actually have a chance in hell of staying on the little feet they were made for!


The thing I never realized about babies until I had one is that, when they are awake, babies are NEVER still. Those little arms and legs are always moving. In fact, they even move a fair bit whilst the baby is asleep as well. Any slip-on type shoes will slip right off again, and after a couple of attempts to put them on their baby, the parents will give up and consign those shoes back to the drawer for good. To make sure your pair of shoes stays on (and therefore gets used) my advice is to choose a style that is either elasticated or tied on around the ankle. Hopefully then the baby will wear those shoes for longer than it takes to get a photo!


There are literally hundreds of sewing patterns for baby shoes/slippes/booties/footies available, but the one I used here is a free one via www.poopockets.com (!) that can be found here. It is graded for two sizes, 0-3 months and 3-6 months. It consists of three pattern pieces and you’ll need two types of fabric (outer and lining) plus a small length of elastic. I changed the construction method slightly by choosing to line the back heel section too, plus I used 3/8” wide elastic rather than 1/8” wide as the pattern suggests.


Most of the fun here lies in choosing awesome fabric to make them in (as with all sewing projects, let’s face it!). With the outer fabric, you really can go to town. They can be as cute, kitsch, contemporary, classic or bizarre as you want! We went ‘subtle contemporary’ by picking some gorgeous 100% organic Cloud9 First Light flannel/brushed cotton in turquoise by Eloise Renouf. You only need about 30cm of fabric, so why not pick something really special?


As with the outer fabric, your lining fabric options are pretty broad but make sure that whatever you choose is soft. For this pair, I used a scrap of white felt from my stash, but toweling/terry cloth, sweatshirting, or velour would be great too.


We let the fabric do the talking on this pair, but there’s nothing stopping you from customising your baby shoes with ribbon, braid, ricrac, (very securely stitched-on) buttons, or whatever else your heart desires!

Saturday, 30 January 2016

Scrap-busting Summer Shorts


My goodness that's some pleasing alliteration, isn't it? Since I made the commitment to get to grips with my over-flowing scrap-and-small piece boxes, I've been having lots of fun using some lovely pieces of cotton to make super cute summer shorts for the scamp. But it hasn't stopped there. I've also been making them for other children as birthday gifts and bartering fodder. I've been sharing most of them via my Instagram feed, but these two pairs are my favourites.  


Pattern:

I first made the Dana made it Kid Shorts pattern last summer as a sample for a Village Haberdashery window display. It's a really simple pattern that is graded from 12months to 10 years that has a squillion style variations. You buy the pattern in PDF form, which includes the pattern pieces and cutting guide and pretty much nothing else, all the construction details are to be found on her site. I really like this idea because it is then available for others who perhaps drafted their own pattern or are using another, I think it's pretty selfless to make it available in that way. 


As you can imagine from these images, it is a really basic pattern. It consists of just two pieces (with different length and style options) with a separate optional pocket piece. However, the layout of the PDF has been cleverly thought out with the sizes batched in pairs so you only have to print out the pages you need and no more. If you're looking for a basic kids shorts pattern that will last you for many years (that you could theoretically extend to make trousers from also), this would be my recommendation. The only two minor flaws I can think to mention are, 1) I've found the sizing comes up a bit small, I've been making the size bigger than the age of each of the kids I've been sewing for and that's worked out well, 2) and this is me being ridiculous, but I don't like that the lengths are labelled 'girl' and 'boy'! But that's it. 


Fabric:

I made the size 3 for these two pairs and they really do take a tiny amount of fabric (I chose the shorter/'girl' length, of course!). The spotty fabric was a tiny strip of cotton that I bought from a charity shop in Southend about 9 years ago. I thought it had a Japanese vibe and I'm so glad that I didn't use for anything else like a bag lining in the meantime. 


The tropical pair was squeezed out of two weird-shaped scraps from fabric left over from more Village Haberdashery window display sample making. FYI, the garment I made was this awesome Kim dress that you can see Annie wearing here. Isn't she the very picture of summer?! Dolores, on the other hand, reminds me of a toddler-Hunter S Thompson with the vest and socks! Sadly, it looks like this tropical fabric is no longer available. If you're interested, it might be worth contacting them to see if they will get some more for this summer, it is divine. 


I added a cute little label so we can quickly tell which is the back using woven ribbon from my blog sponsor Textile Garden

Thoughts:

I'm officially obsessed with making these shorts. Check out the Instagram hashtag #kidshortsmade to see loads of amazing versions other people have made. However, Dolores now has enough shorts lined up for this summer, so I need to complete the pairs I've cut for the other kids and turn my attentions elsewhere. I'm sorely tempted to start making her pairs for summer 2017, but she'll be out of nappies by then so the size 3 might last her more than one summer...


Cost:

Pattern: £0 (I was sent it to make samples from, but it can be purchased here for $8. I have used this pattern seven times so far and am not finished by a long shot)
Fabric: spotty fabric 50p, tropical fabric £0
Label ribbon: £0 (I was given some sample lengths but you can find Textile Garden's woven ribbon selection here from £1.25 per metre)
Elastic, thread and bias binding: £0 (from the stash and I'm pretty sure I didn't pay for the elastic or thread originally anyway)
Total: spotty pair = 50p, Tropical pair = £0

Thanks so much everyone who chimed in with how I should cost my makes (that I was discussing at the bottom of this post). There were quite a few differing opinions so I can't adopt all suggested approaches, so I'm going with what makes the most sense to me whilst providing as much info as I can for others who are considering making something similar or buying the pattern etc. For patterns that I pay for, I'll divide the cost with the amount of initial makes, and then divide the cost further if I make more things from it if I blog about those as well (and of course note the full price paid). I'll share how many times I've used the pattern and if I think I'll use it again or not. I have decided to include the price of fabric and notions from my stash if I can remember or accurately estimate what I paid for them. Sound fair?

Wednesday, 27 January 2016

Teach All The Classes!

(Tilly and the Button HQ's breathtakingly lovely workspace features a distractingly impressive view of the London skyline)

So I've finally created a 'Sewing Classes' page. Anyone who's interested can now easily see what sewing and dressmaking classes I'll be teaching in the near future, rather than having to head to the individual websites of the places I teach at to see what's up.

(It's arguably the perfect shift dress pattern, want to make one at The Village Haberdashery?)

I teach at four location: two in London (Tilly and the Buttons HQ and The Village Haberdashery) and two in East Sussex (MIY Workshop and Fabric Godmother). I've only listed the classes that aren't sold out at time of writing, and I'll try to update the page regularly to add newly scheduled classes and remove the ones that are either sold out of have been and gone. Each class listing on the page includes a link to where you can find more info, including how you can book up.

(everyone's bust creating awesomeness at MIY Workshop)

I love each of these establishments, they each have a very different feel. The Village Haberdashery and Fabric Godmother include the benefit of being able to gaze at (and buy from) two of the finest selections of fabric in the UK. Whilst Tilly and the Buttons HQ and MIY Workshop are genuinely two of the most creatively inspiring spaces I've had the pleasure to hang out in.


So if you happen to live in the south east of the UK and are looking to learn how to sew, or to improve your existing skills (or you want to see what I get up to whilst Pat and Dolores drink too much coffee and apple juice respectively and hang out at the park), then please check out my new 'Sewing Classes' page! And in case you are interested in booking a class taught by me, please know that I make excellent tea and coffee. Fact.

Related Posts Plugin for WordPress, Blogger...