Showing posts with label shorts. Show all posts

Friday, 4 August 2023

Free Pattern Friday: Siem Shorts for Kids


Welcome to my monthly 'Free Pattern Friday' feature, where I road test a free sewing pattern or tutorial: sometimes a children's one, sometimes an adult's one. I publish these posts every first Friday of the month, timed to provide inspiration for those who plan to get their sew on over the weekend. I firmly believe that, if you pick your projects carefully, sewing doesn't have to be a crazy-expensive way to clothe yourself and your family. Thanks to all the amazing pattern designers who have offered up their hard work for us to enjoy for free.

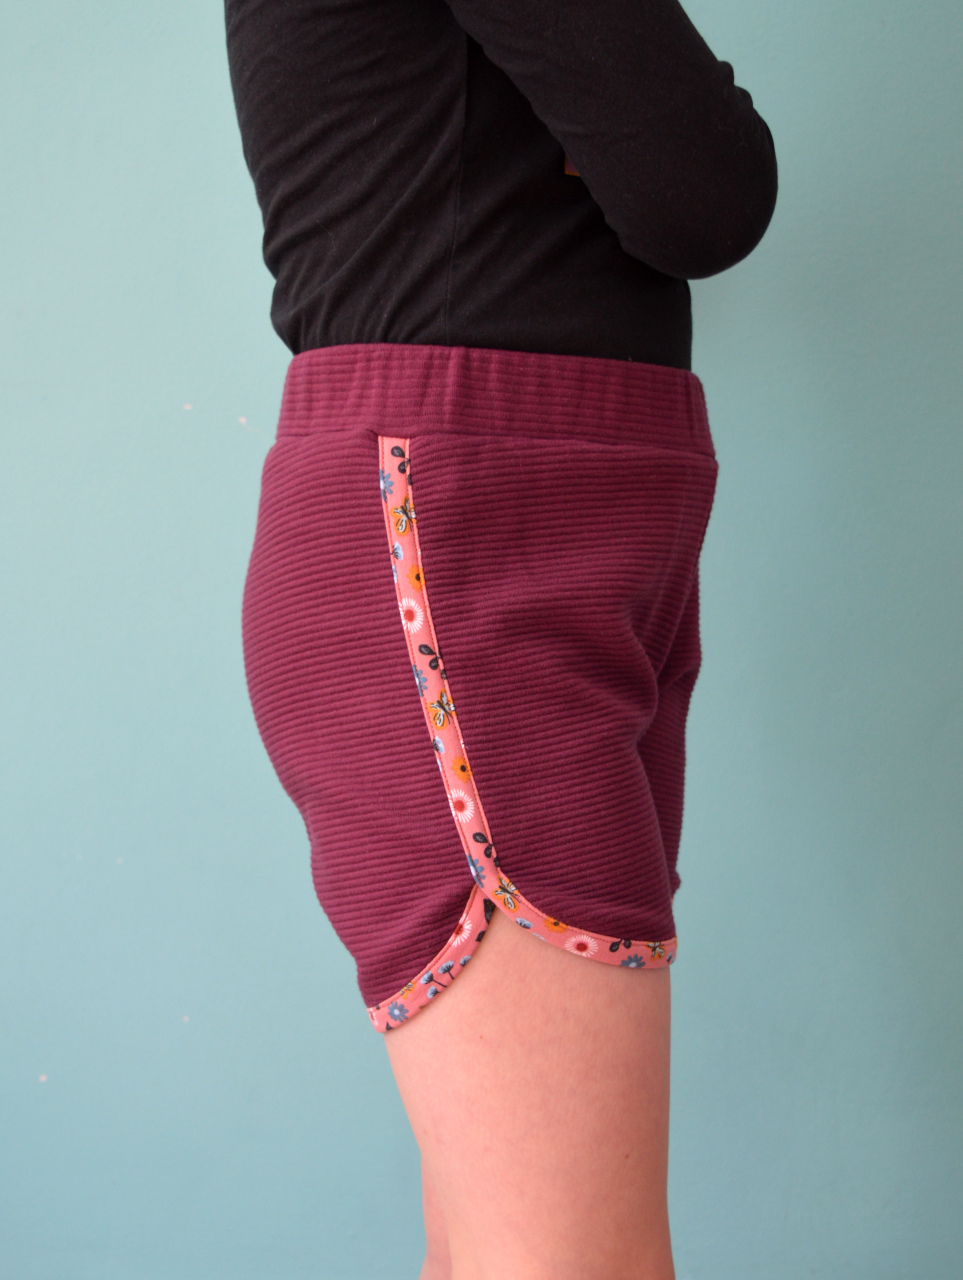
This month I'm returning to a pattern that I have made and loved previously. It's a unisex shorts pattern designed for knit fabrics called the Siem shorts pattern (pronounced 'seam') by Bel'Etoile patterns. I reviewed it two years ago, and I have been wanting to make it again ever since. I really love the retro stylings, plus it's a fantastic way to use up smaller amounts of knit fabrics that aren't suitable for undies making. Let's get into my experience this time round....
 

Pattern type: 

The Siem shorts pattern is a retro style designed for knit fabrics. The pattern consists of three pieces: front, back and waistband. Plus you need binding (preferably stretchy) to finish the edges. 

Sizing info:

This pattern is graded between a generous 98cm (approx. 3 years) and 164cm (approx. 14 years) which I really appreciate it. I made the size 152 this time, going by my daughter's hip measurement as opposed to her height, and the sizing is pretty perfect. 


Fabric info:

Fabric types that are listed as suitable for this pattern include jersey, ponte roma, french terry and sweatshirt knits. This is such a fantastic pattern for using up scraps and leftovers from other projects, so as long as the knit is pretty stable and isn't too light-weight it's probably worth a try. Last time I made and reviewed this pattern, I declared that I'd love to make these in a classic retro towelling or velour knit. My wish was granted when I found this discarded small remnant of pink velour at work. The burgundy pair are made using scraps of ponte roma that have been hanging around in my stash for a couple of years. 

The pattern calls for 'stretch bias binding' for finishing the edges. That's not a super common item to find in fabric shops or haberdashers, plus I'm still participating in the Last Sewist Standing challenge so I can't buy new sewing supplies at the moment anyway. So for the pink pair I used strips of white cotton ribbing (the kind that's sold for cuffs and neckbands). For the burgundy pair, I chanced my arm with something a bit thicker, and used a strips of printed french terry. I cut the strips along the DOGS (direction of greatest stretch) rather than on the bias.


Findings:

The pattern and the instructions come in separate PDF files. The pattern is easily obtained via the Bel-Etoile website, with no sign-ups to anything required. I was super happy to find that the pattern file includes the layers function which is great for saving ink, particularly when the pattern is graded to such a generous number of sizes. 

The instructions document was equally user-friendly. The only thing I felt was missing was some advice on making your own binding. It is an easy enough process to do, but the lack of that step in the instructions may cause a beginner sewer/sewist to have a bit of a head-scratch. This time I did remember that SEAM ALLOWANCE IS NOT INCLUDED IN THIS PATTERN. However, it did take me a while to work out that it's not necessary to add allowance to the curved edges. 


So I kind of messed the fit up a bit on these. When I made this pattern for my daughter two years ago, she found them to sit too high on her waist for her liking. This time, I made the burgundy pair as per the pattern and she experienced the same problem again. As before, she kept pulling them down to sit on her hips which resulted in a bunching of excess fabric at the front. So I unpicked the waistband and lowered the waist, particularly at the front. I made the same change to the pattern before cutting out the pink pair (see above for the pattern pieces with the new cutting line drawn in). Except now, as you can see from the picture below, that has resulted in the front rise being too short and a whole world of ugly tightness (*major eye roll*!). 

I think I've also stitched the side seam down too far on the burgundy pair as there's some tightness where the curve begins. I'll probably unpick it a bit at some point. 

But these things are my mistake! Don't let that put you off this super cute pattern. 


Customisation ideas:

Stealing my own ideas from last time:

  • Adding patch pockets to the back
  • Adding front pockets with curved pocket openings and matching bound edges like these 
  • Lengthening or shortening the legs if the wearer has a different preference
  • Applying a cute patch or decal for extra vintage coolness

Would I make it again?

YES! I have to work out how to alter where the waist of these shorts sit on her body without messing up the rise length. But I'd love to make these again in the future if she still likes the style in a year or so. 


Friday, 5 August 2022

Free Pattern Friday: Kid's Olli Shorts and Pants


Welcome to my monthly 'Free Pattern Friday' feature, where I road test a free sewing pattern or tutorial: sometimes a children's one, sometimes an adult's one . I publish these posts every first Friday of the month, timed to provide inspiration for those who plan to get their sew on over the weekend. I firmly believe that, if you pick your projects carefully, sewing doesn't have to be a crazy-expensive way to clothe yourself and your family. I also firmly believe that pattern designers deserve to be properly paid for their work, so if you enjoy using a pattern and can afford to do so, make sure you support that designer. Some designers' websites offer the option to make a donation, alternatively you can buy one of their paid-for products. If you can't afford to do so, you can support the designer by sharing your project via social media to help draw more attention to their work. Thanks to all the amazing pattern designers who have offered up their hard work for us to enjoy for free.

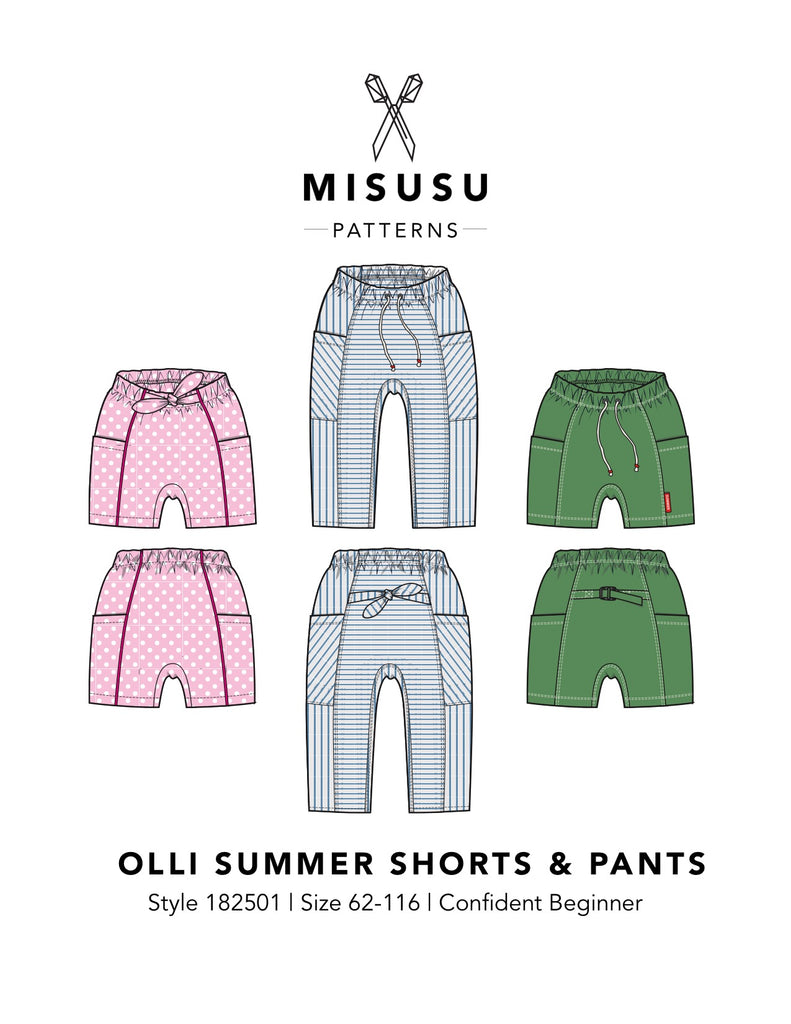
You know how sometimes I post about a free pattern that I road tested years ago, but have come back to because they're great? Well, you know that those patterns are definitely worth taking note of! Today's post is about one of those. I originally posted about Misusu Pattern's Olli shorts and pants pattern three years ago, when my sweet little boy was just two years old. Today he's five, still incredibly sweet, and in need of new shorts. Now he fits into the biggest size this pattern comes in, so it's basically my last chance to sew up and enjoy this excellent free pattern. I've used a number of their patterns, both free and paid-for, and they've all been a real joy to use and dress my kids in. Thanks very much to Misusu Patterns for sharing their hard work for free with this one. To get this pattern for free, you will need to join the Misusu Patterns Sew & Tell Facebook group to access a link that will automatically add the freebie discount code at check out. This pattern is also available to purchase on their site


(image source: Misusu Patterns)

Pattern type: 

The Olli shorts and pants/trousers patterns have a modern, baggy look and feature big side pockets and interesting panels. Pattern pieces for bow or buckle strap details are included, plus there are squillions of ways you can monkey with this pattern to create different looks. 

Sizing info: 

This pattern is graded for sizes 62 to 116, which refers to the child's height in centimetres, and roughly equates to ages 0 - 3 months to 5 - 6 years. I would DEFINITELY recommend going by height and waist measurements rather than age with this pattern. Going by height on both the occasions I made this pattern I ended up making a size smaller than Frankie's actual age, and the fit has worked out really well. 


Fabric info:

This pattern is designed for wovens, and includes cotton, double gauze, flannel, denim, ribcord (needlecord?) and linen as suggestions. This pattern is excellent for scrap-and-small-piece busting. The various panels that make up these shorts means that you can cut the pieces from weird-shaped offcuts from previous projects, or even pieced together from a mix of fabrics that are different colours or prints, but have a similar weight. 
I'd LOVE to make some from African wax fabric, perhaps mixing up scraps of different print designs. 

This pair photographed in this post are made using a small length of quilting cotton. I didn't have enough to concern myself with print placement particularly. The previous pair I made him using cotton/linen mix worked really well, but the black stretch denim version was a tiny bit on the thickness side. Those previous two pairs got use from another child after Frankie though. 

Findings:

This Olli pattern is a really good advert for Misusu patterns. The instructions are so clear and well illustrated, and all the pieces come together flawlessly with everything matching up as it should. I love the look and fit of the finished garments, and it's wonderful to have a pattern that can be squeezed out of leftovers and remnants that you may already own. The basic pattern itself is interesting enough that a fantastic result can be achieved without needing to add anything. However, you can also get super creative and have a lot of fun dreaming up a really unique garment. The gusset panel allows for a lot of movement which I think is really important for kid's clothes. 


Customisation ideas:

Rare is a pattern as customisable as this one! Here's some ideas:
  • Go crazy with your scraps and make a mash up of different prints for each of the panels
  • Alternatively, play around with colour blocking by using two or more solids fabrics
  • Monkey with the rules and ignore the grainlines to make interesting effects using striped, checked or printed fabrics. I'd love to do this with needlecord
  • Add single or double rows of visible, contrast topstitching. 
  • Insert piping, braid, ric-rac or pom-pom trim into the vertical seams
  • Apply braid, ric-rac, lace etc at the back of the top edge of the pocket piece so it peeks out from behind, or stitch it across below the opening of the pocket piece.
  • Add a button and buttonhole or snaps to each pocket so they can be closed up
  • Stitch on ready-made patches, or insert labels or tabs into the seam like I did with this 'Yo Mama Made It' Kylie and the Machine label (pictured above). 
  • Shorten the pants version to 3/4 or 7/8 lengths for capri or clam digger styles. 

Would I make it again?

I can't remember if I used the 4-5 or 5-6 size for the anchor pair, however I'm pretty sure he'll get another summer's worth of wear after this one from these so it'll definitely be worth it to make another pair. I'm going to keep my eyes peeled for leftovers from my forthcoming adult garment projects. 


Friday, 4 June 2021

Free Pattern Friday: Kid's Siem Shorts


Welcome to my monthly 'Free Pattern Friday' feature, where I road test a free sewing pattern or tutorial: sometimes a children's one, sometimes an adult's one. I publish these posts every first Friday of the month, timed to provide inspiration for those who plan to get their sew on over the weekend. I firmly believe that, if you pick your projects carefully, sewing doesn't have to be a crazy-expensive way to clothe yourself and your family. Thanks to all the amazing pattern designers who have offered up their hard work for us to enjoy for free.

Apologies for the disappearance for Free Pattern Friday for a couple of months, My sewing life and online life get pretty crazy on the run up to and during (Me-Made-)May. But the monthly blog feature is back! I'm excited to road test and write about some fantastic and useful free sewing patterns/tutorials. Today's pattern is one I had my eye on to try for a couple of years. It's a unisex shorts pattern designed for knit fabrics called the Siem shorts pattern (pronounced 'seam', I just had to check!) by Bel'Etoile patterns. Bel'Etoile is a Belgium pattern company, and this pattern is available in Dutch and English. Massive thanks to the designer, Isabel, for sharing this wonderful pattern for free. Let's go...


Pattern type: 

The Siem shorts pattern is a retro style designed for knit fabrics. The pattern consists of three pieces: front, back and waistband. Plus you need binding (preferably stretchy) to finish the edges. These shorts would look awesome on boys and girls, and are the perfect summer staple when paired with a vest or T-shirt. 

Sizing info:

This pattern is graded between a generous 98cm (approx. 3 years) and 164cm (approx. 14 years) which I absolutely love. So often free patterns finish at ages 5 or 6, so it's great to have this pattern to come back to year after year. Lola is currently between two of the sizes, so I chose the larger, size 128. Good thing I did because I made the classic move of assuming seam allowance is included in this pattern. Please don't make the same mistake, take note: SEAM ALLOWANCE IS NOT INCLUDED IN THIS PATTERN! I ended up sewing the seams of these shorts on my overlocker without trimming away any fabric and the resultant fit is fine. 


Fabric info:

Fabric types that are listed as suitable for this pattern include jersey, ponte roma, French terry and sweatshirt knits. This is such a fantastic pattern for using up scraps and leftovers from other projects, so as long as the knit is pretty stable and isn't too light-weight it's probably worth a try. I'd LOVE to make these in a classic retro towelling or velour knit. 

For this pair pictured, I used up some scraps of looped back french terry given to me by byGraziela fabrics leftover from another kid's project that didn't make it to the blog. Another colour way can be found here. I think the retro print design suits the vintage style of garment well. You could have so much fun trying out this pattern with solids, prints and striped fabrics with different bindings. 

Speaking of those, 'stretch bias binding' is recommended for finishing the edges. That's not a common item to find in fabric shops or haberdashers, so you'll likely need to make your own binding, as I did. I used strips of cotton ribbing for both the binding and the waistband. I didn't cut the binding on the bias, because cutting the strips along the DOGS (direction of greatest stretch) is more than stretchy enough, and a more economical use of fabric. 


Findings:

The pattern and the instructions come in separate PDF files. The pattern is easily obtained via the Bel-Etoile website, with no sign-ups to anything required. I was super happy to find that the pattern file includes the layers function which is great for saving ink, particularly when the pattern is graded to such a generous number of sizes. Remember: seam allowances are not included!!!! Make sure to add them to your pattern pieces before cutting out. 

The instructions document was equally user-friendly. The only thing I felt was missing was some advice on making your own binding. It is an easy enough process to do, but the lack of that step in the instructions may cause a beginner sewer/sewist to have a bit of a head-scratch. 

As for the finished garment, I wasn't sure I would be able to sell them to Lola because A) she prefers wearing skirts or leggings-shorts to actual shorts for some reason, and B) she's decided she doesn't like wearing pink anymore. However, I asked her to try them on to take a couple of pictures this morning and she hasn't taken them off many hours later, so they must be comfortable. She has a tendency to yank elasticated waist garments down and wear them on her hips, so if I make this pattern for her again I'll most likely lower the height of them, particularly at the front because the fabric bunches up a little. 


Customisation ideas:

I don't have many ideas for this one, however you could try:

  • Adding patch pockets to the back
  • Adding front pockets with curved pocket openings and matching bound edges like these 
  • Lengthening or shortening the legs if the wearer has a different preference
  • Applying a cute patch or decal for extra vintage coolness

Would I make it again?

Frankie doesn't need new shorts this summer because I've been busy cutting off the legs from all the joggers and leggings that he's busted through the knees of to make shorts. However, I can't wait to try this pattern for him next year. I've got some stripy towelling in my stash that will look fantastic, I have no doubt! If Lola truly is convinced by this style, I'll happily make her more pairs too. 

Friday, 5 July 2019

Free Pattern Friday: Kids' Olli Shorts and Pants


Welcome to my monthly 'Free Pattern Friday' feature, where I road test a free sewing pattern or tutorial: sometimes a children's one, sometimes a women's one. I publish these posts every first Friday of the month, timed to provide inspiration for those who plan to get their sew on over the weekend. I firmly believe that, if you pick your projects carefully, sewing doesn't have to be a crazy-expensive way to clothe yourself and your family. Thanks to all the amazing pattern designers who have offered up their hard work for us to enjoy for free.

If you're looking for a summer shorts pattern for younger kids that's more interesting than your standard basic shorts pattern, then if you haven't already, you're going to want to check out about the Olli patternMisusu Patterns have a very generous selection of free sewing patterns in their range, and after a very pleasant experience trying their free Rowan tee pattern, I was very excited to download this one also. To obtain this pattern for free, you will need to join their Facebook group, Misusu Patterns Sew & Tell, to access a code that you can then use at the checkout. Thanks Elles for offering this pattern up for free. 


Pattern type: 

The Olli shorts and pants/trousers patterns have a modern, baggy look and feature big side pockets and interesting panels. Pattern pieces for bow or buckle strap details are included, plus there are squillions of ways you can monkey with this pattern to create different looks. 

Olli Shorts & Pants PDF Sewing Pattern 
(image source: Misusu Patterns)

Sizing info: 

This pattern is graded for sizes 62 to 116, which refers to the child's height in centimetres, and roughly equates to ages 0 - 3 months to 5 - 6 years. I would DEFINITELY recommend going by height rather than age with this pattern. After checking his height, I ended up making a size smaller than Frankie's actual age, and the fit has worked out really well. It might not be such an issue if you live somewhere that is hot for a large portion of the year, as shorts that turn out a bit big will get worn in due course. But where we live, the shorts-wearing window of time is limited to a few months, so I really wanted to make sure I was making a garment that he could wear, like, now.


Fabric info:

This pattern is designed for wovens, and includes cotton, double gauze, flannel, denim, ribcord (needlecord?) and linen as suggestions. Let it be known that this pattern is excellent for scrap-and-small-piece busting. Frankie needed plain-ish bottoms to go with some jazzier tops, so I used leftovers of army green cotton/linen mix from my Burnside bibs, and some black stretch denim leftover from some jeggings. The various panels that make up these shorts means that you can cut the pieces from weird-shaped offcuts from previous projects, or even pieced together from a mix of fabrics that are different colours or prints, but have a similar weight. The versions I've made here are a little dull, but you could really go to town with the prints if you so wished. I'd LOVE to make some from African wax fabric, perhaps mixing up scraps of different print designs.  


Findings:

This Olli pattern is a really good advert for Misusu patterns. The instructions are so clear and well illustrated, and all the pieces come together flawlessly with everything matching up as it should. I love the look and fit of the finished garments, and it's wonderful to have a pattern that can be squeezed out of leftovers and remnants that you may already own. The basic pattern itself is interesting enough that a fantastic result can be achieved without needing to add anything. However, you can also get super creative and have a lot of fun dreaming up a really unique garment.

The Olli shorts and pants are clearly designed to be unisex garments, and initially I printed out two copies in different sizes (this PDF pattern has the layers function), one for Frankie and one for Dolores. However, after making Frankie's, I decided not to use this pattern for Dolores because she's annoyingly, stereotypically gender-minded when it comes to the fit of her clothing, and I know that sadly she wouldn't want to wear a pair of shorts with a baggy fit such as these at this point in time. 

Customisation ideas:

Rare is a pattern as customisable as this one! Here's some ideas:
  • Go crazy with your scraps and make a mash up of different prints for each of the panels
  • Alternatively, play around with colour blocking by using two or more solids fabrics
  • Monkey with the rules and ignore the grainlines to make interesting effects using striped, checked or printed fabrics. I'd love to do this with needlecord
  • Add single or double rows of visible, contrast topstitching. I used regular sew-all thread on the army green pair because I wanted a subtle look, but you could use upholstery or full on topstitching threads for a bolder effect
  • Insert piping, braid, ric-rac or pom-pom trim into the vertical seams
  • Apply braid, ric-rac, lace etc at the back of the top edge of the pocket piece so it peeks out from behind, or stitch it across the pocket piece just below the top edge like on Frankie's black pair
  • Add a button and buttonhole to each pocket so they can be closed up
  • Stitch on ready-made patches, or make your own like I did on the army green pair by using a section of woven ribbon with a cute motif
  • Shorten the pants version to 3/4 or 7/8 lengths for capri or clam digger styles. 

Would I make it again?

A number of months passed between making these two versions, so technically I have already made this pattern again! But I definitely see more versions in the future. I may prep the next size up to have on hand so if I have any suitable leftovers from future projects, I can cut some pairs out in advance of next summer. 

Wednesday, 8 August 2018

The Landers Have Landed


Most of the time, I like to blog about a sewing project soon after completion, whilst the experience of making it is still fresh in my mind. These Lander shorts, however, were tricky to get round to photographing because I've been wearing them so much, they always seem to be in the wash. I eventually got these pics taken a couple of days ago, and if you were wondering what Lander shorts look like when they've been worn almost constantly for two months, then I have your answer right here. 


Pattern:

It's not often that I fall in love with a sewing pattern the very first instant that I become aware of it. Usually, it takes seeing a number of versions pop up via blogs and Instagram before a pattern can fully win me over. However, this one I knew straight away that I had to have it. I included it in my #2018makenine plans at the very beginning of the year, but I didn't pull the trigger and buy it until May, when I was able to take advantage of the #MMMay18 celebration discount codes (I also bought the zipper expansion pack, FYI).

(image source: True Bias)

I'm deeply obsessed with the full length (view C, pictured above) version of this pattern. But with summer then just round the corner, like many other sewers, I decided to make a hopefully-wearable toile of the shorts version as my entry point.

I'd read good things about how this pattern has been drafted, and that many had found that minimal fitting was required. In general, I completely agree, however I did take things slowly and made a number of alterations that I'll share with you now, if you're interested. 


First up, I started by blending between the sizes for my waist and hips, as I so often do. I chose the size 8 for the hips, blending out to a size 10 at the waist. The pattern gives you a sizeable 1" seam allowance on the side seams so you can make any tweaks that you find necessary. At the point of fitting the side seams, the pattern instructions do say that you can't alter the waist measurement during your tweaking, because your waistband will no longer fit if you do. I didn't even look at the waistband pattern piece, much less cut it out, until I had the shorts almost completed with the side seams basted, partly because I wanted the option to alter the side seams at the waist if I needed to. 
I ended up letting my side seams out a straight 1/2" all the way down (effectively giving me an extra 2" all the way around my bootay). I then pinched out about 2cm total per dart at the back to get the waistline to lie nicely against my body (I'm beginning to suspect I have a sway back situation going on). I restitched my darts so that they were curved rather than straight and made this alteration on my pattern pieces for next time. 


The other reason why I didn't cut out my waistband out until I absolutely needed to, was because I had read that a number of people had drafted curved waistbands rather then use the straight waistband included in the pattern. I wasn't sure if that need would apply to me, but after the dart pinching, I was convinced I would also have to redraft the waistband to include a curve if I didn't want it to sit up weirdly at the back. I then hit a bit of a stumbling block; I wasn't sure exactly how much to curve it or on at what point of the waistband to do so. By chance, I saw on Instagram that Josie of Fabric Godmother was tackling the Lander pants pattern at the same time as me. We entered into a discussion and she said that she planned to add the curve just at the back, between one side seam and the other. This made total sense to me; I don't go 'in' around the belly area, so curving the waistband at the front didn't feel necessary. 


So when I finally did draft my waistband, I started by tracing off the original size 10 waistband, minus the seam allowance. Then added the extra at the side seams that I had needed, then I removed the measurement that I had had to pinch out of the back darts, and THEN I added a curve to the back area (between the side seams). I created the curve by slashing down through the waistband and overlapping the slashes at regular intervals, eyeballing the curve that I was forming. I then added the seam allowance to all the edges. It may be worth mentioning that a curved waistband has to be cut in two mirror-image pieces (a waistband and a waistband facing, if you like), rather than in one piece like the original waistband pattern piece.

The other, more minor changes I made to the pattern were: 1) to shorten the length of the hem a little, 2) make the curved topstitching at the fly at little farther out to accommodate my buttonholes (my buttons are slightly larger than the pattern recommends, and 3) to leave off the belt loops as I know I'll never wear these with a belt.


Fabric:

I'm guessing this fabric is a cotton or poly/cotton twill, and its origin and how it got into to my stash are even more of a mystery. What I do know is that this fabric was in two pieces, and has lived in my stash for at least five years. Recently, I had made some vague plans to use it to make some trousers for Frankie, possibly involving some red piping. However, I wasn't sold on that plan as I'm not a fan of kids wearing trousers from fabric that have no stretch to it, so it wasn't much of a struggle to bury that idea and use it for these shorts instead. There was just enough for these shorts if I cut the waistband facing from something else, so in the end I felt that this twill was destined to become these shorts!


I'm a fan of a contrast waistband, so I used a scrap of the koi print cotton left over from the matching shirts I recently made. I used a scrap of black and white gingham to line the pockets, and despite deploying the techniques in the instructions to cut back the pocket lining pieces to avoid them being visible, you can still see peeks of it from the outside around the edges of the pocket if you look closely enough. Next time I'll try to select a pocket lining very similar to my outer fabric.

I chose these metal buttons from my stash because, A) they were in my stash and therefore effectively free, and B), because I thought that, when combined with this khaki twill, it gave a cute nod to a  uniform-y vibe, like the original boy scout shorts that I heard in a podcast inspired Kelli from True Bias to design this pattern in the first place.


Thoughts:

I'm so glad that I took the time to complete all those tweaks and changes carefully, because I think the fit is pretty spot on. They are really comfortable to wear, despite being made from a non-stretch woven fabric, although I might take a tiny scoop out of the front crotch curve on my next pair. Although the waistband curve was eyeballed, I'm very happy with how it fits snuggly around my lower back, and unless a different fabric type or weight loss/gain force me to take the side seams in or out, I'll use the same waistband piece going forwards.  

Although I'm now itching to make a squillion pairs of the full-length Lander pants, I can definitely see another pair or two of Lander shorts getting made for next summer. I've got my eye on a couple of pieces of fabric already in my stash for them, and I'll probably change the fit of the leg slightly to make them closer fitting, hopefully more akin to the image of the Lander shorts on the True Bias website. 


These shorts have also made me entirely reconsider my stance on khaki. I would NEVER have picked this fabric out if I were shopping in a fabric shop, however I have been really surprised by how much of my existing wardrobe this colour goes with. On the back of this discovery, I even got some khaki linen/cotton from the most recent Fabric Godmother open day for another project I've got lined up for the near future. 

Not only am I excited to make the full length Landers next, but I'm also chomping at the bit to try drafting different pocket shapes and styles, have a go at the zip fly, and maybe to play with constrasting topstitching threads. Expect to see more Landers round here before the year is out. 

Friday, 2 February 2018

Free Pattern Friday: Women's and Kids' City Gym Shorts


This is my monthly feature where I road test a free sewing pattern or tutorial: sometimes a children's one, sometimes a women's one (or in today's case, both). I publish these posts every first Friday of the month, timed to provide inspiration for those of you who plan to get your sew-on over the weekend. I firmly believe that, if you pick your projects carefully, sewing doesn't have to be a crazy-expensive way to clothe yourself and your family. Thanks to all the amazing pattern designers who have offered up their hard work for us to enjoy for free.

Today, I'm keeping to the theme of out-of-season shorts projects. Last month I shared my stack of kid's shorts, but today's pattern is sized for women and kids. I would have loved to have made some small ones, but what with all those Sunny day shorts I've made, my kids really don't need any more shorts for the summer, so I've become the recipient of a test pair of Purl Soho's City Gym Shorts pattern


(image source: Purl Soho)

Pattern type:

The City Gym Shorts are a retro, 70's sporty style which have been brought up to date by New York's Purl Soho with the use of fancy fabric. I was unsure if I'd enjoy wearing this style as regular shorts, so I've intended this test pair as sleep wear, which I think this pattern also easily lends itself to. It consists of just three pattern pieces (front, back and waistband) with the edges of the legs bound with bias binding.   

Sizing info:

This pattern is rather generous in that it covers ages 2 to 11 years for kids, and 33" to 46" hip circumference for women. My hip measurement is 39" so I made the 38"-40" and I feel the fit around the hips is spot on. I have yet to wear them properly (what with me making these in winter and all!), so I can't comment fully on the fit at this time.


Fabric info:

I imagine that Purl Soho released this free pattern, at least in part, to promote the fabrics they have for sale, so they link to specific fabrics on their site rather than give generic specifications on fabric choice for this pattern. I think that what you're looking for is a light-to-medium weight, stable woven fabric: cotton is going to be your best bet. It's important to make sure the main fabric has enough body to hold those crisp curved shapes on the outer leg. I've used some thickish shirting for these, but I may make my next pair in quilting cotton. 

The pattern suggests making self bias binding, but I didn't have enough of my main fabric so bought this floral bias binding from my local haberdashery. I recommend doing a Google image search for this pattern to see the many amazing fabric choices and combinations that have been made by other people. 

Findings:

The PDF pattern files are grouped into kids' sizes and women's sizes. The seam allowance is included in the pattern, but I'd already cut out my pieces before I realised it's a scant 1/4". I'd have increased it to 1cm (3/8") if I'd realised sooner. But it was a fun and relatively speedy make, applying all the binding was the most time-consuming and fiddly part. 

The instructions for construction are presented in the blog post, rather than a separate PDF file, which I like because it's easy to access them on a phone as opposed to getting my laptop out. Better for when you can only sew in short spurts of time...

I was hoping that I'd like this style on me enough to be happy wearing it outdoors, however I think for my proportions they aren't the most flattering garment, so I'll keep as sleep wear and pottering-around-indoors wear. 


Customisation ideas:
  • All manner of fabric combos, as I say, just Google 'city gym shorts' to get inspired
  • Add front pockets by altering the front piece to add a pocket mouth, and draft pocket lining and facing pieces
  • Add patch pockets to the bum
  • Lengthen the legs to make them a surf-y, bermuda style
  • Apply a trim, such as pompom trim or lace, around the leg edges. 


Would I make them again?

I'd be surprised if this is ends up being my final dealings with this pattern. I'm waiting for warm weather to see if I feel the rise needs to be altered for me, and then I'm sure I'll make at least one more pair to sleep in/knock about the flat in. And when Dolores has grown out of all her current shorts, I'd love to make some for her. You could go to town using up cute pieces of quilting cotton making these for kids (or adults!). 

Related Posts Plugin for WordPress, Blogger...