Showing posts with label Lander pants. Show all posts

Monday, 7 June 2021

Workwear Denim Lander Pants


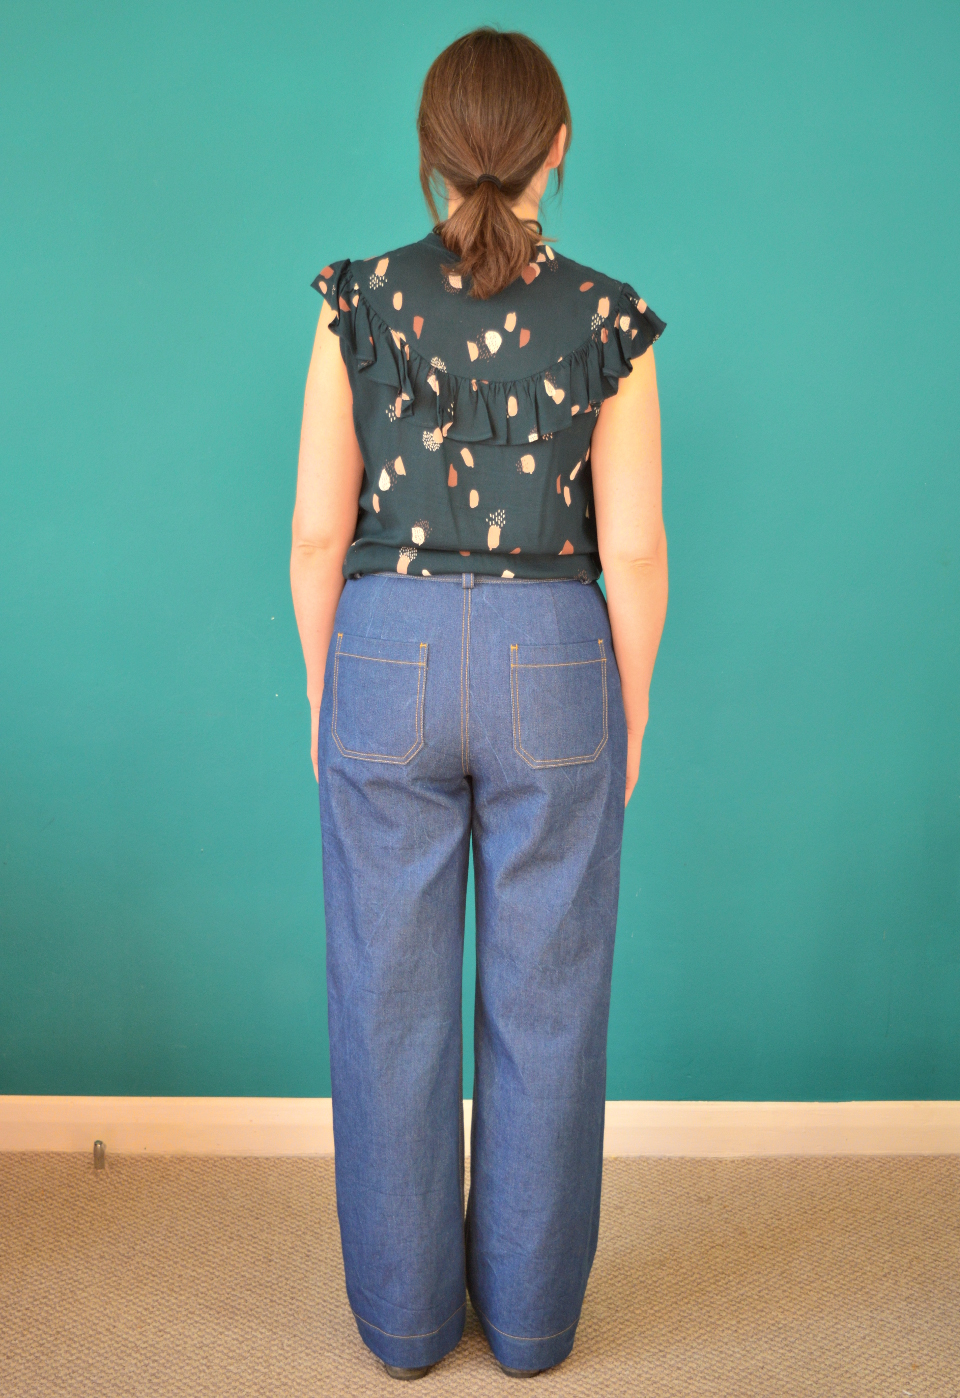
Those who follow me on Instagram may have seen that I've been working on perfecting the fit of the Lander pants pattern by True Bias. Two years ago I made this pair of 70s inspired Landers, and whilst they've seen heaps of wear, they just don't fit my post-lockdown-increasingly-middleaged body anymore.


I've really missed having them as an option in my wardrobe, so I decided to 'go back in' and see if I could make another pair with an improved fit for my current shape. Having finally accepted to myself that I could do with a full-tummy adjustment, I did a bunch of research on various methods and made a couple of toiles. I think I've worked out a full-tummy-adjustment-lite method that is a bit of a mish-mash of methods that seems to work for me. 


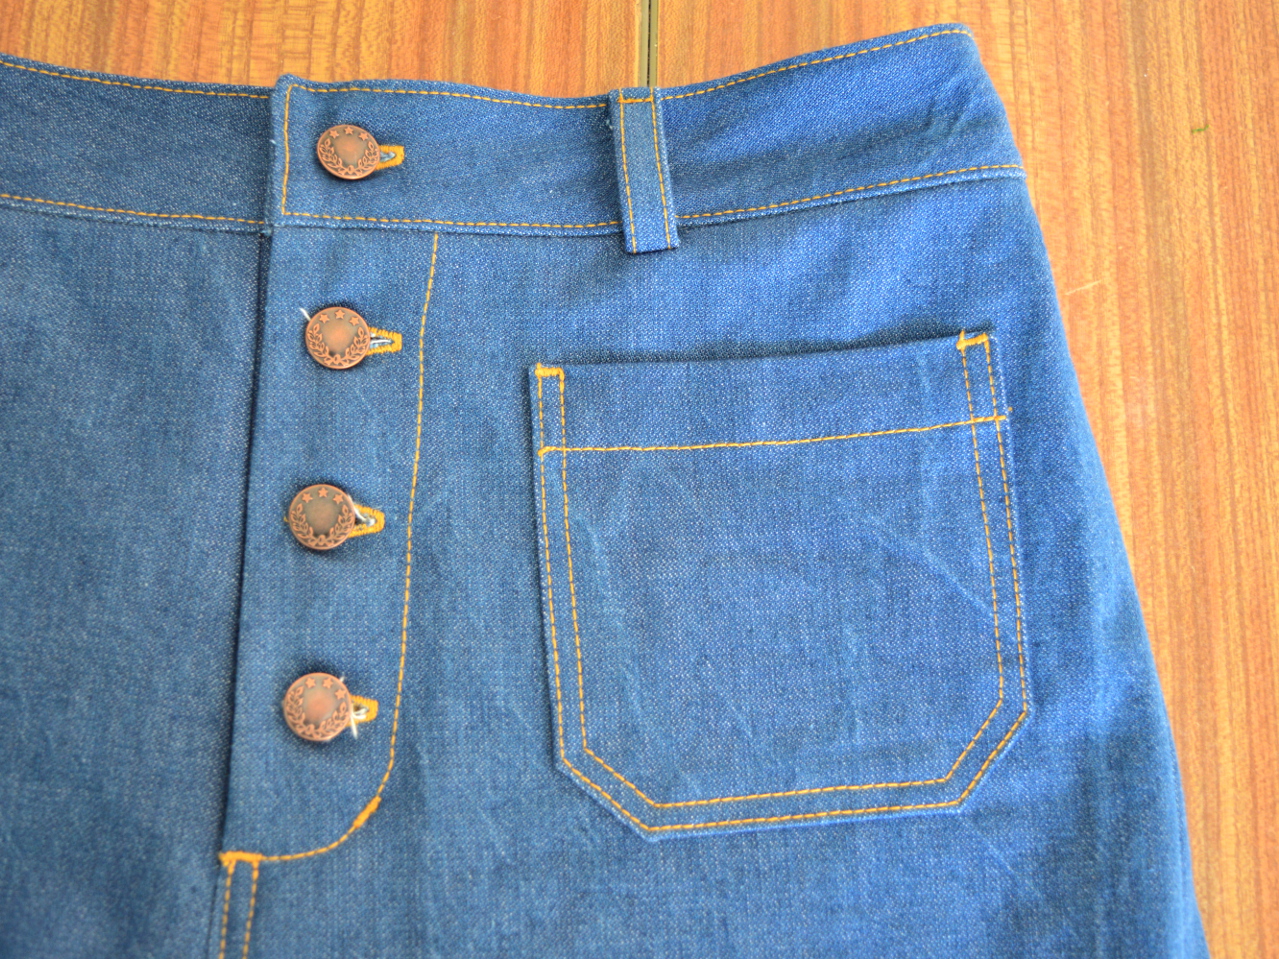
The other adjustments I made to the pattern included scooping out the front and back crotch a tiny bit, and widening the legs at the hem to create a more exaggerated flare. I used the same pocket templates that I worked out for the previous pair. The denim is some gorgeous, sturdy-but-soft workwear denim from Fabric Godmother. Annoyingly, there's some white lines that appeared after my pre-wash. I'm wondering if I could over-dye them out. I've never figured out how to avoid these, if you have figured it out, I'd be very grateful if you'd drop me a quick email!


But back to the fit for a second. Overall, I'm super happy with how these have turned out. Even though the denim has no stretch, I can actually wear these comfortably all day. Even days that I spent largely sitting down. This is a MAJOR breakthrough for me. There's still some slight pooling of fabric at the top of thae back legs under the bum still, but I wonder if these are necessary to actually bend forward or sit down properly. 


My confidence has been having a bit of a wobble recently regarding my changing body shape, and theoretically, this outfit of slim fitting top and high-waisted jeans is highlighting all the aspects of my body that I currently feel self-conscious about. However, I actually really like how I look in these pictures. yesterday I unexpectedly caught a glance of myself in a mirror whilst wearing this outfit, and again I was happy with what I saw. Are there elements pf my body that I wish were different? Of course. But generally, I'm pleasantly surprised with how I feel in this outfit. I'm guessing that a big chunk of that is that I actually feel physically comfortable, now that there's adequate room for my tum. 
 

Thursday, 7 March 2019

Lander Pants: 70s Style


Agh! My photographer (Mr SoZo) and I experienced a host of technical difficulties which has resulted in the colours in these photos being really weird. But, you know, when it takes as much luck and effort as it does to get a rare sunny day during the winter, clear sufficient space in the lounge and then placate the children long enough to take some photos, there's no way I'm going to retake them! Hopefully I'll get some more accurate pictures of these trousers during Me-Made-May later this year. 


70s style denim flared trousers are a real dream sewing project of mine. Until last year, I had a thrifted pair somewhat similar to these that were originally from Topshop. I wore them fairly regularly (pregnancies and weight fluctuation sometimes getting in the way) for about six years. Then, one day, I looked at my back view in the mirror. Oh bejeezus did they fit me badly around the bum! Even though they still felt comfy and were fine from the front, I just couldn't un-see what I had seen; the bubble was burst. Off they went to the charity shop. Ever since then, I have been plotting and scheming to make myself some replacement 70s style denim flares. 

(image source: Fabric Godmother)

Fabric: 

So what was the impetus to finally get to making these now? Well, my dream fabric landed in my lap. Well, not literally. It actually landed on a shelf at my fave fabric purveyor, Fabric Godmother. I have a very soft spot for denim in general, but this, THIS, is my one true love: broken twill denim. Seriously, I considered abusing my savings and buying the whole bolt. If you're not sure what broken twill denim is, basically, it's this: instead of the distinctive diagonal twill weave of regular denim, broken twill weave looks like zigzags (see below). Wrangler used broken twill denim a lot in the 70s, and many moons ago I found an amazing pair of vintage Wrangler jeans in a charity shop that I made into a denim mini skirt. I wore the living shizzle out of that skirt, and now that I think about it, I was wearing that skirt when I met Mr SoZo nearly eleven years ago! I digress...

(image source: Indiamart)

This broken twill denim that Fabric Godmother is currently stocking is a lovely mid-blue (in reality a bit darker than the pics of my denim trousers). It's 100% cotton and a medium-to-heavy weight, so suitably sturdy for the Lander pants pattern I planned to use. 

Pattern:

Of course, I am not the first to either make the True Bias Lander pants in denim, or to acknowledge this pattern's potential for realising your 70s denim flares fantasy. However, I did spend a sizeable amount of time researching 70s jeans pocket shapes and drafting what looked right to me (oh, and even longer positioning and repositioning them endlessly during construction!).  


This wasn't my first dalliance with the Lander pants pattern. Last year I made a very successful wearable toile of the shorts version. I spent a lot of time tweaking the pattern but used some random olive green twill in my stash that I wasn't mad about, so I really wasn't expecting to love or wear them as much as I did. 

What you won't have seen on any of my sosh medias is my second stab at this pattern. I had such high hopes for it, but the result was a massive pile of meh. I made the full length version in some navy suiting from my stash with metal buttons with little anchors on for the fly. I used the pattern's original front and back pockets, but rounded the corners for a slightly different take. Sounds alright, no? They weren't. The end result was so blah: disappointment levels were high. I forced myself to wear them a couple of times on the school run to see if I could warm to them, but no. I think the over arching problem lay with the fabric: they looked too office-wear, not cute naval officer as I'd hoped. And my doctoring of the pocket shapes hadn't been jazzy enough to elevate them. However, what they did teach me was that I could use a couple of additional tweaks to the pattern before embarking on another attempt.


The navy suiting pair taught me that I might have been a bit over zealous with my previous curving of the originally-straight waistband. I'd also been too heavy-handed by pinching out far too much from the back waist darts in my attempt to eliminate any sway back gaping. Somehow, the over-correction of these issues weren't really visible in my shorts version, but they became apparent in the full-length version. I sorted out those alterations before cutting into this beloved denim, and I feel that readdressing both was time well spent. 

Thoughts:

I love these trousers so much, and I'm so excited to see the denim age with wear and laundering. The fit is great and I've already worn them heaps. The higher waist of this pattern means that these work well with some of the garments, and in some outfit combos, that my low-rise Ginger jeans don't work so well with. And as the weather warms up, it'll be fun to discover new outfits to wear them in.   


If I were being hyper critical, I would point to two 'flaws'. You can't see the first here, but since these pics were taken, the buttons have shifted to the very edge of their buttonholes, resulting in a 1cm strip of the fly piece below now becoming visible. I thought I had positioned the buttons with due care, but I'm wondering if using a keyhole rather than regular buttonhole setting has contributed to this. Seriously though, I'm well aware that no one else in the world, aside from serious sewing nazis, would probably notice it.  

The second point that gives me slight pause is in regard to the fit through the leg. A lot of the vintage jeans I found images of were more fitted through the thigh, and flared out more from the knee. The Landers are fitted around the waist and hips and the leg shape is straight from the top of the thigh down to the ankle, which gives the illusion of a gradual flare starting at the top of the leg. This distinction is why I'd refer to these as denim trousers, rather than jeans. Someday I might scratch that itch with the Closet Case Patterns Ginger flared jeans expansion pack, but in the meantime, I'm sure I'll get much wear and joy from these. 

Wednesday, 8 August 2018

The Landers Have Landed


Most of the time, I like to blog about a sewing project soon after completion, whilst the experience of making it is still fresh in my mind. These Lander shorts, however, were tricky to get round to photographing because I've been wearing them so much, they always seem to be in the wash. I eventually got these pics taken a couple of days ago, and if you were wondering what Lander shorts look like when they've been worn almost constantly for two months, then I have your answer right here. 


Pattern:

It's not often that I fall in love with a sewing pattern the very first instant that I become aware of it. Usually, it takes seeing a number of versions pop up via blogs and Instagram before a pattern can fully win me over. However, this one I knew straight away that I had to have it. I included it in my #2018makenine plans at the very beginning of the year, but I didn't pull the trigger and buy it until May, when I was able to take advantage of the #MMMay18 celebration discount codes (I also bought the zipper expansion pack, FYI).

(image source: True Bias)

I'm deeply obsessed with the full length (view C, pictured above) version of this pattern. But with summer then just round the corner, like many other sewers, I decided to make a hopefully-wearable toile of the shorts version as my entry point.

I'd read good things about how this pattern has been drafted, and that many had found that minimal fitting was required. In general, I completely agree, however I did take things slowly and made a number of alterations that I'll share with you now, if you're interested. 


First up, I started by blending between the sizes for my waist and hips, as I so often do. I chose the size 8 for the hips, blending out to a size 10 at the waist. The pattern gives you a sizeable 1" seam allowance on the side seams so you can make any tweaks that you find necessary. At the point of fitting the side seams, the pattern instructions do say that you can't alter the waist measurement during your tweaking, because your waistband will no longer fit if you do. I didn't even look at the waistband pattern piece, much less cut it out, until I had the shorts almost completed with the side seams basted, partly because I wanted the option to alter the side seams at the waist if I needed to. 
I ended up letting my side seams out a straight 1/2" all the way down (effectively giving me an extra 2" all the way around my bootay). I then pinched out about 2cm total per dart at the back to get the waistline to lie nicely against my body (I'm beginning to suspect I have a sway back situation going on). I restitched my darts so that they were curved rather than straight and made this alteration on my pattern pieces for next time. 


The other reason why I didn't cut out my waistband out until I absolutely needed to, was because I had read that a number of people had drafted curved waistbands rather then use the straight waistband included in the pattern. I wasn't sure if that need would apply to me, but after the dart pinching, I was convinced I would also have to redraft the waistband to include a curve if I didn't want it to sit up weirdly at the back. I then hit a bit of a stumbling block; I wasn't sure exactly how much to curve it or on at what point of the waistband to do so. By chance, I saw on Instagram that Josie of Fabric Godmother was tackling the Lander pants pattern at the same time as me. We entered into a discussion and she said that she planned to add the curve just at the back, between one side seam and the other. This made total sense to me; I don't go 'in' around the belly area, so curving the waistband at the front didn't feel necessary. 


So when I finally did draft my waistband, I started by tracing off the original size 10 waistband, minus the seam allowance. Then added the extra at the side seams that I had needed, then I removed the measurement that I had had to pinch out of the back darts, and THEN I added a curve to the back area (between the side seams). I created the curve by slashing down through the waistband and overlapping the slashes at regular intervals, eyeballing the curve that I was forming. I then added the seam allowance to all the edges. It may be worth mentioning that a curved waistband has to be cut in two mirror-image pieces (a waistband and a waistband facing, if you like), rather than in one piece like the original waistband pattern piece.

The other, more minor changes I made to the pattern were: 1) to shorten the length of the hem a little, 2) make the curved topstitching at the fly at little farther out to accommodate my buttonholes (my buttons are slightly larger than the pattern recommends, and 3) to leave off the belt loops as I know I'll never wear these with a belt.


Fabric:

I'm guessing this fabric is a cotton or poly/cotton twill, and its origin and how it got into to my stash are even more of a mystery. What I do know is that this fabric was in two pieces, and has lived in my stash for at least five years. Recently, I had made some vague plans to use it to make some trousers for Frankie, possibly involving some red piping. However, I wasn't sold on that plan as I'm not a fan of kids wearing trousers from fabric that have no stretch to it, so it wasn't much of a struggle to bury that idea and use it for these shorts instead. There was just enough for these shorts if I cut the waistband facing from something else, so in the end I felt that this twill was destined to become these shorts!


I'm a fan of a contrast waistband, so I used a scrap of the koi print cotton left over from the matching shirts I recently made. I used a scrap of black and white gingham to line the pockets, and despite deploying the techniques in the instructions to cut back the pocket lining pieces to avoid them being visible, you can still see peeks of it from the outside around the edges of the pocket if you look closely enough. Next time I'll try to select a pocket lining very similar to my outer fabric.

I chose these metal buttons from my stash because, A) they were in my stash and therefore effectively free, and B), because I thought that, when combined with this khaki twill, it gave a cute nod to a  uniform-y vibe, like the original boy scout shorts that I heard in a podcast inspired Kelli from True Bias to design this pattern in the first place.


Thoughts:

I'm so glad that I took the time to complete all those tweaks and changes carefully, because I think the fit is pretty spot on. They are really comfortable to wear, despite being made from a non-stretch woven fabric, although I might take a tiny scoop out of the front crotch curve on my next pair. Although the waistband curve was eyeballed, I'm very happy with how it fits snuggly around my lower back, and unless a different fabric type or weight loss/gain force me to take the side seams in or out, I'll use the same waistband piece going forwards.  

Although I'm now itching to make a squillion pairs of the full-length Lander pants, I can definitely see another pair or two of Lander shorts getting made for next summer. I've got my eye on a couple of pieces of fabric already in my stash for them, and I'll probably change the fit of the leg slightly to make them closer fitting, hopefully more akin to the image of the Lander shorts on the True Bias website. 


These shorts have also made me entirely reconsider my stance on khaki. I would NEVER have picked this fabric out if I were shopping in a fabric shop, however I have been really surprised by how much of my existing wardrobe this colour goes with. On the back of this discovery, I even got some khaki linen/cotton from the most recent Fabric Godmother open day for another project I've got lined up for the near future. 

Not only am I excited to make the full length Landers next, but I'm also chomping at the bit to try drafting different pocket shapes and styles, have a go at the zip fly, and maybe to play with constrasting topstitching threads. Expect to see more Landers round here before the year is out. 
Related Posts Plugin for WordPress, Blogger...