Thursday 20 September 2018

Swiss Dot Tova Top and a #2018makenine Wrap Up


So I didn't plan to make this top. My aim for this fabric, as per my #2018makenine plan, was to make it into the Sew Liberated Matcha top. However, during a brief pause before I went ahead and bought the Matcha pattern, I checked the fabric requirements and found I was substantially short for the sleeved version that I hoped to make.


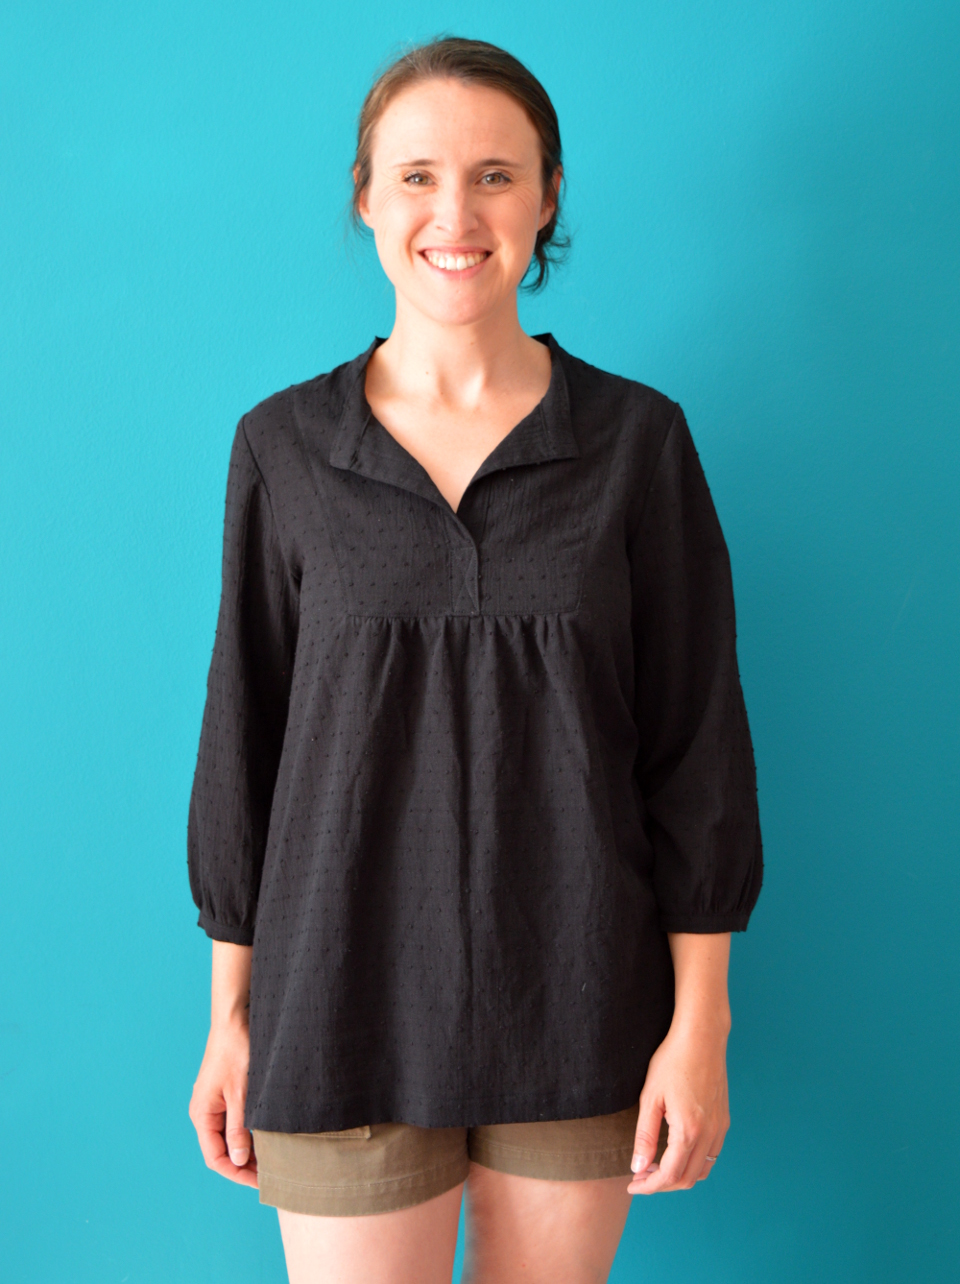
Yet I really wanted to get this fine swiss dot cotton from Fabric Godmother (the black is currently out of stock but it is still available in navyredwhitepale blue and blush) out of my stash and into my wardrobe. So I reached for my trusted, well-used and thoroughly tweaked copy of the Wiksten Tova top/dress pattern. I have lost count of how many garments I have made using this pattern to date, but I basically replicated my much-loved washed denim version (which has now been demoted to allotment wear only). 


I veered away from the denim version just a smidge with the tiny addition of this criss-cross stitching at the base of the placket (pictured above) so I can wear this top without a camisole underneath, should I desire. (And during this past summer, I have desired.) For my previous versions of this pattern I have added poppers or buttons/buttonholes to the placket to stop it gaping open too much, however I like this stitching way more as a solution. 

As you can imagine, this top instantly found itself in regular rotation in my wardrobe, as only a black version of your favourite sewing pattern could. I've worn it heaps with these Lander shorts and my Cobra corsage Luna pants, and now that the weather is turning nippy, I'm excited to try some new outfit combos with a vest layered underneath. 


Because I have already blogged about the Tova pattern multiple times, I was tempted not to bother sharing this top at all. However, this project signifies the end (kind of) of my #2018makenine plan/challenge. Let's see how that went....

My original set of plans:


And here's what became of those plans:


From the top left:

1) The cocoon coat was a major success.
2) I have yet to make the full length Lander pants as I intended, however the wearable-toile shorts version came out better than I hoped and saw MASSES of wear.
3) The Burdastyle oversized cardigan pattern plan was a flop, but this Kinder cardigan rose out from its ashes, and I wear it almost daily.
4) My version of the Ivy pinafore didn't fit exactly as I'd hoped, which was my fault for not toiling first, however I've still worn it numerous times during colder weather.
5) I made two new Dolores batwing tops and the long sleeved white/burgundy striped one in particular has been worn SO MUCH.
6) The Suzon pattern got a double airing, and both times I paired it with fancy Atelier Brunette fabric. I love both, but I thought the 3/4 sleeve one would be my favourite. However, it's the sleeveless one that has seen the most wear.
7) Even though we experienced a climate change-induced heat wave this summer that lasted several months, in the end I ran out of warm days to warrant making the Chataigne shorts this year. I got as far as tracing the pattern pieces and making a toile (see? I'm learning!), however my toile showed me I would need to go back and trace a couple of sizes smaller (I'm going to use a fabric with a little stretch), and I dragged my heels until it was too late to bother continuing. I do have the fabric, thread and zip gathered though, so I'll roll over this plan to next year.
8) The Matcha top became the Tova top (see top of this post!).
9) I went on a fitting odyssey with the Gemma tank pattern that resulted in a couple of wearable tops (and many toiles that were left in its wake!).

This was my first year of participating in the make nine challenge and creating a grid of project plans for the upcoming year. I went into it fully embracing the philosophy behind the initial idea: that it's a gentle guide to kickstarting your sewjo at the beginning of a new year, and shouldn't be viewed as a strict blueprint that you must stick to or else. Yet, I'm surprised by how many of the plans I laid out many months ago I did actually bring to fruition. I guess now would be a suitable time to admit that I did actually go back and revise my grid a couple of days after making my first after having a thorough hunt through my fabric and pattern stashes. So perhaps this revision helped me to make some really sound and suitable plans that I really wanted to stick to, months after the initial ideas. But I also like how this type of planning completely leaves room for other, more spontaneous projects ideas to jump to the top of your 'to make' list. I guess this type of planning endeavour is only going to be as strong as your initial plans, so if you know yourself, your style, your lifestyle and what suits you well, then you're more likely to have made great plans that you don't feel like abandoning six months later. I'm excited to do this again next year, and I have an idea for a slightly different approach that I'm looking forward to working on.

What about you? Have you created a make nine grid of plans before? How many of those plans did you actually end up making? What impact did it have on your creativity and/or productivity? Do you even see any worth in making such a plan at the start of a year anyhow? Enquiring minds (well, my mind at least) need to know...

Wednesday 12 September 2018

The York Pinafore


I know that it's common to find the statement 'This new thing I made is all I want to wear right now' on sewing blogs and Instagram posts, but I can't help that. This pinafore IS my favourite thing to wear right now. The pattern appeared, as if by magic, in my inbox, sent by its designer Helen from Helen's Closet as a freebie shortly after she released it. I was under no obligation to sew it up, but as soon as I saw a few modelled versions pop up on the interwebs, I knew I had to make it when the right fabric came my way.... 

Pattern:

The York pinafore is a clever little pattern. Despite the number of pinafore and dungaree type patterns out there these days, I think it's unique. Part of its brilliance, IMO, it how simple it is: consisting of just a front and a back piece, and a couple of pockets. The neck and armholes are bound so there's not even facings to deal with. Once you've printed it out and stuck it together, there are three choices you need to make: which neckline (I went with the higher, but I adore the lower option too), pocket style (I love these big, scoopy ones, but there's also a cute hoodie-style, kangaroo version) and hem length (I picked the longer length so it'd be more suitable for chasing and wrestling with small children). 

(image source: Helen's Closet)

Going into this project, I remembered the realisation I came to during my Gemma tank escapades, that simple garments need to fit really well to look fantastic. I made a toile of this pinafore in some stable cotton to try and figure out if some pattern alterations would need to be made. I have to say at this point that the York pinafore pattern instructions may be the best pattern instructions I have ever encountered. This is in part because they include is a sizeable section on what to look for when fitting this garment, which is incredibly useful and makes this a wonderful pattern for helping beginner sewers to level up. I toiled the size M, and although the general size was fine, I found that the hip area sat too low on my body. This was unsurprising because I'm both short-waisted and an inch shorter than the height the pattern was designed for. I pinched out 3cm total (split into two places, as per the lengthen/shorten lines on the pattern) from the bodice are on both the front and back pieces. Plus, although I don't think it applies to me, I really liked how Helen explained an easy method for adjusting the pattern for larger bust sizes.  


The only other modification I made was related to the bias binding. I bought ready made bias (the instructions include how to make your own if you wish), but I picked a narrower width than suggested and applied it using the Grainline Scout tee method because I find it gives a nicer finish  around curved areas. But in short: the whole construction was super simple, and took very little time. 

Fabric:

I knew that I had nothing suitable in my stash for this pattern, so the next time I visited Fabric Godmother, I was in the look out. I didn't have a clear vision of what I was aiming for, other than I wanted a solid. With some guidance, I landed on this linen twill. I'm going to go out on a limb here and say that this may be the best fabric/pattern match I've EVER made! I've never worked with or worn linen before, let alone a linen with a twill weave, but it feels soooo nice on, kind of slinky but stable, I really love it. I'm struggling with the urge to go back and buy up the rest of the roll like some hoardy fabric-Gollum. 


Top:

With the pinafore complete, I couldn't ignore the desire for a new, super plain top to go with it. I already had this white cotton/spandex jersey in my stash that I'd procured from Girl Charlie UK for a different project that I later changed my mind about. I reached for my well-used copy of TATB's Agnes top pattern, and the perfect plain white knit top was born, that can also be paired with heaps of my other garments. 


Thoughts:

As you can probably tell, I adore this pinafore, and the outfit generally. Style wise, I'm not sure how you'd describe this whole vibe; the linen and the silhouette of the pinafore makes me think of art teachers, which is a direction Mr SoZo would probably argue I've been heading in for a while. I now own TWO floaty scarves which I wear quite a lot, and I've decided to allow my hair to go grey without dyeing it. Anyways, I don't think you could describe this pinafore as sexy, it gives my bum a kind of teletubby look (see below), but thankfully that's not an adjective I often aspire to. I wish I'd had this pinafore in my wardrobe when I was breastfeeding. I think it would give you sufficient boob access without too much outfit rearrangement required. I got so fed up of the limited collection of separates I wore for over a year, and it would have been great to have a dress option in the mix. 


I'm very happy with the tweaks I made to the fit, and the finish I achieved during construction. The only criticism I have for this garment, and it's a very mild one, is that I often find it shifts backwards a little, and I have to rearrange it slightly so the shoulder seams sit back on top of my shoulders where they belong. Anyone have any idea why that might be happening, or what I can do about it? I'd really love to make another of these early next year, probably with the lower scooped neckline and perhaps in a soft denim. I saw a version on Instagram made by @twodogs_and_a_sewingmachine where she had added centre front and back seams and went to town with topstitching, which looked really amazing. Helen has shared some great blog posts with other pattern hack ideas for the York pattern, as well as releasing an expansion pack to turn it into an apron. What fabric would you make this pattern in and what tweaks would you suggest? 

Friday 7 September 2018

Free Pattern Friday: Women's Knit Headband


Welcome to my monthly 'Free Pattern Friday' feature, where I road test a free sewing pattern or tutorial: sometimes a children's one, sometimes a women's one. I publish these posts every first Friday of the month, timed to provide inspiration for those of you who plan to get their sew on over the weekend. I firmly believe that, if you pick your projects carefully, sewing doesn't have to be a crazy-expensive way to clothe yourself and your family. Thanks to all the amazing pattern designers who have offered up their hard work for us to enjoy for free.

So I've taken a slightly different tack for this month's free pattern project. It's not an entire garment, like usual, but a quicker accessory make that may appeal to A) beginners, B) sewers looking for useful ways to use up some fabric scraps, or C) a time-poor sewer who would like to make something from beginning to end in a very short amount of time. Thanks to Caroline Hulse via Janome for sharing her work on this pattern for free.  


Pattern type:

If truth be told, it probably wouldn't be a complete stretch for most sewers to figure out how to make a halfway decent headband. However, why not let someone else figure out the dimensions and method for us?! In case you were in any doubt, lemme tell you that there are about 300,000 headband tutorials and patterns available on the interwebs that people are generously sharing for free. I picked the Knit Headband pattern by Sew Caroline, which is actually downloadable via the Janome website here. I liked the width of the band, and the knot detail, which I hoped would help attract attention away from my greasy hair on days that I didn't get to wash it!

Sizing info:

This is billed as a 'one-size-fits-most' pattern. I'd say my head is on the large end of medium, and this fits me fine, however I'd be tempted to make it a bit shorter for future versions so that the tie ends don't stick out quite as much. Of course, the final size will also depend on the properties of your chosen fabric. 

(image source: Caroline Hulse)

Fabric info:

The good news is you only need ¼ metre/yard or less of fabric for this project, so if you've been sewing with knits for a while, it's possible that you've already got something suitable in your stash or fabric scraps collection. The bad news is that the only guidance given for what to use is 'knit fabric'. I would very much urge you to pick a jersey knit that isn't too thin, and has a sizeable (at least 5%) elastane/lycra/spandex content with very good recovery. 

For my first attempt at this pattern, I used a leopard print off cut from a refashioned garment, and it was a total flop (literally). The jersey was too thin, and despite a noticeable elastane content, the recovery was weak. Second time round, I used some jersey that was more substantial (this one from Girl Charlee UK) and it's perfect. I think anything you'd be happy to make leggings from would be fine for this project. 

Findings:

The pattern and tutorial take the form of a nicely designed four page PDF doc: two of those pages containing the pattern piece that you stick together. As mentioned, more info should have been given for choosing suitable fabric, particularly for beginners (and me, evidently!). Plus, there are no images or illustrations for the construction steps, which might have been helpful for a sewing novice, and I reckon the additional step of trimming away some of the seam allowance would lead to a slightly more polished headband. 

That said, it really was a fun and super-quick project, and the finished headband turned out much nicer than I thought it would. I'm sure I'll get a lot of use from it, on worse-than-usual hair days, and to keep my hair out of the way whilst I'm washing my face. 


Customisation ideas:

  • You could try adding some contrast top stitching around the edge of the headband with a lightning or zigzag stitch, or a cool decorative stretch stitch, if your machine has any.
  • To copy Caroline's headband (third from the top in her image above), you could try mixing two different fabrics in the same headband. 
  • Monkey around with the dimensions, making the band wider or thinner for different looks.
  • I saw on a different online headband tutorial (sorry can't recall now where), someone added some squiggles of hot glue from a glue gun to the underside towards the back of their headband. Apparently, this makes them much less likely to slip off, which is especially helpful whilst exercising (so I hear).

Would I make it again?

If I came across a scrap of the right type of knit, I would be very tempted to bust out some more of these, for myself or as gifts. If you've got lots of suitable pieces of knit to use up, these could make great stocking fillers for Christmas. Trying this pattern/tutorial has also inspired me to scale down the pattern and make my little girl some headbands too. 

Related Posts Plugin for WordPress, Blogger...