Saturday 10 July 2021

Scrap Busting Jersey T-shirts


During the winter lockdown, I was without an overlocker. Now, I know that you can sew any garment on a regular machine: that overlockers are entirely optional. I have told people this a million times during sewing classes I've taught. However, I just didn't want to make anything that wouldn't look as neat on the inside as I've become used to. 


Because of this, the only things I made were oven mitts that have no exposed seam allowance plus a couple of items with french seams. I also cut out a few projects to stitch together in the future, and I allowed myself to go down a rabbit hole that resulted in these wild patchwork tops! 


I'm really into the idea of using up fabric scraps and leftovers from previous projects to make new garments. Most examples of this kind of thing, including most of my previous attempts, involve woven fabric. However, in the autumn I made a couple of sweatshirts for Frankie using up pieces of sweatshirt fleece and ponte roma pieced together, which really helped me get those types of scraps under control. So the next logical step was to try something similar with jersey scraps. 


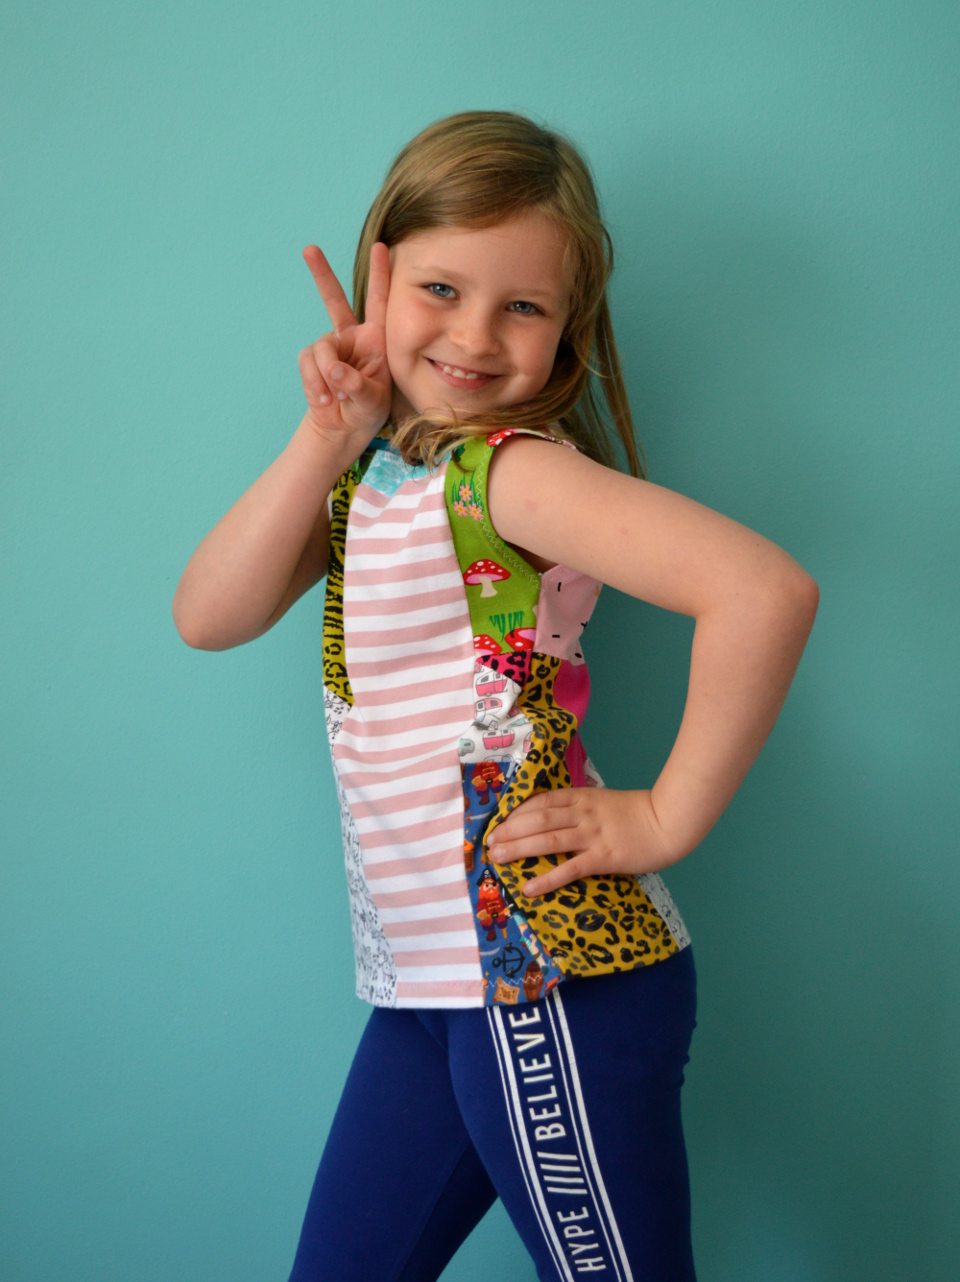
My jersey scraps tub was becoming overwhelming. I'd cut out as many pairs of adult and kids undies as possible from suitable pieces of jersey, but I was left with so many pieces that were too small or odd-shaped to squeeze out any more. I decided to try piecing some of them together to make a top for my daughter. And when my husband saw what I was creating, to my enormous surprise, he commissioned one for himself! 


Method:

My approach to piecing was to play around with how I could combine some of the shapes without needing to trim too much away whilst also keeping the grainlines in roughly the same direction. If the edges weren't straight, or at not quite the right angle, I'd trim away a bit from the edge, then I stitched two pieces together using my regular sewing machine. I stitched them using a narrow seam allowance and a narrow lightning flash stitch which meant the seam allowances weren't too bulky. I kept adding more and more shapes until the bigger pieces could be combined, and eventually became big enough to fit the pattern pieces within them. 


Patterns:

If you are attempting to create jersey tops from scraps and leftovers, you either need to use a sewing pattern that already features a lot of seams (like the new Shift tee pattern by Misusu patterns), or you need to do the piecing yourself and choose a very simply sewing pattern with minimal seams. For my daughter's top, I chose a very basic top pattern (see the two images below) from a 2014 edition of Ottobre Design magazine. 


It's effectively just a front and back, with a neckband. I forgot that the armholes were also meant to be bound, and I just turned those under and stitched them. I love Ottobre Design for these basic, knit fabric garment patterns. Their styles tend to be really wearable and comfortable, and IMO don't look dated. I got a year's subcsription back in 2013 when I was pregnant with my daughter. As she's grown, she's fitted into the different styles in the magazines, so it's been like getting new sets of patterns every few years.


For Mr SoZo's T-shirt, I traced round one of his very favourite T-shirts that was starting to fall apart at the seams. Next time I make him a T-shirt from the pattern, I'll add a little extra width at the hips, but other than that, it's a great fitting garment. 


Having cut out the main pattern pieces from the pieced together fabric, they then lay dormant for a few months. During that time we moved house, seasons changed, and I bought a new (secondhand) overlocker! So a couple of weeks ago I took them out again and finally whipped them together. 


It's so pleasing to reduce the amount of scraps in my stash (particularly the pieces that I'd owned for years and was sick of the sight of) and turn them into useful, wearable garments. I'd say that the colour palette in Lola's top works better, but Pat has definitely got more use from his T-shirt so far. The scraps bins will never be completely emptied of course, because new projects results in new scraps. However, I'd like to try making undies from pieces together fabric next, with wearability being even less of a consideration when combining a wild selection of fabrics.


Friday 2 July 2021

Free Pattern Friday: Adult's Valley Jumpsuit


Welcome to my monthly 'Free Pattern Friday' feature, where I road test a free sewing pattern or tutorial: sometimes a children's one, sometimes an adult's one. I publish these posts every first Friday of the month, timed to provide inspiration for those who plan to get their sew on over the weekend. I firmly believe that, if you pick your projects carefully, sewing doesn't have to be a crazy-expensive way to clothe yourself and your family. Thanks to all the amazing pattern designers who have offered up their hard work for us to enjoy for free.

Friends, have I got a blinding free pattern to tell you about today?! (Short answer: yes.) You've probably already heard of the amazing resource that is the Peppermint Magazine's collection of free sewing patterns. But if you haven't: this Australia-based magazine employs the talents of an indie pattern designer to produce a free sewing pattern to coincide with the release of each print edition of their magazine. The magazine is released quarterly, so that's four incredible new free sewing patterns a year with 41 patterns already available to trawl through. The patterns are really easy to access; the A4 and A0 pattern files plus instruction documents are downloaded directly from each style's webpage, with just a sign up to their newsletter required (which you can obviously unsubscribe from, should you wish). It is also easy to donated a few quid if you can afford to, and seeing as print magazines are generally in a precarious position these days, I think it's important to do so to say thanks and to support this wonderful resource. 


Pattern type:

The pattern I've just road tested and am writing about today is the Valley jumpsuit. Designed by Raphaëlle Bonamy of Ready To Sew patterns, the Valley jumpsuit is a casual, super wearable style with elasticated waist, button front and large patch pockets. I absolutely love that the instructions are available in English, French and Spanish. The design itself is is really clever, consisting of just three pattern pieces that need to be cut from your fabric. The bodice and sleeves are ingeniously formed from just one pattern piece that you cut a pair of, and in the same vein, the trouser part has no side seams so is also made from one pattern piece. To get the garment on and off, the button front is assisted by a small back neck closure to open things up sufficiently.


Sizing info:

There's so much talk in the sewing community in recent months (years?) about size inclusivity, and many pattern companies are listening and expanding their offerings. I think the sizing of this particular pattern is a great example of what we'll see from most sewing pattern releases in the future. Spilt into two ranges (sizes 32 - 46 drafted for a B-cup and sizes 46 - 58 drafted for a D-cup) resulting in busts from 31" to 54" and hips from 35" to 60" approx. being catered for. In total the pattern has been graded to 28 sizes, including half sizes, which should help you to achieve an accurate fit. I appreciated that the garment ease for bust, waist and hips has been shared to give additional information when picking a size/s, because who wants to toile/muslin a whole damn jumpsuit?!

For mine, I used the size 38 for the top part of the bodice, and blended out to the size 40 below the bust for the waist downwards. According to the size chart, I should have gone for a larger size for the waist, but the elasticated waist meant that I was easily able to accommodate by tum. 


Fabric info:

The Valley jumpsuit instructions suggest that you select 'light weight fabric with drape ranging from tencel, cupro, linen, ramie or hemp, batik, poplin or light denim' for this pattern. 

This is my third jumpsuit made from African fabric, I just think they're a match made in heaven, and I'm sure this will end up getting as much use as the other two get. This particular fabric was given to me by Wax and Wraps, who sell African textiles by the metre, or in fantastic, monthly, sewing subscription boxes. It's a printed version of a traditional fabric from Cameroon called Ndop that's usually resist dyed with indigo. Check out this interesting article for more info on Ndop. This fabric I used for my jumpsuit is a wonderful, light-weight cotton with a similar handle to a poplin, but slightly less crisp. Because there's a linear aspect to the print design, there's a noticeable chevron effect at the centre back seam of the bodice, which I really love. The fabric was slightly narrower than the pattern called for, plus the fabric matching gave me some additional head-scratching, and I ended up having add a seam and piece the fabric to fit one of the bodice pattern pieces. I defy you to spot where it is in the finished garment though! 


Findings:

Going back through the instructions to write this post, I'm still blown away by the inclusivity of the sizing. I'm sure that sadly there are still a number of sewers that aren't able to fit this pattern who otherwise would have liked to have tried it, but that really has to be small minority. I'm also still really impressed by the drafting: that such a cool-looking, well-fitting style has been achieved with effectively just two pattern pieces. However, because there are so few pattern pieces, and subsequently fewer seams, I wonder if this style offers fewer opportunities for making fit adjustments, I don't know. 

Anyways, on top of my standard blending between sizes, I also shortened the bodice length by 1.5cm to allow for my short-waistedness (AKA high natural waist line). I usually have to remove about 2cm of length from the torso area of all sewing patterns I make, yet this time I wish that I hadn't. If I make another, I'll add that measurement back in because raising my arms up isn't the most comfortable! I might also lengthen the front and back rise on the bottom part a bit, because the rise on this garment is definitely higher than the rise on my other jumpsuits (my Zadie jumpsuit, pattern by Paper Theory and my Roberts Collection jumpsuit, pattern by Marilla Walker). If you are tall and/or have a long torso, I'd definitely recommend lengthening the bodice pieces before you cut out your fabric. It's always easier to remove any extra length that it turns out you didn't need, than to try and figure out how to add in some extra length later on.

Speaking of cutting out your fabric, one downside to having just two mammoth pattern pieces as opposed to a number of smaller ones is that I found that I wasted quite a bit of fabric in the lay. This was compounded by the fact that I had some pattern matching to consider. However, even though you have to cut the pattern out of a single layer of fabric, the cutting out process was probably quicker and potentially less of a headache than a pattern that consists of more pieces. 


When it came to the actual sewing, the instructions were wonderfully clear and easy to follow. To prevent the instructions document from becoming too unwieldy, some steps are included as links to posts on the Ready To Sew website, or in the case of the steps for making the waist casing, a YouTube video. This provides space for more detail and clearer visuals for these potentially tricky bits. I'm sure it's particularly helpful for visual learners, and turns this pattern into a real learning opportunity for beginner sewers.  

As I mentioned above, I would have preferred a tiny bit more length in the body and possibly the rise, but beyond that, I am genuinely thrilled with this jumpsuit! I wasn't sure initially that I liked the look of the patch pockets. I added them thinking that I could remove them at a later date, however I really like their placement and proportions now they're on the actual garment. 


Customisation ideas:

  • Shorten the sleeves
  • Shorten the leg length to make a playsuit/romper
  • Add a side seam to the trouser section then taper or widen the leg shape for some different looks. It's amazing what this can do to completely alter the feel of a garment
  • Adding a side seam to the bottom section also allows you the possibility to add inseam or slanted pockets if you'd prefer 
  • Change the neckline to a V-neck
  • Use smaller buttons and group them in pairs

Would I make it again?

Yes I could easily see myself making more of these, probably in a solid fabric, a black linen perhaps. 

Related Posts Plugin for WordPress, Blogger...