Friday 30 November 2012

Refashion Friday: Invisible Mending, Darning and Tom of Holland


You don't have to have a dictionary close to hand to figure out that 'refashioning' and 'mending' are not the same thing. However, I feel they come from a similar enough angle to justify going on a slight mending tangent this week. They are, after all, both about extending the longevity of existing garments.

I am a sewer who doesn't get particularly excited about mending. I could be spending that time working on a brand new exciting project. When I do get round to mending, it is with reluctance. However, I have been lucky enough to meet someone who feels very differently about mending, someone who relishes the challenge of a holey jumper or ripped jacket, and has gone to great length to study and master many of the long forgotten mending techniques our grandmothers and great grandmothers were probably dab hands at. I am talking about Tom of Holland


(Tom mending some shoes)

As well as a mending and darning sensei Tom is also a total master at knitting, and he teaches all these things here at Super+Super HQ in Brighton, although he can also been found sharing his knowledge at other locations. He has developed a concept that I find super interesting: the Visible Mending Programme, which Tom explains thus:

''The Visible Mending Programme seeks to highlight that the art and craftsmanship of clothes repair is particularly relevant in a world where more and more people voice their dissatisfaction with fashion’s throwaway culture. By exploring the story behind garment and repair, the Programme attempts to reinforce the relationship between the wearer and garment,  leading to people wearing their existing clothes for longer, with the beautiful darn worn as a badge of honour. By writing this blog, running darning workshops and taking repair work commissions I provide mending inspiration, skills and services to people and hopefully persuade them that shop-bought clothes deserve care and attention too, just like a precious hand-knit.''


(Tom's impressive collection of darning tools)

Tom has also started sewing clothing, and with his tenacity and eye for detail no doubt he will soon be a total legend at that too. But right now, whilst I still have some knowledge I can offer him, we brokered a deal: I would help him with some of his sewing and fitting dilemmas and in return, he would teach me to darn properly! A few years ago, I came to the conclusion that I needed to learn how to darn my socks, but after a fairly poor attempt, I admit I gave up. But since conquering how to make so many of my own clothes and largely no longer relying on buying mass-produced items, I want to push that even further, and being able to properly darn my existing socks is something I am now re-inspired to do. 


Tom has a vast collection of books on knitting, darning and mending techniques. My own tiny collection of related books is pictured above! I've long been obsessed with the public information pamphlets that were released during the second world war to show the population how to make the best of their restricted rations and resources. Both these books are basically compilations of those original govverment issued pamphlets. Their illustrations are awesome, and as pieces of social history I think they are priceless. I was thrilled when I discovered the darning technique Tom was to show me was basically the same as the one in the 1940's picture below.


I brought along two poorly socks, Tom took the one with the biggest hole. This is the sock I started with  (pictured below). This pair of socks are actually men's golfing socks that I was given over ten years ago, and although this may sound weird, I have some significant memories attached to these socks! But the sheer fact that they have lasted well over a decade prove that they deserve some investment on my part to extend their life still further!


Obviously this mend was intended to be a visible one, so I chose a burgundy darning floss and set to work following Tom's instructions. I was heartened to find out that, once Tom started showing me the best technique for mu holey sock, that I had been on the right lines with my previous attempts to darn, just that I had been using the wrong type of mending yarn (which I knew) and that my stitches had been too far apart. 


I should mention that all this darning went on whilst the sock was turned through to the wrong side. It's looks like a whole crazy mass of yarn from the inside (I'll get neater with practice, I'm sure) but you can kind of see the grid I created. 


Turned through the right way and it looks really cool! The contrast colour is peeking through. After washing the darning floss goes more woolly and a bit matted which helps to plug the hole further.  


I've properly caught the darning bug now. I've even asked for a darning mushroom and floss for Christmas! I feel guilty about all those otherwise perfectly good socks I've binned in the past that could have lived on much longer if I'd figured all this out earlier. What about you? Do you darn? Do you prefer a visible or invisible approach?

Wednesday 28 November 2012

Mumma E's 'Mother-of-the-Bride's Dress


This is the last instalment of my wedding-related blog posts. After this one, it'll be taken as red that, A) I got married, B) we all looked ace, and C) fun was had. Enough said. But in many ways I have saved the best post 'til last! This post is about the dress my mum made herself for her day as Mother-of-the-Bride.


Self-made Garms!

Long term readers of my blog may already have read this post in which I interviewed my mum about sewing in the 1960's. In that interview she relays the story of making her own wedding dress, forty-odd years ago. So I guess it was in keeping with tradition that I should make my own wedding dress, and that she should make her own Mother-of-the-Bride's dress. Mumma E has seriously good sewing skills, but like many people who have used their skills as a form of income over the years, her passion for sewing clothes has waned. I'm so glad she dug deep and mustered the motivation to battle through this project, which I know was a toughie. But I'm getting ahead of myself...


The Pattern

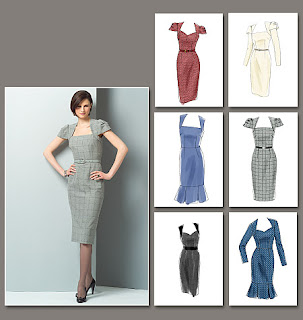
Mum and I had a discussion about the kind of style of the dress she was thinking about, which reminded me of having seen something that sounded similar. Some internet digging around later and I discovered the pattern I'd been thinking about was Vogue 8280 (pictured above) with it's Roland Mouret 'Galaxy dress'-esque elements. I sent the link to Mum and she was in agreement that it was definitely similar to what she had in mind and an excellent place to start. 


Fitting

She found the pattern at her local fabric and haberdashery shop in Essex, and picked up some beautiful purpley crepe and matching lining in London. So far, so good. But, poor mum, getting a good fit with this pattern took her an age and countless toiles (I didn't want to ask her exactly as I didn't want to drag up old wounds!). Part of the difficulty was born from the fact that Mum is very petite so a lot of work had to be done on changing the proportions of the pattern. Plus the lovely shoulder yoke section was a nightmare to get to sit correctly. It's formed from just one pattern piece which has to lay again the curved of the body from shoulder to underarm side seam: a challenge in 2D to 3D that would take the greatest of architects to get to sit perfectly. Scratch that, it would take the greatest architects or MY MUM!!! After all her changes and tweaks, she got that damn yoke detail to fit beautifully! 


Still fitting...

When it came to the fitting, not only must she be praised for her tenacity, but also the trickiness of not having anyone to help her most of the time. I was able to help a couple of times when we saw each other, but otherwise she had to make do with the (now much improved) pinning skills of my dad and her own self-fitting ability.   


Inspiration Strikes

At some point, fairly far into the cutting out and construction of the final garment, my mum had a brain wave. The plan had been to make the sleeves from the same fabric as the rest of the dress and make tiny self-covered buttons to apply to the cuffs and along the top of the centre back. But although the dress was now fitting beautifully, and would doubtlessly be very classic and sleek when finished, Mum was feeling it was a bit plain and not special enough for a very special occasion such as this. From somewhere or other, she had an idea of adding lace sleeves. So off Mum went to an amazing fabric shop on Edgeware Road in London. There she found a fantastic lace in the same colour purple, but at £90 a pop (metre), and requiring over a metre in case of mistakes, it was somewhat outside of her budget, special occasion or no! 


Further Inspiration Strikes

All along Mum had planned to wear black shoes and accessories with her dress. From that she drew inspiration that perhaps black lace would work. When she was down in Brighton for my hen weekend, we visited a fabric shop here and came across a beautiful (and reasonable) black lace that fit the bill perfectly.  Then she got the idea of covering the shoulder yoke detail and adding lace to the top of the back piece to make a bolero/shrug effect. Genius, no?! Look how perfectly she matched up the lace, and then PUT A DAMN CONCEALED ZIP THROUGH IT! Awe-inspiring. 


But inspiration still hadn't finished striking! She then decided to harvest the remaining scalloped edging and apply it round the curve of the yoke detail to match the scalloped edges of the cuffs and the back pieces. Oh, and she had inserted the centre back concealed zip so well that apparently she had to point it out to my dad when he couldn't figure out how she was going to get in and out of the dress!


To say that I am proud of my mum doesn't even begin to cover it. Not just for making this dress, of course. For also being the sweetest and loveliest lady I ever did meet. And also for hitting the dance floor hard at the wedding reception and showing everyone how to bust some serious moves! I'm also hugely proud of my dad for looking equally dapper at the wedding and throwing some shapes of his own on the night! Massive love to Mumma and Papa E xxx


Monday 26 November 2012

Pat's Wedding Waistcoat


I am very aware that I owe you a couple more wedding-related blog posts. I've been waiting for the proper photos to arrive so I can fully illustrate the last two handmade garments that I want to share with you. A quick recap: you can see my self-made wedding dress here; Vic's bridesmaid dress here; and pics from our NYC honeymoon here. Later this week I'll show you the AMAZING 'Mother of the Bride' dress my mum made herself, but today I'm going to talk about the waistcoat I made for Pat (AKA, The Groom). 


I hesitate to use the word 'theme', but we definitely wanted our wedding to have an overall look. Because we were going down a very DIY route with everything, and had picked a reception venue that looked like a club that we could decorate as we pleased, we had to think hard about what we wanted because we were going to have to invent it all. Everything from the venue to our dresses ended up referencing a mid-century vintage/cocktail/casino/playing cards/speak-easy/cabaret kind of vibe. 


The Elements

Pat had to come up with what kind of look he wanted to rock, and he decided he wanted to wear a slick suit of some kind. We were totally lucky that the kind of mens suits that are in the shops at the moment are of a particularly slim-fit, skinny nature, which work fantastically on his own slim physique. We found the perfect dark grey suit with black sateen collar in the very first shop we visited. He later got himself a beautiful slim-fitting shirt and skinny black sateen tie. Our friend Kirstin (who made my fascinator/hat) made him some wonderful playing card cufflinks. But even though the suit he chose also had a matching waistcoat available, I wanted to add a Zoe-made element to his outfit as well, so it was agreed I would make his waistcoat. 

    
The Inspiration

From early on, Pat was floating Tybalt from Baz Luhrman's version of Romeo and Juliet as a style inspiration. He's long been drawn to latino/Mexican/Catholic/Gangster style, and John Leguizamo shows how good a slender guy can wear such a vibe. We obviously decided to go down a less costumey road with our interpretation, but decided a Maria de Guadalupe on the back of the waistcoat would provide an appropriate touch of the Catholic/latino kitsch we both enjoy so much, whilst simultaneously referencing Pat's own Catholic heritage (albeit of a far more Irish origin).  Although I doubt everyone would fully appreciate it, it was also our homage to the whole Catholic thing, as we were the first couple in his family not to get married in a church (or more specifically, one particular Catholic church in his mother's home town). 


Fabric and Pattern

So where to start? I bought extra black sateen when getting the fabric for Vic's bridesmaid dress (which I hoped would also look sufficiently similar to the sateen of the jacket collar) and I ordered a panel of the Henry Alexander Virgin of Guadalupe fabric pictured above (from someone on Etsy though, not from that site I just linked to, I should mention). With the fabric order taken care of, it was on to the pattern dilemma. I randomly got hold of this questionable 1990's mens formal attire pattern pictured below. (Incidentally, you can get your own copy here! Should you want to...) I think it came from a public donation when I worked for Traid and I had kept it stashed with half an eye on the fact we had a wedding coming up. 


Alterations and Fitting

Even the smallest size was way too roomy for Pat, so I did several rounds of toiles until I was happy with the fit and how it would look under the jacket when it was buttoned up. One of the changes I made included adding back shaping darts instead of the pull tab detail because I wanted a very sleek silhouette rather than a bunched up gathered effect. I also initially thought the entire back panel would be made from the Guadalupe fabric, so I had to change the back of the pattern so it could be cut on the fold rather than with a centre back seam. There was actually quite a bit of shaping in the centre back seam, so transferring all that into the new back shaping darts was something of a challenge. However, the big back shaping darts and the positioning of the Mary/Maria on the panel of fabric I finally ended up with meant that cutting the whole back piece from the fabric panel wouldn't have worked so it was back to the drawing board. 


Appliqué Detail 

Thankfully I have mad-skillz when it comes to machine appliqué (which is how I spent a big chunk of my twenties when I wasn't working in casinos and pizza restaurants or guzzling chardonnay). I sped off to the local fabric shop and bought some nice black fabric to form the new back panel and got some bondaweb stuff (isn't it annoying when you could have sworn you have a large stash of something but can't lay your hands on it when it's needed?!) to secure the Maria whilst I satin stitched her down. I should have added a layer of fusible interfacing to the wrong side of the back panel before I started to satin stitch, so the stitching is a tiny bit wavy, but NOONE is going to notice that but me. Pat certainly didn't. He just kept repeating 'Strong', when I showed him the appliquéd back panel.  


A couple of years ago I decided I would try and make Pat a shirt for every year we are together. I think I'll reword that to a 'garment' for every year we are together, which will bring me in line with the four years we've clocked up so far. Perhaps surprisingly, this waistcoat has actually been worn since the wedding. Pictured above is Pat rocking his sans jacket look for my birthday drinks last month.

Friday 23 November 2012

Refashion Friday Inspiration: Front Tab Denim Skirt


Morning Refashioners! Here's a little skirt I made out of two pairs of unwanted jeans. The basic pattern is a high-waisted skirt style that I shortened and split up into panels so it could be cut easily from length of jean-legs. It's the same basic shape and style as this skirt, in fact. 


The main difference with this style is that it fastens with a centre back zip, and it has this simple little tab detail on the front. I'm a big fan of using tabs to add quick interest to fairly plain garments, and I used to use them a lot when creating clothing for TRAIDremade.  


To make them you need to draft your desired shape with a 1cm seam allowance all the way around. There's no point in adding a wider seam allowance because you're going to trim most of it away anyhow. The tabs work better if they can really hold their shape, so add at least one layer of fusible interfacing to the back of both pieces. 


Pair the pieces up, right sides together, and stitch around the edge with that 1 cm seam allowance. Remember to leave a gap along one of the longer edges so you can turn it through to the right side. 


Before you turn the tab through, you'll need to trim away most of your seam allowance, particularly at the points to remove bulk and help you get a crisp corner (if you are making a pointy tab like this). When you turn the tab through to the right side, you may need something 'pokey' to get those corners as  sharp as possible. Give the tab a good old press with an iron at this point, making sure that the edges of your opening are nicely tucked in. 


Stitch at least one row of top stitching along the edge to both close the gap opening and the create a nice, solid effect. Contrast top stitching could look fantastic, as could a couple of rows of top stitching. 

The tabs don't need to be this shape of course, rounded ends also look nice. You may wish to make a pair of tabs and trap one end of the tabs inside a seam (the side seam for example) for a different effect.

I secure the tabs down by then applying buttons, although you may wish to do some more secure secret stitches to keep it in more firmly in position. The buttons give the impression the tabs are removable or adjustable, which of course they would be if you created them to be so. But mine are faux and quick to make and apply! 

Wednesday 21 November 2012

Self-Employment Update

As you may already know, a bunch of months ago, I rather suddenly became self-employed. Some of my super-sweet readers have expressed an interest in hearing how life as a self-employed person is panning out. So here is a little update of where I find myself several months into it...


Brighton Craftaganza

This aspect of my self-employedness is currently at the forefront of my mind because our next craft and handmade market is looming close and I am eye-ball deep in the organising and promotion stages. My activities include:
  • Writing and scheduling posts for the Brighton Craftaganza blog, in particular there are lots of 'Meet the Seller' interview posts at the moment to give visitors and other sellers an opportunity to learn more about the people who will be selling their work at the event.
  • Co-promoting and co-hosting our new Craftaganza Live free creative meet-ups. These are monthly events (we just did our second) to provide opportunities for local creative types, very often designer-makers, to meet, have a drink and a chat. Each event starts with a talk by a member or members of the crafty/handmade scene about their work, business and inspiration. Past speakers have been Amy and Claire from Super+Super HQ and TheBigForest
  • Pat and I have also created a workshop called 'Sales for People Who Hate Selling' which we have presented for a room full of designer-makers interested in improving their face-to-face sales technique in time for the festive selling period. The first date sold out of tickets super-quick so we lined up another which takes place this week. 


Teaching

You may well have seen before on this blog my announcements for the 'Introduction to Commercial Sewing Patterns' class and Vest Making sessions that I've been teaching at Super+Super HQ. Both have been going well, but some more attendees wouldn't hurt! I just freakin' LOVE teaching sewing and pattern related stuff. I get to talk to lovely people for a few hours at a time about the subject I am most interested in and get paid (a bit). In the New Year I plan to expand the range of classes I teach in Brighton at S+S, including a clothing alteration and mending class which there has been call for recently I've found. 


I have also begun assisting with a pattern cutting class at Sew Over It in London. In the New Year I will be teaching that Intro to Pattern Cutting class solo, alongside a 40s Tea Dress class (pictured above) and a Trouser Making class. It's pretty fabulous working at Sew Over It. It's a beautiful space with all the equipment you could possibly need, and cake in abundance. 


Hat-Making

The local sewing machine repair man Richard (who shared a heap of his knowledge in this post) who knows everyone in Sussex with a sewing machine, domestic or industrial, phoned me up shortly after the TRAIDremade studio closed down saying he knew a woman who was looking for a part-time machinist. When I became self-employed my income dropped to basically zilch so I contacted her with haste. 'That woman' was hatter Jill Corbett, I went for a trial and now I work for her between one and three days a week. 

Generally, I make her pork-pie (pictured above), fedora (AKA Snatch) or trilby styles in leather, canvas or moleskin using mental-looking industrial machines. It's been a real education learning how the pieces go together. I'm still getting used to making the leather ones: thick, tough leather really doesn't want to become a 3D shape! All her hats are made to order for specific customers across the globe. 

Random fact: milliners create hats for women, hatters create hats for men.


Making Stuff to Sell

This is quite a small category of activity because I'm not taking it super-seriously. Basically, I've been making lots more of the recycled wool mittens I made last Winter to sell at a couple of craft fairs on the lead-up to Christmas. I'll be sharing a stall with my mate Kirstin at this event and I'll be present (and hopefully festively tipsy) at this festive selling soiree at Super+Super HQ.

To be honest, I get a bit jealous of the sellers at all the craft fairs I visit and organise. Plus, having been thinking lots about selling due to the 'Sales for Peops...' event Pat and I have been working on, I thought I'd give selling a whirl this festive season. I won't, however, have a stall at my own event. I've learnt that at Brighton Craftaganza I need to be getting people inside the venue and checking all the sellers are ok (and eating sausage rolls), which doesn't fit well with trying to man your own stall and concentrating on making sales. I'm really excited to be the other side of the table and putting into practice the techniques I feel I've learnt. I'll let you know how it goes. Oh, and if I don't sell many, I'm all set for Christmas presents to give!!! 


Conclusion:

Being self-employed is wonderful but really hard work. I kind of imagined it would be both those things of course, but until I was actually living it, it is impossible to actually visualise how my new life will be. I thought I worked a lot when I had a full-time job and organised Brighton Craftaganza, blogged, sewed and made patterns on the side. But now I find myself working even longer hours; there is no cut-off between 'work' and 'being at home', especially after the acquisition of an iPhone, even though I have a desk space where I theoretically can walk away from. It's confusing knowing what task I should be concentrating on and when with no-one else to ask. Plus, taking time to plan for the future, even just a couple of weeks ahead, can kind of get forgotten. I'm trying to improve in these areas though. 

When I announced my self-employedness, lots of people left comments of their own experiences of redundancy and/or setting up on their own and their financial concerns. I can totally relate to many of these now. I'm making very little money right now, but I have two things I am very grateful for: 1) I live in a country that (currently, just about) has a welfare state that provided Pat and I with some housing benefit assistance that helped us out when we needed it most, and 2) Pat's recent book has been doing well, and he received a royalty cheque that meant we can keep a roof over our heads and food on the table for the foreseeable future. PHEW.

So, thanks masses to everyone who wished me well when I wrote about all this stuff previously. I'll get back to blogging about pretty dresses and refashioned T-shirts soon, promise!

Monday 19 November 2012

Giveaway Monday: Me-Made 'Skirt' Skirts!

** UPDATE: THIS GIVEAWAY IS NOW CLOSED. THANKS TO THOSE WHO ENTERED**
 

This is the fifth and last instalment of my month of Giveaway Mondays. There will be giveaways round these parts again in the future, and some of them may even land on a Monday, so don't mourn its loss too hard. This week is another chance to acquire some items from my former little clothing label. 


I have two of what I imaginatively called my 'Skirt' skirt design, one is a Small and one is a Medium.  The Medium skirt's waist measures 85 cms / 33.5", so if the level you like to wear your skirts at measures a bit smaller than that, then these should fit you (or whoever you'd like to give one of these to) just fine. The Small skirt's waist measures 77.5 cms / 30 1/2", so similarly if your own measurement is a bit smaller than that at the point you like a skirt to sit, then this size should be the one for you. From top to hem, both of these skirts measure 34.5 cms / 13 1/2 ".

They are A-line mini-skirts made from black poly-cotton blend with satin-stitched 'skirt' design in contrast red thread. The fasten with a concealed side zip, and have contrast gingham facings. 


To enter the giveaway to get one of these skirts, just leave a comment in the comments section of this post telling me which size you'd like and what you'd do with it if you won (e.g, you'd give it to a loved one; or how you'd wear it, etc... not for any particular reason, I'm just nosey). If I can't access your email address within two clicks, please include it in your entry comment. Email addresses will not be used for anything other than to contact you if you are one of the two lucky winners of this giveaway. 

This giveaway is open internationally and the winners will receive the skirt completely free of charge. The giveaway entries will close at midnight GMT Sunday 25th November and the winners will be chosen by random number generator and contacted Monday 26th November October. Good luck, my skirt-skirt-loving friends!

Friday 16 November 2012

Refashion Friday Inspiration: Bow Detail Sweatshirt Dress


Happy Friday everyone! Today's inspiration point is undeniably similar to last week's lace yoke detail sweatshirt dress! That lace yoke dress was well received so I thought I'd offer a variation so people can see how else to interpret the basic idea. 


As you may well have figured out, the basic dress has been made in exactly the same way as last week's, using two unwanted men's sweatshirts that are the same colour. As you can see if the image above, one of the sweatshirts was a raglan style so the final dress has ended up with this cool shoulder seam effect (if you are wondering why the image below doesn't have those seams, it is because I made a few of these dresses and ended up photographing a couple). 


I wanted to keep the red dress really fun and youthful, so I used some candy-striped cotton to make simple bows and applied them to the shoulders. Winter and cold-weather dressing can so often be drab and dull, so I wanted to make something bright yet still snug and warm. You could really amp up the effect by combining this dress with equally bright and vivid coloured tights!

How about you? Do you have any strategies for avoiding drabness when dressing for Winter weather? 

Monday 12 November 2012

Giveaway Monday UK-only Edition: 'Just Sew Stories' Book

*** UPDATE: THIS GIVEAWAY IS NOW CLOSED. THANKS IF YOU ENTERED ***


If ever the was a publication that proved craft and sewing has moved on from it's stuffy, old-fashioned image it's 'Just Sew Stories' by Katie Allen. It would take a week to explain to your grandma all the influences and cultural references behind the projects in this neon-hued book.  It is interesting that Allen (who is a regular contributor to Mollie Makes magazine) references her grandmothers as her source of inspiration in the introduction of this book, but you cannot deny that she has taken the techniques they taught her (cross-stitch, patch work, hand embroidery etc.) and translated them in a direction that is very much her own and for her generation. 


The design of this book is delightful: cute collages of inspiration, clever typography and geometric elements make flicking through this book a joy. As with most books of this ilk, she starts by imparting some basic techniques that you'll need to complete the projects within. But this is no detailed 'How to Sew' book: mastering skills is not the objective here. You get just enough under your belt to get going with the projects, so if you are looking for a comprehensive sewing guide, you'd best look elsewhere. But in this sense it is perfect for it's intended audience.


The projects include appliquéd glasses case, sequinned hair fascinator and bloomers. They are cute, fun and quick. But I'm not going to pretend otherwise: this book probably isn't for the readers of my blog, not even the younger ones. This book is for their teenage-ish daughters or little sisters: individuals who have expressed an interest in making stuff but don't currently have the patience and/or desire to master a sewing machine or figure out sewing/knitting patterns. Obvs I'd like to say this book would appeal to sons and little brothers too, but alas vintage-style aprons, retro head bands and puffy bloomers are unlikely to draw many young creative dudes. However, the projects are 'cool' enough for the teen market who would like to have a bash at them (I'd imagine) but also quick enough to get a finished result before Hollyoaks or Skins comes on the telly.


The eagle-eyed of you will have noticed that this post is another instalment of my Giveaway Monday series, so it may not surprise you to learn that I have one copy to give to a lovely reader of my blog.  And with Christmas coming up, this giveaway could be a great opportunity to encourage the creativity of a young crafter or crafter-to-be at no expense to yourself! Unlike the 'Sew Over It' book I gave away a couple of weeks ago, I don't have the publisher stumping up the postage this time, and because books are heavy and I am skint, I'm afraid this week's giveaway is UK ONLY. Sorry overseas-peops. 


To enter, just leave a comment in the comments section of this post telling me why you fancy getting hold of a copy of 'Just Sew Stories' (no reason, I'm just nosey). If I can't access your email address within two clicks, please include it in your entry comment. Email addresses will not be used for anything other than to contact you if you are the lucky winner of this giveaway. To reiterate, this giveaway is open to residents of the UK only and the winner will receive the book completely free of charge. The giveaway entries will close at midnight GMT Sunday 18th November and the winner will be chosen by random number generator and contacted Monday 19th November October. Good luck, my UK-based, book-loving friends!

Friday 9 November 2012

Refashion Friday Inspiration: Lace Yoke Sweatshirt Dress


If you are somewhere in the Northern Hemisphere that is as chilly as my studio in Brighton, you may be looking at this dress and thinking, 'That's what I need'! That's a damn cosy dress pictured above there, I just wish it was mine... I'm thinking a long-sleeved T-shirt underneath (something like Winnie's, perhaps), woolly grey tights, boots and a mustard cardigan!


If this refashioned/remade garment is looking a bit familiar to you, it's because it is a reworking of a previous idea. The grey sweatshirt I made for myself and the navy version I made for Jane share the same lace yoke detail. However, for the dress I went for short puff sleeves rather than the 3/4 length ones, and added a skirt section. This remake took two second-hand men's navy sweatshirts which were thankfully almost exactly the same shade. It's semi-fitted and just pulls on with no fastenings. I used the original neck ribbing to remake the new neck finishing, and harvested one of the waist band ribbing to fashion the sleeve cuffs. There was, joyously, very little wasted sweatshirts at the end of this remake.  


As with most refashioning projects, the original sweatshirts threw up some extra challenges. One of the sweatshirts had some permanent marks on the front, rendering that panel pretty useless. I used the good back panel from the sweatshirt to cut the dress's front piece and opened up one pair of sleeves to cut out the dress's back piece, forming a seam along the Centre Back.

Who says refashioning/remaking garments is only about taking shirts and T-shirts and making pretty, flimsy, whimsical tops?! Happy Winter-Refashioning, my friends.  
Related Posts Plugin for WordPress, Blogger...