Monday 29 February 2016

Vintage Cord Bunny Applique Dress

kid's clothes week

Well, its quality rather quantity that you're seeing right now! I was super excited to be taking part in the KCW sewalong/challenge last week, but a couple of days in and I was struck down with the lurgy, so I only got to complete one garment. Sad times. Anyways, let me tell you about what I was able to achieve...


Fabric:

As I mentioned in my last post, I wanted to take the opportunity to make something slightly more time consuming than the quick scrap-busters I've recently been knocking out. I've got some lovely pieces of fabric that have been patiently waiting in my stash for years that aren't ear marked for any specific usage. I thought last week would be a great chance to explore the potential in a few of them. 

I'm guessing that this piece of floral printed corduroy is vintage, it really reminds me of pinafores and dungarees from the late 70's. At one point I had vague plans to make some shorts for my tiny friend Kirstin (there wasn't much of this fabric!) after she mentioned that it reminded her of her childhood, but I think I used something else in the end. It's quite thick and pretty stiff, so a pinafore dress was probably always going to be the best use for it anyhow. 

I considered making patch pockets from the leather to bring a slightly contemporary vibe to this garment, possibly using the original pattern's pocket piece as a guide. However, I know that Dolores will engage far more with a garment if it features an animal, character or shape that she recognises, so the leather pockets became leather bunny appliques. I had a lot of fun with my walking foot stitching down these bunnies, which I first secured with some blobs of copydex. I really like how the bunnies are now sitting in a field of flowers. 


Pattern:

I almost used the same pattern as the fawn pinafore dress, but I then unearthed this vintage pattern that's been in my stash for years. I bought it pretty cheaply from Snoopers Paradise in Brighton about four or five years ago, and it was originally published in 1978. I cut the size 3, and because I find some little girl dress patterns from the 50's, 60's and 70's disturbingly short, I added about 10cm to the length. Dolores is coming up to 2 and a half, and I think this dress may fit her this time next year, and maybe will continue to do so until she's nearly five! 

It was a super simple make. Aside from the length, the only other change I made was the addition of a centre back seam to make it fit on the limited quantity of fabric. The one element I'm not wild about is that I think, in hindsight, that the buttonholes on the shoulders don't sit close enough to the edge, which is making the overlaps stick out a little bit. 


Thoughts:

The combination of vintage pattern and (probably) vintage fabric along with a dash of leather detailing is making me pretty happy here. Dolores seems to love it too, but whether she still feels that way about it in a year's time remains to be seen!

Cost:

Fabric: £0 (I'm pretty sure I was given this fabric)
Lining fabric: £0 (left overs from some sampling work I did last year)
Pattern: £1.50 (I may use it once again)
Leather: £0 (from a number of little samples given to me by Claire)
Butons: £0 (from my stash but were donated to me)
Total: £1.50

I'm pleased with that. Now I just need to make sure I don't forget about it so it actually sees lots of wear to make its creation worth while. How about you? If you participated in KCW, how did you get on? I hope the lurgy didn't get you too!

Sunday 21 February 2016

Kid's Clothes Week Sewalong February 2016: Toys!

kid's clothes week 

Woo hoo! The Kid's Clothes Week sewalong/challenge is here again and starts TOMORROW! I bowed out of taking part last time (October 2015) bcause I was eyeball-deep in working on my Anya shoulder bag pattern, but this one couldn't have come at a better time. Today I sewed the final stitches of some window display sample garments for the Village Haberdashery, and with no other personal sewing projects currently on the go, I'm free to indulge my love of making stuff for Dolores all week.

As you may or may not already know, the rules of Kid's Clothes Week are incredibly simple: you just have to sew kid's clothing for one hour each day for a week. This season's challenge is 'Toys', but you can take or leave the theme as you wish. As usual, they have offered some great ideas (like these) on how you may find inspiration in the theme.

  kid's clothes week

So what are my sewing plans for next week? Umm, I'm not sure! I've been doing a bunch of quick scrap-busting projects for Dolores recently (like these shorts and these sweatshirts, plus others that have yet to be blogged), so I think I may take a different tack and work on slightly more time-consuming projects that use some larger pieces of fabric from my stash. 

What about you? Are you taking part this season? If so, are you incorporating the theme? Either way, what was your favourite ever kid's clothing sewing project, if you've made one? 

Wednesday 17 February 2016

Nippy Weather Sewing Plans: Addendum, A Thermal Under-T-Shirt


When I was figuring out my nippy weather sewing plans, I really should have included a plan for something like this: a warm under-garment. As much as I like my denim Tova top and as pleased as I am to own it, it turns out that nippy weather wear it is NOT! This, however, IS. 

Pattern:

This is my third go at the Tilly and the Buttons Agnes knit top pattern, and I'm confident that it won't be my last. The Agnes top is actually very similar to my early attempts at self-drafting a knit top pattern, but it's just so perfect that I doubt I'll ever return to my self-drafted efforts again. Having learnt from the fit of my previous versions, this time I used a size 3, grading out from the armpit to a size 4 for the rest of the sleeve. I knew this would result in a snug fitting garment, but as this is intended to be underwear, that was what I was looking for. When I say snug, I mean snug: I not sure you're ready for this jelly so I avoided sharing a modelled shot of this garment! 


The Agnes already has a fairly wide neckline, but I omitted the neckband in favour of a decorative elastic finish to make the neckline wider still. I did this to avoid it peeking out from whatever I'm wearing on top. 


Fabric and Notions:

This knit fabric had been burning a hole in my stash for about the last four years! For a while I was planning to use it to make a cropped, short sleeve Jenna cardi, but A) I wasn't sure there'd be quite enough, B) I think a tiny summer cardi would see so little wear throughout the year that I wasn't sure I could justify using this fabric on that project, and C) I hate wearing white. I considered dyeing this fabric red, but was worried about getting an even result so I ended up doing nothing with it.

I don't know what the hell it is, or even how to adequately describe it, other than it's fairly thick with a floral design/texture somehow knitted into it. Any ideas? Basically, it looks like its designed for thermal garments. Hey, I never claimed to be reinventing the wheel here. When I realised that a warm layerable under-t-shirt would help my current clothing selection limp along 'til Spring, I knew where to look. 

The cotton lace elastic that I used round the neckline was kindly given to me by my lovely blog sponsor, Textile Garden. At time of writing I couldn't find it on their site so they may have sold out. It's really special stuff so hopefully they'll be getting more in soon, otherwise you could drop them an email in case they still have a stash somewhere. I applied it by gently stitching it to the right side of the garment neckline with a lightning flash stitch, then I flipped the bottom elastic part to the inside of the neckline and secured it in place with a tiny zigzag so only the lace part peeks out. The whole thing stretched out a little through handling but a healthy dose of steam from my iron did the trick and made everything sit as it should. 


Thoughts:

The aim of this garment is to bring some of my garments back into regular rotation that would otherwise be hiding until Spring. It has succeeded in that I have been wearing my anchor applique remade sweatshirt, but sadly even this wide neckline is visible underneath my 1960's Breton top

Cost:

Pattern: £0 (I got it for free because I teach at Tilly and the Buttons HQ, but it can be bought here for £12.50. If I hadn't got it for free, I definitely would have bought it anyway because it is excellent and my ideal knit top pattern. I've used it three times now, with plans for many more).
Fabric: £0 (it was lurking in my stash but I'm pretty sure I didn't pay for it in the first place)
Elastic: £0 (I got it for free, but sadly I can't link to where it came from at this time, sorry)
Total: £0

Saturday 13 February 2016

Scrap-busting Crew Neck Sweatshirts


Hip hip hooray for scrap-and-small piece busting!!! I've been having heaps of fun whipping up these simple sweatshirts. Lemme tell you about them...

Pattern:

I've mentioned Brindille and Twig sewing patterns on this blog various times before, but I must admit that to date I've only actually sewn their free hoodie pattern (which you can see here). Well, that free pattern did it's job because I thoroughly enjoyed that project and went on to buy another from their range. I saw the crew neck sweatshirt pattern (pictured below) ages ago via Pinterest and thought, 'That's the one!'. It seemed to have the fit and proportions that I had been hoping to achieve when I used an Ottobre magazine to make this sweatshirt

(image source: Brindille and Twig)

The crew neck sweatshirt pattern is graded in sizes from tiny baby to 5-6T. After comparing the pattern pieces of the hoodie pattern to this one, I decided to go for the 18-24 month size which for a height of approx. 90cm, even though Dolores is nearly 2 and a half and over 90cm high. The garments have come up a bit big, but that is fine as I was hoping she'd grow into them anyhow. Aside from the sizing coming up a bit big, my only other minor issue with this pattern is that the seam allowance is a scant 6mm. I traced off the pieces I wanted so I could make the seam allowances a more manageable 1cm and retain all the other sizes of the pattern.  


Fabric: 

In the kind of sizes I'm making for Dolores at the moment, this kind of project requires such a pleasingly small amount of fabric! The pattern recommends jersey, interlock or stretchy french terry, rather than traditional sweatshirt fabrics which I guess might not be stretchy enough for this garment to be comfortable. For my first version of this pattern, I used a small piece of gorgeous emerald jersey that I was given by the amazingly lovely Katherine Sheers as part of a secret santa swap at a sewing blogger's Christmas meet up. At first I intended this fabric to become pants for me as it was the perfect weight and stretchiness, but it seemed such a shame for such a vibrant colour to be hidden most of the time! 

(image source: Cos)

Initially I tried to use an iron-on transfer of a sparkly rainbow on the front piece, but the transfer was too old and wouldn't stick properly so I had to abandon that plan. I then took inspiration from the image above that I'd squirrelled away on my Kiddie clothes making Pinterest board and used a sample of spotty knit that was sent to me by Girl Charlee to make a simple little patch pocket detail. 


For my second version, I used up a small piece of this fawn print organic cotton knit by Birch fabrics and this magenta jersey knit, both of which were left overs from sampling work I've done for the Village Haberdashery. Annoyingly, my camera can't seem to show the magenta colour accurately, you'll have to believe me when I say that it's much pinker and more vibrant IRL.


My third and favourite version is a crazy mix of monochrome with a splash of lime. The spotty and solid black double knits were scraps leftover from these knit pencil skirts, both of which are now completely busted. The zebra stuff has been lurking in my stash for a while and I still have some left for future projects. The almost-neon lime jersey knit was a small sample sent to me by the VH and is available here. After trying this sweatshirt on Dolores, I realised the neck was too tight, probably because the solid black and zebra print fabrics don't have as much stretch as the jerseys I used for the other two versions, so I cut away the black neckband and made another from a strip of black jersey which is much better. 


Thoughts:

I love making these sweatshirts! For my second and third version I shortened the length of the body and I'll probably continue to do that for any future versions (of which I expect there to be many). Also, I'll probably start cutting the neck hole and neck band for the size above to avoid them being difficult to get on and off. Fickle toddlers can let things like a tight neck hole put them off a garment entirely!

Cost:

Pattern: $7.50 (approx. £5.18) available here. I've used this pattern three times and have a couple more planned for friends' kids. Plus I'm sure I make many more for Dolores in bigger sizes in the future.
Fabric: £0 (all entirely scraps and small pieces from my stash, or little samples recently sent to me for free)
Total: £1.72 each

Bargain, non?

Tuesday 9 February 2016

Podcast / Audio Post #3: Tired and Busy and Being Silly

It's only taken over two and a half years to make another audio post! If I'd had more control over things, this one would have been an in depth piece about something that I'm passionate about. Instead this is a silly little sewing-related conversion I had with Pat whilst I traced out a pattern and he tested his new audio-recorder/toy...


Saturday 6 February 2016

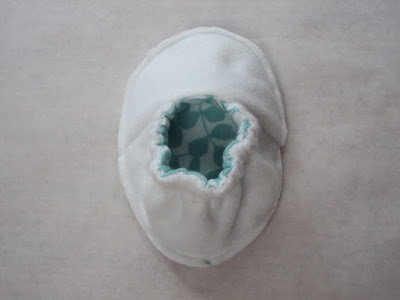
Five Genuinely Useful New Baby Makes #2: Elastic-back Shoes


Hello! If you’ll indulge me, it’s time to have a look at my second monthly suggestion for something to make for a new baby that will actually get used. Massive thanks again to the Village Haberdashery for allowing me to repost this that was originally posted on The Daily Stitch.


Let’s face it: there are few things cuter on this earth than a pair of baby shoes. No doubt, the new parents will be given a clutch of baby shoes (what is the collective noun for shoes, anyway?), but if you heed my advice, yours make will stand out from the rest. How so? Because the ones you make actually have a chance in hell of staying on the little feet they were made for!


The thing I never realized about babies until I had one is that, when they are awake, babies are NEVER still. Those little arms and legs are always moving. In fact, they even move a fair bit whilst the baby is asleep as well. Any slip-on type shoes will slip right off again, and after a couple of attempts to put them on their baby, the parents will give up and consign those shoes back to the drawer for good. To make sure your pair of shoes stays on (and therefore gets used) my advice is to choose a style that is either elasticated or tied on around the ankle. Hopefully then the baby will wear those shoes for longer than it takes to get a photo!


There are literally hundreds of sewing patterns for baby shoes/slippes/booties/footies available, but the one I used here is a free one via www.poopockets.com (!) that can be found here. It is graded for two sizes, 0-3 months and 3-6 months. It consists of three pattern pieces and you’ll need two types of fabric (outer and lining) plus a small length of elastic. I changed the construction method slightly by choosing to line the back heel section too, plus I used 3/8” wide elastic rather than 1/8” wide as the pattern suggests.


Most of the fun here lies in choosing awesome fabric to make them in (as with all sewing projects, let’s face it!). With the outer fabric, you really can go to town. They can be as cute, kitsch, contemporary, classic or bizarre as you want! We went ‘subtle contemporary’ by picking some gorgeous 100% organic Cloud9 First Light flannel/brushed cotton in turquoise by Eloise Renouf. You only need about 30cm of fabric, so why not pick something really special?


As with the outer fabric, your lining fabric options are pretty broad but make sure that whatever you choose is soft. For this pair, I used a scrap of white felt from my stash, but toweling/terry cloth, sweatshirting, or velour would be great too.


We let the fabric do the talking on this pair, but there’s nothing stopping you from customising your baby shoes with ribbon, braid, ricrac, (very securely stitched-on) buttons, or whatever else your heart desires!

Wednesday 3 February 2016

Breton Fleece


So I made a fleece garment, for myself. Quite frankly, I can't believe we're having this conversation. I've always associated fleece with hiking or children's wear only, and I am NOT generally a fan of it in any other guise. But I got fed up of feeling cold, and now I'm wearing fleece too, outside the house even. I've adopted such a mum style, I'm even wearing wellies.


Pattern:

This garment is the last of my nippy weather sewing plans. My aim was to make another version of my 1960's Breton top, as I wear that thing sooooo often. When I took out the fabric that I had lined up for my second version, I realised that it was way too thin to keep me very warm in nippy weather. I'll still make that version, but when the fleece came into my life, the project took on a different angle and the fabric and pattern kind of informed each other. 


I decided that full length sleeves would be required, and that the drop shoulders of the original 1960's Breton top pattern (based on the pattern pictured above) probably wouldn't sit very well in the stiffer fleece fabric. It became clear that a mashup was being called for so I used the Tilly and the Buttons Coco pattern (pictured below) for the armholes and sleeve in a size larger than I would usually require, and I decided to incorporate the funnel neck option as well for maximum snugness. I basically used my original Breton pattern from the armpits down, omitting the bust darts. 


Fabric:

I found approx. 1m of this stripy fleece in a reduced bin in a fabric shop/haberdashery called Thimbalinas in Bexhill. I was in there with Dolores and my mum a few weeks back (the latter was buying yarn to knit a cardi for the former). When I saw it I joked to myself 'I could make a fleece Breton!" Then I thought, 'Umm, actually I could make a fleece Breton...'. So I spent about £5.60 on the metre and took it home to ponder. I decided that a contrast shoulder panel in a solid cream would hopefully make it more evident that a Breton top was what I was trying to emulate. The solid cream fleece also came from the Hastings branch of Thimbalinas. Initially I had intended to cut the sleeves entirely from the stripy fleece only, but there wasn't enough to I had to use the cream fleece for the tops of the arms as well. I kind of dislike the slight difference of fleece textures that comprise the sleeves, but there wasn't really any other option. The garment seams where stitched using my (long-suffering) overlocker, and I used my regular sewing machine for hemming. 


Thoughts:

I'm in two minds about this garment. On the one hand I love it because it is now the cosiest garment I own, and it means that my only other two cold-weather tops can get a tiny break! On the other hand, I look at these pictures and I see a someone who belongs on an allotment. Which is a ridiculous thing to think because actually I would LOVE an allotment! Although I've been a mum for a couple of years now, and my barfly days have been largely left behind (two drink limit these days, amirite?), and I've long been committed to comfort in any clothing I make, I think this garment is a significant leap in that direction that I didn't quite see coming. 


Cost:

Stripy fleece: approx. £5.60
Cream fleece: approx. £8
Pattern: £0 (the vintage one has been in my stash forever, and I got the Coco one for free because I teach the Coco workshop, but it can be bought here for £12.50)
Total: approx. £13.60

I imagine I'll be using this fleece top for years and years. If it gets covered in paint or something, maybe it'll be relegated to the allotment!

Related Posts Plugin for WordPress, Blogger...