Showing posts with label KCW. Show all posts

Tuesday, 22 November 2016

Oliver + S Hopscotch Skirt Pattern Hack Tutorial


Here's a super-easy pattern hack tutorial that was previously published over at The Village Haberdashery's Daily Stitch blog back in September. Thanks to them for allowing me to repost it over here. It features the second of my creations for the summer instalment of Kid's Clothes Week, donchaknow

If your interested in sewing clothing for little girls and haven’t come across the Oliver + S Hopscotch pattern, then allow me to introduce you! The skirt, in particular, is a wonderful, timeless garment that has perfect proportions and great details. However, it only really works in solid fabrics or prints with a small-scale design. The skirt’s button placket and clever pleated pockets would most likely chew up a larger design of print. But wait! I have the answer: an incredibly simple pattern hack that turns the Hopscotch skirt pattern into the ideal canvas for fabric with a bold print. We’re going to ignore the pockets and omit the button stand.


In fact, I may be cheeky even alluding to this as a pattern hack. Because we’re not actually going to alter the pattern pieces at all: we’re just going to use them slightly differently and alter the construction method a tad. Aside from being able to now use this pattern for a wider range of fabric designs, it also pretty much halves the construction time. Which may appeal to you, whether you’re creating wardrobe staples for your little girl, or whipping up a cute gift for someone else’s!

You will need: 
Trace the pattern pieces in the size that you require to preserve the other sizes for future projects. For this hacked version of the pattern, you will only need the front skirt piece, back skirt piece and front waistband piece.


When positioning the pieces on your fabric, ignore the ‘cut 2’ direction on the front skirt piece and front waistband piece. Instead, position these two pieces on a fold (like the back skirt piece) as pictured above. You’ll need to trust me on this: the dimensions of these pattern pieces mean that, even though you are using them on the fold and omitting the button stand, the measurements of the finished skirt will remain the same as if you made the regular version of this skirt pattern.

Once you have cut out the pieces, snip a tiny notch at the centre fold on the bottom edge of the front waistband piece, and another tiny notch at the centre front fold at the top edge of the front skirt piece. These notches will be matched up during construction.


The main difference in the construction of this hacked version is that you will now be making one front skirt panel (see above), rather than two. Gather the top edge of the front skirt piece and apply it to the front waistband piece, and continue the construction as per the rest of the instructions.


Congratulations! You have made the ideal gathered skirt, AND saved yourself some precious sewing time. Now, stop being so selfless and get back to making something for you!

Friday, 19 August 2016

Kid's Clothes Week Summer 2016: Celebration


My last blog post was basically a pile of kid's clothes that I've made, and this one is basically the same. Last week was the summer 2016 edition of the Kid's Clothes Week challenge/sewalong. As I'm sure you know by now, the only criteria for taking part is to sew clothing for children for at least an hour a day for a week. Each instalment has a theme, that you can adopt or ignore as you please. This summer's theme was 'Celebration', and I decided to translate it as a celebration of the little girl that my baby is turning into. So that meant embracing her defiantly girly, dressy clothing preferences! 


I failed to do any sewing on Monday or Friday, so I made sure I caught up by doing more than an hour on other days and extended it to include Monday this week. I managed to complete three woven garments, a skirt, a tunic top and a dress. I actually cut out the tunic top months ago, and it was great to be able to use KCW to fit in the actual construction, since I had clearly been stalling for various reasons. 


I intend to write individual posts for each of these garments in due course. However, I must admit at this point that the dress is the only one that Dolores hasn't refused to even try on! So modelled photos may be thin on the ground. 


Any tips on getting head strong toddlers and children to put on clothes when they don't want to?!

Monday, 30 May 2016

Kid's Clothes Week 'The Future': Results


Last week I put my Spring/preggers sewing plans on hold to participate in the latest instalment of the Kid's Clothes Week sewalong. To play along, all you have to do is sew for at least an hour a day for a week. I definitely managed over seven hours of sewing time over the week, although those hours were distributed slightly differently due to being at work on a couple of those days. Each KCW challenge has a theme, which you are free to adopt or ignore as you wish. My interpretation of the theme was to make clothing for my future-son that is currently dwelling in my belly. Check out the image above to see the results of my week of intense kiddie-sewing.


This challenge was an opportunity to get my head around sewing for a little boy, and it made me think about the types of garments that I imagine will be useful for him. Now let me tell you about what I sewed, in the order in which they were completed:


Straight Stripes joggers:


I really want most of my little dude's wardrobe to be as comfortable and unrestrictive as possible, so some joggers were top of my list to sew. I traced the 'Straight Stripes' pattern (pictured below) from Ottobre design magazine issue 4/2014. I used the size 62 width and 68 length, which is assuming he'll be fairly skinny like his sister! We can always roll up the bottoms for a while so they will get maximum use. The royal blue pair are made from some lovely soft double knit (which I think is this stuff) kindly given to me by Fabric Godmother. The grey stripy French terry was left over from my Breton sweatshirt, and was also given to me by Fabric Godmother. 


The pattern is super simple: just two pattern pieces. I made them using my overlocker for the seams, and my regular sewing machine to sew a channel to thread the elastic through. I've made it easy to unpick the channel slightly and left a big overlap on the elastic so these can be made larger round the waist if needs be. After all, I have no real idea of his proportions yet! 


Drop crotch joggers:


More of the same lovely double knit became a different style of joggers. For these I used the 'Streaky Legs' sweatpants pattern from Ottobre issue 1/2015. I already had the pieces traced out in a size 80 width and 86 length from when I made these awesome leopard print bottoms for Dolores. They were one of my very favourite things I've made for her, although I've probably passed them on to another child as I can't find them anywhere (sad face). I later used the next size up for these epic red/denim/rainbow joggers and pyjama bottoms. It's safe to say that I love this pattern, I'll probably trace some more size-combos to make more versions at some point so that the little guy will always have some of these in his current size. 


This pattern has one whole extra pattern piece compared to the first jogger pattern! It's not the most fabric-efficient, but can be made more so by adding a centre back seam if necessary. As with the others, I used my overlocker for all the seams and my regular sewing machine for the elastic channel. 


Geometric sweatshirt:


Determined was I to make the absolute most of the 1m of blue double knit! This little crew neck sweatshirt was made using this Brindille and Twig pattern that I've previously used for Dolores here. Remembering how the size I used for hers came out a bit big, I traced the size 74 (approx. 1 year) so he'll hopefully fit it during the autumn/winter/spring after next. The jazzy little geometric detailing began as a little sample of this jersey from Girl Charlee. I really liked how to colours worked with the royal blue, so I cut it in half and applied it to the front sweatshirt piece before constructing the garment on my overlocker.


Comic print shirt:


This garment was the most time consuming, but therefore probably gave me the biggest sense of accomplishment! It's hard to gauge the size of these garments without a model, but this is basically a tiny-scale dude's shirt. The pattern (Burda 9851) was kindly given to me by Catherine from Clothes and Sewing when her youngest son grew out of the largest size. She'd already traced the size 9m pieces for the short-sleeved version, so that is what I've used here, but I actually think it's turned out more like 1 year or even 18 months. Time will tell!

The teensy-ness of it all made some steps, like setting in the sleeves, pretty tricky. But I was rewarded for my troubles when it came to stitching on the buttons and I found that I'd completely accidentally got an almost-perfect pattern match at the front!

The amazing fabric is once again from Fabric Godmother, another part of the package she sent me once I announced that I was having a boy. Annoyingly I can't find it on their site, so I'm not sure if it was an end of roll piece but it would be worth dropping Josie an email if it's taken your fancy.


Comic print shorts:


To get full value from each piece I've been sent, I was able to squeeze out a size 1 year of the Made Everyday (previously Dana Made It) Kid Shorts pattern (previously used here). Truth be told, I messed things up a bit when cutting out the shirt so I had to recut the front pieces. If that hadn't happened then I'd have had enough of the comic print fabric for an entire pair of shorts, but instead I had to think on my feet and ended up combining it with some red poly cotton that was one of the squillion red table cloths that my lovely mum made for our wedding. I actually think that necessity being the mother of invention, as it has been here, has served me well and these shorts are probably way more interesting and unique because of the enforced design change. I now only have just enough of the comic print fabric for a couple of small contrast patch pockets for a future sewing project. 


Thoughts:

This has been a really productive and valuable KCW for me. Not only have I made a nice variety of cute, and hopefully useful, pieces for the mini-dude, it has also really helped me get used to the idea of having a little boy in my life. It has been an opportunity to express some of the ideas and inspiration that I was discussing in this post. I like the blend of more traditional style garments (the shirt and the shorts) with the more modern (the drop crotch joggers and the geometric sweatshirt), and as I made these items I had about a thousand new ideas for more things that I want to make him.  

I love all these garments and can't wait to see them worn by my future-son in the months/years to come, but my favourite item is probably the sweatshirt. The simple application of a tiny piece of contrast fabric has really elevated what would have been a fairly dull item, and it's left me with lots of ideas along this theme. 

If you participated in KCW this season, how was it for you? What did you make and what was your favourite garment? Do you find it difficult to find an hour a day to sew? Did you have to fudge the timings a bit?! 

Monday, 29 February 2016

Vintage Cord Bunny Applique Dress

kid's clothes week

Well, its quality rather quantity that you're seeing right now! I was super excited to be taking part in the KCW sewalong/challenge last week, but a couple of days in and I was struck down with the lurgy, so I only got to complete one garment. Sad times. Anyways, let me tell you about what I was able to achieve...


Fabric:

As I mentioned in my last post, I wanted to take the opportunity to make something slightly more time consuming than the quick scrap-busters I've recently been knocking out. I've got some lovely pieces of fabric that have been patiently waiting in my stash for years that aren't ear marked for any specific usage. I thought last week would be a great chance to explore the potential in a few of them. 

I'm guessing that this piece of floral printed corduroy is vintage, it really reminds me of pinafores and dungarees from the late 70's. At one point I had vague plans to make some shorts for my tiny friend Kirstin (there wasn't much of this fabric!) after she mentioned that it reminded her of her childhood, but I think I used something else in the end. It's quite thick and pretty stiff, so a pinafore dress was probably always going to be the best use for it anyhow. 

I considered making patch pockets from the leather to bring a slightly contemporary vibe to this garment, possibly using the original pattern's pocket piece as a guide. However, I know that Dolores will engage far more with a garment if it features an animal, character or shape that she recognises, so the leather pockets became leather bunny appliques. I had a lot of fun with my walking foot stitching down these bunnies, which I first secured with some blobs of copydex. I really like how the bunnies are now sitting in a field of flowers. 


Pattern:

I almost used the same pattern as the fawn pinafore dress, but I then unearthed this vintage pattern that's been in my stash for years. I bought it pretty cheaply from Snoopers Paradise in Brighton about four or five years ago, and it was originally published in 1978. I cut the size 3, and because I find some little girl dress patterns from the 50's, 60's and 70's disturbingly short, I added about 10cm to the length. Dolores is coming up to 2 and a half, and I think this dress may fit her this time next year, and maybe will continue to do so until she's nearly five! 

It was a super simple make. Aside from the length, the only other change I made was the addition of a centre back seam to make it fit on the limited quantity of fabric. The one element I'm not wild about is that I think, in hindsight, that the buttonholes on the shoulders don't sit close enough to the edge, which is making the overlaps stick out a little bit. 


Thoughts:

The combination of vintage pattern and (probably) vintage fabric along with a dash of leather detailing is making me pretty happy here. Dolores seems to love it too, but whether she still feels that way about it in a year's time remains to be seen!

Cost:

Fabric: £0 (I'm pretty sure I was given this fabric)
Lining fabric: £0 (left overs from some sampling work I did last year)
Pattern: £1.50 (I may use it once again)
Leather: £0 (from a number of little samples given to me by Claire)
Butons: £0 (from my stash but were donated to me)
Total: £1.50

I'm pleased with that. Now I just need to make sure I don't forget about it so it actually sees lots of wear to make its creation worth while. How about you? If you participated in KCW, how did you get on? I hope the lurgy didn't get you too!

Sunday, 21 February 2016

Kid's Clothes Week Sewalong February 2016: Toys!

kid's clothes week 

Woo hoo! The Kid's Clothes Week sewalong/challenge is here again and starts TOMORROW! I bowed out of taking part last time (October 2015) bcause I was eyeball-deep in working on my Anya shoulder bag pattern, but this one couldn't have come at a better time. Today I sewed the final stitches of some window display sample garments for the Village Haberdashery, and with no other personal sewing projects currently on the go, I'm free to indulge my love of making stuff for Dolores all week.

As you may or may not already know, the rules of Kid's Clothes Week are incredibly simple: you just have to sew kid's clothing for one hour each day for a week. This season's challenge is 'Toys', but you can take or leave the theme as you wish. As usual, they have offered some great ideas (like these) on how you may find inspiration in the theme.

  kid's clothes week

So what are my sewing plans for next week? Umm, I'm not sure! I've been doing a bunch of quick scrap-busting projects for Dolores recently (like these shorts and these sweatshirts, plus others that have yet to be blogged), so I think I may take a different tack and work on slightly more time-consuming projects that use some larger pieces of fabric from my stash. 

What about you? Are you taking part this season? If so, are you incorporating the theme? Either way, what was your favourite ever kid's clothing sewing project, if you've made one? 

Thursday, 25 June 2015

African Wax Print Geranium Dress: Plus, I'm Tapping Out


Here it is peops, my second and final garment for this summer's 'Traveling' themed KCW. And I give up. But let's talk about the garment first. Oh, and if you don't like pictures of cute toddlers, or the colour orange, or eyes, then you may want to skip this post entirely. 


Pattern:

This is my second go using the Made By Rae's Geranium pattern for Dolores, and my forth go at it in total. I wrote pretty thoroughly about it in the Liberty print version blog post if you want to know my thoughts on it. But you can probably guess how I feel about it simply by the fact that I've made it four times now. 


This time round I used the plain armholes like the Liberty print one, but opted for the V-notch neckline and gathered skirt options. I'm not sure why, but I feel a bold print (and let's face it, you don't get much bolder than this one!) suits the gathered skirt style, and plain or very subtle/small prints look better with the pleated style. I think the formulae of crazy fabric + traditional style OR traditional/subtle fabric + more interesting design works well for children's wear.


Fabric and Notions:

If you've been following my blog for a couple of years, this fabric may look familiar; it once took the form of a big fat horrendous FAIL of a maternity garment. Once I had finally stopped laughing about that dress, I put it away with the intention of reusing the fabric, even though I still have metres and metres of it left uncut. I just couldn't waste the fabric, like I'd wasted my time and energy.


If you've made it this far into the post, it's probably already seared your retinas, however let me tell you a bit more about it. It's a medium weight African wax cotton fabric printed with an insane design of eyes and abstract Aztec-y diamonds. It feels and behaves like quilting cotton, and kind of makes the skirt stick out a little bit. I worked hard to achieve a linear pattern match at the seams, but through absolutely no effort on my part, I seem to have nailed an almost exact pattern match on the skirt's back seam and one of the side seams. Like, the eyes are complete. I don't think I couldn't have done that if I'd tried. 


The bodice is lined in a scrap of cream silk habotai from my stash, and despite intense amounts of clipping into the bodice seam allowances before turning it through and very careful pressing, you get slight glimpses of it peeking out. I'm not about to attempt to source bright orange lining fabric and then try to buy only 15 cms of it though, so I'll have to get over it. 


To extend the African theme further still, I used these little zebra buttons for the back closure. They were a gift from the lovely Maggie from Textile Garden (my sponsors, FYI). You can find the zebra ones, plus many many more amazing novelty buttons here. My initial button choice was some giraffes (also given to me by Maggie), but they required vertical button holes which really wouldn't have worked for this dress. No matter, African savannah theme remains intact. (Please don't leave a comment if you happen to know that African wax fabric is from an entirely different part of Africa than where zebras live or something!)


Thoughts on the Dress:

Aside from nearly making my eyes bleed when I look at it, I think this is a pretty awesome garment. The only thing I'd criticise, aside from the aforementioned comment on the lining peeking out, it that the scale of the V-notch is a little small for my liking. If I use this pattern again (which I probably will) and use the V-notch option (which I probably will), I'll make it bigger so it stands out more, even if I'm using more subtle fabric.

The only other thing that could have improved the final look is if I'd found the time and energy to make a matching sun hat. However, I really don't think this dress will get that much wear that it warrants its own special hat! 


Thoughts on This Season's KCW:

So that's me done. I've only completed two garments this time, and I probably didn't sew for a total of seven hours (although I've definitely stopped trying to complete the required seven hours within the specified week). The truth is, I've been ill all week and struggling to entertain Dolores at the same time. She's been sick too and neither of us have had much sleep for agessssss. I was hoping to complete the two projects that I had had brewing anyway, and then bust out something fresh (to me) inspired by the Traveling theme. But it wasn't meant to be.

And, not that anyone should notice this, but I've been blogging way more frequently for the last couple of months than has been my usual routine. I've still got a bit of a backlog of projects to share and topics to discuss in blog post form, but I need to slow up a bit again because I'm heaping pressure and stress onto myself for no good reason. Hmm, starting to realise why I might be ill at the moment! I'm going house-sitting tomorrow for a five days, so that's drawn a line under the challenge, as well as running out of steam. Anyway, this wasn't meant to be a pity party, I just wanted to explain why I'm sadly tapping out of this awesome sewing challenge early. On the plus side, I have to say that sewing (and children's wear sewing in particular) is a regular activity for me at the moment, so if one of the motivations behind the KCW challenges is to kick start someone's flagging sewjo, then I'm pleased to say that I don't feel I need to gain that from it. If you are taking part, I really hope you are having a super fun week!

Tuesday, 23 June 2015

'Hola' Batwing Sweatshirt


My first make for the summer Kid's Clothes Week challenge! I must admit that, even though the challenge officially started just yesterday (22nd June), I actually made this at the weekend. This is because I'll be working all next weekend so won't get a chance to sew at all, so I was 'making time'. Not that this was a particularly time consuming garment, it could have easily been completed in a day if there were no cheeky toddler about requiring entertaining, feeding, changing etc.  


Pattern and Construction:

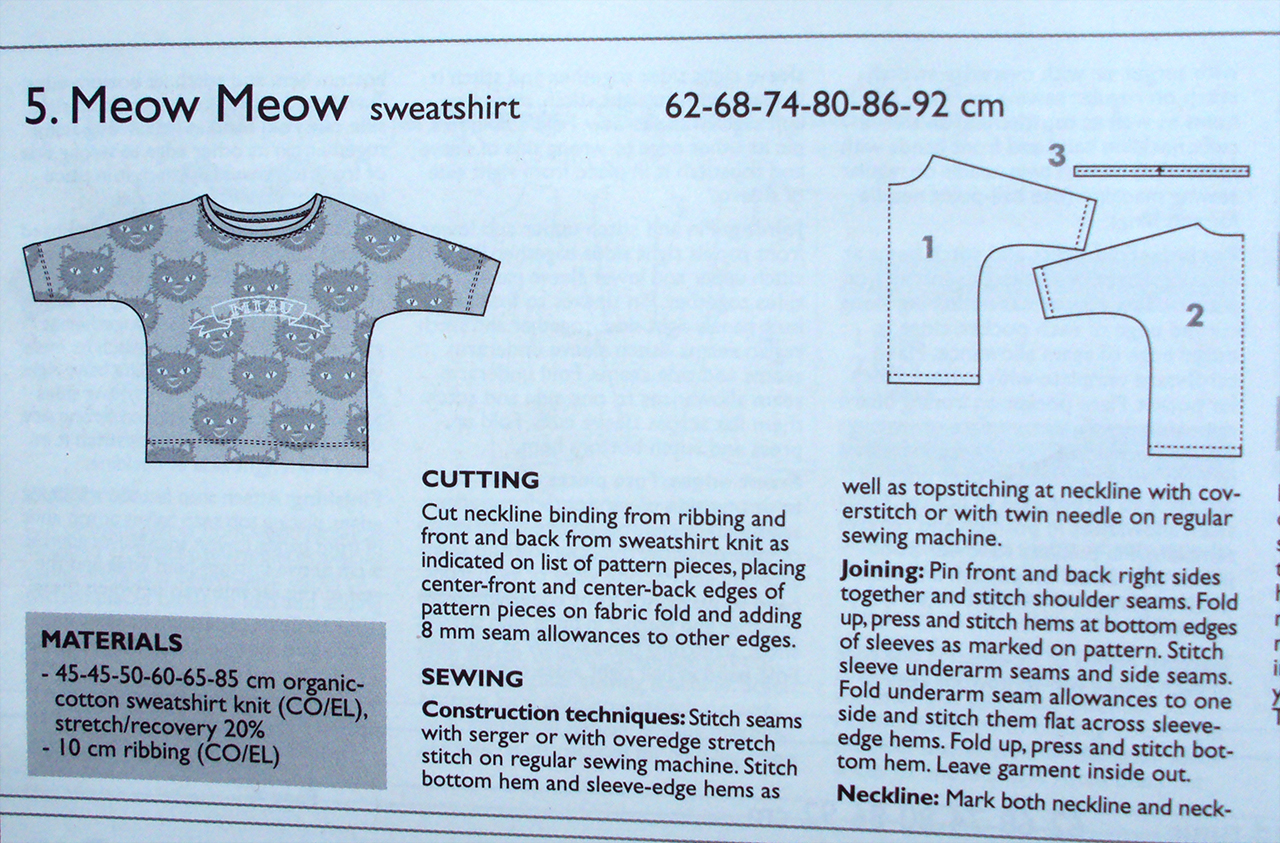
The names of the garment patterns in Ottobre magazine usually relates to the fabric they have used in the version photographed. I say this in the hope that it won't be odd when stating that I used the Meow Meow sweatshirt pattern for this project! The spring 1/2015 edition of Ottobre magazine (pictured above) has been well worth the tenner it cost as this is the second or third pattern I've used from it with many more that I plan to try in the future.  


The Meow Meow sweatshirt is a simple batwing style comprising of just one piece for the front, one for the back and a neck band. Dolores currently fits about a Size 80, but seeing as we are coming into summer, I chose to make the Size 86 so hopefully it'll fit her during the Autumn or even next Spring. Having said that, it's come out massive, but I'm sure it'll fit at some point! I may trace out the Size 80 for this Autumn after all...

I knew that I would be making a self neck binding rather than ribbing as recommended by the pattern, so I applied the lesson I learnt from the Lightning Flash raglan sweatshirt and cut the neck binding piece 2 cm longer than the pattern piece suggests. After faffing about with the appliqué, the actual garment construction was super quick, as I'm sure you can imagine from a pattern that consists of just two pieces plus binding. I couldn't even be bothered to switch back and forth between my sewing machine and overlocker, so I stitched it all on my regular sewing machine using a narrow lightning stitch for the seams.  


I hemmed the bottom and the sleeves with my newly befriended twin needle, as well as topstitching down the neck binding seam allowance. I took it slowly, particularly round the neckline, as my twin needle is realistically too fine to be forced through all those layers. We won though. 

Fabric and Applique: 

Instead of using sweatshirting as recommend by the pattern, I used yet more of the synthetic maroon double knit from my stash that, apparently, will never run out. I previously used it to make myself Hudson pants/jogging bottoms (which, despite all my moaning about the fit, I've worn HEAPS about the house) and countless pairs of toddler leggings. I'm not sure if this double knit is quite stretchy enough for this pattern, time will tell when Dolores is big enough to wear it, so I'm kind of treating this as an experiment and am not too emotionally attached to this garment. 


Back in the day (well, about ten years ago) I used to make a lot of appliquéd bags and I've really got back into appliqué to embellish clothes for Dolores (see aforementioned Lightning flash sweatshirt and Fawn pinafore dress). Running with the KCW theme of Traveling, I took it in the direction of languages that you may encounter when traveling around the world. I used a scrap of star print denim/chambray that was recently and kindly donated to me by Gill from Vintage Rock Chick which I fused with bondaweb before cutting the letters out. I also applied some fusible interfacing on the back of the front piece covering the area that would be appliquéd. I then used a satin stitch (basically a zigzag stitch with the stitch length cranked down to 0.2) and a fancy appliqué machine foot (blog post coming soon...) to stitch round the edges of each letter. 


Thoughts:

The ideas for this top, or at least something similar, had been floating round my brain for a while. I'm glad that this top now exists so that bit of brain-space can now be filled with new project ideas. However, I'm not sure if the reality has been as successful as I pictured it to be. I can't decide if it's a poor fabric choice for this type of garment, a poor fabric choice in general, a poor colour combination, a poor choice of appliqué thread colour, or what.

As I say, I wasn't overly attached to this project and am ok with winning some and losing others. I'll put it away now and pull it back out when Dolores is big enough to wear it. Hopefully then I will gain some insight about what is wrong with it, or if in fact it isn't that bad after all. As Marilla Walker wisely commented on a previous blog post of mine, 'Time is an excellent healer, especially when everything else is in the wash!!!'. Amen to that.

Sunday, 21 June 2015

Kid's Clothes Week Sewalong June 2015: Traveling!

kid's clothes week

I don't know how they do it, but the organisers of the Kid's Clothes Week challenge have come up with ANOTHER awesome and inspiring theme for this summer. Although following the theme of KCW is entirely optional (the only stipulation is to sew for at least one hour per day for a week), 'Traveling' can be taken in soooo many directions that it'd be hard to not come up with a project plan that could be even vaguely linked to it. 

(tourist T-shirt image source: Boden)

This season's challenge starts really soon: like, TOMORROW! And as ever they have had some really great blog posts packed with interesting suggestions of how to interpret the theme, if you wish to. There are some lovely ideas linked to transportation, holidaying at the seaside and different parts of the world.  Personally, I'm really into the idea of road trips, which could be a fun direction to take the traveling theme. That said, I'm pretty sure of what I'm going to make now and the two ideas I'm currently rolling with don't really link to that. 

(airplane applique inspiration image source: hilemanhouse on Etsy)

One of the things I love about KCW, particularly when the theme is as open to interpretation as this one, is that it can be a kick up the bum to simply push forward with some ideas that have been brewing away anyhow. So that is what I am going to do. However, I have included a few other potential points of inspiration for the Traveling theme that have been lurking on my Pinterest boards. 

(skyline dress image source: nanamar on flickr)

So, what about you? Are you going to take part this season? If you are, or even if you aren't, what direction will/would you take this particular theme? 

(mini messenger bag image source: crazylittleprojects.com

Wednesday, 29 April 2015

Kid's Clothes Week 'Wild Things' Summary


So I've already blogged about the three garments I made for last week's KCW challenge, so sadly no new discoveries in this post, I'm afraid. However, I'd like to post a little summary on my thoughts and experiences from the challenge, and learn any lessons there are for me to take away. 

My favourite bits:
  • The challenge gives participants the permission to prioritise our creative endeavours. I think it's fair to assume that most of the participants of this challenge are parents. And therefore I'm going to assume that many of us usually find our hobbies get pushed to the bottom of the 'things to do' list. This challenge encourages (no, insists) that we make time for it every-single-freakin-day for a whole week. I'd argue that the mental health benefits of that are massive.
  • Seeing what other participants have created is mind-blowing! If you sign up as a part of the community, you are able to view all the projects uploaded to the site, but even if you don't sign-up, you can enjoy a wealth of kid's sewing inspiration in the daily summary posts on their blog
  • I'm really pleased with the actually garments I made. They are not without their flaws (for more details, please read the individual posts for the lightning flash sweatshirt, leopard trousers and fawn pinafore dress), but generally they have come out more or less as I envisaged them and I'm proud of my achievements.
  • I love making stuff using fabric from my stash and/or reusing unwanted garments, and all three of these projects included elements of both upcycling and stash busting. In fact, the only thing I needed to buy all week was a reel of pink thread for the lightning flaw appliqué.  

My least favourite bits:
  • Forgive the sob story, but this season's challenge came at an exceptionally busy time for me. I had a heap of sample sewing for the Village Haberdashery and Me-Made-May organisation to do, on top of normal childcare, teaching and other activities. Which made taking part way more stressful than it has been previously, although I know that taking part was a choice and no one made me sign up. 
  • Because of the above, I kind of had to cheat in order to take part. I actually planned, prepped and cut out my projects a couple of weeks before, and actually stitched the two knit garments the week before the 'official' KCW. I feel a bit rubbish about that. I like the idea of everyone taking part simultaneously and I feel I spoiled that element of the challenge this time. 
  • Linked to the above, I found trying to squeeze in photo sessions and blogging about the garments  a bit of an added pressure as well. It's a double-edged sword though, because posting and sharing creations as, or close to when, the challenge is taking place feels more like full participation to me, although obviously that part isn't the 'real' challenge. 

Lessons learnt:
  • Keep taking part! Even when the week coincides with an extra busy patch in my life, not taking part would have felt rubbish. I love the productivity, the excuse to really focus on an area of sewing that is currently bringing me so much joy AND being part of new-to-me section of the sewing community. 
  • Keep making stuff that involves stash busting and refashioning/upcycling existing garments. It's such a thrill to make useful stuff without any spends. 
  • Make more stuff with animals on it! Dolores really engages with pictures of animals more than anything else at the moment. 

Lessons still to be learnt:
  • I'm not sure how to approach the community sharing and blogging aspect. I know it's not the point of the challenge, just as it isn't the point of Me-Made-May. But to me it feels important, integral even. Maybe it'll be fine next time and it won't even be an issue if the challenge coincides with a quieter period of my on and offline life. 

Tuesday, 28 April 2015

Fawn Pinafore Dress


Alrighty! The last garment I made for last week's Kid's Clothes Week. Taking the 'Wild Things' theme in a slightly calmer direction than the two leopard print garments, here's a little denim pinafore dress with leather fawn appliqué and galloping horses on the facings. 


Pattern:

Remember the pile of awesome children's sewing patterns I was given last year? This pinafore pattern (Newlook 6578, pictured below) was amongst them, given to me by lovely Adey from The Sew Convert. This pattern has been playing on my mind since I received it, it looks like such a useful (as well as quick!) potential project that could work in many different fabrics. 


So having actually used it, I can definitely confirm that it is both a quick and a simple make. In fact, the pattern includes some appliqué shapes and a stupid head-triangle in an attempt to make it look a bit trickier! My copy of the pattern was still factory folded when I opened it up, so all sizes were in tact. I traced the size 2. I'm sure you'll be bored of me saying this by now but I have to: this garment came out a bit big for Dolores to wear right now, but that was my aim as I want her to get full use from it. The only thing the pattern didn't call for which I probably would do next time is to stitch a row of topstitching/edge-stitching all around the top and along the straps. Not that there's anything stopping me from adding it to this version, aside from my own laziness! 


Fabric:

I think I may have made a bit of a mistake here. I used some more of the slightly stretchy denim that I'd also made my denim sweet shorts fail from. I thought the stretch in the denim might make it more comfortable to wear, but I fear the fabric is a bit too thick. The shape sticks out a bit like a lampshade, but I'm hoping that will be less apparent when she is a bit bigger and fills it out more. 


The appliqué, however, I am super pleased with. I have a small stash of leather samples that were given to me by Claire from Sew Incidentally (how generous is the sewing community?!). I believe she rescued them from a bin at work! I've had this fawn outline print out since I worked at Traid where I used to do appliquéing from time to time, but hadn't used this particular design before. I think this appliqué works perfectly for children's wear: it's a cute addition, but not too girly when cut out of leather. I used a fancy new foot on my sewing machine to make sewing leather easier, but I'll write about that in more detail when I review some sewing machine feet in a post that will publish in June. 


I'm also very happy with the choice of fabric for the facings. This light-weight horse print cotton used to be part of a dress that was donated to me by my friend Umi. There was a massive rip under one arm that would have been extremely difficult to mend so it got assigned to the cutting up pile instead. Umi's dress was really tiny and the style was comprised of panels so it was tricky to harvest much fabric from it, so children's wear it was destined to be! I think these facings look great in this print. 


Thoughts:

I'm really glad to have found such a great pinafore pattern and I intend to make a stack of these over the next few years (the pattern goes up to size 4). They will be great for layering with vests, t-shirts, tights and cardigans. Plus the basic shape is a fabulous canvas for all sorts of creative use of appliqués or applied pockets, or for playing with details like a scalloped hem. Do you have any ideas how this pinafore pattern could be jazzed up? 

My poor choice of fabric is a bit annoying though. It made for easy appliquéing but the sticky-outiness of the overall shape looks a bit silly. I'm still going to put her in it though, and I'm hoping that it'll soften after several wears and washes with fabric conditioner. 

Related Posts Plugin for WordPress, Blogger...