Showing posts with label shirt. Show all posts

Thursday, 25 November 2021

Denim Shirt Anthea Blouse


I'm so excited to finally share this project with you because more went into it than most of my projects. More time and more techniques, and a lot more thought. This was an idea-itch that I had to scratch, and I was more invested in manifesting my idea than the actual outcome. However, I do love the outcome also!


This secondhand denim shirt has been in my stash for a shameful ten years! I feel bad about that because it's possible that someone else could have been during that time. Anyhow, I was keeping it out of landfill at least! I've always loved those pearly snaps and knew that they had to be included in whatever it was to become.


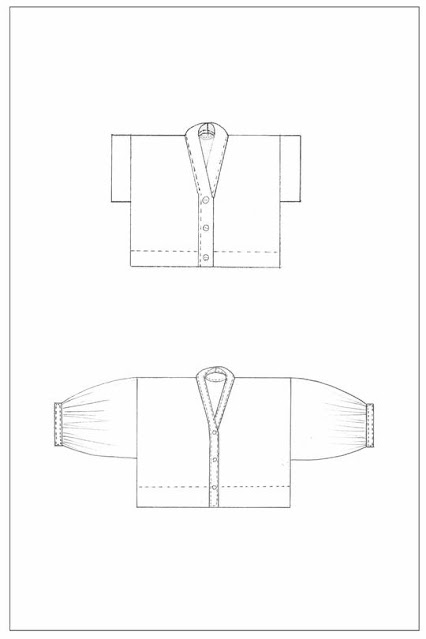
I'd had my eye on the Anthea blouse pattern by Anna Allen (pictured below) as soon as I clapped eyes on it. I have adored every single version I've seen on Instagram. And it's been a very popular pattern so there are a TON of versions to behold! 

(image source: Anna Allen)

The problem was that I didn't have any pieces of fabric in my stash suitable for the pattern, and I couldn't justify buying a new pattern AND new fabric when I already own a lot of both. I'm not exactly sure where the idea came from to use the denim shirt, but I've been having so many inspiring conversations with interesting people lately for my podcast, Check Your Thread, that my mind is kind of permanently in this kind of zone these days. 


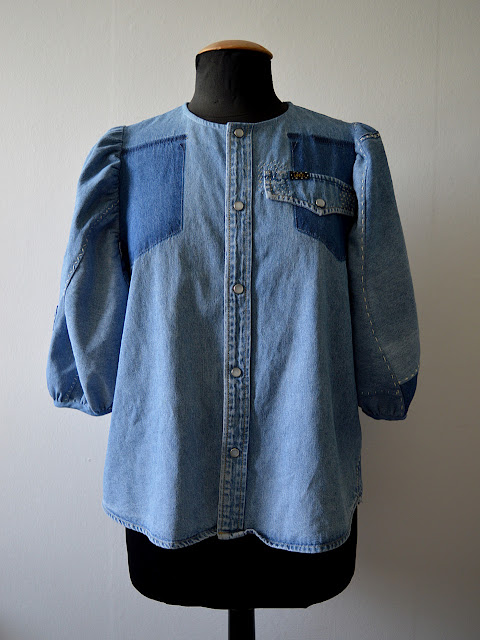
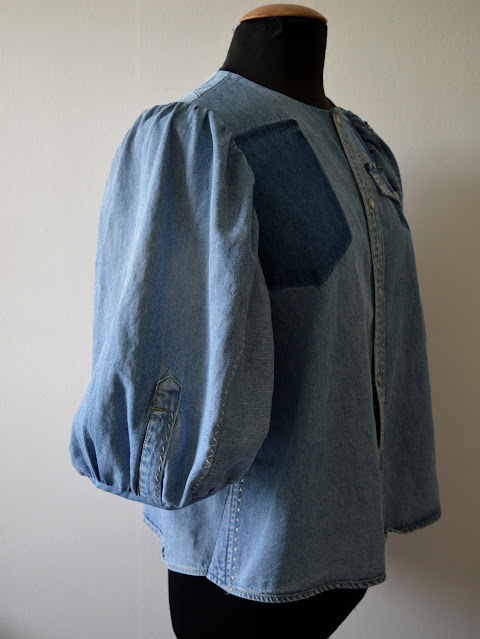
I removed the front pockets so I could fit the Anthea front pattern pieces on, and I love how a shadow of the pockets remain. I reapplied the pocket flap on one side to reference the removed pockets, and stitched it into position with random sashiko style stitching. For this I used some 'proper' sashiko thread that I bought on eBay a couple of years ago but had yet to try. That spot on the sleeve is a hole that I covered with satin stitch to stop it getting any bigger.


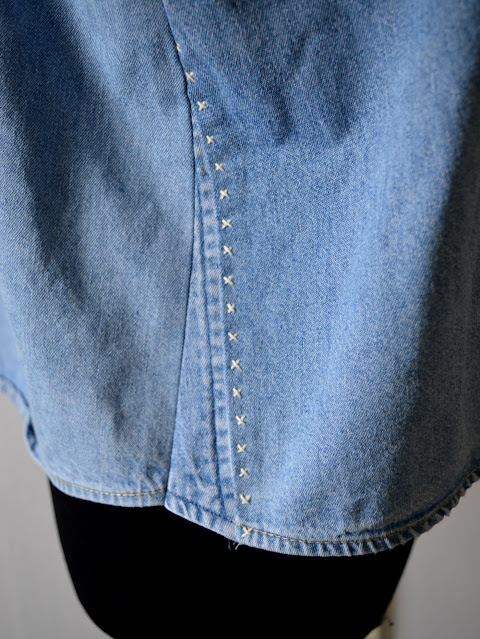
As you can probably imagine, this project was not without it's challenges, but I like how the challenges determined the aesthetic in some cases. For example, the pattern pieces for the body were wider at the hem than the original shirt. So I ended up piecing together the side seams with sections of the original collar (see above). I then decided to highlight the join with another row of sashiko-style stitching, which is a theme that I continued throughout the project.


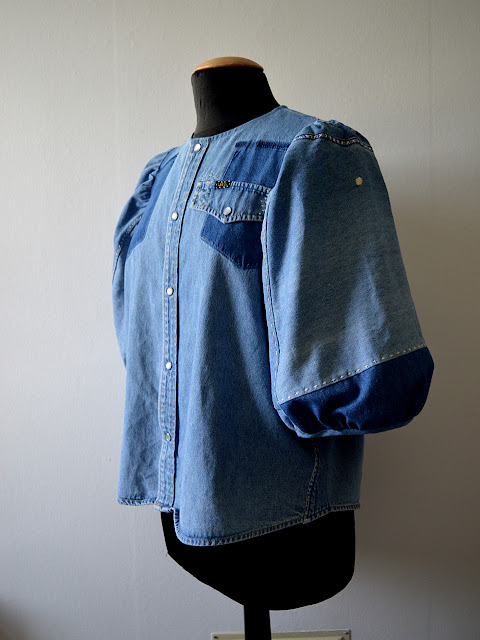
The sleeve pattern pieces on the Anthea are pretty massive, far larger than the original shirt's sleeves. So to form a sufficient area of fabric, I had to piece together pieces of the original sleeves with lots of other pieces harvested from the original garments. I didn't think about it too much, just joined the edges with my overlocker, then 'topstitched' down the seam by hand using a mixtures of stitching styles that I was totally winging. 


I really like the hints of shading and differing colours that existing in the original shirt. However, I tried to play down the patchwork vibe a little, I'm not sure if I quite hit the right balance. 


I made binding from some scraps of lightweight washed denim from my stash. That was used to finish the neckline and the sleeve hems. I don't really like the bias for the sleeve hems and I think the opening is a bit wide. I think I'll go back at some point and make cuff bands instead. 


What is incredibly pleasing is the little pile of scraps that remain from this project. I really wish that I'd weighted the original shirt, and then weighed the scraps to see if I beat the industry average of 15% of fabric wasted during the cutting process.  


The lack of available fabric meant that I couldn't really overthink the placement of various elements in this garment. That felt pretty freeing actually, and I just have to accept the outcome and find elements to enjoy. 


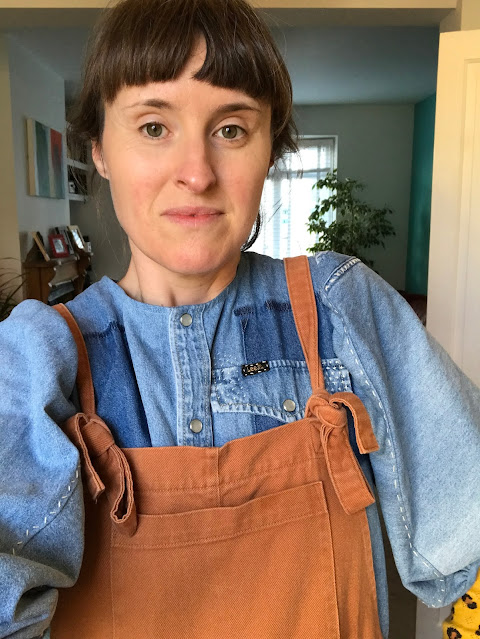
I haven't owned a proper denim shirt since I was a teenager, so I was very surprised by how warm it actually is. Pictured below is how I've enjoyed wearing it the most since I finished it: layered with a long sleeved thermal top underneath and dungarees on top.  

Saturday, 21 August 2021

Zero Waste Cropped Shirt: Two Attempts


Pattern:

Earlier this summer I bought the ZW Cropped Shirt pattern by Swedish designer, Birgitta Helmersson. There are some really inspiring versions of this pattern on Instagram. Zero waste sewing patterns are unlike regular patterns in that you receive a set of measurements to help you draw shapes directly onto your fabric, rather than paper pieces to cut out and pin on to your fabric. There is zero or very little wasted fabric from this approach, so you often need far less fabric to begin with than with a typical sewing project. For example, the short sleeve version of this shirt in the smaller size range (there are two size ranges available covering bust sizes 33"- 40" and 41" -  50") requires just 90cm of fabric. 


(image source: Birgitta Helmersson)


Attempt #1:

For my first attempt, I used 1m of checked cotton that I thrifted (see below). I really enjoyed this new approach to garment creation, although the project fought me at every turn! Partly the problems occurred because the check is slightly different on each side and I kept messing up my right and wrong sides. The fabric was a little stiff for the sleeves, so I unpicked them, halved them and restitched. Sadly the proportions of this top just weren't right for me, so I found it a new loving home with my friend Sophie, and tried the pattern again a couple of months later when more suitable fabric appeared. 


Attempt #2:

For my second attempt, I used the leftovers of the curtain I used for my recent summer dungers. One of the things I really love about this pattern is how customisable to your own preferences it is. This time I narrowed the width of the body by 5cm front and back (so 10cm all round). I also used the original length (I'd lengthened it by about 5cm for the first version) and tried a version of the long, gathered sleeve hack that is covered in the pattern instructions. For the sleeves, I effectively just used as much of the fabric that I had left and thankfully, I'm thrilled with the volume and length that came out!


I've been wearing this a whole lot since making it. It works well as a top, of course, but also as a kind of summer jacket layer when the weather is a bit changeable. It can be layered over other tops, either buttoned up or left open.  


You can't see them very clearly, but the buttons are ones I've had in my stash for over a decade. I'm pretty sure they came from a market stall when I lived in Barcelona. They have the club symbol from playing cards on them. Playing card symbols have always had a significance for me, not least because I was a croupier for a couple of years in my early twenties! The background colour of the buttons is a dark grey, which suits this fabric perfectly because the black curtain is quite a washed out shade. 


What I'm most surprised about it how soft this curtain feels to wear! I'm definitely on the look out for similar curtains for other future sewing projects. It's such a great way to get a lot of fabric for relatively little money, plus they're often 100% cotton (therefore biodegradable and easily dyed), AND it's not creating additional need for virgin textiles. 


Wednesday, 20 June 2018

Koi Shirts X 2


I have a hefty backlog of sewing projects going back months that I want to share with you, but these two recent makes are jumping the queue today because they are making me so happy! So, a little background....

I don’t mind doing a bit of selfless sewing when the mood strikes me. However, I don't throw my sewing skills around willy nilly. If I’ve made you a garment, or mended/altered anything for you, even if you paid me in food for something, then it means that you are VERY special to me. The first garment I made for Pat (Mr SoZo) was a western style shirt, created not long after we moved in together. After that, I vowed to make him one garment per year that we were together. However, the last garment I made for him (another crazy western shirt) was FIVE years ago, whilst I was pregnant with our daughter, and I must admit that I hadn’t made him a garment since. There just seemed so much sewing for this new small person (later, people), and for my new body and lifestyle, to do. Plus, I generally made him shirts that he’d wear to go out in the evening. And the new small people has meant that there's been very little going out in the evening in the last 4.5 years, so new shirts seemed a bit pointless. I felt a bit guilty about this complete transference of my creative energies away from him, but I assuaged that guilt by reminding myself that instead of some annual new shirts, I’d just made him some ACTUAL CHILDREN.


Fabric:

Then, this fabric came into my life, thanks to the generosity of Josie from Fabric Godmother. She very kindly gave me this fabric when I was struggling to justify buying all the pieces I wanted during one of their open days last year. Originally, I intended for it to become a jumpsuit to wear to my sister-in-law’s wedding last summer. But a toile of the proposed jumpsuit pattern taught me two important things: A), the pattern was going to require some major tweaking if it were to look flattering and provide sufficient coverage to hide my ugly old nursing bra, which I just didn’t have time for, and B), the fabric probably wouldn’t have worked very well for the style of pattern.


This koi print cotton poplin (also available with ivory, blue or jade backgrounds) has a similar weight and handle to a medium-weight quilting cotton. I rarely wear prints myself, but I know a good one when I see one. The print design is really detailed and has been created using some metallic inks so that parts of it have a subtle iridescence (no, I didn't spell that correctly first time). Because the original jumpsuit pattern was full length, I came away with 3m, which is nearly double the amount of fabric that I usually acquire when buying fabric (I usually make separates). Having that sizeable quantity of stunning, free fabric just sitting there dormant on my fabric shelf weighed heavily on me. I must have been refolding my fabrics (which I do with embarrassingly regularity) and Pat mentioned that it was cool. Before I even thought about what I was saying, I offered to make him a shirt out of it. The offer was met with a favourable (but probably skeptical!) response, and a plan was born. And thanks to the abundance of fabric, I was able to squeeze a mini version out of what was left over from Pat's!


Patterns:

Probably the most successful, and certainly the most used, of the garments I’ve made Pat is this check, short-sleeved shirt, a tweaked version of Burdastyle's Jakob pattern. I used the exact same pattern pieces for this koi version, but turned the sleeve cuffs under instead of outward, and omitted the breast pockets because it looked like it would disrupt the print unnecessarily. Thankfully he seems to have changed size or shape very little in the last eight years, because the fit seems to me to be fine. Looking at these pictures, however, I'm wondering if the sleeves, in this slightly stiffer fabric at least, are a little full. I've got another shirt planned for him now, and I may make an adjustment to narrow them slightly, which should also have the beneficial effect of raising the height of the sleeve head.


I made Frankie's shirt using Burda 9851 (which seems to be purchasable on eBay), the same pattern I used to make this comic book print version, made whilst he was still in utero. Thanks again to Catherine from Clothes and Sewing for giving me the pattern when her youngest son grew out of the size range. To make that comic book print one, I used the size 9 months pieces, however, currently at 20 months, he's only just starting to grow out of that one. For this koi print shirt, I went with the size 18 months pieces, and I think he should get at least a year's worth of wear from it.


Thoughts:

I made these shirts along side each other so that I would need to do less switching between the regular sewing machine and my overlocker. It was fun to see them progress at roughly the same rate, although the construction methods were somewhat different. And there's nothing like making two at a time to remind you just how much work making a button up shirt actually is! 

It's probably no surprise when I say that I love these shirts. I really benefitted from having a couple of successful TNT sewing patterns ready to reach for, so using this amazing fabric wasn't much of a gamble. It's been such a joy to make them for my boys, and hopefully they'll both get lots of wear from them, although perhaps not always at the same time!

Thursday, 11 January 2018

Bloomsbury Blouse


Usually, what's currently 'on trend' in clothes shops is of very little interest to me, and has next to no influence on what I want to sew. But occasionally a style/look/detail comes along that really chimes with me. And right now, I'm ALL about the ruffles. 

Pattern:

I discovered Nina Lee's Bloomsbury blouse pattern via Pinterest, and it was kind of love at first sight. I had a similar blouse when I was at university, with the pie-crust collar but sleeve-less I think. I rarely buy printed sewing patterns these days, but when I saw Nina's stall at last year's GBSB Live event, I took the opportunity to buy it directly from her. Let it be known, she and her sister (pictured below) are the sweetest ladies you could meet IRL! 

(image source: Nina Lee)

Back to the pattern. This blouse has some options to choose from: a dramatically wide or more modest yoke ruffle (I split the difference and went for something in between the two widths), and optional neck and sleeve ruffles. I decided to go for the neck ruffle in homage to my university blouse that I doubt I wore as often as I should have, but my limited fabric ruled out the sleeve ruffles as well. I'd like to try the sleeve ruffles on a potential next version, however I would be a little concerned that they may make it difficult to wear a cardigan over the top. Anyway, you could have a lot of fun mix-and-matching the design elements, plus I think Nina has made a sleeveless version which could be great for hotter weather. 


I started making this blouse during the time my overlocker was out of action, and I worked on it in small instalments alongside a bunch of other projects, so it's difficult for me to judge exactly how long this project took from start to finish. However, even if this was the only thing on your sewing table, it would be a relatively time-consuming make. Prepping, hemming, gathering, pinning and stitching all those ruffles takes time, so I'd recommend sewing this pattern when you're not in a rush for something new to wear. 

Usually I'd trace a sewing pattern first instead of cutting straight into a printed one. Yet this time I was feeling bold, so after measuring the pattern pieces against other, well-fitting blouse patterns I own, I felt confident to cut the size 10 around the shoulders and bust, blending to a size 12 for the waist and hips, plus folding out 2cm below the bust to account for my short-waistedness (my standard pattern alterations). I think the fit in general was spot on, however I made a couple of small changes after checking the fit mid-way. Firstly, I restitched the sleeve seam to allow a bit more width around the elbow and sleeve hem. Secondly, I reworked the side seams as I found the angle of the original waist shaping too extreme and the seam allowance couldn't lay properly. 


Fabric:

My friend Kerrie (hi Kerrie!) recently had a MAJOR destash; her job and post-grad course take up so much of her time that she has little opportunity to sew these days. I was a grateful recipient of a sizeable chunk of her stash, including this plum/off-white cotton gingham. Initially, I considered using it to make a shirt for Pat, but men's work shirts are so easily found in charity shops that I decided not to bother, and in fact managed to thrift him a gingham work shirt shortly after making myself this blouse.  


Thoughts:

When I first put this blouse on, I questioned the wisdom of including the neck ruffle, and foresaw some unpicking and removal. In the end, I decided to keep it, but if I were to make it again, I'd possibly alter the proportions slightly by making the neck stand narrower. Plus, if I were to make this pattern again, I'd change the back yoke pieces so I could add buttons all the way up. As you can see from the back photo above, the open section of the centre back doesn't lay flat, which is a shame as I think it's a lovely design detail. But these are all little niggles, in general I'm super happy with this blouse. I wouldn't have chosen this colour fabric as it's not one of 'my colours' but I'm so glad that stash-busting forced me to try something different and add a new shade to my clothing selection.

Cost:

Pattern: £14 (from here)
Fabric: £0 (a gift)
Buttons and interfacing: £0 (from stash)
Total: £14

Monday, 30 May 2016

Kid's Clothes Week 'The Future': Results


Last week I put my Spring/preggers sewing plans on hold to participate in the latest instalment of the Kid's Clothes Week sewalong. To play along, all you have to do is sew for at least an hour a day for a week. I definitely managed over seven hours of sewing time over the week, although those hours were distributed slightly differently due to being at work on a couple of those days. Each KCW challenge has a theme, which you are free to adopt or ignore as you wish. My interpretation of the theme was to make clothing for my future-son that is currently dwelling in my belly. Check out the image above to see the results of my week of intense kiddie-sewing.


This challenge was an opportunity to get my head around sewing for a little boy, and it made me think about the types of garments that I imagine will be useful for him. Now let me tell you about what I sewed, in the order in which they were completed:


Straight Stripes joggers:


I really want most of my little dude's wardrobe to be as comfortable and unrestrictive as possible, so some joggers were top of my list to sew. I traced the 'Straight Stripes' pattern (pictured below) from Ottobre design magazine issue 4/2014. I used the size 62 width and 68 length, which is assuming he'll be fairly skinny like his sister! We can always roll up the bottoms for a while so they will get maximum use. The royal blue pair are made from some lovely soft double knit (which I think is this stuff) kindly given to me by Fabric Godmother. The grey stripy French terry was left over from my Breton sweatshirt, and was also given to me by Fabric Godmother. 


The pattern is super simple: just two pattern pieces. I made them using my overlocker for the seams, and my regular sewing machine to sew a channel to thread the elastic through. I've made it easy to unpick the channel slightly and left a big overlap on the elastic so these can be made larger round the waist if needs be. After all, I have no real idea of his proportions yet! 


Drop crotch joggers:


More of the same lovely double knit became a different style of joggers. For these I used the 'Streaky Legs' sweatpants pattern from Ottobre issue 1/2015. I already had the pieces traced out in a size 80 width and 86 length from when I made these awesome leopard print bottoms for Dolores. They were one of my very favourite things I've made for her, although I've probably passed them on to another child as I can't find them anywhere (sad face). I later used the next size up for these epic red/denim/rainbow joggers and pyjama bottoms. It's safe to say that I love this pattern, I'll probably trace some more size-combos to make more versions at some point so that the little guy will always have some of these in his current size. 


This pattern has one whole extra pattern piece compared to the first jogger pattern! It's not the most fabric-efficient, but can be made more so by adding a centre back seam if necessary. As with the others, I used my overlocker for all the seams and my regular sewing machine for the elastic channel. 


Geometric sweatshirt:


Determined was I to make the absolute most of the 1m of blue double knit! This little crew neck sweatshirt was made using this Brindille and Twig pattern that I've previously used for Dolores here. Remembering how the size I used for hers came out a bit big, I traced the size 74 (approx. 1 year) so he'll hopefully fit it during the autumn/winter/spring after next. The jazzy little geometric detailing began as a little sample of this jersey from Girl Charlee. I really liked how to colours worked with the royal blue, so I cut it in half and applied it to the front sweatshirt piece before constructing the garment on my overlocker.


Comic print shirt:


This garment was the most time consuming, but therefore probably gave me the biggest sense of accomplishment! It's hard to gauge the size of these garments without a model, but this is basically a tiny-scale dude's shirt. The pattern (Burda 9851) was kindly given to me by Catherine from Clothes and Sewing when her youngest son grew out of the largest size. She'd already traced the size 9m pieces for the short-sleeved version, so that is what I've used here, but I actually think it's turned out more like 1 year or even 18 months. Time will tell!

The teensy-ness of it all made some steps, like setting in the sleeves, pretty tricky. But I was rewarded for my troubles when it came to stitching on the buttons and I found that I'd completely accidentally got an almost-perfect pattern match at the front!

The amazing fabric is once again from Fabric Godmother, another part of the package she sent me once I announced that I was having a boy. Annoyingly I can't find it on their site, so I'm not sure if it was an end of roll piece but it would be worth dropping Josie an email if it's taken your fancy.


Comic print shorts:


To get full value from each piece I've been sent, I was able to squeeze out a size 1 year of the Made Everyday (previously Dana Made It) Kid Shorts pattern (previously used here). Truth be told, I messed things up a bit when cutting out the shirt so I had to recut the front pieces. If that hadn't happened then I'd have had enough of the comic print fabric for an entire pair of shorts, but instead I had to think on my feet and ended up combining it with some red poly cotton that was one of the squillion red table cloths that my lovely mum made for our wedding. I actually think that necessity being the mother of invention, as it has been here, has served me well and these shorts are probably way more interesting and unique because of the enforced design change. I now only have just enough of the comic print fabric for a couple of small contrast patch pockets for a future sewing project. 


Thoughts:

This has been a really productive and valuable KCW for me. Not only have I made a nice variety of cute, and hopefully useful, pieces for the mini-dude, it has also really helped me get used to the idea of having a little boy in my life. It has been an opportunity to express some of the ideas and inspiration that I was discussing in this post. I like the blend of more traditional style garments (the shirt and the shorts) with the more modern (the drop crotch joggers and the geometric sweatshirt), and as I made these items I had about a thousand new ideas for more things that I want to make him.  

I love all these garments and can't wait to see them worn by my future-son in the months/years to come, but my favourite item is probably the sweatshirt. The simple application of a tiny piece of contrast fabric has really elevated what would have been a fairly dull item, and it's left me with lots of ideas along this theme. 

If you participated in KCW this season, how was it for you? What did you make and what was your favourite garment? Do you find it difficult to find an hour a day to sew? Did you have to fudge the timings a bit?! 

Friday, 14 August 2015

Refashion Friday: The Refashioners 2015 Result!


If you are even vaguely interested in refashioning, then you've probably already been flipping out over the Refashioners 2015 series on Portia's Makery blog. The big reveals of the shirt challenge results are filtering in, one per weekday, throughout August. There's been some amazing and truly inspirational projects so far, including Elisalex from By Hand London's reworking of the swiss dot Farah shirt I sent her. 


So, it's time to share my shirt transformation! I started out with this bias-cut gingham dress shirt (picture above) which I turned into the toddler shirt dress you can see in the other pictures in this post. It was probably no surprise to you all that I made something for Dolores. I make no apologies for that as I know it's going to see a good amount of use, and I refuse to make anything these days that I don't think will be worn (by someone at least!). 


The shirt I was sent felt quite preppy to me and the fabric has quite a lot of body, so those things helped me figure out what approach to take with the project. If you want to read more about how I went about this refashion, check out the full post on Portia's blog here


Don't forget: you can take part yourself by submitting a shirt refashion. You could end up winning a truly ridiculous amount of sewing-related prizes, which is now worth something like £700 (including my Dolores batwing pattern, donchaknow!). If you have even a vague idea of something you could do with an old shirt, then you may as well have a pop! And if you don't have an idea, go on Pinterest to get some inspiration (my Refashioning Project Ideas board has some crackers). Good luck! 


Friday, 17 July 2015

Refashion Friday: Announcing The Refashioners 2015


It's an exciting time for fans of refashioning! Portia of Makery (formerly Miss P) is currently hosting another round of The Refashioners, a group based challenge where she invites a selection of sewing bloggers to attempt a refashion, and shares their methods on her blog in a bid to encourage more members of the sewing community to have a go at refashioning. Well, this year she has amped it right up! 2015's challenge is more refined (this year it's focussing solely on shirts), she has amassed an amazing array of 20 talented and sewing bloggers (you can see the line-up here), AND she's encouraging other sewers to take part with the chance to win some amazing sewing-related prizes.  


Personally, I was lucky enough to be asked to take part in 2011 and 2013. AND I'm taking part again this year! I'm really excited as it's soooo much fun to be involved in! And preaching the gospel of refashioning is something that is very close to my heart, as Portia knows. Because The Refashioners has grown so much, Portia is no longer sending out the raw materials herself (that would be insane-expensive), so instead most of us are taking part in a swap to provide each other with the shirts. I bought a shirt and sent it to Elisalex from By Hand London, and Sally from Charity Shop Chic (who I interviewed here a couple of years ago) sent me the bias cut gingham dress shirt pictured above. 

Our deadline is the end of July, and at the time of writing, all I've done is stick it through the wash! However, I just made four sample garments in eight days whilst Dolores was napping or after she'd gone to bed, so I'm not worried that I won't get it done in time! I've got heaps of ideas of what direction to take that I keep tossing about in my head. I can't wait to see what the other sewing bloggers and the other sewers come up with! So, what about you? Are you going to have a crack at a shirt refashion?

Friday, 20 February 2015

Refashion Friday: Men's Shirt to Toddler's Ruffle Neck Dress


I'm really pleased to be sharing this make with you today because I'm super happy with it. It's the second project that I completed as part of the recent KCW upcycling sewing challenge. Warning: this is quite an image-dense post. I got some real cuties of my little girl modelling this make whilst going about her business. Consider yourself warned!


Pattern:

After the success of my men's shirt to baby blouse refashion, I knew I had to crack out that pattern again at some point. It was such a great little basic pattern with lovely proportions, and by reusing a shirt and incorporating the button stand, most of the hard work was already done for you!


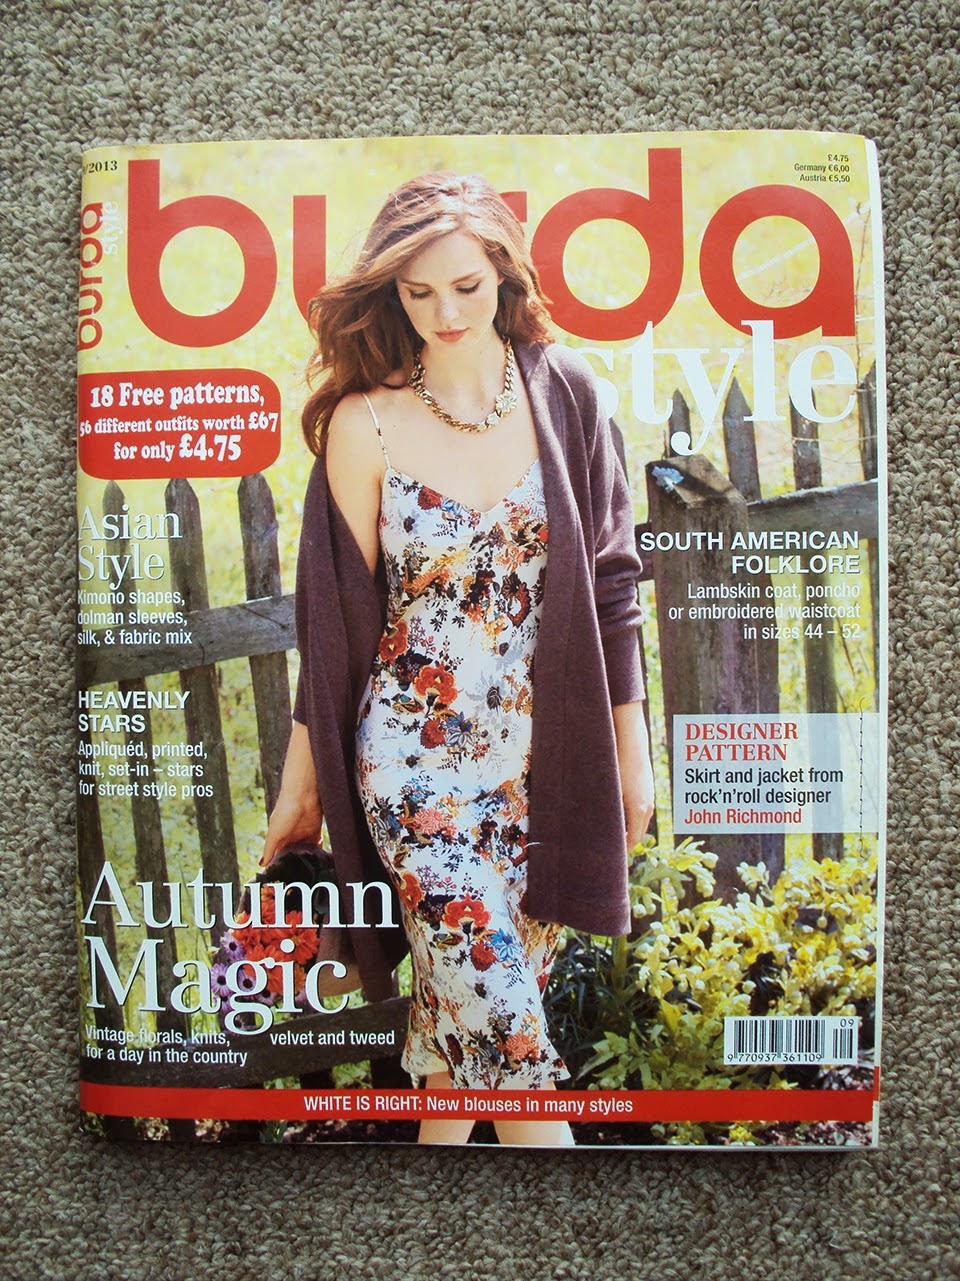
I used the baby blouse pattern from the Sept 2013 edition of Burdastyle magazine (pictured above). I traced the next size up from the last time I used this pattern, so this is the Size 80. I then lengthened and flared out the hem to make an A-line dress shape and omitted the sleeves. 


To finish the armholes I simply used my overlocker to neaten the raw edge, folded it over then top stitched it down. I did that after the shoulder seams had been sewn but before the side seams as I worried about the overlocker going round such a tight circle and accidentally hacking off a chunk of fabric! Inspired by this picture I found via Pinterest, I decided to extend the ruffle to make it more of a feature. 


Fabric:

I have a few lovely thrifted men's shirts in my stash that I was saving to make into blouses for myself. This one was probably going to be some kind of diner waitress-esque type affair. But it hasn't happened and the longer I leave it, the less likely I am to actually wear a candy-striped diner waitress blouse in my day-to-day life! So I decided to give up on that dream (for now...) and use it for a different project that will hopefully get used lots and lots. 


The shirt itself was in pretty good nick. There's a bit of fading from going through the wash a lot, but not much else up with it. Despite the wide white stripes between the coral ones, the fabric is pretty much opaque so I felt it's appropriate for summer wear when she might not wear anything other than a nappy underneath when it's really hot. 

It wasn't all plain sailing (sorry, more nautical puns) when using this shirt though. No part of the shirt was wide enough to cut the ruffle in one piece. I cut the ruffle length in three parts and joined them up by carefully matching up the stripes. Hopefully the joins are fairly unnoticeable. 


Refashion:

Aside from the fabric of the garment, I also reused the button stand to form the fastening on the back of the dress. The original shirt's pocket had a cute little embroidered boat, which obviously I was going to incorporate into the end result come hell or high water! 


Usually when I'm refashioning a shirt into a new garment, I try to reuse the existing hem. However this shirt's wasn't great as it kept rolling up, so I decided to avoid it and cut and hem the dress as usual. I think this has helped give the whole garment a nice, clean finish and makes more sense with the A-line silhouette. 


Thoughts: 

Ahh! I love this dress! There is a distinct possibility that some may think she's dressed as a clown, but I think that's a look that Dolores could rock: Nautical Clown! I'm really pleased with how the stripes have lined up at the side seams, and I am pleased to prove to refashioning-phobes that sewing something from an existing garment can still result in a neat and crisp looking garment!


Currently it is a bit big for her (she still fits into the original blouse which was Size 74) but that's fine. It is intended to be worn in the height of summer, which may still be five or so months away! In the meantime, I will probably try and get more use from it by layering it over other clothes, more or less like she is wearing it in these pics. 


Related Posts Plugin for WordPress, Blogger...