Friday 29 May 2020

Tencel Twill Luna Pants


I'm sitting at my desk and should really be writing something else, however I'm going to quickly tell you about my new Tencel twill Lina pants instead....


Fabric:

This is the same Tencel twill from Fabric Godmother that I used to make a Wiksten Tank top last month. This is the mustard colour way, but I'd describe it as 'ochre-of-my-dreams'. It was kindly sent to me for free by Josie, essentially to cheer me up about being in lockdown. As I mentioned previously in my tank post, it has incredible drape, with an almost rubbery handle, which sounds odd but is great! 


I've been wearing these trousers all day, so I can attest to some creasing, but not as much as you'd probably get from a viscose. As with any slippery fabric, cutting out and handling it whilst sewing was a challenge. But it doesn't fray too badly, and presses really well. 


Pattern:

I bought the Made by Rae Luna pants pattern a few years ago, and made the pattern up twice, first in a light-weight, washed denim, and then in cotton lawn. The fabric of the denim pair disintegrated, but, although very faded, the cotton lawn pair have stood the test of time surprisingly well. This garment style is so comfy to wear, in no small part because the elasticated waist sits on the hips rather than higher up on the natural waist: the former being my preferred position. 


Rae reworked the Luna pattern last year and re-released it. I received the updated file but haven't printed it out, so I'm not sure how the pattern pieces differ from the original. For this pair, I wanted a slightly looser, less tapered look through the legs. To do so, I added about 2cm to the outer leg seam at the hem of the front and back leg pattern pieces, blending it into the original seam by the lower hips. I also made this pair a few centimetres longer, as I found my other pair have shrunk a bit over the years, and I'm not sure how this Tencel will behave over the long term.


Label:

I'd seen these cool Isewlation garment labels popping up on Instagram during lockdown, and eventually their designer, Sally (@modistasewing), got in touch with me to request some help in promoting them during Me-Made-May. All the profits she receives from their sale goes to the National Emergencies Trust, which supports local charities in helping the victims of disasters and emergencies. I bought some myself, and they are awesome. I held off finishing this project until they arrived, because they are the perfect colour and shape for these trousers.


Thoughts:

I'm so happy with these trousers! I'm wearing them right now with my washed denim Kabuki tee. I feel comfy and breezy on this warm day, but somehow I'm also looking pretty stylish, if I say so myself. I love how this pattern hits a sweet spot of being loose but not baggy, which I think is particularly important around the bum! I doubt this will be my last pair of Lunas. The next time a super-fluid, woven fabric that I adore crosses my path, I'll be ready to deploy this pattern.

Monday 25 May 2020

Endless Summer Dorothie Blouse


A year ago I made one of my very favourite me-made garments of all time. It was a sweet little blouse made using the Dorothie Blouse pattern by Slow Sunday Paris, in some mustard viscose twill. I loved it so much and wore it a lot. But sadly it started to literally come apart at the seams along the collar/lapel in a way that was not repairable. 


Later that year I made another Dorothie blouse with longer sleeves, but it didn't work out quite how I pictured it would. My mum has that one now, after virtually remaking the whole thing because she's much smaller than me! 


Pattern:

So, third time lucky? This time, I went back to those gathered, mid-length sleeves that drew me to this pattern in the first place. I omitted the weird split, bias-finished hem of the original pattern, and hemmed the whole bottom edge with a simple double turn. I also raised the armholes by 1.5cm, which was a faff but totally worth it. I would have raised them even more but that would have risked messing with the yoke seams.


Fabric:

Oh, this fabric. I cannot properly explain how much I love it. If you could reach inside my head and pull out the most perfect fabric design for me, it would likely be something just like this. I adore the kitsch Americana, the nod to vintage postcard designs and visions of exciting road trips.  


I bought it from Fabric Godmother last summer. It also came in a navy background version, but both have long sold out. The 1.5m length had been sitting in my stash for many months whilst I tried to figure out how best to use it. 


I included it in my #2020makenine plans (which you can see in this post), because I didn't want it to become one of *those* fabrics that live in my stash so long that eventually my tastes change and I end up not being all that into it. The little red plastic buttons are vintage ones that have been in my stash forever. I was careful this time not to position them too far away from the front edge, like I did with my original mustard Dorothie. 


Thoughts:

There are definitely things I could point to on this blouse to prove its imperfection. But that would be silly, because, overall, I've made a lovely blouse and I'm very excited to wear it. Although my style is far less vintage/retro inspired these days than it used to be, this somehow still feels very 'me'. I can't wait to wear it with my Romero trousers and some sandals and go somewhere that isn't my home! 


Tuesday 19 May 2020

Biro-Ink Pivoine Blouse


Here's a new little blouse that kind of got made by accident. I had both the fabric and the pattern sitting in my stash for over six months, and finally I made the connection that they might work well together. And by Jove, they did!


Pattern:

As I've have proclaimed many times before on this blog, I'm a big fan of Delphine et Morissette patterns. And although I'd had my eye on the Pivoine pattern for some time, it wasn't until I saw a few versions on Instagram without the collar that I was truly sold. 


In essence, it's a sweet little loose-fitting blouse. There's gathering into the yoke on the front and back, plus an interesting, sloping yoke seam that piping can be inserted into, should one desire. The armholes are finished with simple, turn-back cuffs. The original pattern includes a rounded collar, but I used bias binding to finish off the neck edge instead. 


The construction of this garment was straight-forward and enjoyable. The instructions are in French, so I copy-and-pasted chunks into Google translate to guide me through.


Fabric:

Isn't it weird how differently the colour of this fabric looks in these two sets of photographs? IRL, it's a biro-ink, navy blue: somewhere in between the two colours that have come out in my pics. The colour aside, what I can tell you is that it's a crepe, most likely viscose. It came to me in the form of a remnant without a label, just over 1m in length. Even though the pattern called for 1.5m, because I was leaving out the collar pieces, I was just about able to squeeze the blouse out of my length of fabric with basically only dust to spare. 


I'd held onto this remnant for about a year because I wasn't sure I'd even wear a top in this colour. I tend to wear dark-coloured bottoms, so I didn't think I could make a navy top work in an outfit with the rest of my clothing selection. But having recently made the fawn-coloured Harper pants, I realised that I do have something suitable now. 


I love garments with simple, contrasting buttons. I went with these basic, two-hole, plastic ones from my stash so that they'd add contrast but wouldn't effect what other colours I could wear this top with too much. 


Thoughts:

I'll admit, I haven't fully integrated this top into my wardrobe yet, and I've only worn it once so far. However, I am currently working on some more bottoms that I hope will look good with it. As for the pattern, I can definitely imagine using it again. I'd like to try it in a cotton lawn, or a double gauze perhaps. 

Thursday 14 May 2020

Frankie Baseball Tee in Isewlation


This garment was the first thing I sewed during lockdown. That was just seven weeks ago, but emotionally speaking, it feels like a whole year may as well have passed. Seven weeks ago I was definitely in shock, but also trying hard to make the most of the situation, and had a Blitz-era, 'What would Nella Last do?' spirit about me. I decided it would be a great opportunity to tackle my fabric stash, and make what I could from the things I already owned safe from the temptations of new fabric, seeing as I wasn't going to work. Pat was still at going to work during that first week, so I had decided to carve out an hour to spend sewing each day, when I would plonk the kids in front of some CBeebies and give myself a little break.

But the following week brought a less chipper attitude about the whole lockdown/global pandemic/thousands of people dying/the world being broken situation. Plus, Pat had to start working from home, so my sewing area became a permanent 'office' set-up in the daytime, as our bedroom is the only place we can shut the door on the kids and be able to concentrate. No daytime sewing for me anymore.

I've still be working through my stash, and making some great things, but it's all been in the evenings when I'm exhausted and sadly it feels like more of a slog. Anyways, I'm soooooo lucky in so many regards. Including having this great new baseball tee! (See how I brought things round there? Pretty smooth, eh?!)

Fabric:

You may recognise this fabric from a previous creation. I used some of this amazing hands-print interlock a couple of years ago to make a Freya top, and I had a weird-shaped piece left over that was burning a hole in my stash. The interlock came from Cotton Bee, a fabric printing service based in Poland that is similar to Spoonflower. They kindly offered me a voucher to test out their process and products to help promote them amongst my readers. I had been dwelling on how best to use the funny-shaped leftovers, and it eventually dawned on me that I could combine it with something else to eek a new, adult-sized garment out of the situation. 

This black knit, also an interlock, has been lurking in my stash for sometime too. In fact, I cannot reliable tell you how it got in there, or when. It's thinner than the hands-print, which concerned me a little, but they seem to behave well together. The black interlock is particularly soft and makes this garment the very definition of 'secret pyjamas'. 


Pattern:

I can't see a baseball tee and not think of my best friend. We've both been fans of them since the 90s, and she still has one or two, I believe. However, when I first received the Stretch! book by Tilly, the Frankie baseball t-shirt (despite being one of my very favourite names!) wasn't one of the patterns that jumped out at me. Then, more recently, one of the women who attends the sewing class I teach made a couple of fantastic Frankies, and I was sold. The fit looked great, casual and comfy but flattering. It's funny that I ended up making two garments from the same fabric, both using patterns from the same sewing book. Yet they perform quite different functions in my wardrobe. The Freya looks and feels a bit more formal to wear. It works very well under pinafores. Yet the Frankie definitely wants to be paired with jeans.

To make this Frankie, I made my usual pattern alterations. I blended between sizes, going up a size for the waist and hips, and I folded out 2cm from the length of the body to account for my short-waistedness. The only other monkey-ing that this project required of me, was to create a seam in the back because because my limited fabric wouldn't allow me to cut it in one piece. You can see the join in the image above, but I doubt you would have noticed unless I pointed it out. No offence. 


Thoughts:

So this will probably always be my 'Isewlation' garment, when we were all a bit excited in the early days of lockdown about how much sewing my might possibly get to do. Although there has been, and will be other garments made during this time, this is the one that I will remember as having been made in the strangest of circumstances. Whilst I was making this top, I would have been shocked to learn that almost two months later, little has changed. Apart from having made over 150 face masks. Also from my stash! But that's another post. 

Thursday 7 May 2020

Candy Cane Emergency Growth-Spurt Pyjamas


The presenter on a podcast I was listening to the other day was urging their listeners to not spend this lockdown focussing on 'when all this is over', and to remember that although life is super weird for most of us right now, it is still life. As someone who has a habit of concentrating on the future, and frequently forgets to 'live in the now', the presenter's comment really struck a chord with me and I've been trying to bring it to the forefront of my mind from time to time. And my kids have been reminding me that life is very much still happening, by getting bigger!


Without warning, suddenly all Dolores's pyjamas were looking decidedly short in the ankle and sleeves. I realised that I had to pause the mask-making for a while and address the situation with what I could find in my stash. 


Fabric:

I've been whittling my stash down somewhat this year, and the jersey section in particular is starting to look a bit sparse. The last suitable piece big enough for my 7yo-sized-6yo was this printed jersey that was kindly given to me by my friend Claire a couple of years ago. It was a sizeable length that she rescued from the bin at a clothing company, and by this point I'd already made three kids' T-shirts from it. After this set, I've probably got enough scraps to make one pair of children's undies, then I really can declare this fabric busted from my stash. 


It's a single jersey, probably a cotton/elastane mix. The stripes are printed on, which gives it a slight stiffness. I couldn't tetris the pattern pieces to also include the bands, so I used a scrap of solid white jersey as contrast for those. 


Applique:

I decided to add a cute design to make these pyjamas feel more special. Using some more of the white jersey and some double-sided bondaweb, I cut out a cloud shape that I first designed for these dungarees. My sewing machine has a faux-blanket stitch option that I've used with some success in the past, so I stitched round the edges of the cloud with that. Finally, I embroidered a very basic sleeping face with some embroidery thread I found lurking deep in my sewing area. Making the whole applique, from start to finish, took less than an hour, but I think it really packs a (very gentle) punch.


Patterns:

For the top, I printed off the next size up of the free Ester and Ebbe top pattern by Threads by Caroline. I removed a few centimetres of length from the body, but otherwise made no changes. For the trousers, I used the mini Hudson pants pattern by True Bias. I'd recently made some mini Hudsons for Dolores from some scraps of stretchy french terry (as yet unblogged), and I love the fit. I thought the roomy crotch area would translate to being really comfy as pj bottoms. I omitted the front pockets, and narrowed the width of the waistband to accommodate the only suitable elastic I had in my stash. 


Thoughts:

Well, Dolores seems to really enjoy wearing these pyjamas, and the fact that this entire project cost me zilch gives me added pleasure. Even the faux-waist tie cord, which I added so she could quickly identify the front from the back, used to be the handle of a carrier bag. I love that I was able to fulfil my child's clothing need with just two or three hours work. Thankfully the pjs are large enough so she should be able to wear them for a couple of years, and hopefully they're gender neutral enough that her brother will also want to wear them in a few year's time! 


Monday 4 May 2020

Stripy La Trop Facile Jacket-igan

"Is this a jacket, or a cardigan? Jacket? Cardigan? Jacket-igan?"

Well, dare I toot my own horn and say that I'm smashing my #2020makenine plans?! I do dare! In January, the epic leopard ponte became an oh so subtle cardigan. In February, I scratched my boiler suit itch with some gorgeous, rust, sanded twill. In March, I made my Romero trousers (further tweaks may still be made) from the nicest denim I've ever encountered (and I've encountered A LOT of denim). And now I present to you April's creation: some stripy ponte turned into a jacket. Or a cardigan. I'm not sure. Anyways, here it is. 


Fabric:

If you feel you may have seen this fabric before on this blog, then you are both correct and super observant. Fifty points to you. My sweet and lovely mum bought me 2m of this lovely, striped, cotton ponte/doubt knit a couple of years ago from C&H fabrics. Some of it became my Breton toaster sweater, but because the fabric was soooo wide (over 2m!) I was also able to squeeze this jacket pattern out of it as well. It's clearly softer and slightly more fluid than the fabric I used for my first La Trop Facile, so I think it gives this garment a very different look to my first version. 


I added a tiny little anchor patch that Tilly (of TATB fame) bought me back from Japan years ago. I forgot to take a photo, but I also used some anchor print grosgrain ribbon to visibly stabilise the shoulder seams, and to form a hanging loop at the back neck. The devil is in the details, after all. 


Pattern:

My original La Trop Facile jacket is about 2.5 years old now, and it remains one of the garments I enjoy wearing the most. The pattern is by Belgian designer Delphine et Morissette (pattern shop here), and I'm obsessed with her many patterns. All but one or two are only available in French, so Google translate and I are good friends at this point. The La Trop Facile is a genius combination of elements that I didn't know I was looking for until I made my first version: it has volume, but isn't overwhelming, and it looks and functions like a jacket but is feels more like a comfy cardigan. 


For this stripy version, I had to omit the turned-back sleeves detail due to fabric restrictions. The heaviness of the turn-backs might not have worked too well with the knit fabric anyhow. As the name would suggest, this pattern is a very quick make, especially for a jacket. Obviously, I had to pattern-match the hell out of the seams and pocket application, which slowed the construction process down a touch. 


Thoughts:

Generally speaking, I very happy with this garment. I'm not entirely sure that this pattern and this ponte were a match made in heaven though. It's likely that the garment style would be better suited to a fabric with a touch more structure, but I think I've just about got away with it. The stripes also make this garment a little harder to pair with other tops underneath. I'm hoping that Me-Made-May will help me discover a few tried and tested combos so it gets the amount of wear that it deserves.  


Friday 1 May 2020

Free Pattern Friday: Kids' Lightning Leggings


Welcome to my monthly 'Free Pattern Friday' feature, where I road test a free sewing pattern or tutorial: sometimes a children's one, sometimes a women's one. I publish these posts every first Friday of the month, timed to provide inspiration for those who plan to get their sew on over the weekend. I firmly believe that, if you pick your projects carefully, sewing doesn't have to be a crazy-expensive way to clothe yourself and your family. Thanks to all the amazing pattern designers who have offered up their hard work for us to enjoy for free.

As you may know, I try to alternate between women's and children's pattern for my Free Pattern Friday review posts. When it's time for a children's one, I especially love being able to shine a light on the super-useful ones, by which I mean patterns that span a wide size range, are (fairly) unisex in style, might work for a variety of climates and even offer some design options. Well today's free pattern ticks each and every one of those boxes. It's the Lightning leggings pattern by Made By Jack's Mum; massive thanks to her for sharing this amazing pattern for free. Please note: to access this pattern, you can join the MBJM Sewing Group on Facebook, or you can get it through her site. If you do the latter and are in UK or EU, the transaction goes through Etsy so you will pay a small fee.   

I'm also very happy to have found this pattern, because my former fave free kid's leggings pattern, as reviewed here, is no longer available. So, shall we begin?


Pattern type:

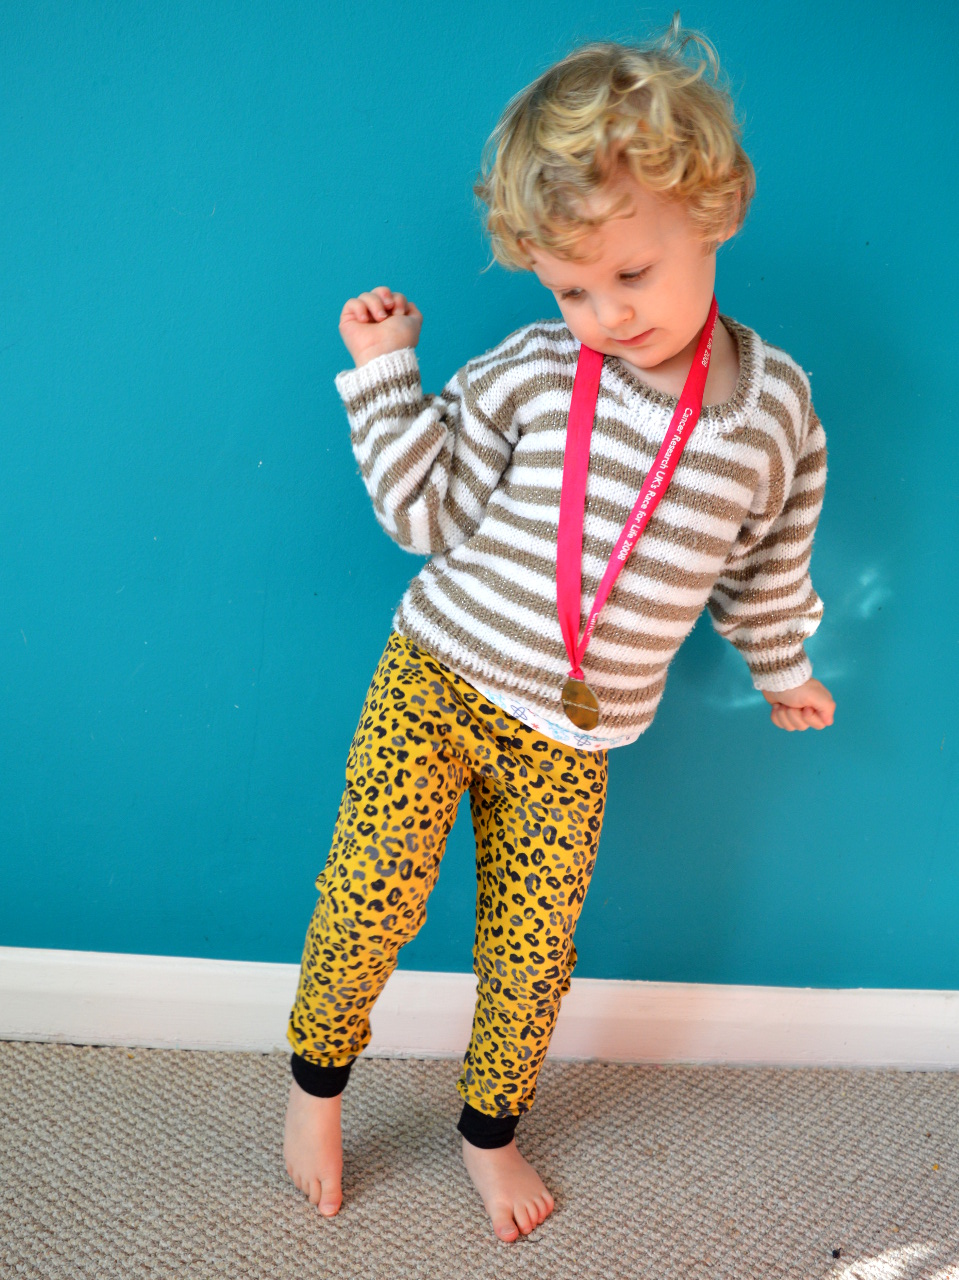
The amount of options included in this pattern is almost ridiculous! You can choose from a slim leg option (which I used for Dolores's pink cat leggings pictured in this post) or a (slightly) relaxed leg option (which I used for Frankie's leopard leggings pictured here). Both leg options then come with a choice of ankle, capri or knee lengths, ALL OF WHICH can be simply hemmed (as per the cat leggings) or finished with cuff bands (as per the leopard leggings). PLUS, both can have elastic applied at the waist, OR have a fabric waistband. Is that it? NO!!!!! BOTH leg style options also come with a cloth nappy-suitable fit option up to 4 years. Damn. I'm exhausted. 

(image source: knee length with cuff hem options via MBJM)

Sizing info:

This pattern goes all the way from premie/small newborn, up to 12 years. With some kids' pattern companies, I find that you always have to automatically size down one size or so. I've made a few MBJM patterns now, however, and I always find the sizing to be very accurate, no sizing down needed. 

Dolores is currently six years old, but basically the height and size of a 7yo. Therefore, I made her cat leggings a size 7 with an additional 2cm in length (hence the slight bunching at the ankle) because I wanted them to last for a couple of years. Frankie is three and average in height and size, and I made the size 3 with no changes because I wanted them to fit him straight away. 

One point I would mention here is that I found the suggested length measurements for the waist elastic to be too short. I would heartily recommend measuring the waist of the child you are sewing for to gauge the correct length, rather than blindly going by the length suggestions in the pattern. If you are making them for a child that you are unable to measure at this time, I'd suggest making the fabric waistband option. 


Fabric info:

The Lightning leggings patterns is recommend that knit fabrics with good stretch and recovery are used, for example cotton/lycra jersey. Both the cat jersey (a different colour way of this one) and leopard jersey used here are cotton/lycra jersey. The relaxed leg style option might also work with a lighter-weight French terry that has an elastane/Lycra/spandex content such as this modal/elastane French terry. BTW, that's not a sponsored link in anyway, I just happen to have used this fabric a couple of times for other projects, and think it would work well with this pattern for a slightly thicker leggings option. 


Findings:

I really like how MBJM's patterns are produced. The information conveyed is very clear and user friendly, without heaps of unnecessary blurb or frou frou. This is particularly important when a designer is trying to guide you through a pattern that contains heaps of options, such as this. Literally the only thing I can think of that is missing but would have been helpful, is a clear, technical spec drawing of the garments. In fact, now I come to think of it, I don't recall seeing a spec drawing for any of MBJM's patterns. I find those can help you get to the bones of a pattern style, without fabric choice, model's pose etc. distracting you.

You might think that, what with all the style options and choices included, that the actual PDF pattern pages would be a Burda-magazine-style web of confusion. However, I am able to report that I found them very well laid out and easy to figure out, despite all the various pieces and cutting lines. In the instructions there is a handy guide to help work out which pages to print for the combo of options you're going for. Plus, both the A4 and A0 copy shop files offer the layers function; yet another way to prevent wasting precious printer paper and ink. If you think you're likely to reach for this pattern again and again as the child you sew for grows, it might be worth getting the A0 file printed at the copy shop with all the sizes (excluding the sizes that they are already too big for). Then you can trace off the size you need onto pattern paper (or wrapping paper/wall paper/whatever you've got to hand that) as and when you need it, to save on ink (and getting your printer out and finding all the relevant wires, amirite?!) further down the line. 

As for the finished garments, I'm really pleased with them. The overall fit of the slim leg option is exactly what you'd hope for in a regular leggings pattern. And the relaxed leg option is a nice, modern alternative that is suitable for any kid who may not wish to wear tight leggings (yeah, I'm trying to find a woke way of referring to 'most boys'!).


Customisation ideas:

If you are looking for even more options for creating a unique garment, other than those included, here's some ideas:
  • Add some seam lines for scrap busting/colour blocking the leg pieces
  • Add a side seam if it'll help you squeeze them out of a smaller or odd-shaped piece of fabric
  • Apply knee patches (think traditional ovals or cute cat head/apples/dinosaur/etc shapes) to reinforce those areas that are vulnerable to holes. 
  • Make a matching set using the free Ester & Ebbe top or Rowan tee patterns, perhaps by cutting the T-shirt sleeves from the same fabric you used for the leggings


Would I make it again?

Yes, yes and thrice yes. I'm very pleased to have this in my arsenal for whenever some awesome printed jersey appears on my radar and the scamps have done some growing. Dolores will only wear leggings or skirts, or at a push, joggers (NOT woven trousers, jeans or even jeggings) so I'm super pleased to have this pattern on hand for the future. I'm also really happy that I can use it for making lighter-weight bottoms for Frankie for warm-but-not-hot weather: for garments that land in between thick joggers and summer shorts. 

This might also be a particularly useful pattern to have right now if your family is in lockdown. If, like mine, the kids you sew for refuse to stop growing despite the quarantine, and you've got some jersey in your stash, whipping up a couple of quick pairs of leggings might help to pad out their clothing options for a while. 


Related Posts Plugin for WordPress, Blogger...