Showing posts with label jacket. Show all posts

Friday, 6 October 2023

Free Pattern Friday: Avelia Bomber Jacket for Adults


Welcome to my monthly 'Free Pattern Friday' feature, where I road test a free sewing pattern or tutorial: sometimes a children's one, sometimes an adult's one. I publish these posts every first Friday of the month, timed to provide inspiration for those who plan to get their sew on over the weekend. I firmly believe that, if you pick your projects carefully, sewing doesn't have to be a crazy-expensive way to clothe yourself and your family. Thanks to all the amazing pattern designers who have offered up their hard work for us to enjoy for free.


Ok, so this probably isn't a very useful post because I didn't actually road test this free sewing pattern very thoroughly. The pattern is for a lined bomber jacket, but I wanted to use pre-quilted fabric, so I had to basically chuck the instructions out the window and make the construction up as I went along. What might be useful for you to know, however, is that the Avelia Bomber jacket pattern is one of 300+ free sewing patterns available via the Mood Fabrics website when you sign up to their newsletter. The Mood Sewsciety is the section of the Mood Fabrics website dedicated to supporting sewers with how to actually their fabrics and develop their skills. That's where you'll find all the patterns and the instructions that come in the form of supporting blog posts. Thanks to Mood for sharing all these patterns for free, the variety of the range is really impressive. 


(image source: Mood Fabrics)

Pattern type:

I promised Mr SoZo a new jacket for his birthday back in January (this was finished in February). Until that point his only outerwear garments were one puffy winter jacket and one incredibly flimpsy unlined jacket (I can hardly bring myself to describe that thing as a jacket, it's so thin!) and nothing inbetween. So I brought him to my work at Fabric Godmother at the end of an open day I was helping out at, and together we selected some cool reversible pre-quilted fabric.

He loves bomber style jackets, largely thanks to Karamo, but a thorough trawl of the internets didn't bring up as many options as you might expect. There's one excellent-looking one by a French (maybe Belgian actually) pattern company but they don't sell PDF versions. The shipping and taxes on goods coming from France these days is eye-watering ('thanks' to Brexit), so I decided to continue my search. 

When I chanced upon the Avelia Bomber jacket pattern, I thought it might give me some bones to work with. Mr SoZo is quite narrow in the shoulders, so a pattern drafted for a more feminine frame wouldn't require a huge amount of reworking, were my thoughts. The original pattern is for a fully lined, zip-up jacket with faux zip pocket, designed in particular to show case the futuristic, oil-effect, reflective fabric pictured above. 


Sizing info:

Here's where things get a bit tricky. The pattern is graded from a US 2 - 30, with sizes 7 and 9 thrown in for good measure. Body measurements are included in the blog post, however finished garment measurements are not. Word on the street, and by 'street' I mean this blog post, is that Mood's patterns' sizing and fit are all over the place. My assumption is that they have many different pattern makers creating patterns for them, seeing as they have so many on offer, and there isn't any consistency across the range. My recommendation would be to measure the pattern pieces themselves and compare with similar style pattern or garment you own before selecting a size. I ended up combining sizes and adding a significant amount of length to the body and some to the sleeves. 


Fabric info:

As I say, this pattern was created to promote this specific fabric, so the only fabric referred to in the list of materials required is that particular one. So you're kind of on your own with fabric choice, but my thoughts are a mid-weight woven with little-to-no-stretch, or even a hefty knit such as a very dense sweatshirting or scuba might work. It also suggests a polyester lining and a thick type of rib knit trim, with links to where you can buy it on their site. As I say, I was using a pre-quilted fabric so I didn't need lining, but I did have to buy some heavy jacket ribbing and found some fairly cheap on eBay. 

Because I lengthened the body, I half-made the garment before measuring for the length of zip I required. Annoyingly, the length I'd created was in between two lengths available on Zipper Station. I wasn't about to start trying to shorten a brass tooth zip, so I went for the longer one and tried to ease it in as best I could.   

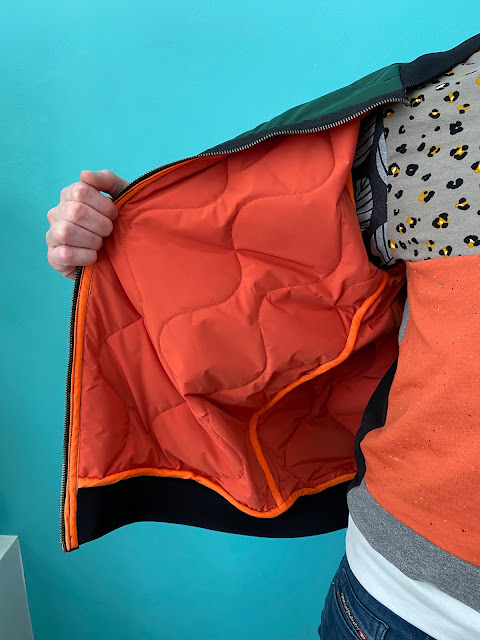
I also had to buy a million metres of orange bias binding to finish all the seams. But I only have myself to blame for that. 


Findings:

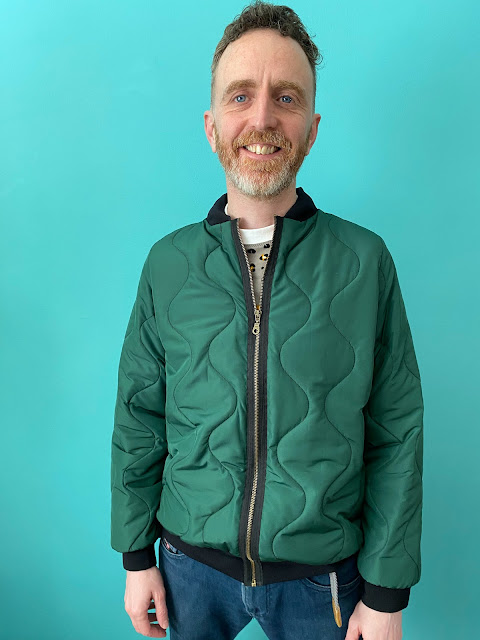
I can say this because the whole process was several seasons ago and I now have some distance, but this was NOT an enjoyable sewing project. I love sewing for Mr SoZo, but this project was not fun. Obviously, choosing the pre-quilted fabric created a big headache because I had to created my own construction method. But also I disliked the drafting on this pattern. I didn't like the shapes and proportions for any body. Plus the zip being a bit long threw things off a bit, and I don't like how the neckline looks where the zip joins with the collar ribbing. Thankfully, after months of wear (and there HAS been months of wear), the neckline has softened a bit and doesn't look as stiff and awkward as it does in these pics that were taken when it was first made. 

I had to hand stitch the bias binding to cover the seams which took FOREVER. I'm still spotting places where the orange stitching is visible on the outside against the green where I made my stitches too deep. AGH!


Would I make it again?:

Would I make Mr SoZo a bomber jacket again? Yes. Would I use this pattern to do so? No. It was a bold move to use a fabric that was not prescribed for the pattern - a risk that partially paid off. However, I'd like to make another with a regular lining with a different pattern as the base. 

What worked out really well, however, were these tablet cases I made with some of the leftovers for my children! They've prevented a lot of scratches I reckon...


Thursday, 25 May 2023

Patchwork Denim Quilted Jacket


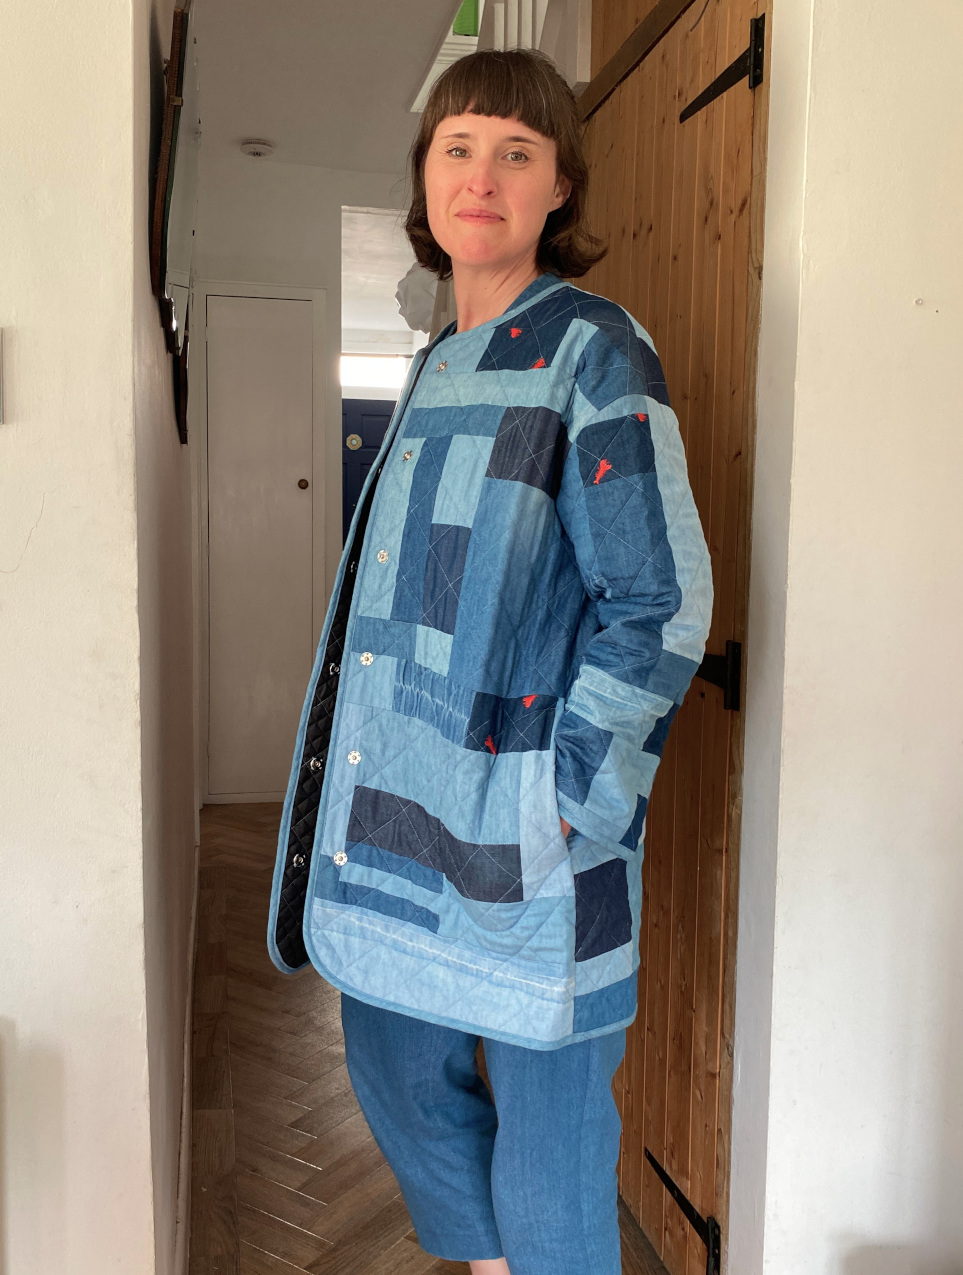
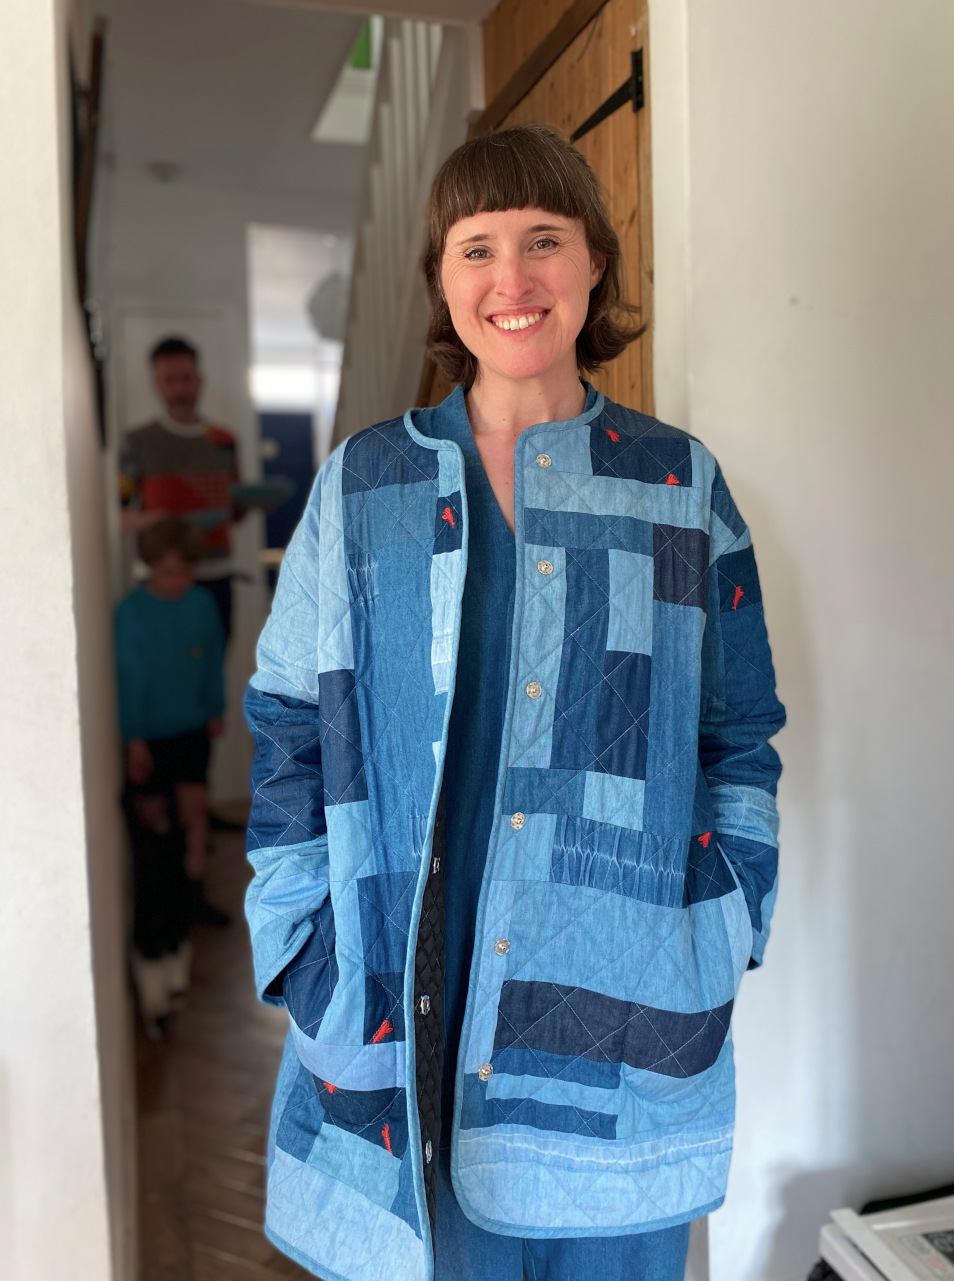
She's done! The jacket with the ridiculously long (but descriptive!) name is complete. This project has been in the works, to some degree, for about two years. That is about how long I've been consciously collecting scraps of this lightweight denim with a view to combining them somehow. 

As I've mentioned all over the place many times, I'm currently obsessed with the possibilities of combining scraps and leftovers to make clothes. Fabric scraps and leftovers from sewing projects are a fantastic resource, but they can build up so quickly. Before you know it, they are spilling out of the box you assigned them, and threaten to take over whatever sewing space you have. But pausing your garment-making activities (if, like me, that's the main thing you're into) just to bust out some little projects to use some of them up, seems like a waste of time and energy. I'm far more interested in applying creativity and resourcefulness to work them into garment projects. 


Fabric:

So I can't exactly pin-point when the idea for this specific garment was born, but when I realised that I had everything I needed to make it happen, I got started on it almost immediately. This jacket has hoovered up a large carrier bag of scraps of 4oz washed denim. Some of that 4oz denim was in the form of scraps from my previous sewing endeavours, some came from the scrap bin at work (including the washed denim with embroidered lobsters!), there were two unworn tunic-y garments, plus the legs from my daughter's woven joggers (which had, in fact, been made from another previously attempted garment projects), also all made from the same type of fabric. I just really love this soft, lightweight washed denim from Fabric Godmother (it comes in three colour ways but this is my fave), which is clear by how many previous garment projects I've made from it over the years. I'm so happy that the finished jacket includes my Tova top, which I wore A LOT during my second pregnancy (proof!). This project also sits very neatly, both in terms of  practicalities and in spirit into the Last Sewist Standing challenge. The only thing I needed to buy to make this happen was thread. 


Pattern:

I settled on the Fibre Mood Molly jacket pattern to use as the basis for this project, not least because I already own it! I chose to lengthen it so the garment would A) use up more of the denim, and B) so it would perform a slightly different function in my wardrobe than my other quilted jacket. I traced out the jacket pieces in my size, then laid them out on the remnant of pre-quilted lining that I was planning to use, and moved the pieces around to work out how much longer I could make them so they still fit. I made sure each piece would have 5cm additional space all the way round to accommodate any shrinking or distortion from the quilting process. 


Patchwork:

To create the actual patchwork, I took my scraps and leftovers and cut them into random rectangles. I took two rectangles that both had an edge a similar length, and stitched them together. Once I had a bunch of pairs, I then found another shape, or pair of shapes, to add to each pair. I kept building it up like that, until I had 'clusters' of rectangles that could be added to each other to make overall shapes that were big enough to fit the pattern pieces on. You can see some of these clusters forming in this Instagram post. At many points, I had to cut some 'custom' shapes to fill in gaps. This was where the actual garments came in particularly handy. I also made an enormous amount of bias binding from the larger of the tunic garments. I planned to bind all the seams inside, as well as round the outside edges, so I knew I'd need A LOT. Obviously I still didn't make enough initially, and had to go back and make more. 

When stitching the patchwork, I used the edge of the machine foot as the seam allowance guide, so it was probably about 7mm. I pressed all the seam allowances open so they'd sit nice and flat, but didn't bother the finish the raw edges because the were going to be hidden by the lining. 


Quilting:

As I say, the lining from my stash that I planned to use was already quilted. With the patchwork panels pinned to the roughly-cut out lining pieces, I stitched along every third row of the quilted lining, so the lining was my guide. I used a walking foot on my machine and really took my time to re-pin after every row to avoid any weirdness in the quilting. I used Gutermann rPET recycled thread for all the quilting and binding, and this project took an embarrassing number of reels to complete! I'm not super happy about that aspect of my 'more sustainable' garment project. 


Construction:

With the pieces quilted and properly cut out, I began construction of the actual garment. All seams were first stitched, then bound with my self-made binding. I also added a cute KATM label that I've been hanging onto for yonks for a special project such as this. 


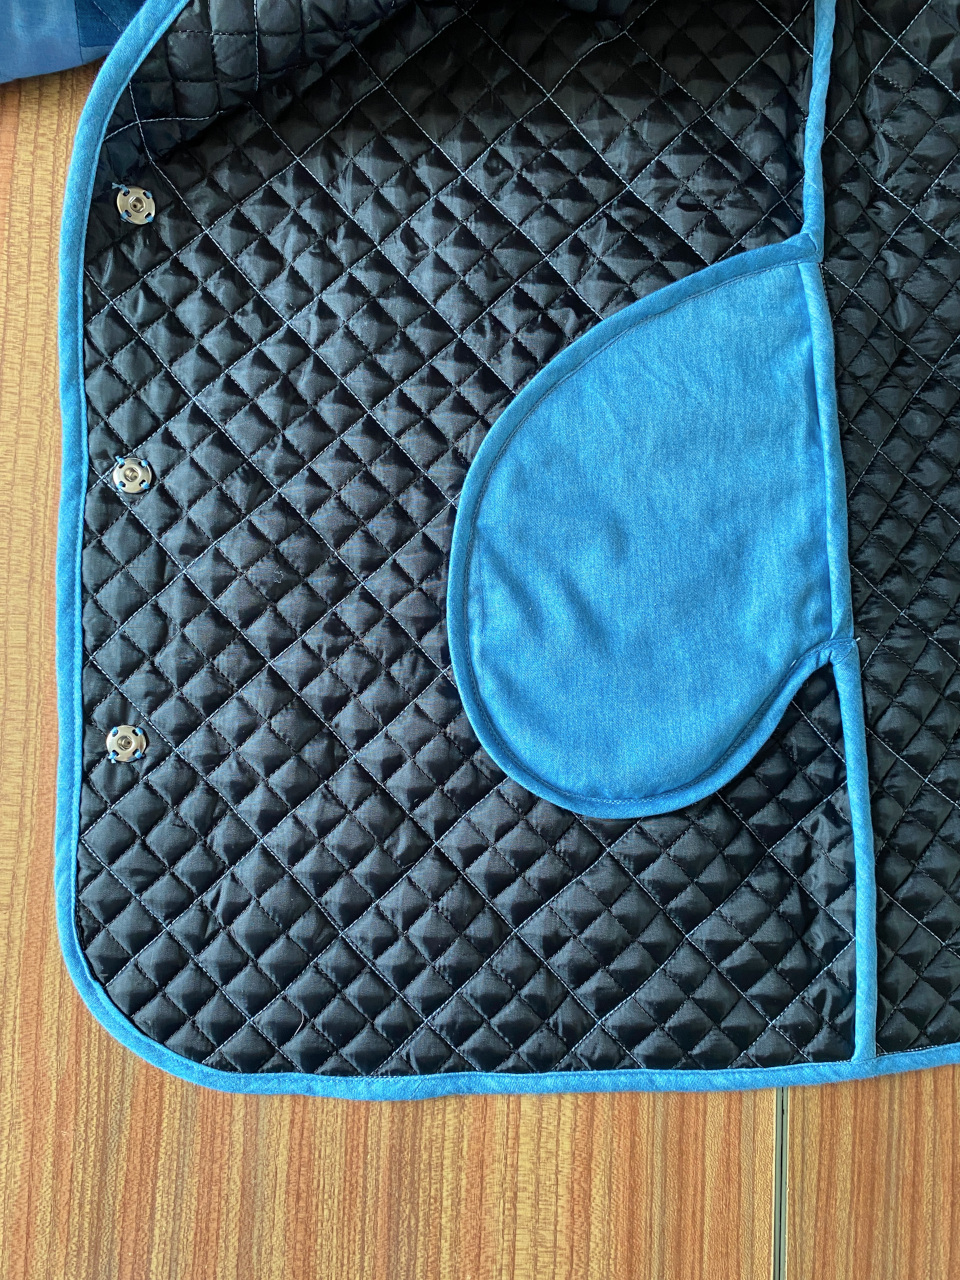
Towards the end of the jacket construction I had to make a call on pockets. The original Molly pattern has simple patch pockets, although not a particularly good-looking shape, IMO. I considered drafting and applying my own patch pockets, but I thought that might disrupt the patchwork on the front panels. Instead, I drafted in-seam pocket bags to make pockets inserted into the side seams. This was a real head-scratcher because I've never made in-seam pockets with completely bound edges before. In the end, I just went for it and it worked out pretty well. I then decided to stitch the pocket bags to the front jacket panels around the edges to keep them in place and give them more stability when in use. I really like the way their shape is visible from the outside if you know where to look. 


The last decision was about fastenings. I considered both traditional sew-on press studs and the set-in type of press studs that I used for my Tamarack jacket. An Instagram poll revealed that the majority of my followers thought the latter was the best option. However, when I went to get them out, I discovered I didn't have quite enough of the back pieces. Because I can't buy haberdashery and still remain in the heavy weight category the Last Sewist Standing challenge, I went with the traditional press studs from my stash, and I actually really like the look of the hand sewn element. 


Thoughts:

I feel triumphant having finished this project! I'm surprised by how similar the outcome is to my original vision, despite winging it the whole time. I love the look of the patchwork. It's got a real abstract, arty vibe, rather than looking like I cut up a quilt, so hopefully it won't look really dated in a year or two. The weight of the garment is also really nice: perfect for late spring and early autumn (plus any rubbish days that summer may throw at us). I also feel great about this project because it's made good use of pieces of fabric that an earlier version of me might have just chucked out. And of course I love that I didn't have to buy anything, other than thread. So. Much. Thread. 

I hope this project inspires others to have a rummage and see what scraps and leftovers they can use for garment making. Using as much of the fabric we purchase is the best way to honour the time, energy, resources and labour that went into its production. 
 

Wednesday, 23 December 2020

Ankara Tamarack Jacket


My love for the Grainline Studio Tamarack jacket pattern developed slowly. As in, it took a couple of years. If this pattern was a potential partner, they would have written me off long ago! My interest grew over time, but it took the vision of an Ankara (AKA African Wax fabric) version that finally made me commit to the plan and I begun to gather supplies. Then a couple of weeks ago the time came to give back the overlocker I'd been borrowing. I looked through my list of potential sewing projects to work out what I could make next that could be made entirely on a regular sewing machine. Although the pattern suggests rather than specifically dictate to do so, I felt that binding all the bulky seam allowances would be the best way of finishing the innards. Therefore, it seemed like a good time for the Tamarack project to rise to the top of my 'to make' list. 


Fabric: 

Last Spring, I saw a woman in a supermarket car park with a really bold puffer jacket. I can't remember exactly what it looked like, but the print reminded me of an Ankara design and my mind went straight to the potential options that were dwelling in my stash. This particularly length of Ankara fabric was brought back for me from her honeymoon in Ghana by my good friend Anna over ten years ago. She told me about the overwhelming awesomeness of the vast fabric market where she bought it, but she knows me well as she picked out the perfect print and colour way for me.  


Shortly after receiving it, I made some of the fabric into this 1950s style retro dress (pictured above). And a year or so later, whilst pregnant with my daughter, I made a dress using the Made by Rae Trillium dress pattern, then called the Washi dress pattern (pictured below). 


Historically, I have kept very few of my me-mades once I have stopped wearing them. However, I kept both of these because of how amazing this fabric it. So I harvested what I could from both, and located the final piece leftover from the original length. Even so, I had to piece the fabric together in a couple of places: around the shoulder/yoke area on both the fronts and the back pieces. I was able to pattern match pretty well, AND I was able to stitch along the joining seams during the quilting step, so I think they are effectively hidden. Finally, I pieced the scraps together to make the self-binding. There really is very little of this fabric left now!


The Tamarack pattern directs you to use the same fabric for both the inner and outer layers. Obviously that wasn't going to happen with mine due to the limited fabric, plus I wanted the ease of taking it on and off that you get with a traditional, slinky lining fabric. I got this navy viscose lining remnant from Fabric Godmother, and made bias binding from the leftovers to bind the pocket edges and all the internal seam allowances. 

The other element that I had to purchase for this project was the quilt batting/wadding. After reading the advice on the Grainline blog, I decided I wanted to source some wool batting rather than cotton for a warmer jacket, but i just couldn't find the size required (twin) in stock anywhere in the UK. As a second choice, I went with a batting made 100% from recycled plastic bottles. I flatter myself by thinking that my green-washing radar is pretty well tuned, but you wouldn't believe how thick they were laying on the 'this product basically saves the world' message in the packaging! It completely ignores how much energy is required to extract usuable polymers from that 13 discarded plastic bottles, and to turn them into quilt batting (which is then wrapped in plastic and shipped to Europe from the US). And looking at the reviews in the comments section of the website, some other customers seemed to have taken the 'I bought this and have just saved the world' perspective on board! Lols. Anyways.


Pattern:

As I say, I wasn't always sold on the style of the Tamarack jacket pattern. Chatting with Mr SoZo about this, I finally figured out that it reminds me of two things: A) the kind of jacket that an elderly Chinese farm worker woman might wear, and B) detachable lining that might be part of a Very Practical Coat. Once I'd made these stylistic links and the question was no longer bugging me, I was honestly much happier to go ahead with the project! 


As with almost all patterns I use, I made a couple of initial adjustments to this one. I blended between sizes at the side seams (my waist and hips usually fall into a size category that is one size larger than my bust), and pinched out about 2cm from the length of the torso on the front and back pieces to account for my short-waistedness. Being able to make these simple (and now automatic) adjustments is such a blessing, and would be worth learning how to sew for even if I didn't actually enjoy it!  

The trickiest part of the project was the welt pockets. When my batting arrived, it was thinner that I expected, but that was partly to my benefit as the construction of the pockets would no doubt have been more difficult if it was been thicker. I declared life too short to pattern match the welts, and once the binding was added to the edges, I think the mis-match of the welts looks fine. Due to the limited amount of fabric I was working with, I was able to match the pattern at the centre front, but couldn't align the colours of the design. 


Thoughts:

I wasn't able to collect all the relevant materials for this project until recently, and because Autumnal jacket weather had passed, I'd kind of shelved the project in my mind until the Spring. However, we've had an (alarmingly) unseasonably warm couple of days lately so I got to wear this out in the world yesterday for the first time. I still feel the elderly farm worker vibes are present, but I also believe that the bold fabric print off sets those vibes enough that it looks pretty stylish. The fit is comfortable, plus the sleeves are narrow enough that it might prove a useful layer underneath my grey Cocoon coat when the temperature really drops and I want to give my Buffalo Check coat a break. 

There have been some amazing quilted coats and jackets popping up on IG recently. If a suitable quilt appeared in a charity shop, I'd be tempted to make it into another Tamarack jacket, with the quilting stage having been done for me. And even if I don't use this particular pattern again, my eyes are definitely opened to the stylistic and thermal qualities of quilted clothing! 

Saturday, 20 June 2020

Patchwork Denim Coat


This coat. Well, lemme tell you two things about it. 1) it took a bloody age to make, and I loved almost every minute of making it. 2) I don't think I'm going to keep it. 


Ever since the success of my scrap-busting patchwork viscose Scout tee, I had in mind doing something similar with denim. I had masses of scraps and small pieces of denim left over from other projects. Denim scraps just aren't as useful as lighter weight fabric scraps for working into other garments or turning into useful gift-y things like schrunchies. I was inspired by a couple of upcycled denim projects that I'd seen on Instagram, including a haori-style jacket that I can't find now. So I decided to use my beloved La Trop Facile pattern by Delphine et Morissette as the base, but lengthen both the body and the sleeves.  


Next was the fun bit. I got all my denim pieces together, and spent a number of the evenings over a couple of weeks hacking them, matching them and stitching them together. I got to select the pieces I liked the best to feature more prominently, and tried to combine them so the overall effect was varied. I decided to include some of the lovely selvedges to break up the blue a bit, and to (hopefully) create an interesting, graphic effect. 


I started on a few sections, joined some of them together and expanded where necessary until I had panels large enough to fit my pattern pieces on. There was a massive back panel, two front panels, two sizeable sleeve-rectangles and a collar. I stitched the outer together, save for the collar, then made a lining. 


Because I was working very much from the angle of #usewhatyouhave, I used some turquoise silk lining from my stash. In hindsight, I don't think it was the best choice as it's very fine, and probably more suited for use in a dress. Anyways, I made the lining then spent a lot of time head-scratching, trying to work out how to insert it. Have done so, I then attached the collar, hand-stitching the inside seam. 


I soooo wish I was the type of person who would wear this. I love the idea and ethics behind 'making fabric' from fabric scraps, and I wish I could fully embody that by wearing this coat out and about. But I've come to accept that it just really isn't my style. It's just too jarring with the rest of my wardrobe.


Therefore I'm going to ask around my IRL friends to see if any of them would like it. I do not regret making it at all, it was such a fun project to work on. I loved exploring the concept of 'fabric from fabric scraps' further and I'm sure I'll do more in the future. 


Now, a tiny bit of house-keeping. I'm afraid I've had to turn off the comments on this blog, at least for a while. The amount of spam I've been getting is ridiculous, I even had two people actually message me about it via Instagram last week. I've exhausted the options within Blogger to curtail it, so I'm not sure what to do. I'm so sad to have had to take this step though, because I absolutely love reading the genuine comments and having a dialogue with my readers, but those comments usually get completely lost within the spam. Thanks so much if you are someone who has commented on previous posts, please know that I really appreciated them. If you would ever like to get in contact with me, my email address is available on my About Me page, and my IG handle is @sozoblog. 

Monday, 4 May 2020

Stripy La Trop Facile Jacket-igan

"Is this a jacket, or a cardigan? Jacket? Cardigan? Jacket-igan?"

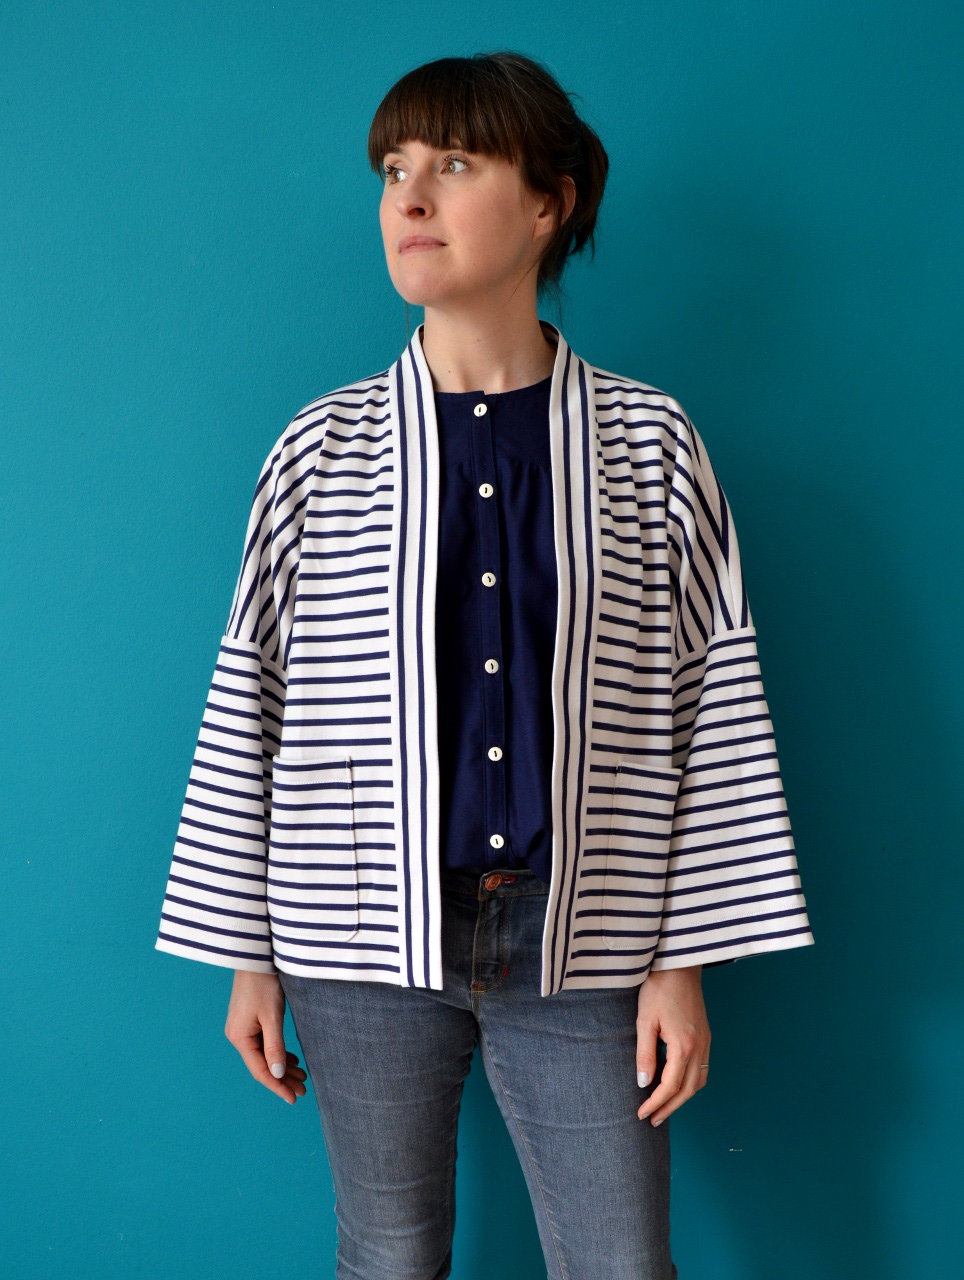
Well, dare I toot my own horn and say that I'm smashing my #2020makenine plans?! I do dare! In January, the epic leopard ponte became an oh so subtle cardigan. In February, I scratched my boiler suit itch with some gorgeous, rust, sanded twill. In March, I made my Romero trousers (further tweaks may still be made) from the nicest denim I've ever encountered (and I've encountered A LOT of denim). And now I present to you April's creation: some stripy ponte turned into a jacket. Or a cardigan. I'm not sure. Anyways, here it is. 


Fabric:

If you feel you may have seen this fabric before on this blog, then you are both correct and super observant. Fifty points to you. My sweet and lovely mum bought me 2m of this lovely, striped, cotton ponte/doubt knit a couple of years ago from C&H fabrics. Some of it became my Breton toaster sweater, but because the fabric was soooo wide (over 2m!) I was also able to squeeze this jacket pattern out of it as well. It's clearly softer and slightly more fluid than the fabric I used for my first La Trop Facile, so I think it gives this garment a very different look to my first version. 


I added a tiny little anchor patch that Tilly (of TATB fame) bought me back from Japan years ago. I forgot to take a photo, but I also used some anchor print grosgrain ribbon to visibly stabilise the shoulder seams, and to form a hanging loop at the back neck. The devil is in the details, after all. 


Pattern:

My original La Trop Facile jacket is about 2.5 years old now, and it remains one of the garments I enjoy wearing the most. The pattern is by Belgian designer Delphine et Morissette (pattern shop here), and I'm obsessed with her many patterns. All but one or two are only available in French, so Google translate and I are good friends at this point. The La Trop Facile is a genius combination of elements that I didn't know I was looking for until I made my first version: it has volume, but isn't overwhelming, and it looks and functions like a jacket but is feels more like a comfy cardigan. 


For this stripy version, I had to omit the turned-back sleeves detail due to fabric restrictions. The heaviness of the turn-backs might not have worked too well with the knit fabric anyhow. As the name would suggest, this pattern is a very quick make, especially for a jacket. Obviously, I had to pattern-match the hell out of the seams and pocket application, which slowed the construction process down a touch. 


Thoughts:

Generally speaking, I very happy with this garment. I'm not entirely sure that this pattern and this ponte were a match made in heaven though. It's likely that the garment style would be better suited to a fabric with a touch more structure, but I think I've just about got away with it. The stripes also make this garment a little harder to pair with other tops underneath. I'm hoping that Me-Made-May will help me discover a few tried and tested combos so it gets the amount of wear that it deserves.  


Tuesday, 17 October 2017

La Trop Facile


This project is a definite departure for me, style-wise, and another pattern by my current sewing-pattern-designer-crush, Delphine et Morissette (designer of La Brune). It took me a couple of weeks after finishing it to actually start to wear it, as the look and the volume feel quite different to the rest of my wardrobe. But now that I've broken the seal, it is the garment I'm most excited to put on at the moment and I wear it every day. 


Pattern:

This is La Trop Facile (the 'Too Easy') pattern by Delphine et Morissette, a casual outerwear garment that can be made in a variety of fabrics. If you google this pattern, you'll find a surprising lack of other people's versions out there compared to some of her other patterns, and I'm not sure why this is. I love the no-frills utility of this garment, and, for me, it hits the sweet spot between 'cardigan' and 'jacket' that I didn't know I was missing. 

To buy any of her patterns, you have to make a request via a contact box; it's not an instant download like most PDFs. That may be frustrating if you want to get cracking immediately, but I found it quite charming to have some direct contact with the pattern designer herself. You can then pay via Paypal or bank transfer. Be warned: the PDFs are pretty basic. The patterns tile together like most PDFs, but the look a bit different as they aren't digitised, and the construction step-by-step page/s are in French with no illustrations or photographs. That said, some of her patterns have additional photographic step-by-step assistance through links on her blog but you need to go find the original blog post about each garment pattern to find them. I think. 


But once all that was dealt with and the pattern was cut out and Pat had been bribed into translating the instructions, it really was very easy to make. I veered away from the instructions a few times: once to add interfacing to the neckband (which, annoyingly, I decided to do after I had already attached it and had to carefully unpick the damn thing), another to attach the neckband slightly differently than instructed, by finishing it by hand to get a neater look with my bulky fabric. I also added rectangles of bias binding to the underarm to strengthen the areas where I had to snip into the seam allowance at the curve (see above), plus, I used some ribbon for a back-neck hanging loop instead of making a self-fabric one which I feared would be too thick (see below)


Fabric:

I bought this navy/black matelasse from Fabric Godmother, but I'm sad to say that they sold out of it some time ago. It's basically a stable knit with a slightly spongy quality, plus it's cosy and doesn't crease. The deep, inky-blue colour seems to work relatively well when worn with both the navy and black items in my wardrobe. The pattern designer suggests that this pattern works in a wide range of fabrics. I'm tempted to try this pattern again in a loosely woven fabric for the warmer months (something like this).


Thoughts:

As I've already said above, I'm super into this garment. It feels to nice to wear, and has upped my daywear game by helping me look a bit more put-together than if I'd chucked on a cardigan to leave the house. It's also incredibly useful for when I'm wearing Frankie in the baby carrier. I'm hoping I can wear it for as possible layered and with scarves as the weather gets chillier.

Friday, 4 December 2015

Woodland Stroll Cape


Remember how I said that, having finished my sailboat raincoat, I was surprised to find that I didn't hate the thought of ever making another coat or jacket again? Well, I tested that revalation by jumping into my next planned outerwear project, the Woodland stroll cape pattern (as outlined in my nippy weather sewing plans). 


Pattern:

I've had a hankering to make myself a cape for years, but struggled to find quite the right pattern for the task. As much as I like the look of most cape sewing patterns, they often seem pretty restrictive and therefore unwearable, IMO. However, the Woodland Stroll Cape sewing pattern by Liesl + Co (pictured below) seemed like it might actually allow you to do things other than stand still and gaze at stuff. Around the time I found this pattern (probably via Pinterest), I also discovered the equally awesome Tessuti New York Cape pattern which pretty similar but it has a hood. After an extensive internal debate, I went with the Woodland Stroll one because it included a lining. If I'm going to make outerwear, it had better bloody keep me at least vaguely warm! PLUS, having used a few Oliver + S patterns (the children's patterns counterpart to the Liesl + Co range) and been super impressed by their instructions, I knew that I'd be getting a little sewing lesson thrown in if I bought that one. This one lived up to my expectations, and I definitely felt cleverer after I completed this project!


I'm really pleased that I read the post by Sarah from Fabric Tragic about her fabulous (also checked) version of this pattern before I cut mine out. She drafted a front facing for hers (the pattern includes a back neck facing but has the front lining attached at the very edge of the front edges) which seemed like a wonderful idea, so I followed suit. Thanks Sarah for the tip! I'm so glad I did as it gives the whole thing more body and feels more snuggly around the neck/throat area.


Aside from the front facing, the only place I deviated from the pattern and instructions was with the buttons. The pattern calls for three buttons (or buckles) down the front but I went with four because I thought that looked nicer. I also stitched the underarm buttons on through both layers, rather than creating buttonholes as the pattern suggests. I knew I was never going to undo those underarm buttons, so making functioning buttonholes seemed a bit of a waste of time.

Fabric:

This piece of checked wool (actually, it may not be wool) has been in my stash for about four years and I am unnecessarily excited to have finally used it. It was the very end of a roll that had been donated for us to use when I worked for TRAID. It was a small piece (maybe about 1.2m), too small for making anything to sell from it, but I loved it too much to stick it in the bag with the other off-cuts to be shredded and recycled. As it was too small for any other jacket-y type pattern I encountered and too thick to be appropriate for a different type of garment to be made from it, it has hung around all this time as I lamented it dormancy (is that a word? I could easily find out I guess if I could be bothered, I'm clearly sitting in front of a computer).


Anyways, you can imagine my excitement when I realised that, with care, I would have enough of it for this cape pattern! I was able to pattern-match at the centre front and at the side seams, but it's all over the place at the shoulder seams and I couldn't give a monkeys. The fabric is soooo snuggly that wearing it feels like I'm receiving a constant, low-level hug.  

The lining, sadly, I had to buy. I didn't have anything even vaguely matching in my stash. Because the lining goes right up to the edges around the whole hem, I knew it would probably be visible from time to time, so I didn't want anything contrasting. I found this grey (acetate?) lining in Ditto fabrics in Brighton after my classes at MIY Workshop one Saturday. I was thrilled to find this lining because their selection isn't huge and it was just the right tone and it had a tiny checked print which references the outer fabric nicely.


Thoughts:

This cape has turned out better than I could have hoped for and I'm beyond happy that I finally got to deploy my beloved checked fabric piece. Before the temperature really dropped last month, I wore this pretty much every day with my fabulous mustard wrist warmers that my friend Michelle knitted for me years ago. I've already turned two of my regular students at the MIY Workshop on to this pattern as it is a fantastic outerwear sewing pattern to cut your teeth on. There are no darts, no sleeves and no collars to worry about; just buttonholes and a lining remain to freak you out/conquer! 


Cost: 

Pattern: $12.95 (about £8.60) from here as a PDF
Outer fabric: £0
Lining: £4.50 from Ditto Fabrics
Buttons: £2.60-ish from my local haberdashery, Thimbelinas (how good it that name?!)
Total: £15.70

A fairly pricey make for me, and it involved buying way more 'new' stuff than I tend to feel comfortable with, but I think it was worth it because I know the final result will get a lot of use. After four years of hard service and approx. 350,000 wears, my Captain jacket is starting to get very ratty, so this may well fill the void that otherwise my wardrobe would be about to experience. 


Related Posts Plugin for WordPress, Blogger...