Showing posts with label selfless sewing. Show all posts

Friday, 6 October 2023

Free Pattern Friday: Avelia Bomber Jacket for Adults


Welcome to my monthly 'Free Pattern Friday' feature, where I road test a free sewing pattern or tutorial: sometimes a children's one, sometimes an adult's one. I publish these posts every first Friday of the month, timed to provide inspiration for those who plan to get their sew on over the weekend. I firmly believe that, if you pick your projects carefully, sewing doesn't have to be a crazy-expensive way to clothe yourself and your family. Thanks to all the amazing pattern designers who have offered up their hard work for us to enjoy for free.


Ok, so this probably isn't a very useful post because I didn't actually road test this free sewing pattern very thoroughly. The pattern is for a lined bomber jacket, but I wanted to use pre-quilted fabric, so I had to basically chuck the instructions out the window and make the construction up as I went along. What might be useful for you to know, however, is that the Avelia Bomber jacket pattern is one of 300+ free sewing patterns available via the Mood Fabrics website when you sign up to their newsletter. The Mood Sewsciety is the section of the Mood Fabrics website dedicated to supporting sewers with how to actually their fabrics and develop their skills. That's where you'll find all the patterns and the instructions that come in the form of supporting blog posts. Thanks to Mood for sharing all these patterns for free, the variety of the range is really impressive. 


(image source: Mood Fabrics)

Pattern type:

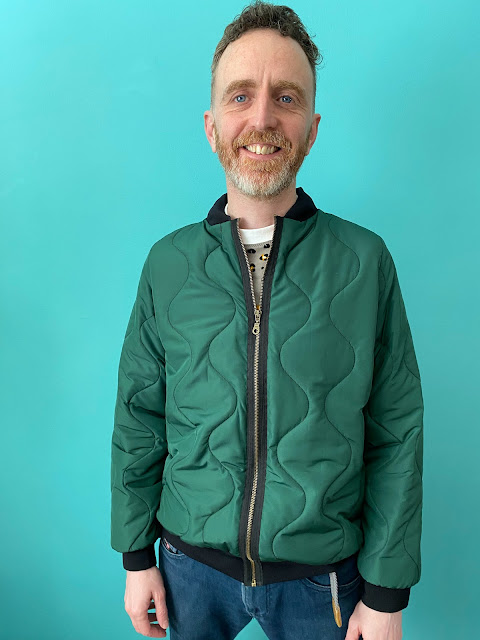
I promised Mr SoZo a new jacket for his birthday back in January (this was finished in February). Until that point his only outerwear garments were one puffy winter jacket and one incredibly flimpsy unlined jacket (I can hardly bring myself to describe that thing as a jacket, it's so thin!) and nothing inbetween. So I brought him to my work at Fabric Godmother at the end of an open day I was helping out at, and together we selected some cool reversible pre-quilted fabric.

He loves bomber style jackets, largely thanks to Karamo, but a thorough trawl of the internets didn't bring up as many options as you might expect. There's one excellent-looking one by a French (maybe Belgian actually) pattern company but they don't sell PDF versions. The shipping and taxes on goods coming from France these days is eye-watering ('thanks' to Brexit), so I decided to continue my search. 

When I chanced upon the Avelia Bomber jacket pattern, I thought it might give me some bones to work with. Mr SoZo is quite narrow in the shoulders, so a pattern drafted for a more feminine frame wouldn't require a huge amount of reworking, were my thoughts. The original pattern is for a fully lined, zip-up jacket with faux zip pocket, designed in particular to show case the futuristic, oil-effect, reflective fabric pictured above. 


Sizing info:

Here's where things get a bit tricky. The pattern is graded from a US 2 - 30, with sizes 7 and 9 thrown in for good measure. Body measurements are included in the blog post, however finished garment measurements are not. Word on the street, and by 'street' I mean this blog post, is that Mood's patterns' sizing and fit are all over the place. My assumption is that they have many different pattern makers creating patterns for them, seeing as they have so many on offer, and there isn't any consistency across the range. My recommendation would be to measure the pattern pieces themselves and compare with similar style pattern or garment you own before selecting a size. I ended up combining sizes and adding a significant amount of length to the body and some to the sleeves. 


Fabric info:

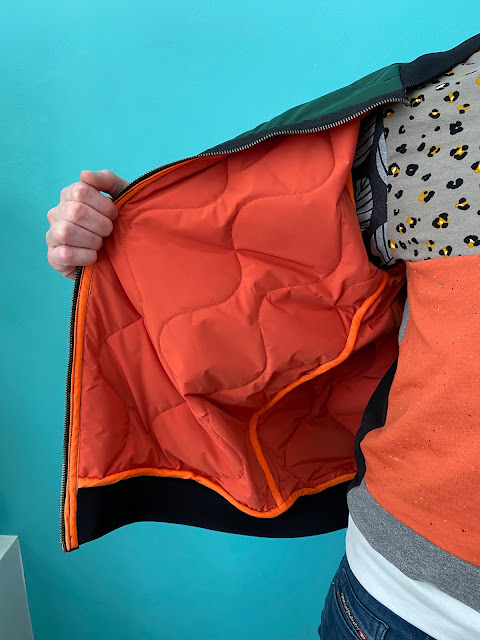
As I say, this pattern was created to promote this specific fabric, so the only fabric referred to in the list of materials required is that particular one. So you're kind of on your own with fabric choice, but my thoughts are a mid-weight woven with little-to-no-stretch, or even a hefty knit such as a very dense sweatshirting or scuba might work. It also suggests a polyester lining and a thick type of rib knit trim, with links to where you can buy it on their site. As I say, I was using a pre-quilted fabric so I didn't need lining, but I did have to buy some heavy jacket ribbing and found some fairly cheap on eBay. 

Because I lengthened the body, I half-made the garment before measuring for the length of zip I required. Annoyingly, the length I'd created was in between two lengths available on Zipper Station. I wasn't about to start trying to shorten a brass tooth zip, so I went for the longer one and tried to ease it in as best I could.   

I also had to buy a million metres of orange bias binding to finish all the seams. But I only have myself to blame for that. 


Findings:

I can say this because the whole process was several seasons ago and I now have some distance, but this was NOT an enjoyable sewing project. I love sewing for Mr SoZo, but this project was not fun. Obviously, choosing the pre-quilted fabric created a big headache because I had to created my own construction method. But also I disliked the drafting on this pattern. I didn't like the shapes and proportions for any body. Plus the zip being a bit long threw things off a bit, and I don't like how the neckline looks where the zip joins with the collar ribbing. Thankfully, after months of wear (and there HAS been months of wear), the neckline has softened a bit and doesn't look as stiff and awkward as it does in these pics that were taken when it was first made. 

I had to hand stitch the bias binding to cover the seams which took FOREVER. I'm still spotting places where the orange stitching is visible on the outside against the green where I made my stitches too deep. AGH!


Would I make it again?:

Would I make Mr SoZo a bomber jacket again? Yes. Would I use this pattern to do so? No. It was a bold move to use a fabric that was not prescribed for the pattern - a risk that partially paid off. However, I'd like to make another with a regular lining with a different pattern as the base. 

What worked out really well, however, were these tablet cases I made with some of the leftovers for my children! They've prevented a lot of scratches I reckon...


Thursday, 23 May 2019

Quadra Jeans Ambassador Project for Fabric Godmother


For this, my second Fabric Godmother Ambassador project (you can see my first one here), I decided to take on the mother of all selfless sewing projects: jeans for Mr SoZo. You can read my post about this project on the Fabric Godmother website here, however, here's an abridged version with some extra details. 


For this Ambassador project, I chose the Thread Theory Quadra Jeans pattern which is part of the range of PDF patterns that you can purchase through Fabric Godmother's website. I paired the pattern with this unusual rust-coloured denim. I thought that it'll add an alternative to the sea of navy and grey that comprises his wardrobe, plus I thought the small stretch content would make these slim legged jeans more comfortable.  

If you're attempting to implement more of a 'slow fashion' approach to your sewing, as I am, making a dude a pair of jeans ticks a lot of the boxes. Firstly, making jeans is literally a comparatively slow sewing project. Secondly, Pat, like many guys, will wear his clothes until they are basically rags. So these jeans are likely to have a lonnngggggg life with many wears.

So, the instructions recommended sizing down if you are using a fabric with stretch, so I chose the size 28” even though his measurements put him as a size 30. In the end, I let them out again a bit at the waist (I waited until I fitted the side seams before cutting out the waistband), so I’d probably start with the size 30” next time and give him a bit more room throughout the whole leg.


I'd also like to mention something that an Instagram post featuring someone else's Quadra jeans project gave me a heads up about; if you're making one of the smaller sizes, you may find that the back pocket pattern piece is crazy-big. Unlike the Ginger jeans pattern, for example, the pocket piece is one size, rather than graded between the size range. After measuring the pockets on his current RTW jeans, I ended up reducing the pocket by about 1.5cm along the sides and bottom.


This final thing I'd like to mention about this project that I didn't write about in the FG post is the pocket bags. Although my woven fabric scraps selection is extensive, I really didn't have anything that worked well with the rust denim. But in the same week that I began this project, I also had to encourage Pat to decommission one of his well-loved and overly-worn out work shirts. The fabric was excellent quality, somehow both crisp and soft, and I was able to squeeze both pocket bag pieces out of the back section, thus giving his old faithful a kind of reincarnation.  


So would I use this pattern again? Very likely. The next time he needs a pair of jeans, if I can find the time and muster the selflessness, I'd definitely consider making him some more. This might be one of the rare sewing projects that might be cheaper to make yourself than to buy at a comparable level of quality in the shops. Is that some kind of unicorn of the sewing world?!

Sunday, 19 May 2019

A Trio of Apollons


Umm, exactly HOW selfless has my sewing been lately?! Bloody selfless. Although, if I'm honest, I didn't make these three sweatshirts back to back. But I did get them all done within about a month, so I can still claim some sort of prize, no?!

Anyway, when the weather started to warm up and we began to claw our way out of winter, Pat (AKA Mr SoZo) discovered a major hole in his wardrobe. This hole existed between the wool jumpers (or sweaters, if you prefer) and the T-shirts, where some cotton-y long-sleeved tops should have been residing. Somehow he found he had just one fine cotton jumper that his mum had bought him that fit the criteria. And that had a very visible hole in the neckline at the front, and a matching one at the back from where he'd cut out an itchy label. TBH, I disliked that jumper so I struggled (and failed) to find the motivation to fix the holes before they got too large. 


Pattern:

I was just about to hit the charity shops on his behalf when French pattern company, I Am Patterns launched a mini collection of styles for men, including a men's version of their super simple women's Apollon sweatshirt pattern. I was immediately very excited because the proportions looked perfect for Pat's slender frame. I atypically bought a paper copy (I normally buy PDF patterns for the immediacy, and lower price) from Fabric Godmother and got prepping.  

I chose not to dive straight in wielding the scissors, and took Pat's measurements carefully, comparing them to the pattern. I expected to have to make adjustments for his relatively narrow shoulders, however, the XS size seemed like it was going to be fine, so I went straight ahead and made it with no adjustments (the army green version). Both Pat and myself were super happy with the fit, and I love the balance of the the resultant widths of the neckband, waistband and cuffs. Going forwards, I decided to make the cuffs and waistband a little tighter and I think you can see the improvement in the rust and grey versions. 

(image source: I Am Patterns)

The only other change I made to the pattern was adding a stage to the construction to stabilise the shoulder seams. I used cotton twill tape on the army green version, but then I found I had some clear elastic in my stash that I used for the other two. I prefer the look of the clear elastic, but it is a total faff to apply. 

The construction of these is embarrassingly straight forward (which is in no way related to why I made three in quick succession!). The seam allowance included is very narrow, which encourages the use of an overlocker to make these, if you have one. The last time I sewed with sweatshirt weight knit on my overlocker, I had major hassles. The seams were stretching out, and because you can't adjust the differential feed on my machine, I was left with no way to prevent it (a call to my favourite sewing machine repair guy confirmed this) and serious steaming with my iron was doing nothing to improve the situation. After some experimentation with my regular machine, I found an overcast stitch that looks and functions similarly to the stitch off an overlocker. And because the seam allowance included in the pattern is so narrow, there was no excess fabric that would need to be trimmed away. For my third version (the grey one), I decided to test my overlocker again, just in case. Miraculously, it seemed to be working with the fabric fine, so the seams on the last one are sewn with the overlocker.  


Fabrics:

I scoured the shelves at Fabric Godmother for sweatshirt fabric that I thought Pat would be happy to wear. His colouring is on the ginger spectrum, so the army green cotton french terry seemed an obvious choice. I think they must have sold out because I couldn't find it on their site to link to, however it's a thick, hefty, excellent quality fabric that feels good and solid, if you know what I mean. My second choice was a bit of a wild card. This speckled sweatshirt fleece (pictured below) is a really bold, almost orange shade of rust. I told him I would happily use it for me if he didn't like it, but no, he was fine for me to go ahead. It's a lighter weight than the french terry, with a lovely soft reverse side. When Pat first wore this version, our daughter told him he would be in trouble with me because she thought he'd already got it dirty! I also bought a length of the navy version, which I believe is the the same as the fabric used for the sample pictured on the I Am Patterns site. I bought it with the intention of making another Apollon sweatshirt, but I've since hatched a slightly different plan for that. Watch this space...

(image source: Fabric Godmother)

The final version of this batch also counts as one of my #2019makenine projects. I had a length of this fun lightning flash french terry kindly given to me by Girl Charlee UK, and although I really love it, I wasn't quite sure what it should be. I'm not really into wearing sweatshirts these days, so my plans were erring towards a cardigan. But when I randomly decided to hold it up to Pat whilst tidying my fabric shelf, the scale of the print looked really good on him so I realised I had to help it fulfil it's destiny as a sweatshirt for him. Once again, I think it must have sold out as I can't find it on the Girl Charlee site, but that's perhaps not surprising as it featured on the most recent series of GBSB. 

Back to the sweatshirt (who knew there was so much to say about such simple garments!). I find that tops that have bands that have been made in self fabric can look a bit weird if the print is a large scale, so I went on the hunt for some matching plain ribbing. I hit the jackpot when I chanced upon this pale grey marl rib, which is near-as-dammit an exact colour match. 


I can't remember exactly how much I had of the lightning flash french terry, (the Apollon pattern requires 1.5m), but I had just enough to squeeze a pair of joggers for Frankie out of the remains. I'm in love with this new-to-me joggers pattern so I'll blog about it separately soon, however needlessly to say, I'm finding it beyond adorable that they are matching. Of course, it's not the for the first time.....

Thoughts:

Ok, so please no one tell Pat exactly how easy these types are garments are to make. It's, like, the exact same amount of work as making this or this. You could fancy things up with topstitching the seams/seam allowances around the neckline, cuffs and waistband. If I had a cover stitch machine (yes please, universe!), or if I'd have more success with a twin needle, I would. But I haven't so I didn't.

As for the pattern itself, I'm so happy to have one that I can easily turn to whenever suitable fabric crosses my path. I'd love to see experiment with fine sweater knits and potentially rustle up some fancier looking garments. The only thing that I dislike about it, is that there isn't a sleeve head notch to help with the sleeve insertion. The sleeve pattern doesn't have a front or back: the curves are the same on both sides. And I measured the armholes of the front and back pattern pieces, and they aren't the same, so it's not a case of simply folding the sleeve head in half and making a snip. But really it is a tint gripe that effects only one process of the construction. Anyways, I can happily report that all three of these sweatshirts are in regular rotation, and I'm excited to make more.   
Related Posts Plugin for WordPress, Blogger...