Welcome to my monthly 'Free Pattern Friday' feature, where I road test a free sewing pattern or tutorial: sometimes a children's one, sometimes an adult's one. I publish these posts every first Friday of the month, timed to provide inspiration for those who plan to get their sew on over the weekend. I firmly believe that, if you pick your projects carefully, sewing doesn't have to be a crazy-expensive way to clothe yourself and your family. Thanks to all the amazing pattern designers who have offered up their hard work for us to enjoy for free.
Happy New Year to you!! I hope that 2021 has many wonderful things in store for us all. Let's start the new year by reviewing some free sewing patterns shall we? A good a plan as any I feel.
Right, so I've made a decision. Going forwards, some of my Free Pattern road tests will feature patterns that I've posted about before. There are a few reasons for this. Firstly, some free patterns are so good and so useful that I end up using them again and again. Obviously it's not always clear during the initial road test if a pattern will become a TNT, and I think it's beneficial for readers to hear which ones over time I've found to be real winners. Secondly, I don't expect that everyone that reads a post on my blog or IG will have viewed my whole back catalogue and seen all the patterns I have tested previously! Crazy, I know. And finally, it's pointless and unsustainable for me to sew up a new free sewing pattern each month just so I'll have something to post about. If there is a free pattern that interests me, I'll try it, but I'm not going to sew something for the sake of content creation if it's not what I really want to be making right now. All that to say: I've posted about the patterns in this post on this blog before. However, I hope you appreciate that I'm reusing not one but TWO free patterns, and showing a different way of using them!

My first review of the Brindille and Twig Ringer Tee pattern from three years ago can be found here. It is easily accessed by adding it to your cart and going through the checkout on the B&T website (no payment required). The Made by Jacks Mum Lightning leggings pattern review was from earlier this year. To access this pattern, you can join the MBJM Sewing Group on Facebook, or you can get it through their site. If you do the latter and are in UK or EU, the transaction goes through Etsy so you will pay a small fee.
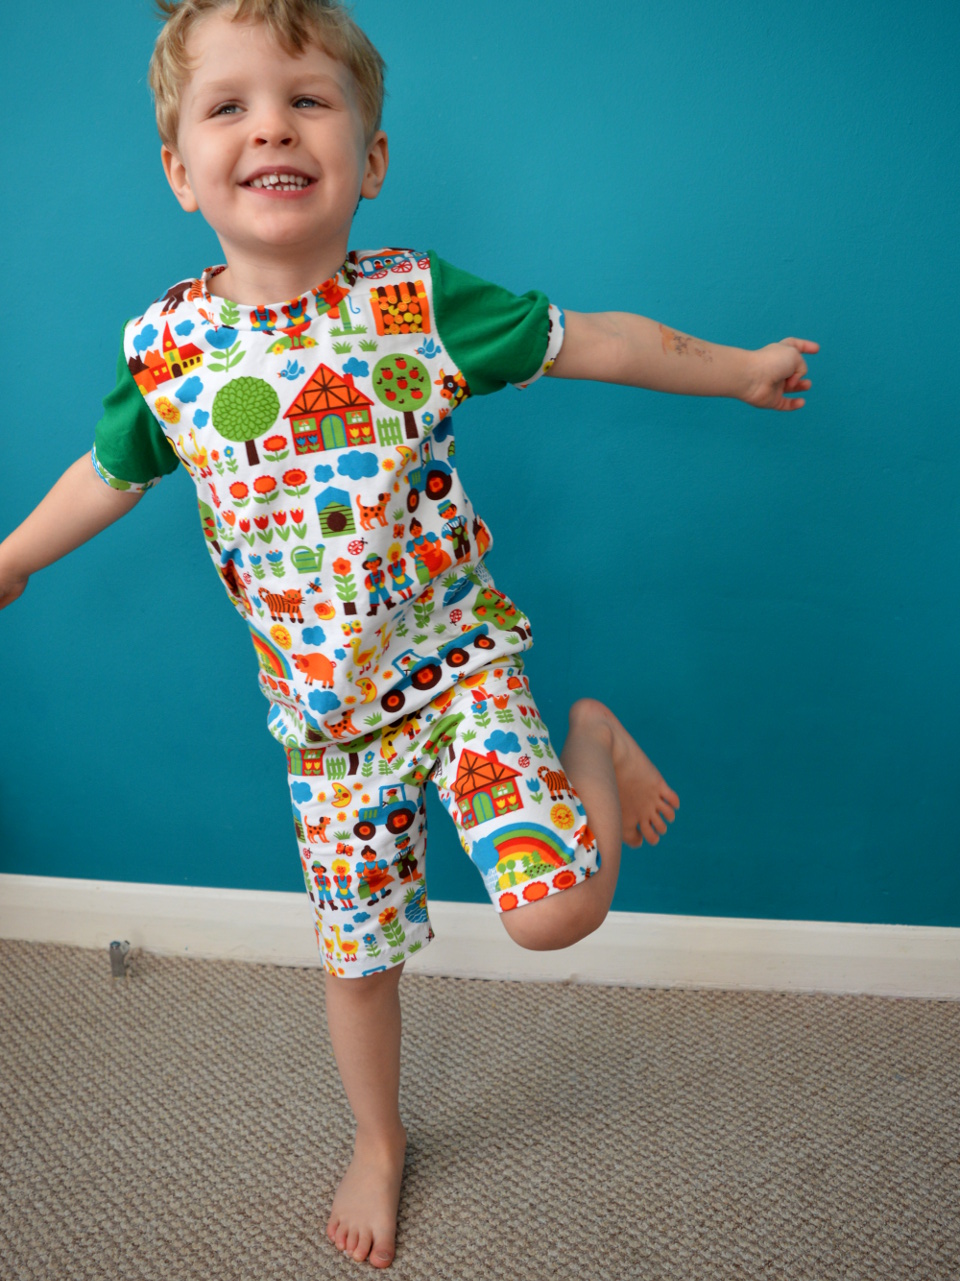
Both patterns are fantastic for making everyday garments, and today I want to highlight that they can also be combined to make knit pyjama sets. As you can see, I've made one summer set with short sleeves and short legs, and one for the rest of the year with the long options. There are other free knit pyjama patterns for kids out there, but to reduce paper and printer ink use, I love that these are multi functional and include various options. Check out the individual posts for more info on each pattern, however I'm including all the most relevant details again here. Massive thanks for both designers for sharing their hard work for free.
Pattern type:
The Ringer tee is a banded T-shirt pattern that includes both long and short sleeved options. The Lightning leggings pattern includes relaxed and slim fit options, both of which can be made in three lengths, with elasticated or band-finished waists AND hemmed or band-finished hems. Another version of the smaller sizes of both leg fits has also been drafted to accommodate reusable nappies. With all these style elements to choose from, take care to read what pages you'll need before you start so you're not printing out a bunch of unnecessary pages.
Sizing info:Whilst the Ringer tee pattern has been graded to include 0m-3m to 5-6T, I've found that B&T sizing runs at least one size bigger, so go by the height rather than the age when selecting which size to make. I wanted these sets to come up big as Frankie (currently aged 4 and about 103 cm tall) doesn't really need them right now, so I made the 4-5T (that I would expect to fit a 5 year old). As expected, they have come out at least one size too big, and I'm guessing he'll get two year's worth of use from the tees.
The Lightning leggings are graded to a larger size range: from premie/small newborn, up to 12 years. I've made a stack of these leggings as this point, as well as few other MBJM patterns, and I always find the sizing to be very accurate. If your child tends towards a stockier or skinnier frame than the 'average', you can easily combine sizes as you need to to get a better fit than most shop-bought leggings. I made the size 5 relaxed fit option (one full length and one shorts length) for both these pairs for Frankie. I expect he'll only get one or one-and-a-half-year's worth of use from these, compared to a good two years from the Ringer tees.
Fabric info:
The Ringer tee pattern requires knit fabric for the body and sleeves and it suggests to use ribbing for the bands. I feel that cotton/Lycra single jersey or cotton interlock would work best for the main fabric, although I have also had success using a very stretchy, lighter-weight French terry. I must admit that I've always used the self-fabric for the bands rather than ribbing, but haven't had any problems.
The Lightning leggings pattern recommends that knit fabrics with good stretch and recovery are used, for example cotton/Lycra jersey. If you're making the slim fit, I'd recommend that you check your jersey isn't too thin. My daughter has bust through a couple of her pairs because the fabric I chose was too thin and was probably better suited to T-shirts. The relaxed leg style option might also work with a lighter-weight French terry that has an elastane/Lycra/spandex content for more of a joggers style garment.
For both the pyjamas sets pictured here, I've used cotton/Lycra jersey. The grey arrow print jersey came from a friend's destash, but originally from Little Miss Sew n Sew I believe. The farm print jersey was sent to me for free from By Graziela. Both fabrics are excellent quality: soft and with excellent recovery.
Findings:
The Ringer tee pattern is really nice to use. The layers function has been included so you can print out just the size you require, and it's easy to see which pieces you need to cut out depending on your choice of sleeve options. I do find that, as well as coming up at least one size larger than the age it's marked as, the pattern also comes up pretty long in the body. I shortened the pattern by a few centimetres for both the tees pictured here. You could easily make this tee by omitting the hem band entirely, and turning up the bottom edge and hemming instead.
For the Lightning leggings pattern, I'm literally going to copy and paste my original post's findings:
I really like how MBJM's patterns are produced. The information conveyed is very clear and user friendly, without heaps of unnecessary blurb or frou frou. This is particularly important when a designer is trying to guide you through a pattern that contains heaps of options, such as this. Literally the only thing I can think of that is missing but would have been helpful, is a clear, technical spec drawing of the garments. In fact, now I come to think of it, I don't recall seeing a spec drawing for any of MBJM's patterns. I find those can help you get to the bones of a pattern style, without fabric choice, model's pose etc. distracting you.
You might think that, what with all the style options and choices included, that the actual PDF pattern pages would be a Burda-magazine-style web of confusion. However, I am able to report that I found them very well laid out and easy to figure out, despite all the various pieces and cutting lines. In the instructions there is a handy guide to help work out which pages to print for the combo of options you're going for. Plus, both the A4 and A0 copy shop files offer the layers function; yet another way to prevent wasting precious printer paper and ink. If you think you're likely to reach for this pattern again and again as the child you sew for grows, it might be worth getting the A0 file printed at the copy shop with all the sizes (excluding the sizes that they are already too big for). Then you can trace off the size you need onto pattern paper (or wrapping paper/wall paper/whatever you've got to hand that) as and when you need it, to save on ink (and getting your printer out and finding all the relevant wires, amirite?!) further down the line.
As for the finished garments, I'm really pleased with them. The overall fit of the slim leg option is exactly what you'd hope for in a regular leggings pattern. And the relaxed leg option is a nice, modern alternative that is suitable for any kid who may not wish to wear tight leggings (yeah, I'm trying to find a woke way of referring to 'most boys'!).
Would I make these again?
Clearly, yes!!! I imagine I'll be using both of these patterns until both my kids grow out of the size ranges for both patterns.