Showing posts with label Tilly and the Buttons. Show all posts

Tuesday, 12 March 2024

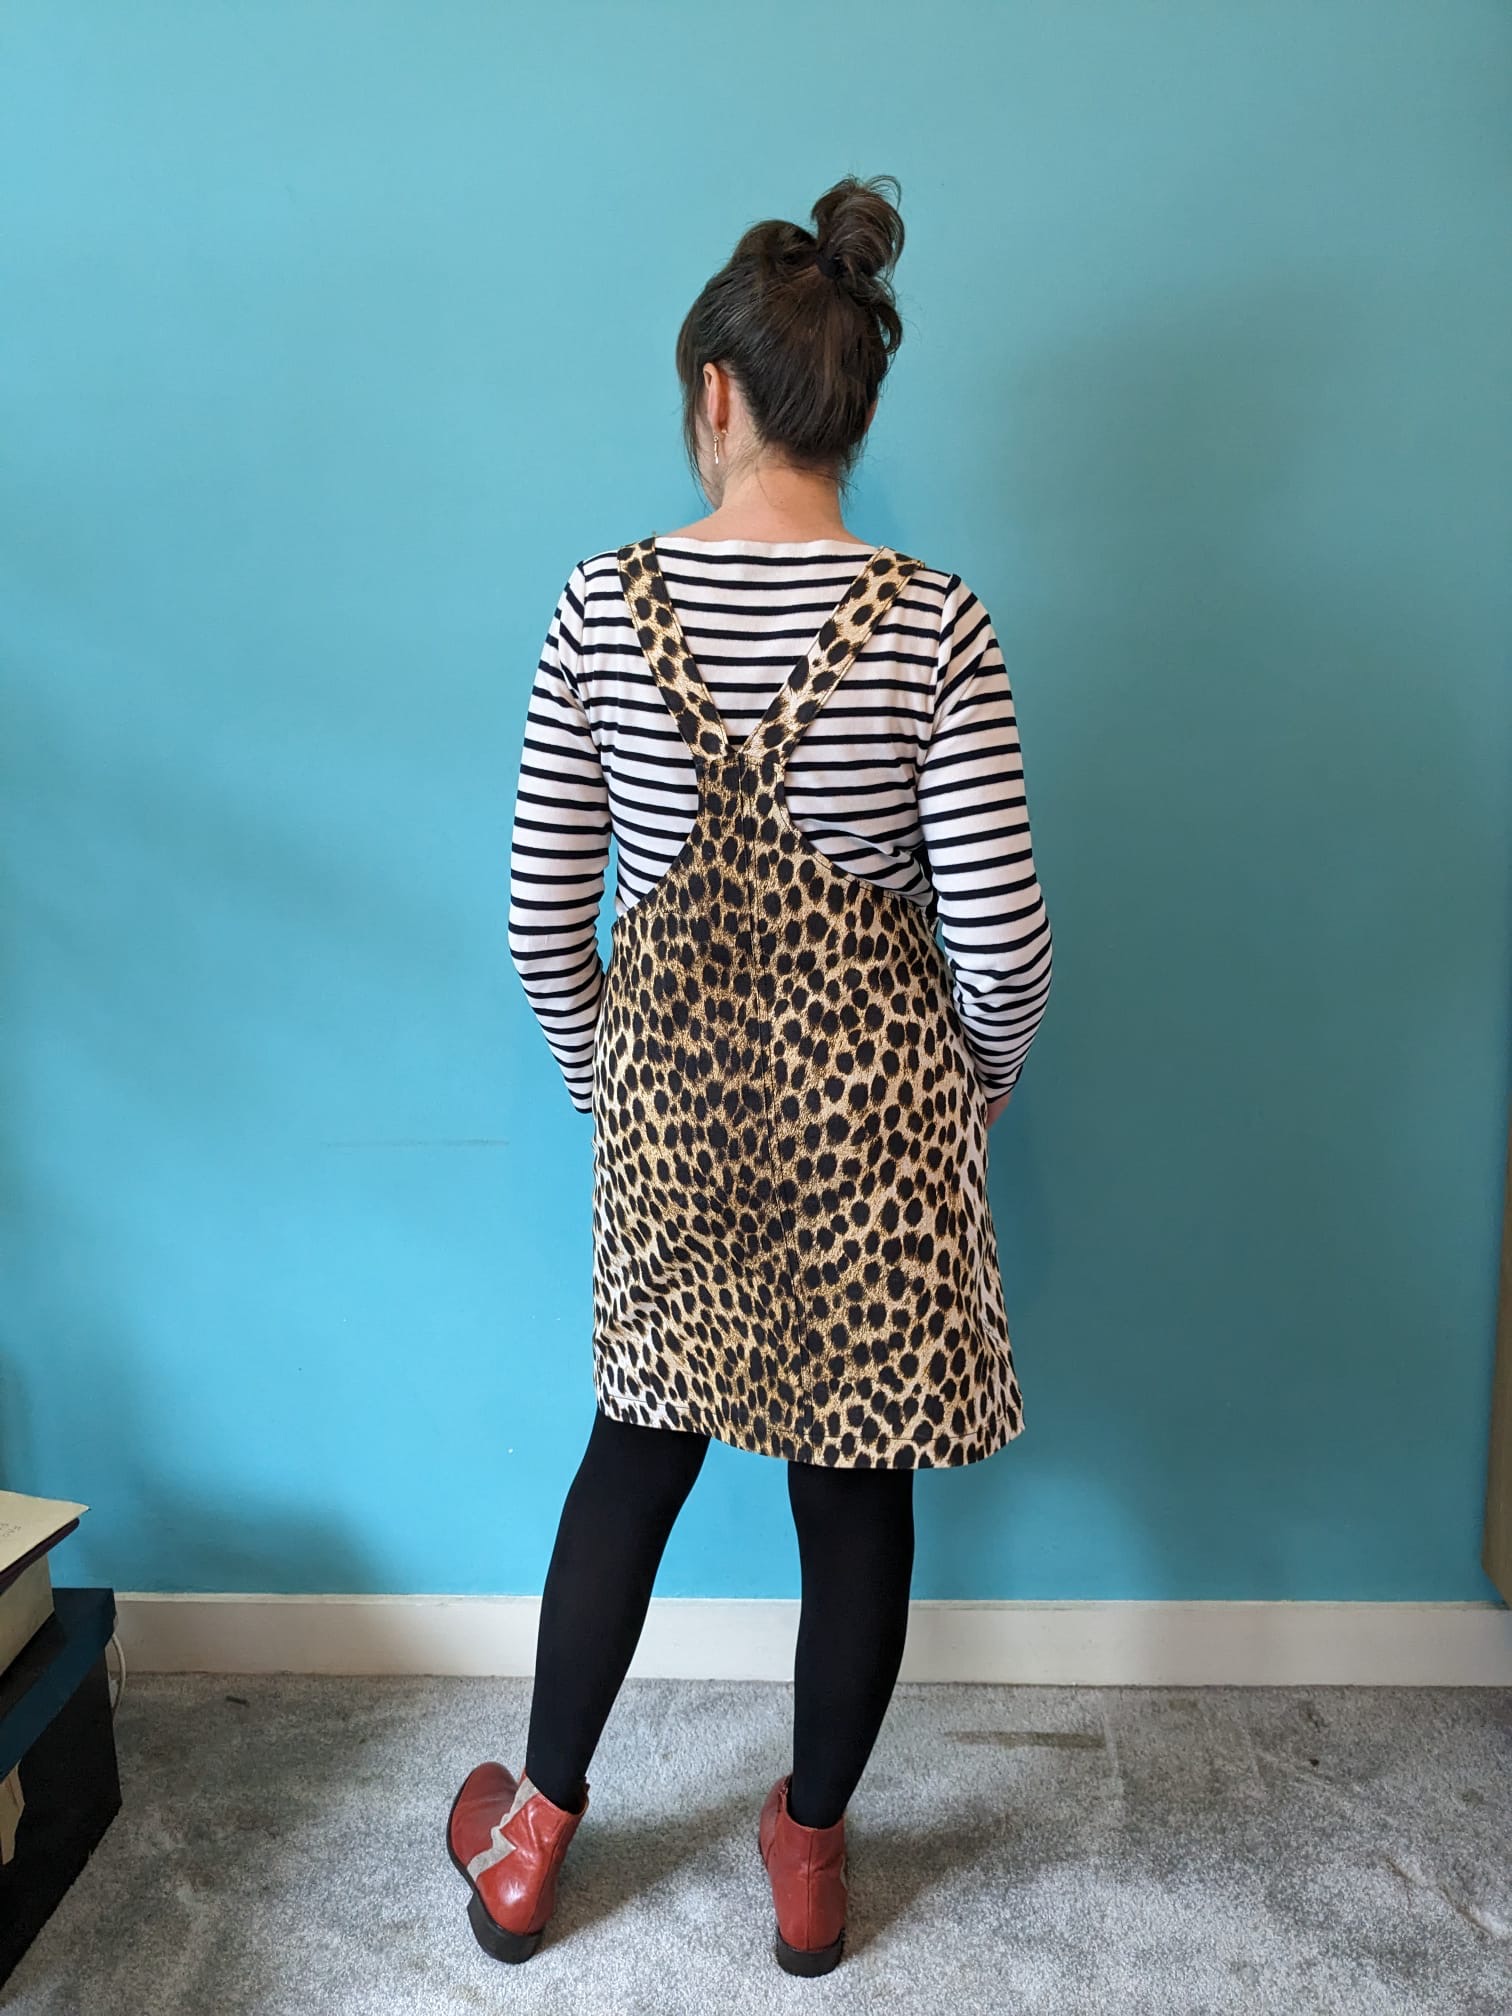
Honeymoon Leopard Twill Pinafore


Over the last few months, I've been doing a lot of thinking about the fabric that lives in our stashes. A lot of the thoughts have become podcast episodes, including Fabric Goals for 2024, Seasonal Stash Organisation, and Sew the Precious with Stephanie Canada from Backroom Finds. I'm more convinced than ever that leaving our fabric sitting on a shelf or inside a tub or drawer, is an enormous waste. Participating in the Last Sewist Standing challenge led me to face some of my own long-term stash residents, and a clear out in advance of attending a fabric swap in London helped me address what I genuinely wanted, and what needed to be passed on to another sewer. 


Fabric:

I took my two oldest stash dwellers (and my pal Catherine!) to the London Fabric Destash Swap, and I have no regrets. The were both amazing quality, deadstock fabrics from Burberry that had been in my stash for about thirteen years. I'd used half of both of them and I just couldn't see myself using the rest. Well, with those lengths out of there, this length of leopard print twill took on the status of oldest stash dweller!

I bought about yard or so of this stretch twill from Mood Fabrics in New York during our honeymoon in 2012! I had a very Rockabilly-inspired look at the time, and I bought it with the intention of making a knee-length pencil skirt. However, soon after our return, I became pregnant, and that skirt never got made. I continued to enjoy the fabric, even as my personal style shifted away from Rockabilly, but the limited quantity made it tricky to find a use for it. 


(image source: L. F. Markey)

Pattern:

A couple of months ago, lightning eventually struck and the idea of a pinafore emerged! I'd recently had to declare my much-loved and often-worn black denim Cleo pinafore unwearable due to body changes, so I was missing a pinafore in my wardrobe. Then I saw an advert for the L. F. Markey dungarees pictured above, and found the shape of the bib really inspiring. So I unearthed my Tilly and the Buttons Cleo pattern pieces and drafted a new bib shape, and new pocket shape for it for good measure. 


The project: 

Cutting the pinafore from the limited fabric was a challenge. The leopard print fabric had two darker sections running parallel down the length of the fabric, and it required a bit of Tetris-ing to get the front pieces, back pieces, pockets and straps out of the fabric in a way that suited the darker and lighter parts of the design. The facings were cut from a remnant of dark blue stretch denim because there was no way to squeeze those out of the main fabric as well. 

I decided to alter how the garment was constructed. I wanted to future-proof this garment and make it as easy as possible to let it out if necessary as and when I change shape again. I learnt so much from making the two Sewing for Body Changes episodes (Part 1 and Part 2), and I've tried to apply those lessons where possible. During a mid-way fit session, it became clear that I had to take it in at the side seams a lot, so I now have very generous side seam allowances, which is great!


Thoughts:

I'm soooo happy that this pinafore now exists! I've worn it quite a bit since completion, and it's so nice to have the fabric on my body rather than in my stash. I figured out that that length of fabric has moved homes with us five times in those twelve years! I'm hoping it'll soften up a tiny bit through wear and washing, and I have no reason to suspect that it won't. 

Thursday, 14 May 2020

Frankie Baseball Tee in Isewlation


This garment was the first thing I sewed during lockdown. That was just seven weeks ago, but emotionally speaking, it feels like a whole year may as well have passed. Seven weeks ago I was definitely in shock, but also trying hard to make the most of the situation, and had a Blitz-era, 'What would Nella Last do?' spirit about me. I decided it would be a great opportunity to tackle my fabric stash, and make what I could from the things I already owned safe from the temptations of new fabric, seeing as I wasn't going to work. Pat was still at going to work during that first week, so I had decided to carve out an hour to spend sewing each day, when I would plonk the kids in front of some CBeebies and give myself a little break.

But the following week brought a less chipper attitude about the whole lockdown/global pandemic/thousands of people dying/the world being broken situation. Plus, Pat had to start working from home, so my sewing area became a permanent 'office' set-up in the daytime, as our bedroom is the only place we can shut the door on the kids and be able to concentrate. No daytime sewing for me anymore.

I've still be working through my stash, and making some great things, but it's all been in the evenings when I'm exhausted and sadly it feels like more of a slog. Anyways, I'm soooooo lucky in so many regards. Including having this great new baseball tee! (See how I brought things round there? Pretty smooth, eh?!)

Fabric:

You may recognise this fabric from a previous creation. I used some of this amazing hands-print interlock a couple of years ago to make a Freya top, and I had a weird-shaped piece left over that was burning a hole in my stash. The interlock came from Cotton Bee, a fabric printing service based in Poland that is similar to Spoonflower. They kindly offered me a voucher to test out their process and products to help promote them amongst my readers. I had been dwelling on how best to use the funny-shaped leftovers, and it eventually dawned on me that I could combine it with something else to eek a new, adult-sized garment out of the situation. 

This black knit, also an interlock, has been lurking in my stash for sometime too. In fact, I cannot reliable tell you how it got in there, or when. It's thinner than the hands-print, which concerned me a little, but they seem to behave well together. The black interlock is particularly soft and makes this garment the very definition of 'secret pyjamas'. 


Pattern:

I can't see a baseball tee and not think of my best friend. We've both been fans of them since the 90s, and she still has one or two, I believe. However, when I first received the Stretch! book by Tilly, the Frankie baseball t-shirt (despite being one of my very favourite names!) wasn't one of the patterns that jumped out at me. Then, more recently, one of the women who attends the sewing class I teach made a couple of fantastic Frankies, and I was sold. The fit looked great, casual and comfy but flattering. It's funny that I ended up making two garments from the same fabric, both using patterns from the same sewing book. Yet they perform quite different functions in my wardrobe. The Freya looks and feels a bit more formal to wear. It works very well under pinafores. Yet the Frankie definitely wants to be paired with jeans.

To make this Frankie, I made my usual pattern alterations. I blended between sizes, going up a size for the waist and hips, and I folded out 2cm from the length of the body to account for my short-waistedness. The only other monkey-ing that this project required of me, was to create a seam in the back because because my limited fabric wouldn't allow me to cut it in one piece. You can see the join in the image above, but I doubt you would have noticed unless I pointed it out. No offence. 


Thoughts:

So this will probably always be my 'Isewlation' garment, when we were all a bit excited in the early days of lockdown about how much sewing my might possibly get to do. Although there has been, and will be other garments made during this time, this is the one that I will remember as having been made in the strangest of circumstances. Whilst I was making this top, I would have been shocked to learn that almost two months later, little has changed. Apart from having made over 150 face masks. Also from my stash! But that's another post. 

Thursday, 14 February 2019

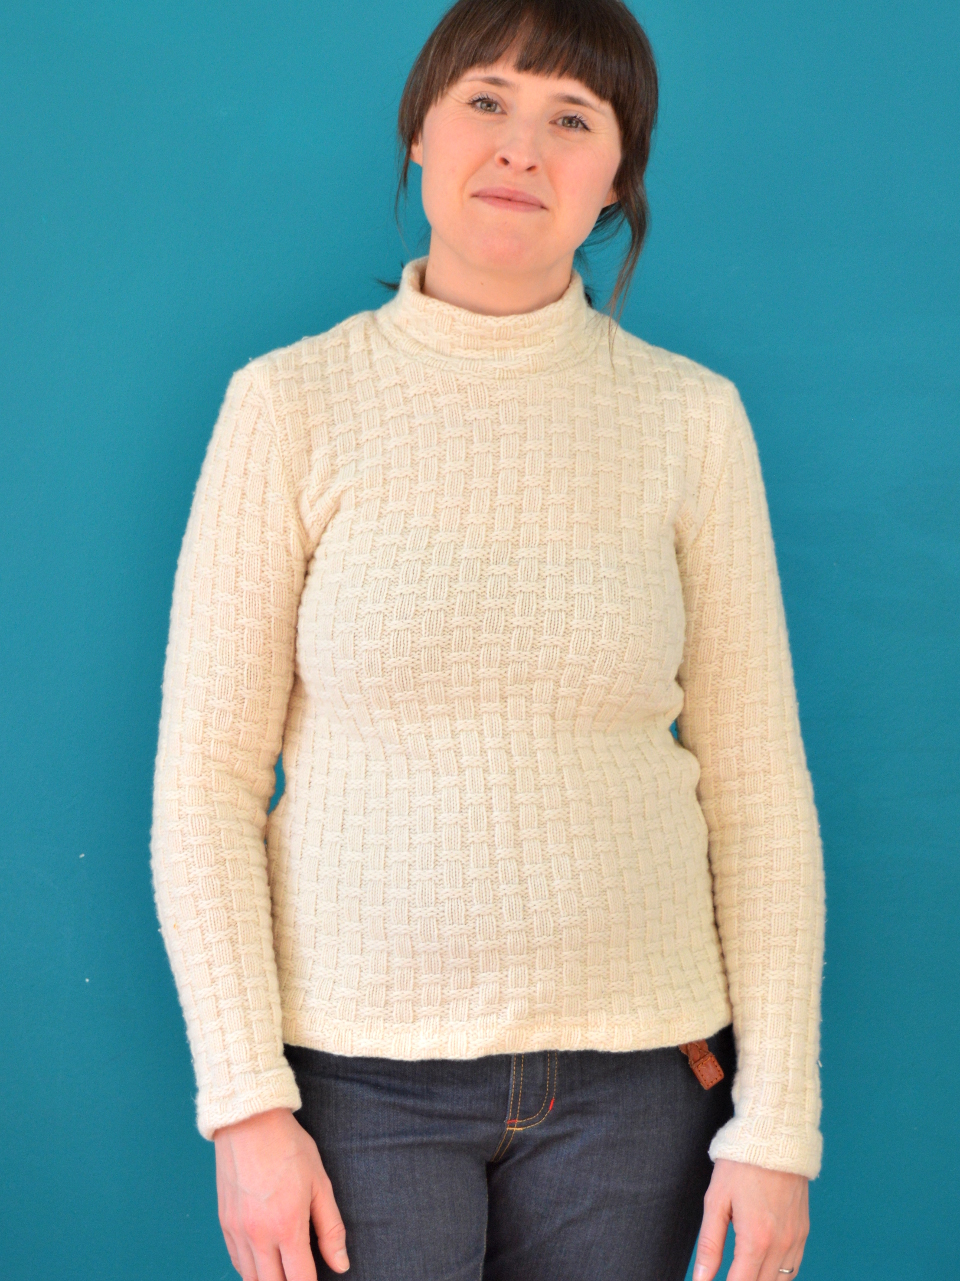
Wool Freya Winter: AKA How I'm Surviving Winter


Agh!!!! I hate winter. I cannot wait for it to be over. However, this top is making it somewhat bearable. At the start of every winter, I think to myself, 'I really don't own enough warm clothing'. However, I always come up against the same problematic equation: I don't buy RTW, I don't knit and I never find knitwear I like in charity shops. But when Fabric Godmother got a whole load of actual wool knit fabric in last December, I realised this was my chance to sew myself a cosy top that would hopefully function like a cosy, knitted garment. 


I snapped up 1.5 m of this cream basket weave wool fabric as soon as I saw it, then threw out the question of what I should make with it to the Instagram massive. (BTW, Fabric Godmother currently have a version in coral pink on sale.) Some suggested a boxy top like a Toaster, some thought a tighter fit top for wearing under dungarees and pinafores would be useful. Others thought a chunky cardigan like a Kinder should be its destiny. All were fabulous ideas, and all potential garments I'd love to welcome into my wardrobe. However, when the pre-wash shrunk it by about 30 cm, my options became limited. 


I *just* managed to squeeze a long sleeved Tilly and the Buttons Freya top from the fabric. For this, my third version of the Freya pattern, I decided to do a sway back adjustment. I found my previous two Freyas bunch a bit at the small of my back, and I really didn't want this chunkier fabric to so the same. I used one of the three sway back adjustment methods explained in this excellent YouTube video and it has worked out really well: no annoying pooling of fabric above my bum. The only other alteration I made to the pattern this time was to make the funnel neck a little higher.  


I wasn't sure how to approach actually sewing this chunky fabric. In the end I settled on stitching all the seams with a walking foot on my regular sewing machine, and going over the raw edges with my overlocker afterwards. If fabric hadn't been so tight, I would have considered finishing the cuffs and hem with bands. But the situations being what it was, I turned both back a scant 2 cm and stitched them in place with a three-step zigzag stitch.

I've worn this top A LOT this winter, usually under my black linen Heyday dungarees, black linen York pinafore and, more recently, my vintage denim Ivy pinafore. The hem has started to stretch out a bit, so I need to go back and nip it in again at the side seams around the hips. How comes it's so much more appealing to start a WHOLE NEW PROJECT than to make a minor improvement to a completed garment?!

Monday, 25 June 2018

Bibi Pinafore Business


Like so many other sewers, it would seem (I just wrote 'seam' there at first!), I fell hard for the pinafore variation of the Bibi skirt pattern from Tilly's Stretch book. However, it wasn't on my 'sewing project priority' list until, A) MMMay made me face the fact that my previous denim-look stretch skirt had to go and, B) I was looking for a way to repurpose the fabric I salvaged from a recent failed project. A plan was born...


Fabric:

You may have noticed by now that the majority of the new fabric that comes into my life these days comes from Fabric Godmother. This is because I work for them from time to time, so have the opportunity to get up close and personal with their inventory, which is invariably both gorgeous excellent quality. After helping out at one of their recent open days, some of this denim jersey (pictured below) came home with me. Personally, I'm not sure if it makes more sense to call it a denim-look knit, or a stretch denim. It looks like a woven denim, but has the four-way stretch properties of some kind of knit fabric. Either way, it looks amazing and is clearly going to be really comfortable to wear. 

(Image source: Fabric Godmother)

A couple of months ago I made the (in hindsight foolish) decision to have another whirl at the True Bias Hudson pants pattern. I had a previous failed attempt at that pattern four years ago, which, I surmised, was a FAIL because I used a 2-way rather than 4-way stretch fabric. This denim-knit-whatever-you'd-call-it definitely fit the four-way stretch bill, and I had dreams of creating a cool and clever jogging/jeans hybrid that I'd never want to take off. Except that didn't happen and the whole thing became a massive FAIL. Possibly due to the thickness of this fabric and/or choosing the wrong size on the pattern, or whatevs. Now I've been burnt twice, I'm going to leave the Hudson pants pattern well alone going forwards, and stick to jeggings styles for my super comfy bottoms unless persuaded otherwise. Anyways once I realised the Hudsons were going to be a FAIL, I cut them up to reclaim the fabric from the front and back legs and the waistband piece. I then made the most of the MMMay celebration discount codes and bought an additional metre of this fabric so that I'd have enough for the Bibi pinafore project.


Pattern:

The Bibi skirt is really cleverly drafted, consisting of one main skirt panel piece that you cut out four of. Once stitched together, the skirt is worn on the body so there are no side seams at all. You also need two waistband pieces that are faced (plus two bibs and two straps if you plan to make the pinafore version). The reason I had to get rid of my stretch denim skirt during MMMay was because my waist measurement has grown a bit. Therefore, for the Bibi, I started out by tracing the size 5 at the waist grading down to the size 4 for the hips, and held off cutting out the waistband pieces until I could check the fit. I basted the skirt panels together (two of which I squeezed out of the back leg pieces of the failed Hudson pants) and a quick fitting showed that I could proceed with no further alterations needed. Because the denim knit is quite thick, I used some plain black cotton-lycra knit I'd recently bought from Girl Charlee to cut the waistband facings and the reverse of the bib section. 


Having stalked the #bibipinafore hashtag on Instagram, I'd seen than some people's versions gaped a little at the top edge of the bib. It seemed that most of those women were perhaps fuller busted and although I wasn't sure where I stand on that particular spectrum, just in case I decided to make the width of the top of my bib section slighter narrower (1cm each side) in an attempt to avoid any gaping. I also positioned my straps (which I've made about 1cm wider than the instructions in the book suggest, FYI) so that they joined the top of the bib at an angle rather than coming straight up so hopefully that would help too.   

Thoughts:

I'm very pleased with this pinafore! When wearing it (as I am now), I feel more put-together and more stylish than I usually do. It seems to hug my shape nicely, but the thickness of the fabric skims over much of the lumps and bumps. And the best of all? It's crazy comfy. If I had to pick metaphorical holes though, I'd flag up that the skirt seams show the white lycra content of the fabric more than I'd prefer, and the bib gapes a bit at the sides (but not at the top!). 

I love wearing it with my hands print Freya top, as I am in these pics, but I've decided I prefer it with trainers more than with these shoes for a more casual vibe. I'm looking forward to working out some outfits to wear it in cooler weather, and I can definitely see myself making the skirt pattern, if not the full on pinafore version, again in the future when the right fabric comes my way. 

Thursday, 10 May 2018

Freya Fabulousness


Sorrynotsorry for this photo heavy post. I've just made two cracking new tops and I'm damn well going to make you look at them!!! In the interests of full disclosure: I was sent this book (Tilly and the Buttons: Stretch!) for free by the publisher. That said, thoughts and views are all my own, obvs. 

(image source: Tilly and the Buttons)

Pattern:

Tilly's latest book was released just after most of us came up with our #2018makenine (or #makenine2018?) selections, myself included. I was so focussed on my own selection of upcoming sewing projects that, having thoroughly enjoyed flicking through this book, I put it aside to ponder the projects later in the year. Then all the Freya dress and top pictures started flooding in on the interwebs. Holy smokes, there's not one that I haven't loved.  


The bones of the pattern are great. The fit is ideal, IMO: form fitting without putting exactly how much you had for lunch on display. The collar is elegant but not choking or annoying. And with three sleeve length options, you can really tailor each version to specific seasons. For both versions, I used the same blend of sizes: size 4 for the shoulder and bust area on the front and back pieces, blending to size 5 for the waist and hips. For the sleeve piece, I used the size 4 for the sleeve head so it would fit into the armholes, then blended out to the size 5 for the bicep down because I have slightly chunkier upper arms. This combo of sizes worked out really well. The only tweak I needed to make was to shave off a bit of the curve around the hip area with my overlocker. 


Version 1: 

Tilly's hack to include a ruffle detail is a stroke of genius, and one that I was unable to resist. After half making the top, I popped the top on my dress form and (as instructed) played around with some twill tape to mark a nice position for the inner edge of the ruffle strip. I cut the strip itself quite a bit longer than the instructions suggested after reading Karen's review, and mine is 1cm narrower than the ruffle on the mustard version in the book. 


I took agessssss pinning the ruffle into position, far longer than all the rest of the construction steps combined. (You can see a WIP picture of this on my Instagram feed, @sozoblog.) But I think taking my time really paid off because, having looked at the top from all angles in these photos, I'm pretty sure I got it spot on. I only usually use my dress form for taking photos of my finished projects, but I'm pretty sure it made the ruffle positioning and pinning process 3000% easier than using a flat surface as per the method shown in the book. 


Fabric:

Fabric Godmother had this amazing anchor ponte di Roma in stock last year in two colour ways: white with navy anchors, and navy with white anchors. I bought a length of the white with navy anchors, then kind of regretted it and bought some of the other way the next time I went (most of which became this cardigan and these sweatpants). A while later I cut into the white background colour way for another project, but I'm not even going to tell you about that because I'm embarrassed to say it was completely the wrong type of fabric for the pattern I was attempting. I didn't even get as far as the construction before I bailed on that project, and the cut pieces and scraps lay dormant in a bag. 

When I realised that it would have been the perfect match for the Freya pattern, I scrabbled about to see if I could squeeze the Freya pieces out of the cut-and-abandoned pieces and the leftover scraps. Thankfully, the garment I had previously attempted was larger than the Freya, and I was able to get most of the Freya pieces out easily enough, apart from the back piece that I had to 'cut and shut' together. You can probably see the join in the photo above, but I doubt you'd notice if you saw me wearing it IRL. And if you did, I don't care. 


Version 2:

Having worn the anchor version a metric ton, I went hunting in my stash to see if I had anything more light weight for a warmer weather version. Believe it or not, the knit section of my fabric stash is looking a lot sparser since I committed myself to using up one piece of stash per week, but I found just the piece. In fact, I had been wondering what to do with this fabric since I ordered it from Cotton Bee. But more on the fabric shortly. For this version, I opted for the shorter sleeve length and kept it ruffle-free. The only difference I made regarding construction was to position the collar seam at the Centre Back, rather than at one of the shoulder seams as suggested in the pattern instructions. When I positioned the collar seam at the shoulder seam on my anchor version, it was visually more pleasing in that you didn't notice the collar seam so much, but I found it added extra bulk and a bit of a lump where all those seam allowances met.


Fabric:

Part of me thinks that this fabric deserves a whole post on its own, but anyways. Back in December of last year, Cotton Bee contacted me to see if I wanted a free voucher to try their fabric printing service in exchange for a mention on the ol' blog. If I ever refuse free fabric, call an ambulance immediately. So, they posted me a swatch book of the different types of base fabric they offer, and some additional samples all printed up with some very lovely print designs. In the same vein as their competitor Spoonflower, with Cotton Bee, you can upload your own design to be printed onto the base fabric of your choice, or search through their ridiculously enormous catalogue of existing designs. 


Whole months could easily be spent thinking up random words, and then trawling through the search results that are brought up. When you click on a design you like, it handily shows you both other designs that are similar that you may like more, AND other designs by the same designer, if there are any. I can no longer remember the search trail that lead me to find this amazing hands design, but I also ended up ordering another piece of fabric with a print by the very same designer because I enjoyed her work so much. The one annoying thing I found whilst searching through their design catalogue is this: if you click on a design that you'd like a closer look at, when you click 'back', you are sent to the bottom of the very first page of search results that loaded, even if you have already trawled through hundreds of designs through from that search.

But when you have found the print design of your dreams, you have the fantastic opportunity to alter the scale of the print, and the heavy burden of responsibility that comes with that. I took AN. AGE. trying to visualise how big I wanted the hands in this design to be. I thoroughly annoyed Mr SoZo by taking as long as I did. Anyways, I'm thrilled with the finished product. It's printed on interlock, which is a lovely, soft 100% cotton knit fabric that is heavier than jersey, but thinner than French terry or sweatshirt fabric. It has the same jersey-like appearance on both sides, but it is more stable and easier to work with, e.g. it doesn't curl up at the edges when you've cut your pieces out.


Because I has already made one version, and I was omitting the trickiest step this time (the ruffle), this second version came together in the blink of an eye. The only 'flaw' in this version, is that one of the sleeve pieces was cut too close to the edge (I was cutting out with the fabric folded right sides together) and a bit of the print is missing. Note: when using this service, the design doesn't get printed right up to the selvedge like you find on 'regular' shop-bought printed fabric. I didn't notice until I was almost finished putting my top together, and could be bothered to unpick and recut it, but thankfully it's under the arm so most likely won't be visible. 

Thoughts:

I'm so in love with these tops! At time of writing I haven't worn Version 2 yet, the weather has been really warm since I finished it, but I'm excited to work it into some new outfit combos, particularly as that's what my Me-Made-May pledge is all about this year. I definitely plan to make another Freya, probably a long-sleeved version in black ponte for the cooler months. As for the fabrics: keep your eyes peeled for an upcoming post where the scraps of the anchor ponte are put to good use, and I'm thrilled that I have enough of the hands print interlock for another small T-shirt or tank top once the right pattern has been sourced. 

Wednesday, 21 March 2018

Urban Farming (AKA Mila Dunagrees)


Cards on the table: I'm not feeling great about my body at the moment. Winter eating patterns (AKA eating EVERYTHING), having had two babies, as well as entering my late thirties all seem to have taken their toll recently and I'm not feeling at all comfortable. I'm hoping that improved eating habits and adapting my expectations will meet in the middle and I'll feel happier in the near future. But in the meantime, I thought it best to make myself a stretchy, tight fitting garment to wear and get photographed in, then share those pictures on the internet. Behold: my new Urban Farmer look. 


Pattern:

Like many I don't doubt, I was instantly drawn to the Mila dungarees pattern. I love wearing jeggings (despite all the hassle they've given me) and I hoped these would be a fun and interesting alternative. Tilly was kind enough to send me a copy of the pattern, so I made a special pilgrimage to Fabric Godmother (more on the fabric in a bit) and set to work. 

I cut the TATB-size 4, and made a couple of small changes. Firstly, I re-drafted the curved edge of the bib piece so that it finished a bit closer to the side seam. And secondly, I spent quite a bit of time making tiny tweaks to the fit of the legs to get them looking balanced all the way down. I could easily have lopped off a few centimetres from the leg length, but I've made too many pairs of jeans and trousers that have ended up annoyingly short after a few washes, so I'm keeping these a bit long as I expect they may do the same. 

The fit-tweaking aside, I found the process of making these sooooo much fun. Working with a well behaved denim and doing all that tidy topstitching was heaven. If I were to make them again, I might even add some extra topstitching to the waistbands or crotch seam, as the topstitching is currently largely concentrated on the bib area. 


Fabric:

Despite some stunning patterned versions popping up on IG, I knew I needed to keep my pair solid. And it had to be denim if they were to become the alternative jeans/jeggings that I hoped they would. I can't find this denim on the Fabric Godmother website right now, so you'll have to go with my title: fabulous-quality mid-blue stretch denim. I always associate this colour denim with the 1970's, and I adore how it looks contrasted with orangey-gold topstitching thread. I must admit, there is a part of me that is regretting not making these dungarees in black. But having made my Cleo pinafore in black, I felt my wardrobe would welcome a little variety. 

Let's talk hard wear. I was sent the buckle set that Tilly stocks with the pattern, and I ended up using the clips combined with these antique copper jeans buttons. Fabric Godmother also stocks the smaller 14mm antique copper jeans buttons, which I got for the side fastenings. I think these buttons suit the denim's colour and vintage-y vibe, whereas I feel it would be silver all the way if I made a black pair. 


Thoughts:

As I'm sure you can tell, I haven't landed on a final opinion on these yet. Perhaps I should have made them in black and saved this vintage-y denim for some epic Lander pants? It is, of course, impossible to say. 

This post is feeling a bit confessional somehow, but I must also admit that the fit around the bum area is not great. I did get Pat to take a pic, but I really didn't feel like sharing that one today. However, I may share that pic with the tutor of The Perfect Jeans craftsy class and get her opinion on what could be improved (as I wrote about in this post). It may be that a bit of scooping could get them looking and fitting better, but I'm not ready to jump down that rabbit hole right now.  

What I do know, is that these feel fairly comfortable. More comfortable than I was expecting them to feel, if truth be told. Stating the obvious, they are currently a bit too tight around my middle. But me  laying off the bread and choc a bit, and putting them through a few more wears and washes, and they should be sufficiently loosened up. Plus, if I can't get them looking better (either through sorting myself out a bit or working on the fit some more), I could always relegate them to use on my future allotment...


Thursday, 9 November 2017

Cleo Pinafore Bandwagon


Yep, I've jumped on board the Cleo pinafore bandwagon too. When TATB first released Cleo I liked it, but didn't really think it was my style and perhaps more suited to women in their 20's. Then I saw a million of them on Pinterest and elsewhere online, made and worn by lots of different ages, shapes and sizes of women, and I've loved every single one of them and they look great on everyone. 

Pattern:

I mentioned my Cleo crush to Tilly during a lunch we had together a few weeks before her little boy was born. Afterwards, she generously sent me a copy of the pattern and set of the dunagree clips. No excuse now; this was happening! 

Tilly was right: this is a quick and easy project. I love working with a well-behaved, stable, woven fabric like this pattern is designed for, and I really enjoy some careful, meditative topstitching. I slowed the process down and made life difficult for myself though, because, after a mid-project fitting, I decided it was a bit loose. I took it in about one size at the side seams and continued with the construction. When it was all finished except for the hem, I tried it on again and realised that somehow it was now too small! So I unpicked a lot of my careful topstitching (I had topstitched down the side seams to get them to lay flat), and salvaged as much of the side seams as possible, taking it back out about one size. Gah! 


Because I can never leave well alone, I decided to veer away from the original pattern by drafting an alternative front pocket shape. I had got the idea for these after seeing similar ones on a pinafore in Topshop; they are rectangular patch pockets with a slanted pocket opening. I'm really pleased with them, however I wished I'd stabilised the pocket opening with twill tape as I fear they will stretch out with use. 


Fabric:

I bought this incredible denim (called Super Black!) from Fabric Godmother during a visit to hang out with the Fabric Godmother herself, Josie. It's thick, strong, amazing quality, and VERY black. I pre-washed it using the old tennis-ball-in-the-washing-machine trick. I'll continue to wash it that way going forwards, but I'm pretty sure I could re-dye this pinafore easily if it starts to fade in a way that I'm not in to. 


Thoughts:

I really like the utility vibe of this garment. It's like a mum-uniform; I look ready for a long hard day at the childcare coal face. I'm pleased with the finish, and I'm even happy with the short length that I was initially unsure would look very good on me. However, I've only worn it once in the few weeks since I made it. I think that that's because the denim is still very stiff and I'm not used to wearing garments that don't have any stretch in them these days. I need to force myself to wear it a few times to soften it up and get used to the feel of it. 

What about you? Have you had to force yourself into wearing something you've made? Did you end up loving it?

Thursday, 19 January 2017

Breastfeeding Agnes Tops


A few years ago I wrote this tutorial/pattern hack for making a breastfeeding/nursing-friendly knit top. I based that tutorial on the Tilly and the Buttons Coco pattern, but in hindsight what the tutorial was really waiting for was Tilly's Agnes jersey top pattern, which was released after I wrote it. The closeness of the fit of the Agnes is much better suited for the type of 'access' the tutorial creates, and shortly after the birth of my second child in October 2016, I set about to prove it. 


I prepared my Agnes top pattern pieces as per the tutorial: making two front pieces instead of one with an overlap. This time I had to make the overlapped section lower than my breastfeeding Coco top, because the effects of breastfeeding and three more years of gravity sadly made it necessary! 

For my first version I used some of this cheetah print jersey, which was kindly sent to me by Girl Charlee. I love the neon green in it, which has pushed me slightly out of my stylistic comfort zone. The fabric itself is the perfect weight for an Agnes: fairly light-weight with excellent stretch and recovery. I also love that the print is performing a cheetah skin's original task of camouflaging, and you can barely see the edge of the overlap at all. 


I've been wearing the cheetah print top almost constantly from the day it left the sewing machine, so another version was clearly on the cards. Not wanting to splash out on fabric for a top that I'll probably only wear for a year or so, I hunted through my stash for a suitably sized piece of knit. This super soft striped interlock is lovely to touch and feels great to wear, but not as ideal as the cheetah print in other ways. 


Firstly, the overlap on the front is much more obvious, which might make it look a little weird to some, especially those who haven't figure out that it's there for boob-access. Secondly, I should have made the neckband shorter than the pattern piece because it doesn't lie flat. There's no elastane/lycra/spandex content to this interlock to help it spring into shape. It doesn't help that I tend to shove my hand down the neckline of these tops to unclip my nursing bra (TMI? Don't care).  


Thoughts:

Although both these tops have been worn way more regularly than any of my other tops over the last few months, it's probably no surprise that the cheetah print one sees much more action. Not only does the superior stretch and recovery work better for this adapted Agnes, but the print is more fun to look at. I was considering making more of these with the shorter sleeve options for when warmer weather blesses us, but by then the longevity of my need for breastfeeding/nursing tops will be even further reduced. I'm also sorely tempted to make a breastfeeding Bronte top, but having already made a squillion Bronte's, I think I'd rather try some new-to-me patterns like Jennifer Lauren's Gable knit top pattern. With so little sewing time currently at my disposal, I'd rather spend it making myself garments that will potentially have years of use in them. Ya dig?

Wednesday, 27 January 2016

Teach All The Classes!

(Tilly and the Button HQ's breathtakingly lovely workspace features a distractingly impressive view of the London skyline)

So I've finally created a 'Sewing Classes' page. Anyone who's interested can now easily see what sewing and dressmaking classes I'll be teaching in the near future, rather than having to head to the individual websites of the places I teach at to see what's up.

(It's arguably the perfect shift dress pattern, want to make one at The Village Haberdashery?)

I teach at four location: two in London (Tilly and the Buttons HQ and The Village Haberdashery) and two in East Sussex (MIY Workshop and Fabric Godmother). I've only listed the classes that aren't sold out at time of writing, and I'll try to update the page regularly to add newly scheduled classes and remove the ones that are either sold out of have been and gone. Each class listing on the page includes a link to where you can find more info, including how you can book up.

(everyone's bust creating awesomeness at MIY Workshop)

I love each of these establishments, they each have a very different feel. The Village Haberdashery and Fabric Godmother include the benefit of being able to gaze at (and buy from) two of the finest selections of fabric in the UK. Whilst Tilly and the Buttons HQ and MIY Workshop are genuinely two of the most creatively inspiring spaces I've had the pleasure to hang out in.


So if you happen to live in the south east of the UK and are looking to learn how to sew, or to improve your existing skills (or you want to see what I get up to whilst Pat and Dolores drink too much coffee and apple juice respectively and hang out at the park), then please check out my new 'Sewing Classes' page! And in case you are interested in booking a class taught by me, please know that I make excellent tea and coffee. Fact.

Thursday, 6 August 2015

Fifi Pyjamas


I'm a bit slow to be blogging about this, but I wanted to share with you my version of the Fifi pyjama pattern, a recent release by Tilly and the Buttons. Along with a number of other sewers, I was asked if I would be able to test the Fifi and Bettine patterns when they were in development. Initially, I naively thought 'd have time to do both, but in reality I didn't so was asked to focus my attentions on Fifi. 


As you can see, Fifi comprises of a pretty vest top and shorts, both to be made in a fine woven fabric. The vest top features pleated cups at the bust, a bias finish around the top edge that forms the straps, and a delicately curved hem. I'm not sure what to say about the shorts, other than they are small!  The version of the pattern I made was obviously the beta version, but it came out pretty damn nice. There were, of course, a couple of tweaks I felt needed to be made (that's the point of having testers, after all), and I have yet to try the final version of the pattern, so I shall comment on it no further. 

My Fifi jammies were made from some pink ditsy floral print faux-Liberty lawn. I tried on the set to assess the fit, and the fabric managed to make me look both pasty AND blotchy! The fabric was the only thing suitable in my stash, and seeing as I feel the cold a lot anyway, I've decided to give this set to a friend who lives somewhere much hotter than I do. I've already seen some really lovely Fifis popping up on blogs (like Jenna's amazing shirt refashioned version) and Instagram. I'm quite new to the IG game, and can be found at @sozoblog over there, BTW. If I ever book myself a holiday to somewhere super toasty, I'll be sure to whip up another set of Fifi's. Hmm, I wonder what they look like in nautical colours, perhaps with a little anchor button where the bow is positioned! 

Friday, 19 June 2015

Refashion Friday: Remade Leopard Print Agnes Top


After the success of my first TATB Agnes top, I knew that it wouldn't be long before another sprang forth from my machine! This time round, I've really explored this pattern's trashier, Rockabilly possibilities. 


Pattern:

I used the same pattern as my previous version, which graded from the Size 3 at the shoulders and bust out the Size 4 for the waist and hips. The only change I did make was to implement what I learnt from the stripy version: that I needed to grade out to a Size 4 around the upper arm part of the sleeves. I fannied about applying, unpicking and the re-applying elastic for the front neckline gathering detail. However, I ended up unpicking it for good as the print is so busy on this fabric that the gathering kind of got lost. 


Fabric:

I bought this humungous, nasty-synthetic leopard print top (pictured above) from a charity a few months ago. Amusingly, the garment label tried to claim a hefty cotton content in the fibre composition. If that is the case, then I can legitimately claim to be 75% inuit. I intended to make some baby trousers from it but ended up finding something else instead which was more suitable. So this top had been knocking about in my sewing corner clogging up the place for months, until inspiration struck.  


Refashion/Remake:

I cut along the original top's seam lines to harvest as much fabric from it as possible. When laying down the Agnes top pattern pieces on to the fabric, I positioned the bottom edges 2 cm lower (see above) so I could use the original top's existing hem on the front, back and sleeve pieces. By eliminating the need to hem, this became a really quick make. I used my overlocker for everything except for topstitching down the neck seam allowance. I did that with the twin needle that came with my regular sewing machine (see below). It's my most successful attempt to use a twin needle so far! 


Thoughts:

This top is awesome, in a trashy diva kind of way. I'm wearing it in these pictures with my denim high waist bow skirt, but I'd love to make some stretchy black capri pants to wear it with. Although I don't like to think what I'd smell like after a day in that synthetic substance! 

I have plans for one more Agnes top project in the near future, then that's my Agnes-appropriate stash busted and I'll have to move on. I'm going to try the poofy sleeve version next, I'm excited to give that feature a try. Have you sewn the Agnes top pattern yet? Or do you have plans to? Which is your favourite combo of features? 

Related Posts Plugin for WordPress, Blogger...