Showing posts with label leggings. Show all posts

Friday, 3 April 2026

Free Pattern Friday: Petite Pegs for Babies


Welcome to my monthly 'Free Pattern Friday' feature, where I road test a free sewing pattern or tutorial: sometimes a children's one, sometimes an adult's one. I try to publish these posts every first Friday of the month, timed to provide inspiration for those who plan to get their sew on over the weekend. I firmly believe that, if you pick your projects carefully, sewing doesn't have to be a crazy-expensive way to clothe yourself and your family. Thanks to all the amazing pattern designers who have offered up their hard work for us to enjoy for free.

This wasn't the project I had planned for this month's instalment of Free Pattern Friday. However, I decided to make a last minute panic new baby project for a family we recently met, so I thought I could kill two birds with one stone. I'm out of the loop with baby sewing these days, but my Fabric Godmother colleague Phoebe reminded me of the excellent Petite Pegs pattern by Patterns for Pirates. I have absolutely downloaded and printed this one out before but, for some reason, I must have chucked most of my baby wear patterns into the recycling at some point. Anyway, huge thanks for Pattern for Pirates for sharing this great free pattern, along with the many other free patterns they have available, including more for babies

(image source: Patterns for Pirates)

Pattern type:

The website describes this pattern as 'a traditional legging with a knit waistband. They are a bit looser for baby to have growing room and a higher rise to cover diapers/nappies. They come with shorties (great for under dresses!), bike, capri and ankle length.

This pattern consists of just two pieces, the legs and the waistband. You could have a lot of fun mixing and matching prints, patterns and solid coloured jerseys. 

There is only one PDF file to contend with which includes both the instructions and the print-at-home pattern pages. 

Sizing info:

The pattern is graded into six sizes, from premmie baby to 12 months. I made the 3 month size because I wasn't sure if the family I was making these for had been swamped with new baby clothes. 

Fabric info:

In the pattern itself you are recommended to choose four way stretch jersey with at least 50% stretch horizontally and vertically with good recovery. They advise using a fabric with spandex/Lycra, which I would say is essential for making a waistband like this that isn't elasticated. I used a scrap of cotton/Lycra jersey I found in the scraps bin at work. It's a lovely blush colour with denim-blue stripes that I hope gives a gender neutral vibe. 

Findings:

This is a great little pattern that could only be improved, in my opinion, with more professional line drawings showing the style more clearly, and a different choice of typeface in the instructions. 

I like that there are lots of additional resources in the form of videos and blog posts to help beginners get to grips with using sewing patterns generally, and this one specifically. 

The only thing I'd add to the instructions is the suggestion to add a label to the back, because it's hard enough trying to dress a wriggly baby without making it clear what is the front and back. 


Would I make this again?

Absolutely! I've kept all the sizes in tact and traced off just the one size, so this will probably be my go-to baby pressie project going forwards. 

Friday, 8 September 2023

Free Pattern Friday: Hat and Leggings for Babies


Welcome to my monthly 'Free Pattern Friday' feature, where I road test a free sewing pattern or tutorial: sometimes a children's one, sometimes an adult's one. I publish these posts every first Friday of the month, timed to provide inspiration for those who plan to get their sew on over the weekend. I firmly believe that, if you pick your projects carefully, sewing doesn't have to be a crazy-expensive way to clothe yourself and your family. Thanks to all the amazing pattern designers who have offered up their hard work for us to enjoy for free.


Today you've got a two free pattern reviews for the price of one! The reason why I'm posting both of these today is because they make such a sweet pairing: they can be worn together AND make a lovely set to give as a gift. If you don't have any babies in your life at this time, and no one you know is currently expecting a child or grandchild, I recommend you bookmark this post for the future. And if you're in that phase of life when it feels like everyone around you is having babies, you could make a few in advance to have on hand as gifts.

Big thanks to Sweet Red Poppy for creating the Double Top Knot Baby hat pattern for free, and to Patterns for Pirates for creating the Petite Pegs pattern for free. I really wish both of these patterns had been around when I was pregnant with my babies!


(image source: Sweet Red Poppy)


Pattern type: 

The Double Knot Baby hat pattern is ridiculously cute and consists of just two pattern pieces: the hat and the band. The Petite Pegs are a casual leggings style with knit waistband (no elastic), with a rise designed to easily cover a nappy. There are four leg lengths included: shorties, bike, capri and ankle. They also consist of two pieces: the legs and the waistband. 


(image source: Patterns For Pirates)


Sizing info:

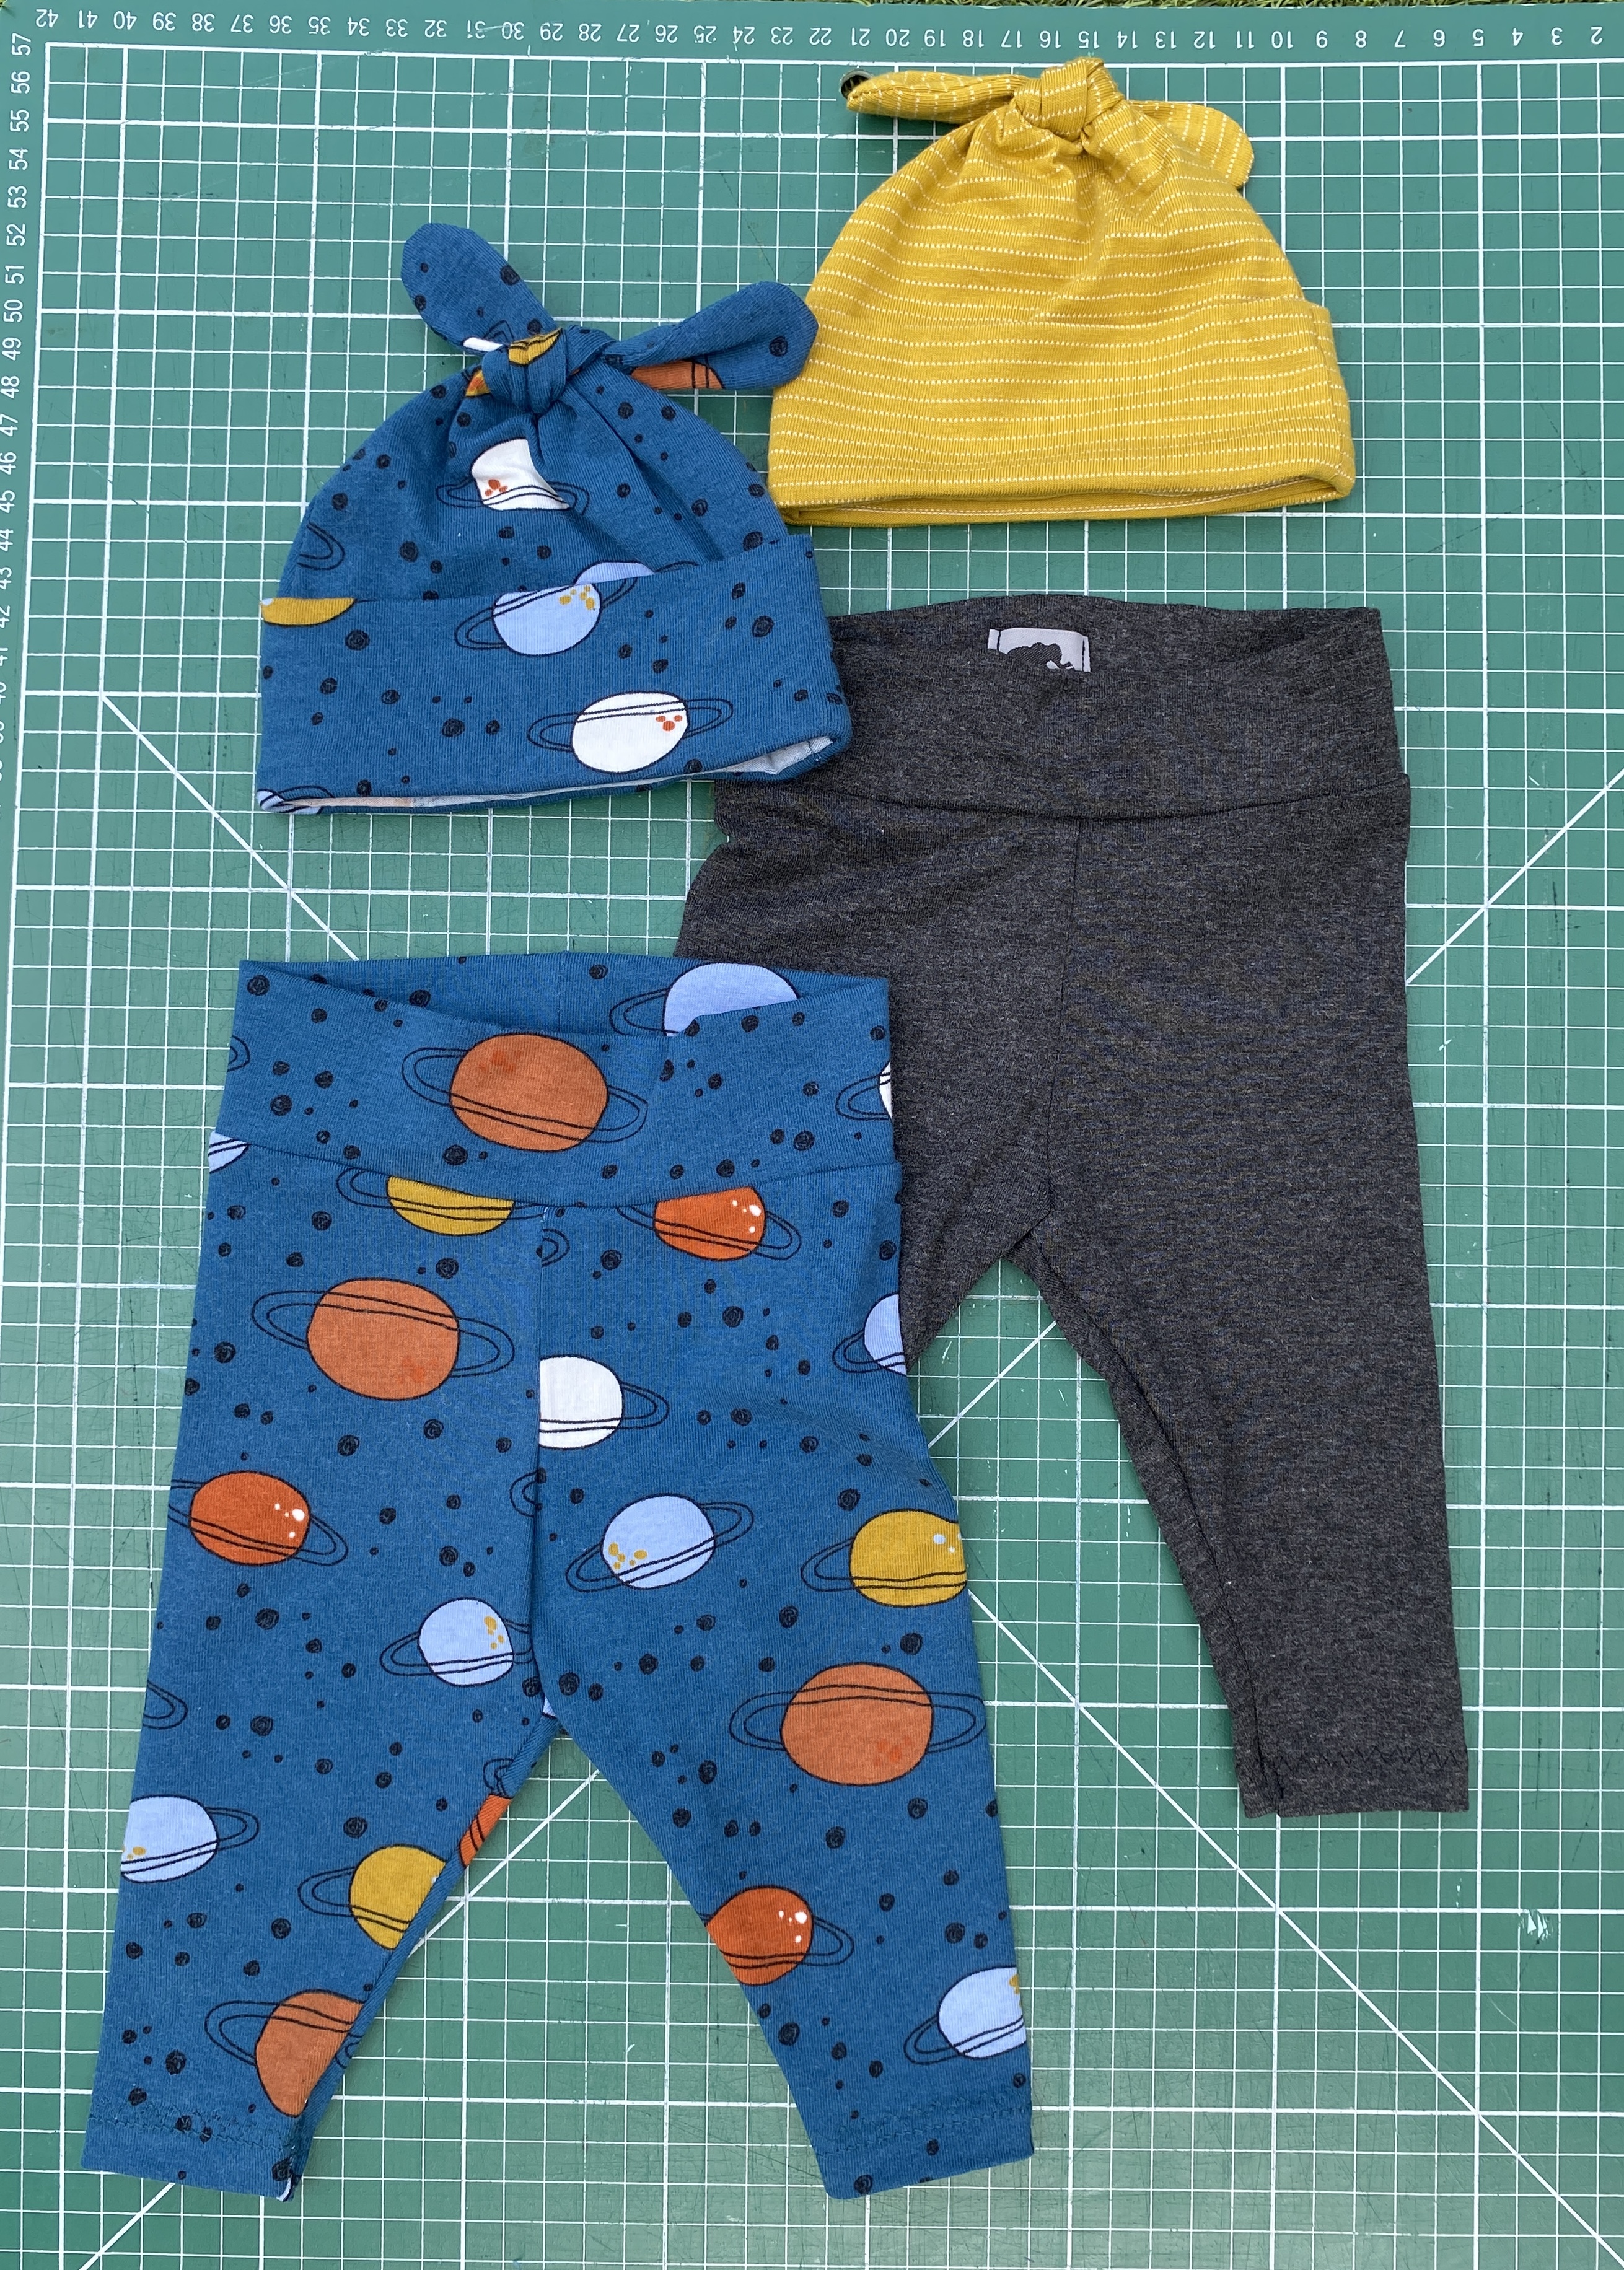
The hat pattern includes six sizes ranging from Newborn to 2Y, and the leggings from Premie to 12 months. After much debate, I created these two sets both using the 3-6 months size for the hat and Newborn for the leggings. I was scared of making the hat too small and them being useless, so I erred on the side of caution with that. I felt more confident going with the Newborn size for the leggings. As you might be able to tell from the tiny feet in the pic below, my friend's child was just a couple of weeks old, to give you a sense of the fit. 

As well as the age of the baby, you should also pick your pattern sizing in relation to the amount of stretch in your fabric: going for a smaller size for super stretch knits, or a larger size if the stretch percentage is much lower. 


Fabric info:

For the hat pattern, it is recommend that you use a medium-weight knit fabric with a content of 95% Cotton, 5% Lycra/Spandex. But then a couple of paragraphs down includes a greater list of other types of knit that could be suitable. I'd probably stick to the cotton/spandex (AKA Lycra or elastane) jerseys because I would be concerned that the other suggestions might be a touch too thick for that tight curve at the top of the knots, or quite slippery and therefore a challenge to work with. 

For the Petite Pegs pattern, they recommend a four-way stretch fabric with at least 50% stretch and good recovery. They also emphasise Lycra or spandex in the content, which is particularly important for this pattern so they stay in place and don't fall down, seeing as the pattern doesn't use elastic at the waist. 


The space print fabric (leftover from these men's PJs - another free sewing pattern!) I used here is exactly on spec for these patterns: cotton/elastane with a good four-way stretch. The mustard fabric for the second hat wasn't quite as stretchy, and more of a two-way stretch, than a true four-way. But I've also used this fabric for making undies and they hold up fine so I was confident in my choice, particularly because I wasn't making the smallest size of hat. The grey jersey I used for the second pair of leggings was probably more like a viscose/elastane jersey. I got this from a charity shop many years ago and it was unlabelled so I can't be sure. It's quite drapey and lighter in weight than the other two but it's really soft, so I knew it would feel particularly nice against the skin. 

Of course, with both of these patterns, I'm going to emphasise what excellent potential scrap busters they are! They take so little fabric, and you can play around using different constrasting fabrics for the bands and the main parts. For the leggings, you could even use two different fabrics for the two legs. And with the hat, you could use different fabrics for the front and back hat pieces. But as always with combining different fabrics, just make sure they have the same amount of stretch and a similar weight. 


Findings:

Downloading the print-at-home pattern for the hat was easy enough. The instructions are in the form of a blog post that you read directly on their site. There's also a YouTube video to support you if you'd like, but I didn't watch it. The instructions on the blog post are good, however it's one of those sites that is dripping with distracting ads. Which I accept because that how this person's business models works in order for them to offer free patterns, including this one. 

Generally speaking, I think the instructions (when you can find them between the adverts) are great. However, there's one step of the process that I did differently and I'm glad I did. The last step gets you to attach the band to the hat with the band on the right side of the hat. You then press the seam allowance up into the hat. My feeling is that the seam allowance would not stay put and probably poke out the bottom because it's not stitched in place. To prevent that, I stitched the band to the WRONG side of the hat, so when you flip the band out to the right side, the seam allowance will always be hidden. I would also recommend tacking the band in place with a few invisible stitches. 


The leggings pattern, by contrast, is accessible via the shop and cart on the Patterns for Pirates website. You have to create an account and go through more steps (you don't need to input any payment details). However, you then have a downloaded file that includes the pattern AND instructions - no ads. 

The construction process was a breeze. The only thing, and this is very minor and personal, is that I dislike a 1/2" seam allowance! It's not one I have to use very often, so I can't visually easily where to position a project on my overlocker so I'm trimming off the correct amount. Oh, and one point I'd make that I think they missed is to add some kind of tag or label so the back is easily identifiable. When parents are trying to change a wriggly baby whilst sleep deprived, they need all the help they can get! But honestly, that's it. I could make these leggings all day.


Would I make them again?

Hell yes! I've really whittled down my stash of jersey fabrics over the last couple of years, but if some more suitable fabric came my way, I'd definitely be making more of the leggings in particular. I do really like the two of these patterns together as a set, so if there are any new babies on the horizon, I'd love to do this again. 

Friday, 1 May 2020

Free Pattern Friday: Kids' Lightning Leggings


Welcome to my monthly 'Free Pattern Friday' feature, where I road test a free sewing pattern or tutorial: sometimes a children's one, sometimes a women's one. I publish these posts every first Friday of the month, timed to provide inspiration for those who plan to get their sew on over the weekend. I firmly believe that, if you pick your projects carefully, sewing doesn't have to be a crazy-expensive way to clothe yourself and your family. Thanks to all the amazing pattern designers who have offered up their hard work for us to enjoy for free.

As you may know, I try to alternate between women's and children's pattern for my Free Pattern Friday review posts. When it's time for a children's one, I especially love being able to shine a light on the super-useful ones, by which I mean patterns that span a wide size range, are (fairly) unisex in style, might work for a variety of climates and even offer some design options. Well today's free pattern ticks each and every one of those boxes. It's the Lightning leggings pattern by Made By Jack's Mum; massive thanks to her for sharing this amazing pattern for free. Please note: to access this pattern, you can join the MBJM Sewing Group on Facebook, or you can get it through her site. If you do the latter and are in UK or EU, the transaction goes through Etsy so you will pay a small fee.   

I'm also very happy to have found this pattern, because my former fave free kid's leggings pattern, as reviewed here, is no longer available. So, shall we begin?


Pattern type:

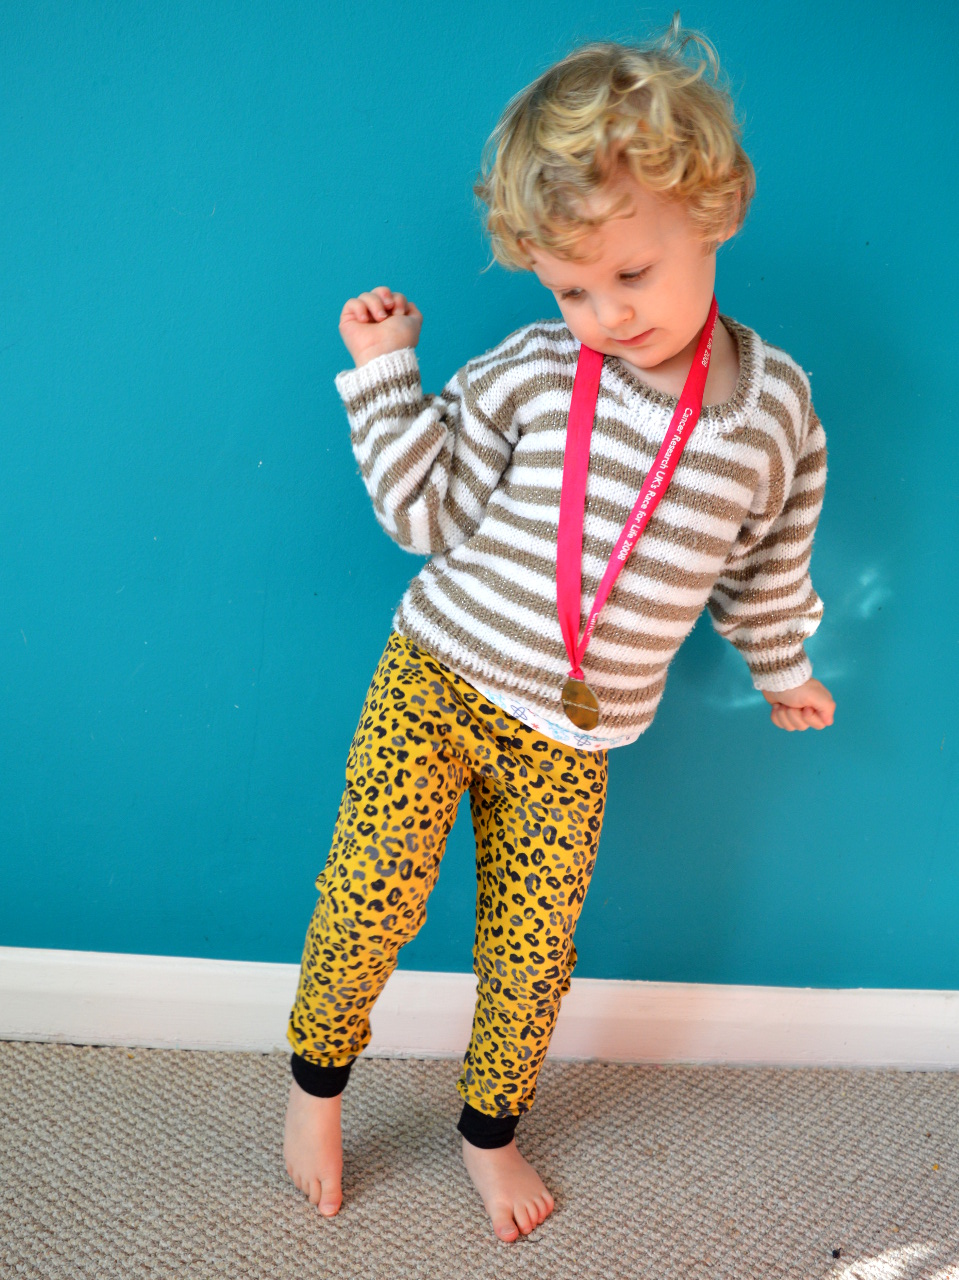
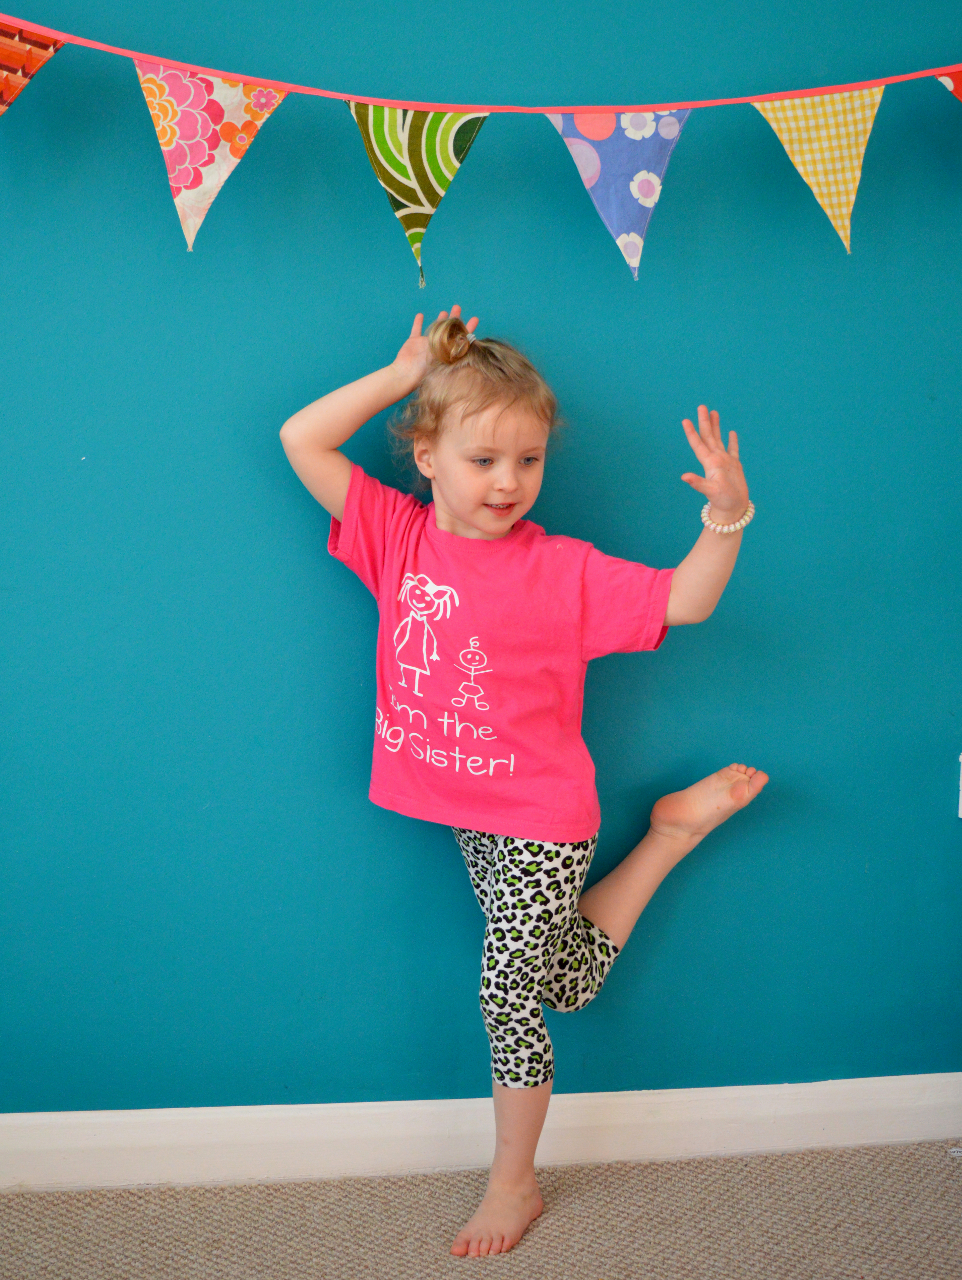
The amount of options included in this pattern is almost ridiculous! You can choose from a slim leg option (which I used for Dolores's pink cat leggings pictured in this post) or a (slightly) relaxed leg option (which I used for Frankie's leopard leggings pictured here). Both leg options then come with a choice of ankle, capri or knee lengths, ALL OF WHICH can be simply hemmed (as per the cat leggings) or finished with cuff bands (as per the leopard leggings). PLUS, both can have elastic applied at the waist, OR have a fabric waistband. Is that it? NO!!!!! BOTH leg style options also come with a cloth nappy-suitable fit option up to 4 years. Damn. I'm exhausted. 

(image source: knee length with cuff hem options via MBJM)

Sizing info:

This pattern goes all the way from premie/small newborn, up to 12 years. With some kids' pattern companies, I find that you always have to automatically size down one size or so. I've made a few MBJM patterns now, however, and I always find the sizing to be very accurate, no sizing down needed. 

Dolores is currently six years old, but basically the height and size of a 7yo. Therefore, I made her cat leggings a size 7 with an additional 2cm in length (hence the slight bunching at the ankle) because I wanted them to last for a couple of years. Frankie is three and average in height and size, and I made the size 3 with no changes because I wanted them to fit him straight away. 

One point I would mention here is that I found the suggested length measurements for the waist elastic to be too short. I would heartily recommend measuring the waist of the child you are sewing for to gauge the correct length, rather than blindly going by the length suggestions in the pattern. If you are making them for a child that you are unable to measure at this time, I'd suggest making the fabric waistband option. 


Fabric info:

The Lightning leggings patterns is recommend that knit fabrics with good stretch and recovery are used, for example cotton/lycra jersey. Both the cat jersey (a different colour way of this one) and leopard jersey used here are cotton/lycra jersey. The relaxed leg style option might also work with a lighter-weight French terry that has an elastane/Lycra/spandex content such as this modal/elastane French terry. BTW, that's not a sponsored link in anyway, I just happen to have used this fabric a couple of times for other projects, and think it would work well with this pattern for a slightly thicker leggings option. 


Findings:

I really like how MBJM's patterns are produced. The information conveyed is very clear and user friendly, without heaps of unnecessary blurb or frou frou. This is particularly important when a designer is trying to guide you through a pattern that contains heaps of options, such as this. Literally the only thing I can think of that is missing but would have been helpful, is a clear, technical spec drawing of the garments. In fact, now I come to think of it, I don't recall seeing a spec drawing for any of MBJM's patterns. I find those can help you get to the bones of a pattern style, without fabric choice, model's pose etc. distracting you.

You might think that, what with all the style options and choices included, that the actual PDF pattern pages would be a Burda-magazine-style web of confusion. However, I am able to report that I found them very well laid out and easy to figure out, despite all the various pieces and cutting lines. In the instructions there is a handy guide to help work out which pages to print for the combo of options you're going for. Plus, both the A4 and A0 copy shop files offer the layers function; yet another way to prevent wasting precious printer paper and ink. If you think you're likely to reach for this pattern again and again as the child you sew for grows, it might be worth getting the A0 file printed at the copy shop with all the sizes (excluding the sizes that they are already too big for). Then you can trace off the size you need onto pattern paper (or wrapping paper/wall paper/whatever you've got to hand that) as and when you need it, to save on ink (and getting your printer out and finding all the relevant wires, amirite?!) further down the line. 

As for the finished garments, I'm really pleased with them. The overall fit of the slim leg option is exactly what you'd hope for in a regular leggings pattern. And the relaxed leg option is a nice, modern alternative that is suitable for any kid who may not wish to wear tight leggings (yeah, I'm trying to find a woke way of referring to 'most boys'!).


Customisation ideas:

If you are looking for even more options for creating a unique garment, other than those included, here's some ideas:
  • Add some seam lines for scrap busting/colour blocking the leg pieces
  • Add a side seam if it'll help you squeeze them out of a smaller or odd-shaped piece of fabric
  • Apply knee patches (think traditional ovals or cute cat head/apples/dinosaur/etc shapes) to reinforce those areas that are vulnerable to holes. 
  • Make a matching set using the free Ester & Ebbe top or Rowan tee patterns, perhaps by cutting the T-shirt sleeves from the same fabric you used for the leggings


Would I make it again?

Yes, yes and thrice yes. I'm very pleased to have this in my arsenal for whenever some awesome printed jersey appears on my radar and the scamps have done some growing. Dolores will only wear leggings or skirts, or at a push, joggers (NOT woven trousers, jeans or even jeggings) so I'm super pleased to have this pattern on hand for the future. I'm also really happy that I can use it for making lighter-weight bottoms for Frankie for warm-but-not-hot weather: for garments that land in between thick joggers and summer shorts. 

This might also be a particularly useful pattern to have right now if your family is in lockdown. If, like mine, the kids you sew for refuse to stop growing despite the quarantine, and you've got some jersey in your stash, whipping up a couple of quick pairs of leggings might help to pad out their clothing options for a while. 


Friday, 1 March 2019

Free Pattern Friday: Women's Matilda Leggings


Welcome to my monthly 'Free Pattern Friday' feature, where I road test a free sewing pattern or tutorial: sometimes a children's one, sometimes a women's one. I publish these posts every first Friday of the month, timed to provide inspiration for those who plan to get their sew on over the weekend. I firmly believe that, if you pick your projects carefully, sewing doesn't have to be a crazy-expensive way to clothe yourself and your family. Thanks to all the amazing pattern designers who have offered up their hard work for us to enjoy for free.

So today's free pattern comes shrouded in mystery! Signs indicate that the Matilda leggings pattern used to be part of a range called 'Sew Loft Patterns', which later morphed into 'Spit-up and Stilettos'. It seems that any sites relating to either have been taken down, hence no links. Apparently the designer, a women named Lauren, is now creating children's patterns which can be found here. And for reasons I don't entirely understand, another blogger (that isn't Lauren) is hosting all the patterns via Dropbox, making them accessible to anyone for free. I'm grateful to all concerned for providing access to these patterns. 


Pattern type:

It's worth pointing out that there are numerous free, women's leggings patterns out there, many of which look a lot like this one. I chose to make the Matilda leggings pattern because, A) I already had it downloaded, and B), the waistband is formed from a tube of the main fabric and does not involve elastic (i.e. comfort to the power of 10). I've been on the look out for a comfy, super-basic, leggings pattern because a friend recently asked me along to a yoga class, and not owning any leggings or other suitable alternative, I had to wear some hideous 'active wear' that I bought in the very early 2000s. So I was hoping that this pattern, which consists of only two pieces (waistband and legs) and includes cutting lines for capri and full length, might just fit the bill. 

Sizing info:


This pattern is graded from XS to XL (US 0-18), hips-wise it's 35"to 47". My measurements put me in the top end of the M and I'm generally very happy with the fit, although of course the stretchiness of your chosen fabric would have a massive effect on the fit of this garment. One sizing issue that's been mentioned by other sewers regarding this pattern, is that the full length version seem to come up a bit short. It is not indicated in the pattern what height they has been drafted for, however, I am 5ft 5"/165cm and I feel these could have done with being 4 or 5cm longer.


Fabric info:

The advice given is to 'find a knit fabric with good resistance that bounces back really well. Otherwise your leggings will start to look stretched out after the first few times you’ve worn it. We suggest getting a knit with Lycra in it.' To that I'd add that your chosen fabric should have a good four-way stretch (i.e. make sure it stretches well when you pull it up and down as well as across), which is essential for successful leggings. Ask me how I know.

For this pair I used this black, cotton/spandex jersey from Girl Charlee UK. It's incredibly soft and was wonderful to cut and sew (minimal rolling edges!), however, in hindsight, I'd say it's a smidge thin for leggings and would be better suited to tops like the Agnes pattern or similar. My pair are a touch transparent when the fabric is stretched and the waistband tends to fold over whenever I bend forwards. However, if you're looking to make leggings that will be exclusively worn underneath dresses or skirts, this fabric might be your best bet afterall, possibly combined with something sturdier for the waistband.


Findings:

This was billed as a quick and easy pattern to make and they weren't wrong! Making a waistband from the fabric rather than faffing with any of the various methods of adding elastic really cut the construction time down a lot. I used my regular machine to hem the bottoms, and all the seams were done using my overlocker/serger. You could easily make the whole garment using a regular machine however, and if evidence of this were required, the step-by-step photos included in the instructions show the sample being made using a faux-overlocker stretch stitch on a regular machine. 

As I mentioned above, fabric selection is everything here so be sure to find a sturdy jersey knit with a decent elastane/spandex/lycra content. You might also want to consider lengthening the rise as they sit very low. This is somewhat exaggertaed on me as I am short-waisted (by natural waist is pretty high up my torso) but for my next version I intend to slash horizontally across the pattern piece half way down the rise and add a few cms of height. Also, I found that they didn't taper quite enough at the ankle, I pinched out a bit at the ankles of this pair, and I feel I could have done so even more. Oh, and do consider adding length at the hem if you're over 5ft 4" and making the full length version.


Customisation ideas:

  • You could draw some panel lines and trace the new pieces off, add seam allowance and make some colour/pattern blocking craziness.
  • Using a print for the legs and a solid for the waistband could give an interesting (but not too wild) effect.
That's all I've got today.

Would I make it again?


Yup. I feel those few changes listed above will get me the easy, comfy, basic leggings pattern I need to provide myself with some half-way decent exercise wear. 'Activewear' is not an area I've previously given any consideration, but I'm keeping my eyes peeled for suitable fabric candidates for another pair.


Thursday, 15 November 2018

A Year of Stash Busting, PLUS: Dutch Label Shop Discount Code


It’s been over a year now since I begun to really definitely actually start busting my fabric stash. I wrote about my plans back in March of this year to sew up one piece of fabric or reusable garment each week, but I'd actually started the previous October. Are you interested in finding out how I’ve got on?! Well, I'm pleased to announce that, yes, I HAVE managed to keep up with this challenge! Some pieces became time-consuming projects, others became swift and satisfying makes, like these four pairs of leggings for my daughter that illustrate this post. All of these leggings/jeggings were made using the free leggings sewing pattern by Petit Boo that I reviewed here by the way, and have all these pairs been worn many times since they were completed.


Truth be told, not all of those 52 pieces of fabric or garments came straight from my stash. My stash is big, but not so big that it contains a piece of every type of fabric I might like to sew with! So I have been purchasing new pieces of fabric here and there, but only with a specific project in mind, and very often for a specific pattern that's in my possession. This accommodation has worked well, because I have been turning lots of my languishing pieces of stash into useful garments, but I haven't felt frustrated because I wasn't confined to only using stash pieces this past year.


Using one piece of fabric or reusable garment per week may sound a lot to some, and you may be concerned that I have been sewing for the sake of it, or that a lot of this output ended up not getting worn. Thankfully, I've kept a list over the last year of everything I've used and what it became so I can address these concerns. Out of the 52 pieces used, only seven were a FAIL (and subsequently were given to a friend, sent to the textile recycling bin, or put back in the stash to reuse the fabric), the rest of the garments I've made have seen a good amount of use. Obviously I have reached for the pieces of stash that I've felt most inspired to use when the right project came to mind, so things may get trickier the deeper into my stash I rummage. But not allowing myself to buy fabric on spec means that I have given each purchase or acquisition of new fabric a great deal of thought, which has reduced FAILS considerably.


Truth be told, there's still a lot of fabric and reusable garments in my stash, but visibly less than this time last year. My sewing time may dwindle a bit in the future as a number of different activities and projects I'm involved in are going to start taking up more of my free time. However, for the foreseeable future, I'm going to continue with my one-piece-per-week challenge, and see how much more I whittle down my stash by creating fabulous and useful garments.


Stash busting update over: on to the discount code! Recently, the Dutch Label Shop generously offered me some store credit for their website to order myself some woven garment labels in exchange for a mention on my social media. Coincidentally, getting some new labels for my family's clothing was on my mind at the time, having just stitched tons of onto my daughter's uniform as she started school this September. The labels I had been using for my daughter's clothes were ordered through Etsy and are very cute. However, I've found that the printed design fades extensively when laundered, so I was musing on acquiring some woven labels to use instead. 

I spent an AGE playing about on the Dutch Label Shop website, designing and redesigning with their pleasingly user-friendly label designing function. Even sticking to the 'Basic' woven label option like I did, you can choose different sizes of labels, different colours for the background and text, different fonts and from hundreds of little logos. I particularly like how clearly you can see how much the different combos of elements will cost you for different quantities before you continue with the ordering process. I managed to make my store credit extend to four different sets of labels. Ta dah!!!!


Cute, non?! I LOVE them, and they make the garments I stitch them into look extra professional (see the My Little Pony leggings above). If you would like to design and order your own garment labels, you can get 15% using the code sozoblog15 (all lowercase) when prompted during the ordering process. This code will be valid for 60 days so you've got a couple of months to go and design yourself some adorable labels, starting from........NOW! Happy label designing!

Friday, 2 March 2018

Free Pattern Friday: Kids' Flora Capri Leggings


This is my monthly feature where I road test a free sewing pattern or tutorial: sometimes a children's one, sometimes a women's one. I publish these posts every first Friday of the month, timed to provide inspiration for those of you who plan to get your sew-on over the weekend. I firmly believe that, if you pick your projects carefully, sewing doesn't have to be a crazy-expensive way to clothe yourself and your family. Thanks to all the amazing pattern designers who have offered up their hard work for us to enjoy for free.


If you're in the market for a stash-busting kids' sewing pattern that is embarrassingly quick to make and will get worn satisfyingly often, then I've got the goods (well, a link) for you right here. I'm genuinely excited to have discovered petitboo's Flora capri leggings pattern, and I'm equally excited to tell you about it today. Please note that you will need to sign up as a member of Craftsy to access this pattern.


Pattern type:

As the title would suggest, this is a pattern to make simple, capri-length leggings with an elasticated waist. It consists of just one, well-drafted pattern piece. The downloadable PDF includes both the pattern piece and the construction instructions, which has illustrations to help with each step. 

Sizing info:

Rather fabulously, this pattern has been graded to span approx. age 2 - 10 (lots of free kids' patterns seem to stop around age 6). One thing I really like about this pattern, is that they have thoughtfully included an alternative back rise shape for the size 2, which goes higher if your little one is still in nappies. 


Fabric info:

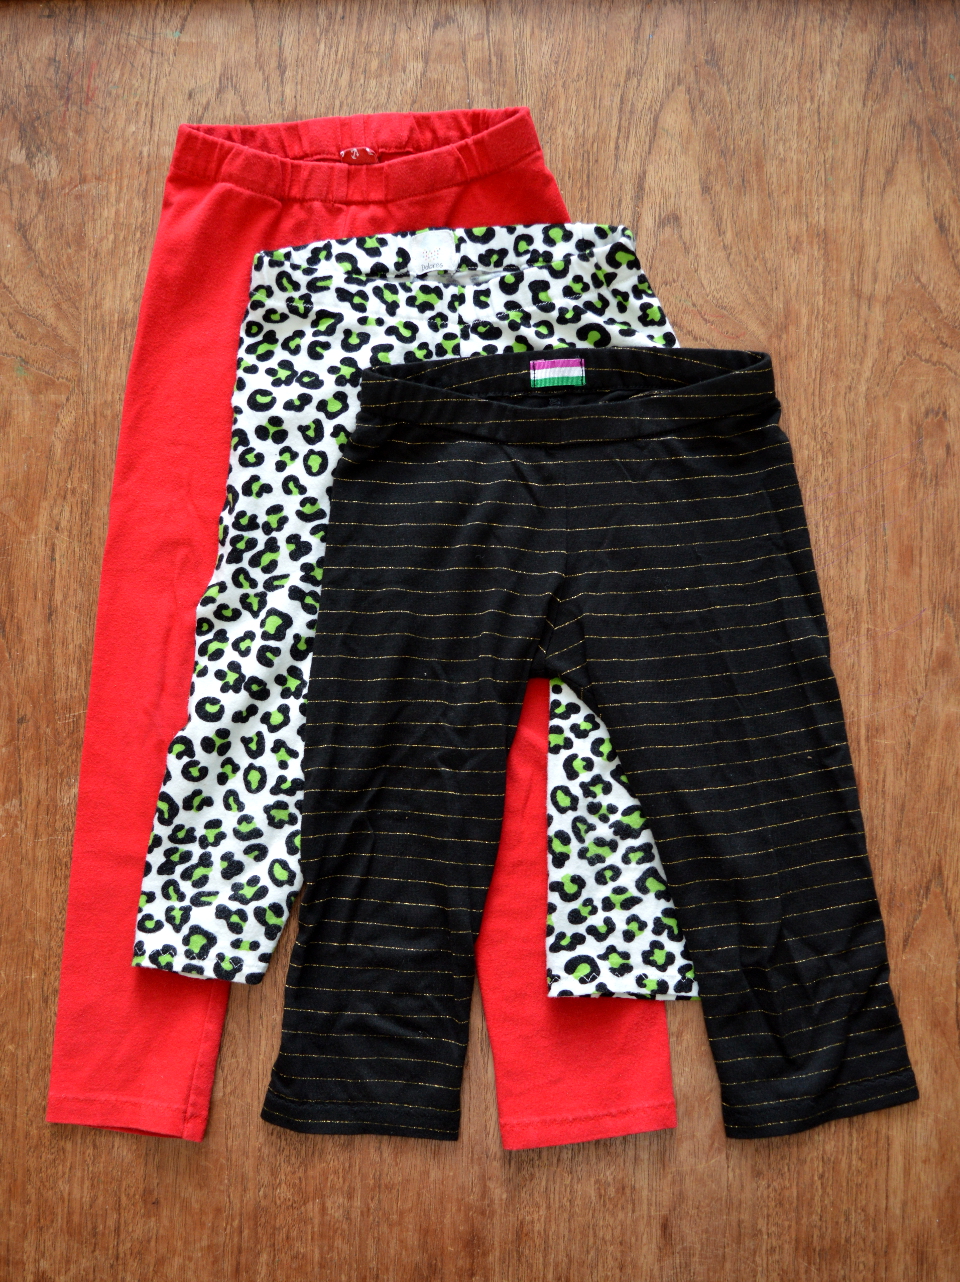
The pattern recommends that you use 'stretchy knits with at least 30% stretch and GOOD RECOVERY (cotton or rayon blends with Spandex /Lycra /elastane)', and I really can't think of any thing else to add to that. Because there's just one pattern piece, I've found this pattern to be a great way to use up too-small-for-most-adult-garments pieces of fabric. You may remember the cheetah fabric from this project and the black/gold from here

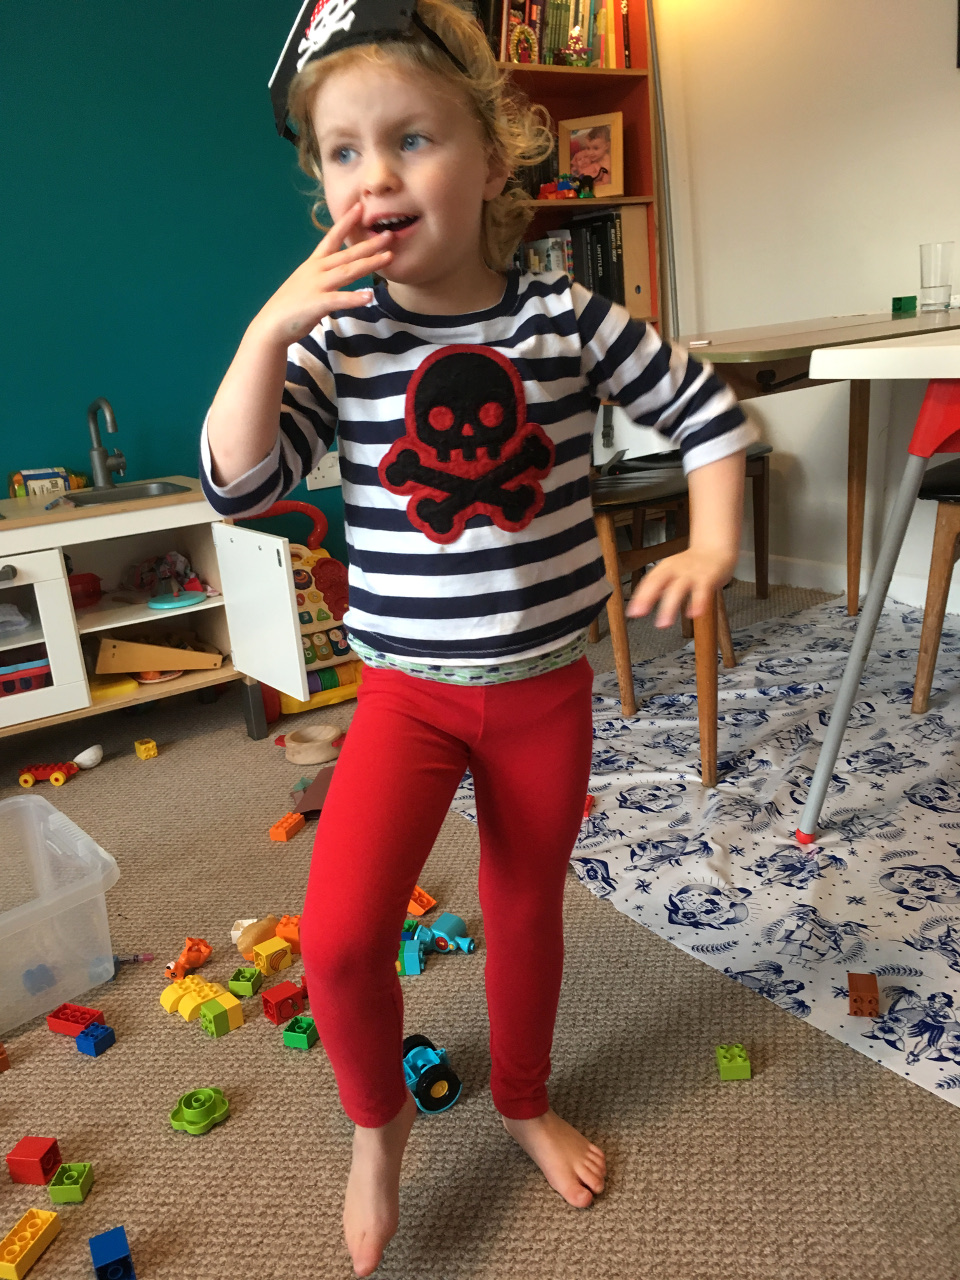
You could also use this pattern to remake unwanted adult leggings into kid's ones. As you can see below, I made Dolores some red leggings out of my old maternity leggings by cutting up the inside leg seam and laying them flat. This way, you can also incorporate the original hem to make this an even faster garment project.  


Findings:

As most people with kids usually have limited time to spend sewing, it's great to find a pattern that is so quick and easy to make. After cutting out, a fairly experienced sewer/sewist could probably bust a pair of these out in half an hour to forty five minutes with a sleep-deprived brain. But the instructions are sufficiently detailed and supportive for this to be a great project for someone new to working with knits, or fairly new to sewing altogether. My only micro-niggle with the pattern is that the seam allowance is 1/2". When I traced off the size I currently need, I reduced the seam allowance to 8mm which is my personal preference for kids' knit projects these days. 

As for the actual garments, I used the age 4 for Dolores (who is about four and a half) and I've found the fit to be excellent. The fit is just as good as the shop-bought leggings she's been given, and a better fit than other leggings sewing patterns I've tried.

Customisation ideas:
  • By taking the child's waist to ankle measurement or using a RTW pair as a guide, this pattern can easily be extended into a full length one. As you can see in the image above, I drew the extra length directly onto the fabric, but I'll probably make a separate full-length version pattern piece at some point so I can make long ones more rapidly. 
  • You could make them extra jazzy by cutting each leg from a different fabric, perhaps two different floral prints or differing widths of stripe. Just make sure both the fabrics have a very similar weight and stretchiness. 
  • You could try colour blocking the pattern like this.  
  • Or if you have more free time than you know what to do with, you could add rows of stretch lace like this
  • Reinforcing the knees with patches will definitely lengthen the leggings' lifespan. And as I have been finding out recently, applying knee patches is MUCH easier if done before the leg seams are sewn up, than afterwards when the hole appears through wear. Go crazy and make a special feature from them like this, or keep it simple with oval, cloud or heart shaped patches. 


Would I make them again?

'Making this leggings pattern' has now overtaken 'making myself some new undies' on my 'Favourite things to do with knit scraps' list (don't tell me you don't have one of those lists too). The red ones have been worn heaps since their creation, and I have to keep telling Dolores that she can't wear the other two pairs yet because it's still currently winter here. 

I love clothing for kids that allows them to play and move around freely, plus leggings worn underneath dresses make the latter far more playground-and-soft-play-friendly, IMO. I've also found that adding leggings under a dress lengthens the lifespan of said dress when it starts getting unsuitably short after a growth spurt. Thanks a bunch petitboo!!!!!

Thursday, 1 September 2016

Lightning Flash Leggings: Plus, myfabrics.co.uk Discount Code


This is the first of three posts that I'll publish over the next few weeks that feature awesome printed knit fabric from myfabrics.co.uk. The site is the UK and Ireland's wing of the wider chain of 12 European online fabric shops. I first had the opportunity to sew with their fabric after an IRL-friend of mine bought a load from their site with the intention of making stuff for her baby daughter, but never getting round to it and donating it all to me! I made her daughter some leggings and bibs to say thanks, and happily enjoyed the rest for myself. 


Earlier this year myfabrics.co.uk got in touch to offer me some fabric to blog about, plus a discount code for my readers. I spent a ridiculously long time trying to choose, but with the help from Dolores I eventually picked three lengths of printed knit that I've been having fun turning into wearable and comfortable garments for her. Here's the first...


Pattern:

Knit trousers make so much sense for toddler-wear. I hate the idea of kids' play being restricted in any way by the clothing their parents provide them. But making basic leggings (of which I feel I've made about 300 pairs now) gets a bit boring so I was looking for an interesting variation on the leggings theme that would still provide a good canvas for this fun lightning flash printed jersey. With this self-set brief, I hunted through my stash of Ottobre Design magazines


The Spring 1/2013 issue previously seemed a bit of a dud to me: there was nothing in there that appealed at first glance, and since I got a year's subscription in 2013 I haven't used any of the patterns in this one. 


Somehow, I must have been overlooking the Chillax unisex jersey pants pattern, which seem to fit the bill pretty damn well. The pattern look super comfy to me, with a slightly baggier, lower crotch style than regular leggings. A fairly simple pocket detail which requires only one extra pattern piece also elevates this pattern from basic leggings without too much extra faff. I used the size 92 width and size 98 length to get the maximum possible wear from them, and cut the waist elastic a centimetre or two looser than Dolores's current waist measurement would indicate for the same reason. 


Fabric:

All three knit fabrics I chose were printed single jersey which are comprised 95% cotton and 5% elastane. They are a medium weight which feels to me to be pretty perfect for leggings, knit dresses, T-shirts or undies. I pre-washed them all and I was relieved to discover that none had faded. I don't know if all myfabrics.co.uk knits are from the same source, but I found that the other knits I got from my friend laundered well and stood up admirably to the abuse and frequent laundering that baby and toddler wear is prone to. 


So whilst I was trying to make the selection, I was really drawn to this lightning flash print. The other two I chose are very busy prints, so I liked the relative simplicity of this design as a contrast. I gave Dolores the choice of colour way and amazingly (and thankfully), she chose the purple over the pink option! I also love the teal colour way. 


It feels quite stable and was lovely to sew with. I used my overlocker for the seams and my regular sewing machine for the pocket binding, stitching the elastic into the waistband and for hemming. I also found a fancy stitch on my regular sewing machine that vaguely replicates the look of a coverstitch machine for topstitching the pocket piece down (see below). 


The fabric did seem like it would be liable to roll a lot if cut into thin strips, plus I thought a contrast binding at the pocket mouth would look better anyway so I went hunting through my stash for something suitable. In the end, I sacrificed a ratty old sleeping vest that was made of ribbed knit and I think it looks pretty awesome. 

Thoughts and discount code:

Ah I love these leggings! However, due to her current obsession with wearing dresses, they might end up as pyjama bottoms. But they'll be the nicest pyjama bottoms in town! I still have a sizeable piece of the original 80cm that I started with, so if they do end up as night wear, I reckon I can scrape a matching sleeping t-shirt out of the remainder. If she does adopt them as day wear, then the leftovers will become a pair of baby trousers for her little brother. I'm also hoping that one day he'll be able to wear these too, as I think the style and colours are definitely gender neutral.
On to the important bit: something for you!   

Use the following code: SoZo16 to receive £10 off your myfabrics.co.uk order (minimum order £60). The fine print is that the code can only be once per order, and once per customer, and not in combination with other vouchers. It is valid until 30/09/2016, but I'll be reminding you of this voucher code twice again before the end date (unless this baby decides to come out earlier than expected). 


Related Posts Plugin for WordPress, Blogger...