Showing posts with label appliqué. Show all posts

Thursday, 30 July 2020

Crew Neck Sweatshirt Update


Like many parents, I try to keep an eye on my kids' clothing selection to avoid getting caught out when a growth spurt occurs. I think this is particularly necessary if, like me, you don't buy new clothing for your kids, because getting what they need can take a bit more time and planning. My children's wardrobes are comprised of handmade, hand-me-downs, thrifted and the odd new item given to them as a present from someone else. 


A recent sort through of Frankie's future-selection of clothes showed me that he has very few items for the next size up (aged 4/size 98+), which he is rapidly hurtling towards. I had a rummage in my clothes-to-upcycle/reuse pile and found a couple of sweatshirts, the first being a sweatshirt that has already had a number of incarnations! I made it (see below) when I worked for Traid about 8 years ago by combining a couple of red, donated sweatshirts and adding a leather anchor applique.   


Adding the navy leather shape was a gamble because I had no idea how it would wash, but actually it came out perfectly well from each wash cycle. Obviously I have no idea how much wear the original sweatshirts received, but I wore mine a lot over the years. 


I used the Brindille & Twig crew neck sweatshirt pattern for these upcycles, as I already had it in my stash and have enjoyed using it previously. I had to make seams at the shoulder for Frankie's version, just as I had to when making my adult-version. I like the additional detail that it brings. 


The second sweatshirt started out as a plain, turquoise, Damart sweatshirt that I picked up in a charity shop for 50p a few years ago. I really liked the colour but it was too small for me so it had been hanging around waiting for a purpose.  


I took the opportunity to finally bust out my Bobbinhood screen printing kit that I had got for my 40th birthday last October. I'd wanted one of these kits ever since I got to have a play with my friend Emily's last summer. But as soon as I got one of my own, all my print ideas seem to evaporate! 


Just to finally give my kit a go, I decided to use someone else's design as a starting point. I found this awesome Octopus design in one of my kids' copies of DOT magazine (which I highly recommend, BTW). I obtained permission from the designer (@annalisedunn) via Instagram, explaining that I was only going to use the design for my son's sweatshirt, and got going. Cutting the stencil out of the special plastic-y paper was the trickiest and most time-consuming part. The actual printing took literally 10min, including prepping the screen! The Bobbinhood kits are designed for stencils, so there's no exposing the screen or anything like that required.


Thoughts:

I love how both these sweatshirts came out! The journey the red sweatshirt has been on reminds me how good quality fabric can have many incarnations. Hopefully I can pass this on to someone else when Frankie eventually grows out of it. And I'm thrilled to have been able to have found an opportunity to break the seal on my awesome printing kit! I can't wait to get some new inks (I currently only have black) to give me more options for customising my clothing projects. 


Wednesday, 22 July 2015

'So, Zo...' Investigates: Janome Sewing Machine Feet


I am NOT an early adopter when it comes to any kind of technology or gadgets. It's not that I fear change, but I can be reluctant to spend time learning how to use something new properly and/or get used to it enough so that it improves on my previous method of doing something. When it comes to sewing, the time I can spend on it is limited so I want to get cracking as soon as a window opens up. I don't want to get slowed down for even a second whilst I get to grips with something new. But I have to admit that this attitude is to my own detriment, and I never regret the time spent figuring out the new thing once it has been adopted into my arsenal of tech! Like my rotary cutter. I bought it in 2007 (from Britex in San Francisco, fact), but only got it out of the packet a month ago! Now I love it and wonder what the hell I was waiting for. And I promise I'm starting to change...

So when I received some different sewing machine feet from Janome for my new DSK30, the old me would have thought 'there's a box of hassle right there'. But the new-attitude me was actually pretty excited to crack them out and find points in my forthcoming sewing projects to try using them. For clarity I want to state that I received these sewing machine feet for free from Janome, in exchange for an honest review. Apparently, not all feet and machine accessories can be used on every sewing machine made by that brand. My machine requires Category B accessories, and a full list of things to pimp your sewing experience in that category can be found here. On to my findings...

Applique Foot:


What's it meant to be for?

The appliqué foot seems to have two main benefits: 1) it is smaller so theoretically more manoeuvrable round angles and shapes than a standard machine foot, and 2) the back of it is raised to accommodate the bulk from a row of close satin stitch. 


Is it any good?

I used the appliqué foot when applying a patch to cover a hole that 'appeared' in Dolores's blouse when she momentarily got hold of some scissors (on her dad's watch, I may add). The patch was a bird-shape, so suitably awkward for testing this foot. I used a faux-blanket stitch rather than a satin stitch, but I definitely had no problems stitching round the shape, which must be in-part thanks to using this little appliqué foot. 


Even Feed Foot (AKA Walking Foot):


What's it meant to be for?

The point of an even feed/walking foot is that it has a row of teeth that feed the top layer of fabric through at the same rate that the feed dogs feed the bottom layer through underneath. Therefore, there isn't the resistance that a regular machine foot can create to the top layer that can make for shifting and slipping when sewing certain types of fabric. There's a bunch of uses for this foot depending on what type of sewing you're into, but it can be good for super-fine and slippery fabrics, knits, vinyl/leather and for quilting. If you were paying close attention during the last series of The Great British Sewing Bee, you would have seen these being used during the leather jacket challenge. 


Is it any good?

Of all the feet I was sent, this was the one that I was most interesting in. When I worked at TRAID, I did a lot of leather and vinyl appliqués (like this, this and these), and often struggled with the machine foot sticking to the leather/vinyl. I found that a squirt of machine lubrication spray helped a little, but I feared staining the fabric of the garment so was excited to try a new foot. 

I tried this walking foot when applying the leather fawn shape on this pinafore dress. It's a chunky old foot this one, not as light and nimble as the appliqué foot (see above), and therefore a bit trickier to manoeuvre round an awkward shape. But it was SO MUCH FUN to use and there was no sticking at all. If you have encountered any sticking, slipping or shifting in your sewing projects, I'd recommend putting this foot on your Christmas (or alternative special occasion that is celebrated with presents) list.   


Zigzag Foot:


What's it meant to be for?

Another foot related to appliqué (can you tell I've got the appliqué bug back these days?!). The zigzag foot is made of clear plastic and has a massive gap in the area where the needle goes down, so visibility for fancy stitches or following the edge of something is made really easy. 


Is it any good?

I cracked open the zigzag foot when appliquéing a lightning flash shape onto a little sweatshirt, and I must admit, the huge gap makes it feel really weird to use initially. However, all that extra visibility is excellent. I think back to the masses of appliquéing I used to do in my twenties (cool appliquéing, mind) and think about how much easier it would have been if I could have seen what I was doing a bit more! If you are into appliqué or fancy stitches, I do recommend getting hold of one of these. I will now stop using the word appliqué for the duration of the rest of this blog post. 


Zipper Foot:


What's it meant to be for?

Now what the Janome website won't tell you, is that the zip/zipper foot that comes with a Janome machine as standard is pretty rubbish. So they have this far superior one available. You can see what the standard zip foot looks like here, and basically when it is positioned so the needle goes down the left side of the foot, the needle can't get very close to the teeth of the zip (or whatever other use you are using it for, like making/inserting piping etc.). 

This superior zip/zipper foot (sorry, I find writing 'zipper' uncomfortable!) is adjustable and can be positioned so you can get really close to the zip teeth or piping, whichever side you need to use. Like the walking foot, it is a screw-on type foot. 


Is it any good?

Hell yes. Check out how close to the piping I got in the picture above. I want to write that buying this adjustable zip foot would be worth every penny, but I am annoyed that the standard zip foot is so rubbish that you have to buy this one. 


Concealed Zipper Foot:


What's it meant to be for?

The concealed/invisible zipper foot makes inserting this type of zip much easier and raises your chances of putting one in successfully first time. It has channels that the teeth run through, and a little central nodule-thing that pushes the teeth to one side so the machine needle can stitch really close to them. 


Is it any good?

At various points in my 'career' (I use that term loosely) I have made money from making garments, many of which had concealed zips. I have always used a regular zip foot for putting them in, using my fingers to push the teeth to the side. Having felt that I'd more or less developed the knack, I wasn't sure that a specific concealed zip foot was necessary. I thought it might be a useful tool for teaching others how to insert a concealed zip, but I didn't think I'd want one myself, particularly if you have a decent regular zip foot (see above). But hear me when I say, I was wrong. The concealed zip foot is great. It would be a stretch to claim that it assists a perfect zip insertion every time; a few times I've seen people stitch too close or even over the teeth when using one of these feet. But it definitely makes your concealed-zip-insertion life considerably easier, and if you usually fear or even avoid concealed zips, you should grab one of these if you can. I would recommend that you use a regular zip foot first for basting the zip tape in position (see the yellow row of stitching in the photo above) before using the concealed zip foot to stitch close to the teeth.

Tuesday, 23 June 2015

'Hola' Batwing Sweatshirt


My first make for the summer Kid's Clothes Week challenge! I must admit that, even though the challenge officially started just yesterday (22nd June), I actually made this at the weekend. This is because I'll be working all next weekend so won't get a chance to sew at all, so I was 'making time'. Not that this was a particularly time consuming garment, it could have easily been completed in a day if there were no cheeky toddler about requiring entertaining, feeding, changing etc.  


Pattern and Construction:

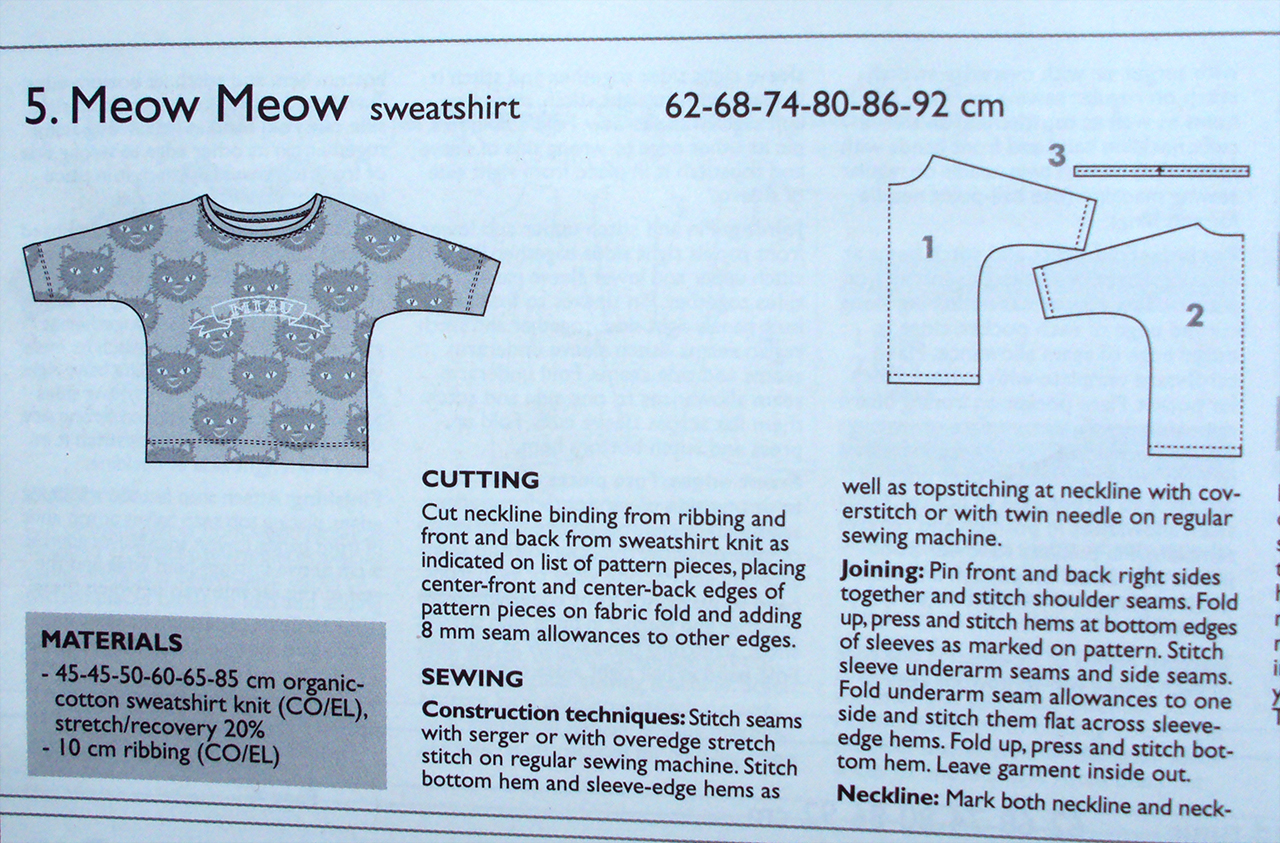
The names of the garment patterns in Ottobre magazine usually relates to the fabric they have used in the version photographed. I say this in the hope that it won't be odd when stating that I used the Meow Meow sweatshirt pattern for this project! The spring 1/2015 edition of Ottobre magazine (pictured above) has been well worth the tenner it cost as this is the second or third pattern I've used from it with many more that I plan to try in the future.  


The Meow Meow sweatshirt is a simple batwing style comprising of just one piece for the front, one for the back and a neck band. Dolores currently fits about a Size 80, but seeing as we are coming into summer, I chose to make the Size 86 so hopefully it'll fit her during the Autumn or even next Spring. Having said that, it's come out massive, but I'm sure it'll fit at some point! I may trace out the Size 80 for this Autumn after all...

I knew that I would be making a self neck binding rather than ribbing as recommended by the pattern, so I applied the lesson I learnt from the Lightning Flash raglan sweatshirt and cut the neck binding piece 2 cm longer than the pattern piece suggests. After faffing about with the appliqué, the actual garment construction was super quick, as I'm sure you can imagine from a pattern that consists of just two pieces plus binding. I couldn't even be bothered to switch back and forth between my sewing machine and overlocker, so I stitched it all on my regular sewing machine using a narrow lightning stitch for the seams.  


I hemmed the bottom and the sleeves with my newly befriended twin needle, as well as topstitching down the neck binding seam allowance. I took it slowly, particularly round the neckline, as my twin needle is realistically too fine to be forced through all those layers. We won though. 

Fabric and Applique: 

Instead of using sweatshirting as recommend by the pattern, I used yet more of the synthetic maroon double knit from my stash that, apparently, will never run out. I previously used it to make myself Hudson pants/jogging bottoms (which, despite all my moaning about the fit, I've worn HEAPS about the house) and countless pairs of toddler leggings. I'm not sure if this double knit is quite stretchy enough for this pattern, time will tell when Dolores is big enough to wear it, so I'm kind of treating this as an experiment and am not too emotionally attached to this garment. 


Back in the day (well, about ten years ago) I used to make a lot of appliquéd bags and I've really got back into appliqué to embellish clothes for Dolores (see aforementioned Lightning flash sweatshirt and Fawn pinafore dress). Running with the KCW theme of Traveling, I took it in the direction of languages that you may encounter when traveling around the world. I used a scrap of star print denim/chambray that was recently and kindly donated to me by Gill from Vintage Rock Chick which I fused with bondaweb before cutting the letters out. I also applied some fusible interfacing on the back of the front piece covering the area that would be appliquéd. I then used a satin stitch (basically a zigzag stitch with the stitch length cranked down to 0.2) and a fancy appliqué machine foot (blog post coming soon...) to stitch round the edges of each letter. 


Thoughts:

The ideas for this top, or at least something similar, had been floating round my brain for a while. I'm glad that this top now exists so that bit of brain-space can now be filled with new project ideas. However, I'm not sure if the reality has been as successful as I pictured it to be. I can't decide if it's a poor fabric choice for this type of garment, a poor fabric choice in general, a poor colour combination, a poor choice of appliqué thread colour, or what.

As I say, I wasn't overly attached to this project and am ok with winning some and losing others. I'll put it away now and pull it back out when Dolores is big enough to wear it. Hopefully then I will gain some insight about what is wrong with it, or if in fact it isn't that bad after all. As Marilla Walker wisely commented on a previous blog post of mine, 'Time is an excellent healer, especially when everything else is in the wash!!!'. Amen to that.

Tuesday, 28 April 2015

Fawn Pinafore Dress


Alrighty! The last garment I made for last week's Kid's Clothes Week. Taking the 'Wild Things' theme in a slightly calmer direction than the two leopard print garments, here's a little denim pinafore dress with leather fawn appliqué and galloping horses on the facings. 


Pattern:

Remember the pile of awesome children's sewing patterns I was given last year? This pinafore pattern (Newlook 6578, pictured below) was amongst them, given to me by lovely Adey from The Sew Convert. This pattern has been playing on my mind since I received it, it looks like such a useful (as well as quick!) potential project that could work in many different fabrics. 


So having actually used it, I can definitely confirm that it is both a quick and a simple make. In fact, the pattern includes some appliqué shapes and a stupid head-triangle in an attempt to make it look a bit trickier! My copy of the pattern was still factory folded when I opened it up, so all sizes were in tact. I traced the size 2. I'm sure you'll be bored of me saying this by now but I have to: this garment came out a bit big for Dolores to wear right now, but that was my aim as I want her to get full use from it. The only thing the pattern didn't call for which I probably would do next time is to stitch a row of topstitching/edge-stitching all around the top and along the straps. Not that there's anything stopping me from adding it to this version, aside from my own laziness! 


Fabric:

I think I may have made a bit of a mistake here. I used some more of the slightly stretchy denim that I'd also made my denim sweet shorts fail from. I thought the stretch in the denim might make it more comfortable to wear, but I fear the fabric is a bit too thick. The shape sticks out a bit like a lampshade, but I'm hoping that will be less apparent when she is a bit bigger and fills it out more. 


The appliqué, however, I am super pleased with. I have a small stash of leather samples that were given to me by Claire from Sew Incidentally (how generous is the sewing community?!). I believe she rescued them from a bin at work! I've had this fawn outline print out since I worked at Traid where I used to do appliquéing from time to time, but hadn't used this particular design before. I think this appliqué works perfectly for children's wear: it's a cute addition, but not too girly when cut out of leather. I used a fancy new foot on my sewing machine to make sewing leather easier, but I'll write about that in more detail when I review some sewing machine feet in a post that will publish in June. 


I'm also very happy with the choice of fabric for the facings. This light-weight horse print cotton used to be part of a dress that was donated to me by my friend Umi. There was a massive rip under one arm that would have been extremely difficult to mend so it got assigned to the cutting up pile instead. Umi's dress was really tiny and the style was comprised of panels so it was tricky to harvest much fabric from it, so children's wear it was destined to be! I think these facings look great in this print. 


Thoughts:

I'm really glad to have found such a great pinafore pattern and I intend to make a stack of these over the next few years (the pattern goes up to size 4). They will be great for layering with vests, t-shirts, tights and cardigans. Plus the basic shape is a fabulous canvas for all sorts of creative use of appliqués or applied pockets, or for playing with details like a scalloped hem. Do you have any ideas how this pinafore pattern could be jazzed up? 

My poor choice of fabric is a bit annoying though. It made for easy appliquéing but the sticky-outiness of the overall shape looks a bit silly. I'm still going to put her in it though, and I'm hoping that it'll soften after several wears and washes with fabric conditioner. 

Related Posts Plugin for WordPress, Blogger...