Showing posts with label dolls clothes. Show all posts

Friday, 8 December 2023

Free Pattern Friday: Doll's Clothes by Fleece Fun


Welcome to my monthly 'Free Pattern Friday' feature, where I road test a free sewing pattern or tutorial: sometimes a children's one, sometimes an adult's one (or even a doll's one!). I try to publish these posts every first Friday of the month, timed to provide inspiration for those who plan to get their sew on over the weekend. I firmly believe that, if you pick your projects carefully, sewing doesn't have to be a crazy-expensive way to clothe yourself and your family. Thanks to all the amazing pattern designers who have offered up their hard work for us to enjoy for free.

At time of writing, Christmas is less than three weeks away. I do not condone panic sewing, but if you did find yourself with a couple of free hours and the energy to sew, and have some stockings to fill for someone who likes dolls, then this could be a great little project. Personally, I LOVE making doll's clothes. It can be super fiddly, but it's a fun use for fabric scraps and the results are almost always adorable. However, sadly (for me), my daughter has hardy played with her dolls all year, and it's been nearly two years since I posted on this blog about any free doll's clothes patterns. The last time I shared about a super versatile dress pattern by Ellie & Mac that included lots of styles options. Today I'm posting about a stash of free doll's patterns by Fleece Fun that I discovered at the beginning of the year through a lovely Instagram follower. Thanks to that follower, and thanks very much to Fleece Fun for their hardwork and for sharing this little treasure trove for free. 

Please note: I haven't road tested all of these little Fleece Fun patterns, so I can't vouch for every one of them. Plus, it needs to be highlighted that different dolls have different proportions. So, just like I'd advise with a human garment, only cut out one and make a (hopefully) wearable toile before going into full production mode! 

Remember: if the doll you wish to dress isn't the height the pattern is designed for, you can adjust the size of the pattern by adjusting the scale setting when printing it out. The patterns on this site are designed for 18" dolls. The doll I was dressing was 14" so I had to print these at about 77% scale. 


(image source: Fleece Fun)

Pattern type:

If you wanted to, you could create a pretty comprehensive feminine-styled wardrobe with this collection of patterns. I asked my daughter which of these patterns she'd like me to make, and she picked out the cuffed leggings, cardigan and robe (AKA dressing gown)


(image source: Fleece Fun)


Sizing info:

As mentioned above, the patterns on this site are designed for 18" dolls. The doll I was dressing was 14" so I had to print these at about 77% scale. However, the doll is portioned with comparatively longer legs and a narrower body than the patterns are designed for. So the leggings came out a bit cropped and the cardigan came out a bit wide. Hence my suggestion to make a trial version before cutting out a load from your favourite fabric scraps. I would also advise cutting any elastic to fit the actual doll in question (if possible) rather than following the pattern's suggested lengths to the letter. 


Fabric info:

So this is the fun bit: finding small bits of fabrics that are languishing in your stash and putting them to good use. Knits are particularly good for making doll's clothes because you don't need to worry about fraying and finishing tiny raw edges. For the cuffed leggings, I used a scrap of very stretchy, lightweight, loop-back french terry. For the cardigan, I used some zebra textured double knit. And for the robe, I used a scrap of fleece that was leftover from the backing of a floor quilt I made for my daughter whilst I was pregnant with her!! These days, I wouldn't buy fleece because it's made from synthetic fibres and will therefore stay on our planet for millennia, in some form or other. But finding uses for what already exists, especially uses that won't have to go through the wash and release microplastics into the waterways, is important and satisfying.


Findings:

Each of these patterns seemed to be well drafted and easily accessible to download in exchange for a sign-up to their newsletter (you can, of course, unsubscribe at anytime). The construction steps are all in the form of a blog post. The cardigan has illustrations to show key steps, the other two have photos to guide you. I have to warn you that it's one of those websites that is dripping in distracting and annoying ads. I understand that every one has bills to pay, but I don't have to like this way of doing it!

The garments came out very cute, despite the proportion issues. I could tweak the patterns and make more, better fitting versions. But as I say, my daughter isn't so into her dolls any more (sniff) so that seems like a waste of sewing time, as much as I enjoy making these. 


Customisation ideas:

Oh my goodness, you could go to TOWN using these patterns as the basis for many more versions. 


Would I make these again?

Are you trying to make me cry?!


Friday, 7 January 2022

Free Pattern Friday: School Cool Dress for Dolls


Welcome to my monthly 'Free Pattern Friday' feature, where I road test a free sewing pattern or tutorial: sometimes a children's one, sometimes an adult's one (or even a doll's one!). I publish these posts every first Friday of the month, timed to provide inspiration for those who plan to get their sew on over the weekend. I firmly believe that, if you pick your projects carefully, sewing doesn't have to be a crazy-expensive way to clothe yourself and your family. Thanks to all the amazing pattern designers who have offered up their hard work for us to enjoy for free.

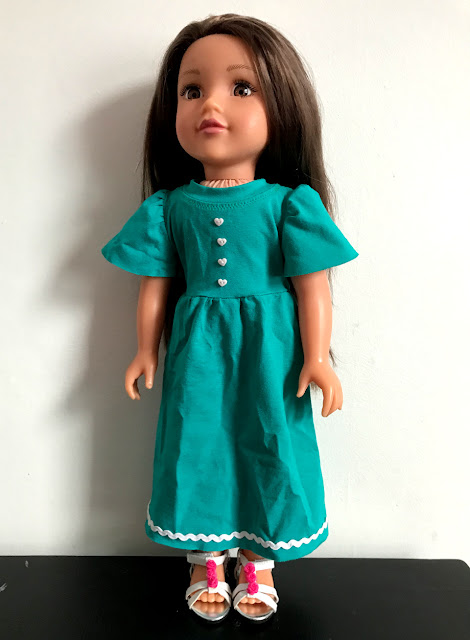
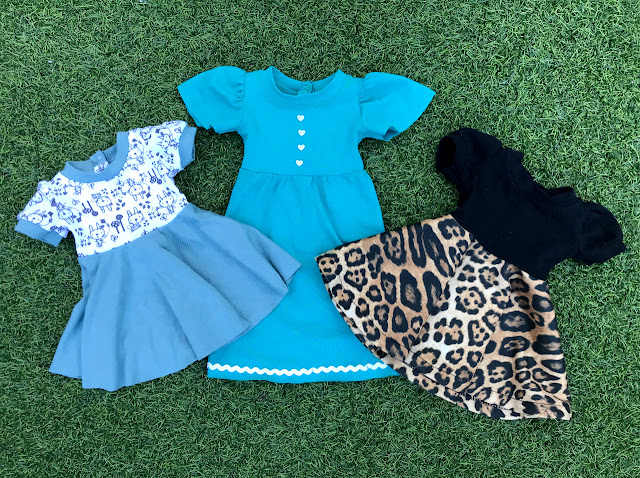
Ok, so the free pattern that I've road tested today may not be of interest to everyone. However, it's a really great little free that pattern that will be a delight for some people. Ellie & Mac have a whole heaps of patterns available for adults, kids and home projects, one of which is a kid's dress pattern called the School Cool tunic and dress. And they have generously made a doll's version available for free. The idea, of course, is that you can make matching tops or dresses for your child and their favourite doll. But whether you choose to go down the matching route or not, the School Cool doll's version is a fantastic scrap buster. I made three versions for my daughter for Christmas to clothe a doll she bought herself from a charity shop. Thanks heaps to Ellie & Mac for sharing their hardworking on this pattern for free. 


(image source: Ellie & Mac)

Pattern type:

This jersey dress pattern has an impressive number of variations. It includes four sleeve options (tank, puff short sleeves, flutter sleeves, and long sleeves) and two lengths (tunic and dress lengths). However, it is incredibly customisable so you can play around and make a variety of garments that all look completely different. I tried the puff short sleeves and the flutter sleeves options. Skirt-wise, I used the standard skirt pattern piece for two versions, but my scrap of the teal colour wasn't the right size or shape so I made a basic gathered skirt in a longer length for that. 

Sizing info:

The pattern has been graded for 15" and 18" dolls. However, the doll I made these clothes for is a bit smaller so I simply adjusted the percentage that I printed the pattern out to a bit smaller. I think that this tactic would work well for pretty much any doll larger than a Barbie sized doll. Things might start to get frustratingly fiddly any smaller than that, but of course you're free to try! 


Fabric info:

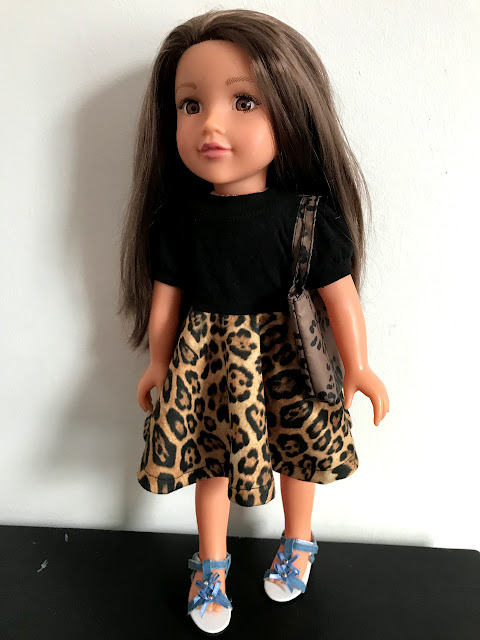
The pattern recommends knits with 50% 4-way stretch. However, I think that pretty much any single jersey would be fine. The white/grey bunny print jersey I used for the bodice and sleeves in the top version was a 100% cotton jersey harvested from a little T-shirt my daughter wore when she was two, and it has very little length-ways stretch. The sage-y green fabric I paired it with is a scrap of very stretchy bamboo jersey. The leopard print skirt that I paired with the black bodice is a double knit of some kind, which works fine for the skirt but would probably be too bulky for the top part. What I'm saying is that I think there's some wiggle room to play about with the scraps in your stash. If you're making a gathered skirt to go on the bodice, you could get away with a woven fabric for the skirt as it doesn't really need to stretch to get the garment on and off. Woven might work for the original skirt pattern piece also, but I'd have to try it to say so with confidence. 


Findings:

The pattern is easily accessible via the webshop on the Ellie & Mac website (no payment needed). There's no signups required or anything else. The pattern is professionally produced and easy to use. The instructions offer extra tips for sewing with knits, and I appreciated the many photos of different versions to help you choose which style variations to pick, and which fabrics might look good. 

Cutting out and making this little pattern is pretty fiddly, but the instructions make the construction as simple as possible. I couldn't find any of the hook and loop tape that they recommend for the back fastening, so I bought some tiny press studs to use instead. I also realised after my first one that the jersey isn't going to fray so I stopped bothering to hem it which made the process quicker. 

The finished dresses are incredibly cute. Small things are just so satisfying aren't they? I think for future versions I'll lengthen the bodice slightly to suit the proportions of my daughter's doll a bit better. 


Customisation ideas:

  • Add trim to the hems, or along the centre front like a faux contrast button stand
  • Use small buttons, little decals or even do a some miniature embroidery to create a detail
  • Play around with mixing and matching colours and prints from different scraps for the different pattern pieces
  • Increase or decrease the scaling when printing to make the patterns suitable for a wider range of doll sizes
  • Cut a wide rectangle and create a gathered skirt rather than the circle skirt included in the pattern
  • Turn the bodice round and have the fastening at the front

Would I make it again?

Definitely! Although I feel my daughter's interest in dolls may be on the wane. If it is revived at some point, I'd love an excuse to bust this pattern out again and try the other two sleeve variations. 

Friday, 6 November 2020

Free Pattern Friday: Mini Sewpony Doll's Clothes


Welcome to my monthly 'Free Pattern Friday' feature, where I road test a free sewing pattern or tutorial: sometimes a children's one, sometimes an adult's one. I publish these posts every first Friday of the month, timed to provide inspiration for those who plan to get their sew on over the weekend. I firmly believe that, if you pick your projects carefully, sewing doesn't have to be a crazy-expensive way to clothe yourself and your family. Thanks to all the amazing pattern designers who have offered up their hard work for us to enjoy for free.

So as you may recall, last month I dropped the ball and road tested a sewing pattern that patterns to be precise) has only just dropped. It's another child-related post, so sorry if you only tune in for the adult sewing-content. But hopefully this will be a particularly useful post if there's a doll-loving kid in your life that you plan to give gifts to this Christmas, or for any other holiday or event that may be coming up. It also offers a great opportunity to use up some scraps of fabric that you may have leftover from previous projects. 


Sewpony is one of my very favourite children's sewing pattern companies. Their pattern selection skilfully combines modern and classic design elements, and skews towards the traditionally female. I have bought a couple of their patterns in the past, and took part in the testing for another. Some time ago, I saw on their IG feed that Suz, the designer of Sewpony, was working on a collection of mini Sewpony patterns to fit Paola Reina Las Amiga dolls. I hadn't heard of the dolls before, but having recently had a conversation with my daughter about her wanting a doll, I did some research and ear-marked them as something my mother-in-law could buy Dolores for her recent birthday. So that Lola's doll wouldn't be naked (her's arrived just in her pants), I put my hand up to join the testing group for the doll's clothes patterns. Some of the little garments you see in this post are pre-testing versions of the patterns, and some are made using the final iterations. Massive thanks to Suz from Sewpony for offering up these adorable patterns for free. I can't even imagine how much work it took to draft the patterns and produce all the instructions. And now she's doing it all over again for another doll range called Minikane

(image source: Sewpony)

Pattern type:

The mini Sewpony collection includes miniaturised and simplified versions of no less than eight Sewpony patterns. They can also be used as a basis for making all sorts of variations. The patterns include all seam and hem allowances. All but one of the styles have written but un-illustrated step-by-step instructions, however, the Miss Polly dress instructions include photographs. Which is handy because that appears to be the trickiest!

Sizing info:

Las Amigas dolls are 32cm /13" high, so these patterns have been developed for that. However, you could try monkeying with your printer's scale settings to make the patterns suitable for larger or smaller dolls and toys.


Fabric info: 

Each style has its own fabric recommendations, however, generally speaking, light-weight woven cotton and single jersey with good stretch and recovery will be the most useful for this project. One point to consider: if you wish to use a fabric with print or pattern, make sure that the scale of it doesn't look odd when made into tiny clothes. 

I absolutely love that these little garments can be made using small scraps that might otherwise be pretty useless. In general, I adore sewing projects that use scraps and leftovers because they feel like they're a 'free' project (especially when they're used with a free pattern or tutorial)! I used scraps of cotton/elastane single jersey for the Sorella T-shirt (the white-with-gold flecks one) and Sorella dress (the red/white/blue striped one), ponte Roma and rib for the Sorella sweatshirt, swimwear lycra for the Cosi (you could easily use cotton/elastane jersey for this one but my daughter was very adamant that it had to be real swimwear fabric!), double gauze for the skirt, chambray for the 'jeans' and pleather for the Twiggy dress (the gold one). 


Findings:

Sewing dolls clothes is really fun but sooooooper fiddly! I wouldn't recommend trying to make these in a rush. The pattern pieces are really clear (and very cute). The step by step instructions provide the help you need, but are not excessively hand-holdy, so I probably wouldn't recommend this project for a beginner. Your child could definitely help you make these doll's clothes, but it would need someone with a few garment sewing projects under their belt to work alongside.

Customisation ideas:

These patterns definitely provide a great basis for experimentation. In my local haberdashery/craft shop I found some miniature buttons that I'm looking forward to using. I also added some extra topstitching detail to both the trousers and the pleather dress. I'd recommend following the #minisewponycollection hashtag on IG to see what others come up with. 

Would I make them again?

Without a shadow of a doubt! I'm considering getting my daughter another of these dolls so her current one (officially 'Liu', but Dolores's is called Rose) has someone to hang out with. I really hope they get on...

Related Posts Plugin for WordPress, Blogger...