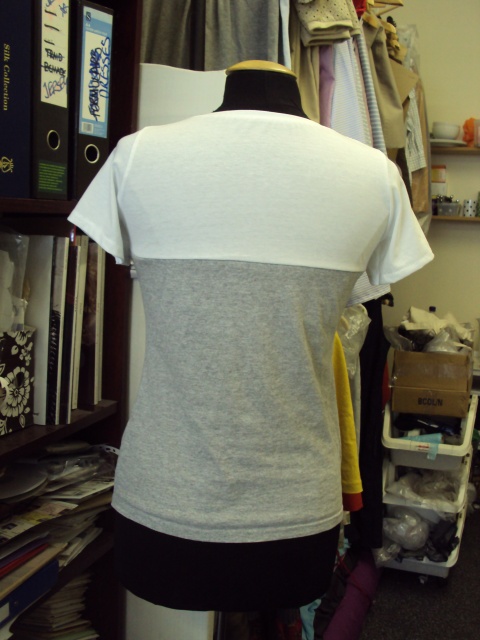
 So here's the second installment in my tutorial for making a bustier line T-shirt like the one pictured above out of two unwanted T-shirts. If you missed Part 1, which dealt with how to develop your pattern pieces and then prepare the garment pieces, I'd go and check it out if I were you!
Ok, so the last tutorial installment left us with a pile of cut out pattern pieces (one upper front, one upper back, one lower front, one lower back, a pair of sleeves plus a strip we cut off the hem of one of your T-shirts). REMEMBER: I am using an overlocker (serger) here, but you can use a normal flatlock machine if you don't have one. Just use whichever stitch you find yields the best results with jersey (do some practice runs on your leftover scraps of T-shirt or jersey fabric). NOTE: if you are using an overlocker, don't cut off the 'tails' of thread as you go, leave them loose and we'll deal with them at the end and get a nice clean finish.
Time to put those pieces together:
Step 1:
Unfortunately, you get thrown in the deep end, with one of the hardest steps coming first. We've got to attached out upper front to our lower front, and our upper back to our lower back. Start with the back pieces as they will be easier. With your lower back piece underneath and your upper back piece on top (right sides together) pin them together at the beginning of the join and the end, as well as in the middle by matching up those notches you so helpfully made yourself. Stitch together remembering to remove the pins before you run over them (particularly if you are using an overlocker!).
Time to do the same with the upper front and lower front pieces. Remember to put your lower front piece underneath, it'll be much easier to ease on the upper piece to create those curves. In the picture below you can see I've begun overlocking the front pieces together with my half way notched matched up and pinned.
 Once your row of stitching is under way, you're going to need to gently ease the edges of the curves together to continue your stitching. Take your time and don't over stretch your fabric or you'll create a wierd effect on the final garment. You just want to gently encourage the edges to line up.
 When you've finished that tricky bit, you'll have two main garment pieces, back and front:
 Step 2:
This bit doesn't necessarily need to be done now, but you may as well get it done and out the way. You need to finish the sleeve hems whilst the sleeve pieces are still flat. Here I have simply overlocked the raw edge, then turned the hem and stitched in place with a normal flatlock machine. You may choose to use a zigzag stitch, twin needle, three-step zigzag, leave the edge overlocked, leave it raw, whatevs.
 Step 3:
Stitch your front and back pieces together at one shoulder seam only.
 Step 4:
You know I said Step 1 was one of the tricky steps? For me, I find this to be the other difficult part, but once again it's ok if you just go slow. Time to bind that neck hole. Start at the beginning of your neck hole at the shoulder you haven't stitched together so far. Keep your body pieces face up, then lay your harvested strip of T-shirt hem on top with its raw edges at the edge of your neck hole. Now you are going to overlock or stitch (I'd maybe recommend a wide zigzag if you aren't using an overlocker/serger) the strip all the way along your neckhole.
The trickiness comes in two forms really. #1, you don't want to stretch your neck hole as you sew or it won't sit nicely when you wear the garment; and #2, you need to pull the strip ever so slightly as you stitch them together so the finished neck binding doesn't gape or stick at a funny angle. Just take your time and don't worry if it doesn't end up perfect. A steamy iron can often do wonders to a jersey neckline, I've found!
 As you may be able to see below, I created a bit too much tension on the strip near the end which has created a little gathering effect. No probs, it'll barely notice when on an actual body.
 Step 5:
A nice easy step after that last epic one: join up the second shoulder seam. You'll probably want to start at the neck edge of the seam because it'll be easier to get these matching nicely. Remember, keep those thread tails long if you are overlocking.
 Step 6:
Ok, this step is a bit time consuming. We've got to put the sleeves in. Depending on your pattern, you may or may not have lots of notches to match up. Hopefully you've got notches at the top of your sleeve heads to match up with your should seams, if nothing else! There's not much I can say about putting your sleeves in, accept I would recommend having your arm hole pieces underneath and your sleeves pieces laying on top as you sew.
Your top should now look more or less like this:
 If you were to put it on a stand, it'd look a bit like this!: an almost-garment!
 Step 7:
My favourite step! Time to overlock/stitch your side and sleeve seams in one fluid motion! Start at the sleeve hems, make sure your side seams meet at the underarm point, the bustier line point and of course at the hem. You GOT to love how compliant jersey is to make matching all those points up pretty easy.
 Step 8:
I forgot to take a photo of this step, but it's a simple tidying up of all those loose threads tails you've got hanging off your T-shirt if you've used an overlocker/serger. Take a wool needle and thread the tails up into the row of overlocking. My boss call this stage 'turning the threads', FYI. You should have to do this at both side of the hem, both sleeve hems and on one side of your neck/shoulder point.
Ta daaaaaaaa!!!!!!!!!!!!!!!!!!!!!!!!!!!!!
 All finished! If I haven't made myself very clear about something, or I can help in any way, just leave a comment in the comment section and check back there in a day or so, that way if others have the same question, it'll be there for them to see also.

If you use this tutorial, or parts of it, please let me know or leave me a link or something. I'd love to see your creations!

7 comments:
Goooood!Thanks for the tutorial :D
This is about the time of a me-made month where I can't keep up with all the loveliness afoot, but thanks for sharing all your new handmade goodies and tutes :) I've been keeping up with the challenge but I've been pretty awful with photos. The photo challenges are so fun to see!
Cheers Zoe! I'm going to print this off so I can try it with some of my Hubby's old tee's :)
In part 1 you mentioned keeping hold of the pre-sewn hems from the original RTW old t-shirts when cutting out the pattern - so save having to sew them up later on (nice tip!).
If someone forgot, or perhaps didn't keep the existing hems (I hope they remember to add a hem-allowance onto their pattern pieces though - or it'd end up a wee bit short afterwards LOL!)... then at which stage would you hem the new top please a) stitch the hems on the bottom of the front 'n' back pieces before stitching up the side seams or, b) stitch the side-seams first and then do the hem? Does it make any difference to how the t-shirt will hang/look when it's worn please?
Cheers, Claire :)!
This is SO awesome!!! I linked to your tutorial on Craft Gossip Sewing:
http://sewing.craftgossip.com/tutorial-bustier-line-t-shirt/2011/06/23/
--Anne
thank, this is really good !
SO awesome Zo, even though I use a lot of knit fabrics, I just never really get the neckline right, and you describing it by pulling the binding a bit tighter makes sense!
Your Step by Step TOTALLY makes sense to me, great job honey!
Hey Zoe!
I just made up a couple bustier tee's using this tutorial, but not from existing tee shirts. I used all stash fabric, though. Thanks so much!
http://lizajanesews.blogspot.com/2011/08/im-knitwit.html
Post a Comment