Saturday, 26 August 2017

Summer Sewing Successes and a Fail


I hope you've been having a great summer/winter* (*delete as appropriate). I've been having a fun (and exhausting) summer trying to entertain my mini peops whilst Pat has been working and studying hard. We're going on a little late-summer break for a few days tomorrow, so I want to quickly share with you the last of my summer sewing projects. 

I begun this season with next to no seasonally appropriate clothes, but thanks to some strategic sewing, based in part on my findings from #MMMay17, I've been able to put together a decent selection of warm weather stuff. I've almost exclusively been wearing:
All but the last four items are recent makes and they reflect the changes my personal style seems to be going through. Out with the retro-y, Rockabilly-lite, and in with whatever-you'd-call-it. Anyway, as great as these pieces have been, what I found I was still missing was really warm weather clothes. I still didn't have any sleeveless tops or shorts (which is evident thanks to my pasty white upper arms and legs!). To fill those gaps, I made these last two summer projects, which also may be my favourites!


Top:

Whilst planning my first version of this pattern, I'd spied some other sewers on the interwebs leaving the sleeves off the Delphine et Morissette La Brune pattern. I decided to follow suit. I'm not a fan of my upper arms, but a sleeveless La Brune is a great solution because the shoulder ruffles provide a focal point that steers the eye away from that area of my arms. Witchcraft.  

I was able to squeeze this top out of the remainder of anchor print light weight denim that I used to make my first pair of Luna pants. It's quite a loose weave, which on the one hand is ideal for a loose fitting summer top (and much softer than the stiff poplin I used for my first version of this pattern), but on the other made the ruffle application a bit of a headache as the raw edges had a tendency to stretch out due to all the handling. I did the best job I could, and I don't think anyone would notice that it has bubbled a little next to the ruffles unless I forced them to!

Once the top was nearly complete, I tried it on and decided to cut a tiny bit away at the bottom of the armhole. I then bound the raw edges in the same way as the neck hole using the method used for the neckline of the Scout tee. I bought some ready-made bias binding rather than making my own because I didn't think the loosely woven denim would provide enough stability to the neck and arm holes. Aside from omitting the sleeves, I also made the shoulder ruffles even narrower than I did on my first version, and I now think the proportions are spot on.  
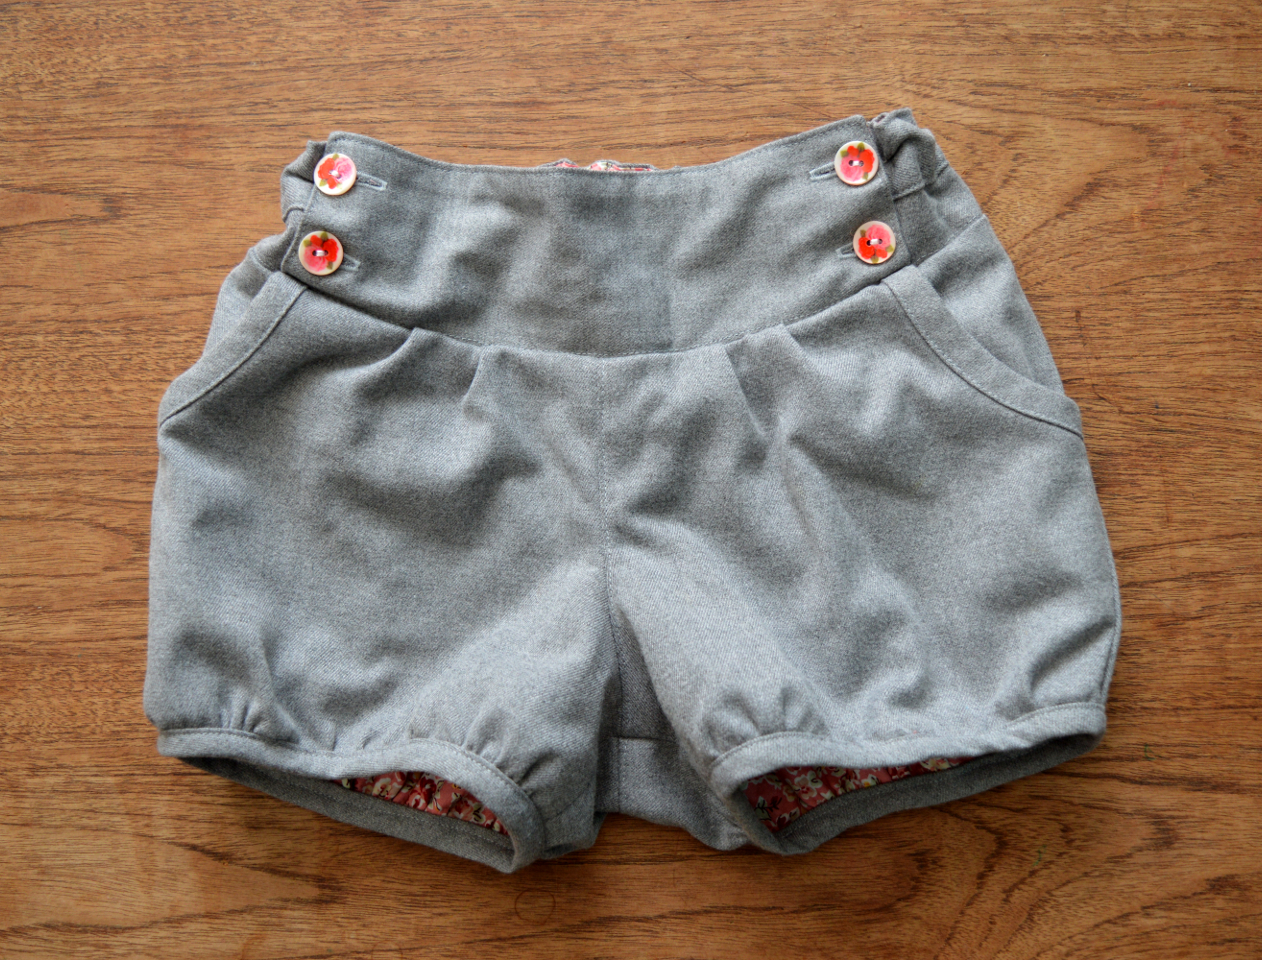


Shorts:

For the shorts, I also revisited a sewing pattern I had previously had a go at. When I tried the Sweet shorts pattern three years ago, I found the sizing to be way too big. So this time I started with a whole size smaller, and made a toile (muslin) that Claire kindly helped me fit. I ended up making a number of changes:
  • started with a size smaller than my measurements correlated to
  • made the leg length about 1" shorter
  • added width around the waist (about 5cm in total at the top, if memory serves, blended out to nothing at the hips)
  • shortened the front rise by about 1cm
  • pinched out some fullness from the back leg at the hem


I made them in this navy suiting that has been in my stash forever. I have no idea what the fibre content is, all I know is that it doesn't need ironing (whoop whoop!). I still have a ton of this fabric left, so I'm sure it'll pop up on this blog in another incarnation some day. I used some turquoise jap silk from my stash for the pocket bags but did a French seam around the curve for a neater finish than overlocking would have resulted in. 

I added extra topstitching in a few places as the fabric wasn't super-responsive to pressing and I wanted all the seam allowances to lay flat. I think topstitching down the seam allowance along the front rise has resulted in some sort of creases radiating outwards from that area, but it's probably only noticeable if I stand stock still and pointed them out to you. The other tiny flaw that something is compelling me to share with you, is that my top and bobbin threads must have been from different reels because the topstitching that keeps the hem facings in place is a slightly different tone of navy to the rest of the topstitching.

Anyway, those things aside, I'm not sure that these photos are doing them justice but these shorts have a really smart, polished look IRL. They are still a bit big, but I expect to gain some weight once Frankie finishes breastfeeding, so that's fine. A lot of work went into them, as much as you'd put into a nice pair of trousers, so I hope I'll get many years of wear out of them.


FAIL:

In the interest of equilibrium, I thought I'd share a recent FAIL project with you too. Sewing bloggers rarely seem to share the project attempts that didn't work out. I usually don't either because I doubt it's very interesting to you readers, and also because I just want to forget about a FAIL as quickly as possible! But I'm worried that without ever sharing a FAIL, those who are new to the sewing game may get an inaccurate sense that every sewing project will, or should, work out. Lessons always have to be learnt that way, it's an important (if annoying) part of improving. But due to my new policy of toiling every-damn-sewing-project that doesn't use a TNT pattern these days, I've managed to avoid having a FAIL for ages. 


So my plan here was to make a top to prevent my flora and fauna Luna pants from being a wardrobe orphan. As I've mentioned previously, I've been trying different styles and silhouettes lately (which led me to making the Luna pants), so I decided to try the free Deer and Doe Plantain T-shirt pattern. I must have mentioned my plan to Claire, because she very sweetly printed it out for me, it's one of her absolute favourites and she's made a million. I had this light-weight, slinky coral jersey in my stash (also from Claire! What a friend she is!) and I thought the colours would work well. But that's about all that did work well...

I tried it on before hemming (see above) and it was a total 'meh'. It didn't skim my figure like some sort of contemporary French siren as I'd hoped, instead it felt really frumpy. I fiddled with the fit a bit by taking in the side seams here and there, and in the end I salvaged the neckline and reworked it entirely using the TATB Agnes top pattern that I've have many successes with previously. But even that didn't work! The fabric was so thin that it showed EVERYTHING, including the exact shape and position of my breast pads, every detail of my bra, the ingredients of my most recent meal. I was really annoyed because I'd made a nice job of the neckline, but I'd had to finally admit defeat and throw it into the textile recycling bag. GAH.

Thoughts:

The anchor La Brune and navy Sweet shorts have been such a success that I'm firmly over the coral Plantain FAIL. I've worn this outfit as often as the weather has allowed since their completion, both feel really comfortable, even though the shorts sit a bit higher on my waist than I'm used to. And the sleeveless-ness of the top feels so nice that I can't wait to make more sleeveless tops for next summer. I fancy trying Jennifer Lauren Handmade's Hunter tank, which should work well with these shorts thanks to the high waistline, plus either Made by Rae's Gemma tank or Wiksten's tank top. Plus next year I really should finally make the Deer and Doe Chataigne shorts pattern that has been lurking in my stash for a couple of years. 

What about you? What have been your most successful recent warm weather sewing projects? Any FAILS you'd like to vent about?! 

Thursday, 17 August 2017

Berry Bubble Shorts


So the sad fact is that these shorts are not popular round here. You want to know how many times they've been worn in the four or five months since I made them? Twice. You want to know how long they took to sew? Forever. 


Pattern:

I think I discovered the Berry Bubble shorts pattern via Pinterest, and bought it during a mini-splurge I had last summer, along with the Sally dress pattern. It's designed by Rebecca Page, who recently (wisely) changed her website's name from Mummykins and Me, and it's also available for women (and dolls!) as well.


I'm a big fan of a bubble short for little girls, and this pattern looked like a particularly polished version, with lots of possibilities for contrast fabrics and awesome buttons. But BE WARNED, this is NOT the sewing pattern to reach for if you want to knock something up quick the night before you take your kid on holiday. 


If memory serves, it's comprised of ten (TEN!) separate pattern pieces. I'm used to kid's shorts patterns that are made of a back and a front and that's it. And they're fully lined, with lots of neat topstitching. Oh, and did I mention that they have adjustable waist elastic?! These are some fancy kids shorts alright. I made the size 3 (which has come out pretty big, I think they'll easily fit her until she's five) and found the construction fun but pretty fiddly, I wouldn't want to try sewing any of the smaller sizes.  


Fabric:

If you've been following my blog for a while you will have seen this grey fabric a few times before. I first used it for these cropped trousers (never worn), then this Tova tunic (which I've worn sooo many times, pregnant and not) and then these nautical palazzo pants (which I've also worn masses but are no longer my style). This is last of that fabric, I promise! I think it's some type of amazing, fantastic quality flannel: incredibly soft and doesn't really crease, both of which make it great for children's wear. What doesn't make it perfect for children's wear, apparently, is the colour. Even when it's fully lined in pretty floral pink cotton lawn. When I first made them, her dad offered to help her put them on and she replied, 'No, please no'! Yes, you read it right: she begged him not to put them on her. 


Thoughts:

As I say, Dolores has chosen to wear them twice. Once, when we went for a day out in Brighton (pictured here), and today when we went to the beach. Only today, she didn't choose them exactly. I usually give her a couple of outfit options that are weather-and-activity-appropriate, but today I just picked out an outfit for her that included her favourite T-shirt, and to my surprise she put it all on without a fight (she may have been distracted by something else!).


So, although they involved a lot of work at a time when my sewing opportunities are limited, plus the recipient isn't falling over herself to make use of them, I still look on this project with a lot of fondness. There's something really satisfying about making a garment from lovely fabric that involves lots of meditative, neat topstitching. I made them whilst binge-listening to the S-town podcast, so I was indulging in two of my very favourite things, which meant this project had double the mental health benefits!

Cost:

Pattern: available here for $9.50 (approx. £7.30)
Fabric: £0 (I didn't pay for either the outer or lining fabrics)
Elastic: approx. £1
Buttons: £0 (from the stash)
Total: £8.30 

It's a great pattern but I'm not in a rush to make it again so I don't think I'll be reducing that total but subsequent uses. 

Thursday, 10 August 2017

Jeggings Attempts #1 and #2


By making my versions of the Luna pants pattern, I successfully created some very wearable trousers whilst neatly side-stepping the trouser-fitting headaches I was having in the spring. So I thought I'd try to pull off the same trick (making wearable trousers whilst side-stepping my trouser fitting issues) by recreating my favourite secondhand RTW jeggings. Here's how that went....


Version #1


Pattern and construction:

Because my old jeggings (the washed-out black ones pictured below) were very much on their last legs, I decided to cut them up so I could lay the shapes out flat, rather than trying to take a pattern from them still as a 3D object. I omitted the back yoke, which didn't seem to be adding anything in terms of shaping, and made the back in one piece instead.


I kept the cut up pieces of dissected jegging so I could take some hints for construction. I decided, as per the originals, to make faux-flat felled seams on the outer legs by making closed seams then pressing and top-stitching down the seam allowances towards the back. The inside legs are regular closed seams. I made the pattern full length, as per the originals, but my #1 copy were cropped due to fabric restrictions.


Fabric:

I've had my eyes peeled for decent jeggings-appropriate stretch denim for a while but it's been pretty illusive. Stretch-denim in general seems to be fairly common, but I need the really stretchy, four-way stretch stuff that's going to behave more like leggings fabric and can deal with an elasticated waist design, rather than the type of denim that you'd buy for making regular jeans that happens to have a small amount of give in it. There's probably a way to describe what I'm talking about using percentages of stretch, but I don't know what that's about yet. Anyway, when I found a 95cm remnant of suitable fabric at a Ditto sale, I snapped it up, even though it wouldn't be quite long enough for the pattern I had copied.


Thoughts:

Generally speaking, for a first attempt they weren't too bad, and I've worn them masses in the two months since I finished them. I even like the necessity-is-the-mother-of-invention cropped length, which has made them really useful for the summer. And I thought I could get winter use from them if worn with long socks and knee-high boots.

So, the bad stuff. The first thing that grabbed my attention was that the overlocking and my faux-flat felling of the outer leg seam felt very noticeable. I probably should have overlocked away at least 0.5cm of the seam allowance before the top-stitching. However, I don't know if it's the wearing and washing softening up the outer seams, or just sensory adaptation, but I realised the other day definitely don't notice it as much these days.


Also, I'd say that overall they are a little big, probably because the fabric of the originals didn't have quite as much stretch as the blue Ditto fabric so the pattern is a little bit too large for this particular fabric. And they are also way too high, particularly at the back. I like that I can bend over in a playground with absolutely no chance of scarring anyone for life, but I have to yank them up from time to time as I don't think it's helping the baggy-bumness.


Speaking of which, check out the horrendous-ness of all those under-bum wrinkles in the image above. I was sooo tempted not to share the back view of these, but then I really need your hive-mind opinions. After all the wears and washes these have had so far, I think the fabric has got a bit saggy, especially by the end of the day which is when I got Pat to take these photos. However, I fear those wrinkles may not be all down to saggy fabric and that some pattern adjustment may be required. Annoyingly, I didn't give the under-bum much notice when I first made these so I'm not sure what the fit in that area was like when the fabric was still very fresh and new. I'm really hoping that it IS the fabric rather than an issue with the pattern, because considering all the hassles I had/am having with the fit of the slim-legged, side-zipped, Ultimate trousers, any visible pooling of fabric/wrinkles under the bum is making me feel like this:


via GIPHY


Version #2


Pattern and construction:

After the relative success of #1, which I view as a wearable toile, I was excited to crack on with another pair soon after. So I lowered the height of the waist by 2cm at the front and 3cm at the back (blending between the two at the sides). I decided to leave the overall size/width the same in case my next piece of fabric had a better recovery/wearability than the blue Ditto stuff. I was also excited to try out the full-length of my pattern, which I'd kept accurate to the originals in length and width round the ankles.


As for construction, I learnt my lesson and made proper flat felled seams on the outer legs to hopefully reduce/omit the discomfort in that area. I also chose a quicker and less faffy method of attaching the waistband/elastic channel than I did on #1 that I won't bore you with. I was also feeling pretty confident going into this version, so I decided to add some patch pockets for extra interest, seeing as I wasn't using contrast top-stitching this time round.

Fabric:

If it's possible to be in love with a piece of fabric, then that's what's happening here. This version is made from some super stretch denim from Fabric Godmother. I'd seen it at their studio space during our recent Portslade bloggers' meet-up, but I didn't buy any because I was on a budget (which obviously got blown anyway). But I kept thinking about it so emailed Josie to check she still had some in stock in advance of their July Open day, hoping she'd put some aside for me if it was running low. Because she is the more generous and thoughtful lady, she sent me a length for free instead! I'm not sure if she getting any more of this exact denim in stock (might be worth emailing her), but there are a lot of other fabulous similarly-stretchy denim on their site, including this blue that I also have some of.


Thoughts:

Ok, first the good points. These feel really comfy and generally I think they look pretty good, therefore I've worn them heaps since I finished them. These are a more recent make, they haven't had as much wear or washing as #1, however I'm pretty sure that they will fair better over time. These pictures were taken when they were fresh out the wash, but you'll have to trust me that the black denim doesn't get so saggy by the end of the day. The real flat felled seams have worked a charm and I don't notice the the outer leg seams at all.

Now for the faults that I think I can improve on without inducing a headache. They still sit too high on my waist. It may not look like it, either in the flesh or in photos, but this is a personal comfort thing. When I wear them now, I tend to roll the waistband down to get it sitting where it feels most comfortable to me. When I can muster the patience, I will go back and unpick and re-do it for a lower waistband permanently.

Another simple flaw is that my patch pockets are sitting too low and too far to the outer leg seams. The height doesn't really notice too much as I always wear tops that cover at least the waist area of these jeggings (I've just got my top tucked in for these photos so you can see what's going on), but for future versions I need to make a note to position them a touch higher.

I also think the wrinkles around the knee are because the jeggings are too long in the leg, so hopefully I can make those disappear easily enough.


Right, time for the tricky stuff. It may not have escaped your attention that, although not as pronounced at the rear view of version #1 there's still some wrinkles under the bum on this pair as well. I think this could be for one of three reasons (or a combination of the three):

1) After an aha-moment whilst listening to the Melissa Fehr episode of the Crafty Planner podcast, I wondered if those wrinkles are a pooling of fabric caused by the fabric being pushed down because the fit is too tight across my bum (although they don't feel it). If that's the case then I do not have a Scooby-do (Cockney for clue) how to change my pattern to correct that.

2) Perhaps less visible in these photos, compared to the originals, like version #1, version #2 still feels too room-y around the pelvis and thigh area. The waist fits fine because I adjusted the elastic to be the correct length so they pull in sufficiently at the waist, but if I were to take in the side seams a smidge from the waist to the knee my theory is that there's less likely to be any wrinkles if the fabric is stretched more across my body. I guess this route would lead to a tighter, more sprayed-on effect like you see many of the 'youth' rocking these days. Annoyingly, I can't simply nip these in to test that theory because of the flat felled seams.

3) The issue could be the same one that my trouser-fitting saga is throwing up. I might need to do some 'scooping out' of the back rise, or lowering the back crotch curve, or taking in the in-seam (although the latter may have cause me problems when I did that to my black pair of Ultimate trousers) because of some kind of low-bum issue or something.

One word:


via GIPHY

What is also clear, is that each different denim fabric would need its own unique sewing pattern to get the best version of jeggings possible. But without making a toile and the subsequent pair from the exact same fabric, I guess I'm going to have to forgo the real flat felled seams in favour of making a pair that can be adjusted at the seams to get a close-to-perfect fit for future versions.

Going forwards:

Having recently read through a lot of Tasha from By Gum By Golly's trouser-fitting trials and being inspired by her tenacity, I'm more determined than I felt for a long time to really get to the, umm, bottom of my trouser fitting endeavours. So now I've got two challenges: to perfect my jeggings pattern, and to perfect my Ultimate trousers pattern. Both these patterns require fabric with some stretch content, unlike Tasha who is aiming to get a great fit for wovens both with and without stretch. I don't feel comfortable in slim-legged trousers or jeans of any type made from fabric without the lycra/elastane/spandex/blah blah. So now when I find some nice woven-with-stretch fabric, I'll pick which of these patterns it'll probably be best suited to and push onwards...

As it stands, I feel the jeggings are closer, but I'm determined to nail both. Then Frankie will pack in breastfeeding and winter will come and I'll put loads of weight on and have to make a whole heap of new pattern changes! Oh, and one day I hope to find the 'proper jeans' sewing pattern that appeals and use that as a base to work on that type of garment too. Hopefully, by then, I'll have learnt so much about trouser fitting and my personal shape that I'll have a heap of knowledge I can transfer to that.

If you have any insights to my fitting issues, please do share your thoughts via a comment. And, how about you? Do you ever wonder if you should just go to a shop and buy some trousers/jeans/jeggings instead?! Have you gone down the trouser/jeans/jeggings fitting rabbit hole and come out victorious? Please let me know! 

Friday, 28 July 2017

Refashion Friday: Bridesmaid's Dress to Princess Dress


Err, for some reason it's taken me over nine months to blog about this creation. I'm not sure why: it took a freaking lot of work and it's seen lots of use, so it's definitely a success that I'm proud of. Maybe it's because it took me a while to get any half-decent 'modelled' shots, and then it kept getting bumped down the ' to blog about' list in favour of more recent projects. Anyway, today I'm going to do a bit of house-keeping and get this crazy project 'out there'. 


Like many a mistaken mother before me, I thought I could prevent my daughter from developing a princess obsession just by avoiding certain books and banning Disney our my home. FAIL. Like so many other little girls, Dolores fell in love with the idea of princesses at some point before her third birthday and desperately wanted to dress up like one. I didn't see the point in trying to ignore or avoid this desire, and instead of sourcing some mass-produced piece of tat that will look shonky after a few wears and washes, I though at least I could rustle up a dress that's unique and well-made. 


'Before' garment:

Rather than fork out a small fortune in the shimmery/frou-frou section of a fabric shop, I decided to find a pre-loved garment from which I could harvest the materials I would need. This bridesmaid's dress, found in a charity shop for £9.99, seemed to fit the bill nicely. After its dissection, the full skirt of this size 16 dress provided a lot of shot taffeta fabric, plus I thought the netting in the underskirt might come in handy. I chose a taffeta dress because I hoped the fabric would hold its shape without the need for extra layers of underskirt, which would be a pain to sew, and possibly annoying to wear. I also liked that there were lots of tiny bugle beads and two fabric roses around the waist that I also thought I might be able to reuse (I didn't end up using the beads in the remake). Oh, and its final plus-point was that it was on the pink spectrum, without being too pink.


Pattern:

Ironically, in a bid to avoid Disney merchandise, I turned to a Disney sewing pattern: Simplicity 2563. It was generously sent to me by the lovely Adey from The Sew Convert, along with some other patterns, when her daughter became older than the largest size. (You can see a whole load of sewing stuff I was generously donated when my little girl was tiny here.) I picked the pattern's design elements that were most suitable for my fabric, including those poofy side things from the 'Cinderella' dress that I figured would make the most of that double layered under-netting.


I know I was making this dress for Dolores's third birthday, but I can't remember if I chose the size 3 or 4 (and I'm NOT prepared to wake Frankie up by going into my bedroom to hunt out the pattern to check!). Either way, I don't think the neckline should have resulted in such a deep scoop. It ended up looking totally different to the dresses on the front of the pattern envelope, like those samples were made from a different pattern entirely. As you can see in the picture above, Dolores often wore it with a vest on underneath, which kind of spoilt the effect, but she didn't seem to notice or mind. Now that she's almost four, the scoop thankfully doesn't look so inappropriately 'scoopy'.


Thoughts:

I decided not to bore you with interior shots, but you're going to have to trust me that this dress was A LOT of work. Well, it certainly felt a lot of work to this then-third-trimester preggers lady. Since its completion, I've gone back and shortened it to make it less of a trip hazard, plus I mended the hand-picked zip which came away during some particularly vigorous princessing. Aside from that, it's withstood a lot of wears, and of course a lot of washes. Over nine months later, Dolores still likes to wear it regularly, including to the library (see pic at top of post!).

Cost:

Thrifted bridesmaid's dress: £9.99
Pattern: £0 (gift)
Zip: £0 (from my stash)
Total: £9.99

Wednesday, 19 July 2017

Ease into Motherhood


Sewing and small children. In many ways, they seem to be sworn enemies of one another. Finding the physical and mental space to sew, whilst being present and available for kids who depend on you for pretty much everything sounds like an impossible task, or at least a recipe for disappointment and frustration. I often hear of women who used to sew before they had children, then stopped, and are trying to get back into it now that their children are older. I can totally understand the decision to not even bother trying to get any sewing done for the duration of your children's early childhoods. But for me, that's not an option, sewing is too big a part of my life. So today I want to talk about why and how I manage to sew whilst being a mum to two tiny peops. 

The prompt for this post came from an invitation to take part in 'Ease-in to Motherhood': a sewists' celebration of motherhood and the changes it brings to our lives, created and hosted by Monserratt, Jodi and Erin. Read here for the full details of this important and beautiful initiative. The motivation to create connection between mothers who sew is similar to my own reasons for setting up the recent dribble bib sewing swap (check out #greatsewingbibswap on Instagram). Anyways, the organisers of Ease-in Motherhood have left it super open about what to write about in relation to these topics, and at first I felt pretty overwhelmed as I have SO MUCH I want to say about all of it! A couple of months ago I felt a blog post brewing about my disgust at the damaging concept of 'bouncing back' after a pregnancy and birth, but I just read Jodi's touching piece on this subject in which she handles it with much more grace than my bile-filled rant probably would have done! So on with my contribution...

Somehow, I've become a stay-at-home-mum who does bits of paid work at the weekends. I never planned to be a SAHM. When Pat and I talked about how we saw our family operating before we had Dolores, we agreed to share the childcare and our freelance work endeavours 50/50, and to keep our child/children home with us rather than in childcare until they were about three years old. But the financial realities were such that two part-time freelance-whatever-you'd-call-what-we-do/did wasn't bringing in enough to live in this pricey part of a pricey country. So I ended up taking on the lion share of the childcare as Pat went out to work full-time, and things will probably stay this way until they are both at school. And the truth is, being a stay-at-home-mum is freaking hard, the hardest job I've ever, and will ever do, I have no doubt. One of the things about being a SAHM (or a SAHD, or any other type of full-time carer), is that no matter how many playdates, playgroups, playgrounds, classes or activities you get involved in, there is A LOT of being stuck at home involved. What's more, you are ALWAYS on call. I find it can be incredibly claustrophobic, and as an escape I have sewing. 

(Frankie caught trying to mess with my sewing machine)

So, sewing. I have to admit that my current relationship with sewing is bordering on compulsive. Working on sewing projects, having something to push forward with, has become even more important to me since having children than before. I'm not sure if the amount I think about (if not actively doing) sewing is healthy, but it is helping me get through this insanely intense part of motherhood so I can't see it changing for the foreseeable future. Sewing accesses a creative part of myself, a need to make stuff with my hands, that has always been part of who I am. And clothing has been the main way that I interpret and have a dialogue with society and popular culture since I was a teenager. 

But why has my need to sew amped up so much since becoming a mum? Partly, I think it's the desire to do something that doesn't get almost immediately undone (laundry, washing up, tidying etc.) but I'm also guessing that it's because I don't have much else to get my teeth into at the moment: my 'career' has somewhat stalled, I'm not developing any new classes to teach and I no longer organise the craft market I set up in 2010. And the other things I'm really inspired to do, like planning and going on trips and experimenting with growing food, are currently hampered by a lack of funds and any outside space. 

And then there's the final product. I get a lot of joy and pride from opening up my wardrobe and seeing that more than 90% has been made by me: that I have chosen how I wish to present myself to the world (which I then temper with the realities of my day-to-day life) and made it myself. Or to watch my kids running around having a crazy time, or contentedly chewing on a lego brick, whilst wearing something I made them. 

However, it's hard to square all this sewing that I'm doing (or planning to do) with my desire to live a vaguely sustainable life that does NOT include the constant acquisition of 'stuff'. So in an attempt to justify my out-put, I'm very careful to only work on garments and accessories for myself and my kids that will get used a lot, and I try to sew with my existing fabric stash or with secondhand textiles for a good proportion of my projects (which I know I could do better at). 

(sleepy faces selfie)

So how do I get the sewing get done with these small peops about? Mainly in my head. I'm mentally present when I'm with my kids and they want me to engage with them, but when I'm doing boring SAHM-related stuff like cleaning the kitchen, or breastfeeding in the middle of the night, I'll often be mulling over the next few steps of my current sewing project, or what I should use a certain piece of fabric for. So when they are in bed, or when one is at nursery and other is napping, I can ATTACK. I'm sure most people, including new(-ish) parents, will tell you that they are so much more productive with their spare time once it has become severely limited. 

But breaking it down further, I'd say that I find two types of chances for sewing. There's the longer stretches lasting an hour or two, like after they're in bed and the tidying up is done, or during a Frankie-nap on a Dolores-nursery day. (The annoying thing is that Frankie sleeps in our bedroom, which is where my sewing table also lives, so I have to remember to take everything that I'll need for the sewing sesh out of there and into the lounge before putting him down.) And then there's the micro-sewing opportunities. These are the teensy windows of time in which you can do something small to aid your project. Like the incredibly rare times that they are both playing and no one needs me, I might change over the threads on my overlocker. Or whilst I'm waiting for the potatoes to boil, I might pin a sleeve into an armhole. Often I'll do other SAHM-related activities in those micro-windows, but the thing is that there are always SAHM-related activities you could find to do, so sometimes I claim the windows for myself and my mental health instead.

I've written this blog post like I undertake my sewing projects: in chunks of time here and there, so it's been on my mind for a while. And my conclusion is that I have not drawn a conclusion. I don't know if my current relationship with sewing is entirely positive, but it seems to be serving a necessary purpose. And I guess there could be worse things to be addicted to!

I'd love to know your thoughts on your relationship to sewing, particularly through motherhood. Did you manage to maintain one? If so, any tips? How has it changed as your kids have got older? Did you ever find yourself getting a bit obsessed with sewing when you were going through a particularly tricky or intense stage of your life? 

Thursday, 13 July 2017

Flora and Fauna Secret Pyjamas


So, having fallen hard for Made by Rae's Luna pants pattern, it'll be little surprise to learn that another pair has been whipped up already. But before I made my second pair, I was a good girl and went back and fixed the issues I had with the stress points on my anchor pair. 

Thanks everyone who left a comment making suggestions on how I could both fix that pair, and avoid the issue with future versions. Want to know which piece of advice I implemented? ALL OF IT!!! First, I cut narrow strips of fusible interfacing and applied them to both sides of the seam where the stress points had appeared. I then restitched the seams slightly inside the original row of stitching, which kind of 'ate up' the bits where the fabric was coming apart (unfortunately I couldn't let out the side seams to compensate for this slight reduction in fabric around the hips because of the in-seam pockets). Finally, I topstitched the rise seam allowance down to one side to reinforce the whole thing, and after a couple of wears, these steps seem to have fixed the issue with no further signs of stress so far.... But to err on the side of caution, I took another piece of advice and chose a size Medium, rather than the Small, for my next pair.


Pattern:

Starting with the size Medium has obviously given a baggier silhouette to this second pair. I think I still prefer the look of the smaller, less-voluminous anchor pair, but I didn't want to wreck this amazing fabric if a repeat of the stress points occurred, so I'm trying to embrace this look. To avoid adding any more fullness around the hips, I didn't bother with the in-seam pockets this time. I know that omitting pockets would be close to blasphemy to some sewers/sewists! I like having pockets in my anchor pair, but the finish on this second pair definitely looks sleeker without. Plus, without them, this was a super-quick project. Aside from not bothering with the pockets, the only other pattern mod I made was to shorten the leg length by about 4cm. 


Fabric:

A couple of months ago Claire, Stevie and I organised a little South Coast sewing meetup. We visited the soon-to-be vacated storage space of Ditto fabrics, and Fabric Godmother's unit/treasure trove. We all came away from the latter with a goodie bag that included 2m of this A-MAZING Cobra corsage cotton lawn. I had been taken with this fabric at a previous Fabric Godmother open day, but had been focussing on purchases for specifics projects at that time. To have acquired some cost-and-therefore-guilt-free, was such a treat! An Instagram thread between the meetup attendees followed about what we planned to make with our pieces, but so far I only know of Claire's epically awesome kimono to have been realised from the fabric we were given.


What I particularly love about this fabric is the fine detail of the printed illustrations. They make me think of Victorian tomes cataloging flora and fauna, the type that might exist at the Natural History museum. I'm actually wearing these trousers now and keep finding myself staring at the veins of a leaf or the scales on the snake. 

As for the fabric itself, it's pretty perfect for this trouser pattern. It's light-weight enough to feel airy when worn on a hot day and to hang well with this type of trouser style, but it's also opaque so no undies are on show. Plus, it's a natural fibre, yet doesn't seem to crease. Hurrah! 


Thoughts:

If my anchor Lunas were a major style departure, then I'm taking the journey further still with these. I'm totally in love with them, but because they're not my usual look, they are pretty much wardrobe orphans. I have only one breastfeeding top that works with them, so I'm currently planning a couple of simple tops that will look good with these and other things in my wardrobe. 

Friday, 7 July 2017

Leopard Geranium Dress


Yep. I can't lie, it's another Geranium dress. Even though I've already made about seven of these already, and have even taught other people to make them in a sewing class, this project still had some lessons to teach me. 

(image source: Made by Rae)

Pattern:

I've waxed lyrical about this pattern a number of times before, but I'll say it again: I really love all the different design options included. It makes the planning stage of your project even more fun than usual. For this version, I decided to try the faux-cap sleeve option for the first time, along with the U-shaped neckline cut out and the pleated skirt (minus the side seam pockets). I also added some black shop-bought piping in the bodice seam to add some interest, and to match the back buttons (you'll have to trust me on that because I forgot to photograph the back). This dress pattern isn't the quickest make ever, but it is super satisfying and you're left with such a classic, well-proportioned garment. 

As you can see, the seasonal suitability of this dress pattern can be extended when worn with a long-sleeved t-shirt and tights underneath. Since I made this dress Rae has released a Geranium expansion pack which includes long-sleeved options. Bring on the Autumn sewing plans....


Fabric:

When I was pregnant last year (was that really only a year ago?!) we chose to find out the gender at the 20 week scan, which I duly announced to the world. The incredibly lovely Josie from Fabric Godmother then sent me a bundle of fabric and a sewing pattern for making into boy clothes (a lot of the fabric became this little selection). Because she is so thoughtful, Josie also included a metre of this coral-y/orange leopard print twill (sadly no longer available) to make something for Dolores so she wouldn't be jealous!

When I received it, it had a crispy handle which softened a bit after a pre-wash. I must have chosen the design elements based on my initial assessment of the fabric, thinking the stiffness would hold the U-shape and pleats nicely. Subsequent washes has softened the fabric further still, and revealed that it is actually very drape-y, and I've subsequently regretted those choices. Sad face. 


Thoughts:

This dress has been worn approx. three hundred times since these pictures were taken. Dolores probably chooses so often because the fabric's weight and drape make it pleasing for twirling around in! Sadly, the U-shape at the neckline has stretched out a lot (despite the interfacing used around that area) and the pleats are even less defined. I regret choosing to include any kind of cut out, and for not making the gathered skirt instead. So my takeaway here is: choose what you're going to make from a piece fabric based on what it's like AFTER it's been washed, not BEFORE. My other lesson, that I think I probably already knew, is this: no matter how much faff piping is, including it is always the right decision.

Related Posts Plugin for WordPress, Blogger...