Showing posts with label La Brune. Show all posts

Saturday, 26 August 2017

Summer Sewing Successes and a Fail


I hope you've been having a great summer/winter* (*delete as appropriate). I've been having a fun (and exhausting) summer trying to entertain my mini peops whilst Pat has been working and studying hard. We're going on a little late-summer break for a few days tomorrow, so I want to quickly share with you the last of my summer sewing projects. 

I begun this season with next to no seasonally appropriate clothes, but thanks to some strategic sewing, based in part on my findings from #MMMay17, I've been able to put together a decent selection of warm weather stuff. I've almost exclusively been wearing:
All but the last four items are recent makes and they reflect the changes my personal style seems to be going through. Out with the retro-y, Rockabilly-lite, and in with whatever-you'd-call-it. Anyway, as great as these pieces have been, what I found I was still missing was really warm weather clothes. I still didn't have any sleeveless tops or shorts (which is evident thanks to my pasty white upper arms and legs!). To fill those gaps, I made these last two summer projects, which also may be my favourites!


Top:

Whilst planning my first version of this pattern, I'd spied some other sewers on the interwebs leaving the sleeves off the Delphine et Morissette La Brune pattern. I decided to follow suit. I'm not a fan of my upper arms, but a sleeveless La Brune is a great solution because the shoulder ruffles provide a focal point that steers the eye away from that area of my arms. Witchcraft.  

I was able to squeeze this top out of the remainder of anchor print light weight denim that I used to make my first pair of Luna pants. It's quite a loose weave, which on the one hand is ideal for a loose fitting summer top (and much softer than the stiff poplin I used for my first version of this pattern), but on the other made the ruffle application a bit of a headache as the raw edges had a tendency to stretch out due to all the handling. I did the best job I could, and I don't think anyone would notice that it has bubbled a little next to the ruffles unless I forced them to!

Once the top was nearly complete, I tried it on and decided to cut a tiny bit away at the bottom of the armhole. I then bound the raw edges in the same way as the neck hole using the method used for the neckline of the Scout tee. I bought some ready-made bias binding rather than making my own because I didn't think the loosely woven denim would provide enough stability to the neck and arm holes. Aside from omitting the sleeves, I also made the shoulder ruffles even narrower than I did on my first version, and I now think the proportions are spot on.  


Shorts:

For the shorts, I also revisited a sewing pattern I had previously had a go at. When I tried the Sweet shorts pattern three years ago, I found the sizing to be way too big. So this time I started with a whole size smaller, and made a toile (muslin) that Claire kindly helped me fit. I ended up making a number of changes:
  • started with a size smaller than my measurements correlated to
  • made the leg length about 1" shorter
  • added width around the waist (about 5cm in total at the top, if memory serves, blended out to nothing at the hips)
  • shortened the front rise by about 1cm
  • pinched out some fullness from the back leg at the hem


I made them in this navy suiting that has been in my stash forever. I have no idea what the fibre content is, all I know is that it doesn't need ironing (whoop whoop!). I still have a ton of this fabric left, so I'm sure it'll pop up on this blog in another incarnation some day. I used some turquoise jap silk from my stash for the pocket bags but did a French seam around the curve for a neater finish than overlocking would have resulted in. 

I added extra topstitching in a few places as the fabric wasn't super-responsive to pressing and I wanted all the seam allowances to lay flat. I think topstitching down the seam allowance along the front rise has resulted in some sort of creases radiating outwards from that area, but it's probably only noticeable if I stand stock still and pointed them out to you. The other tiny flaw that something is compelling me to share with you, is that my top and bobbin threads must have been from different reels because the topstitching that keeps the hem facings in place is a slightly different tone of navy to the rest of the topstitching.

Anyway, those things aside, I'm not sure that these photos are doing them justice but these shorts have a really smart, polished look IRL. They are still a bit big, but I expect to gain some weight once Frankie finishes breastfeeding, so that's fine. A lot of work went into them, as much as you'd put into a nice pair of trousers, so I hope I'll get many years of wear out of them.


FAIL:

In the interest of equilibrium, I thought I'd share a recent FAIL project with you too. Sewing bloggers rarely seem to share the project attempts that didn't work out. I usually don't either because I doubt it's very interesting to you readers, and also because I just want to forget about a FAIL as quickly as possible! But I'm worried that without ever sharing a FAIL, those who are new to the sewing game may get an inaccurate sense that every sewing project will, or should, work out. Lessons always have to be learnt that way, it's an important (if annoying) part of improving. But due to my new policy of toiling every-damn-sewing-project that doesn't use a TNT pattern these days, I've managed to avoid having a FAIL for ages. 


So my plan here was to make a top to prevent my flora and fauna Luna pants from being a wardrobe orphan. As I've mentioned previously, I've been trying different styles and silhouettes lately (which led me to making the Luna pants), so I decided to try the free Deer and Doe Plantain T-shirt pattern. I must have mentioned my plan to Claire, because she very sweetly printed it out for me, it's one of her absolute favourites and she's made a million. I had this light-weight, slinky coral jersey in my stash (also from Claire! What a friend she is!) and I thought the colours would work well. But that's about all that did work well...

I tried it on before hemming (see above) and it was a total 'meh'. It didn't skim my figure like some sort of contemporary French siren as I'd hoped, instead it felt really frumpy. I fiddled with the fit a bit by taking in the side seams here and there, and in the end I salvaged the neckline and reworked it entirely using the TATB Agnes top pattern that I've have many successes with previously. But even that didn't work! The fabric was so thin that it showed EVERYTHING, including the exact shape and position of my breast pads, every detail of my bra, the ingredients of my most recent meal. I was really annoyed because I'd made a nice job of the neckline, but I'd had to finally admit defeat and throw it into the textile recycling bag. GAH.

Thoughts:

The anchor La Brune and navy Sweet shorts have been such a success that I'm firmly over the coral Plantain FAIL. I've worn this outfit as often as the weather has allowed since their completion, both feel really comfortable, even though the shorts sit a bit higher on my waist than I'm used to. And the sleeveless-ness of the top feels so nice that I can't wait to make more sleeveless tops for next summer. I fancy trying Jennifer Lauren Handmade's Hunter tank, which should work well with these shorts thanks to the high waistline, plus either Made by Rae's Gemma tank or Wiksten's tank top. Plus next year I really should finally make the Deer and Doe Chataigne shorts pattern that has been lurking in my stash for a couple of years. 

What about you? What have been your most successful recent warm weather sewing projects? Any FAILS you'd like to vent about?! 

Monday, 5 June 2017

Spoonflower British Blog Hop et La Brune


Look! I made something fancy! That must make me fancy, right? Thought so. By the way, my definition of 'fancy' is something that is not suitable for running around a play park in. I've got a whole lot to say about this project, so let me crack on...


So this project was instigated by an invitation to take part in Spoonflower's British blog hop. They want to promote the fact that they have a second factory which is based in Berlin. This means, for British sewers at least, no nasty surprise taxes or import duties, plus quicker delivery times. I was offered my choice of fabric to make a garment from and blog about it. Seeing as I am very much in the business of making garments and blogging about them, I told them to count me IN. 

(image source: Natalie Grasso)

Fabric:

As you may know, Spoonflower offer a fabric printing service where you can either design your own print or choose one from their catalogue, and get it printed on one of their base cloths. Having never tried a fabric printing service, I was interested in trying out designing my own print. But my primary aim with this project was by the end to have a garment that was very 'me' and I would love wearing. So I had a think about the inspiration I've collated over years on my good old Pinterest boards, and thought that a striped Breton type design would most fit with my style and be most likely to be worn.  

(image source link broken)

I wondered if I could create a kind of hand-drawn striped design, as a spin on the classic Breton stripes, similar to the images above. However, then I fell down the Spoonflower rabbit hole. Turns out there are hundreds of thousands of AMAZING designs already on there to choose from. For a number of days I got completely obsessed by typing in a word into their search box (cacti! flamingos! sketchy! Mexican!) and seeing the many many different interpretations on each theme. I was really into the work of one particular illustrator/designer who annoyingly I can't remember the name of now, but at the last minute I pulled myself back and remembered my wearable-spin-on-a-striped-Breton plan. After typing in 'striped' and searching through the results I found this print. It was almost exactly what I had in mind, and no doubt much better than what I could have rustled up myself in the limited time frame, so I plumbed for that one.  


Having found the print design, next I had to pick the fabric type. My first thoughts were to go for a knit, because I seem to almost always sew with and wear knits these days. But then I had a sudden epiphany: this was a chance to make something more special than a t-shirt variation, and that I could pick a fabric to make the La Brune sewing pattern I had just bought (more on that in a bit), which required something woven but I had been drawing a blank on. I was a little disappointed with Spoonflower's options for finer-weight wovens. I guess I was looking for something natural with some drape, or a lawn perhaps. But my contact at Spoonflower was helpful in guiding me to this cotton poplin that would probably be fairly suitable for the pattern I intended to make.  


If you find yourself ordering from Spoonflower, I would advise paying close attention to the usable width of the fabric you're ordering. Thankfully I did, and ended up having to order 3 yards for this blouse. I could have got away with 2.5 yards but it isn't possible to order half yards. I'll make Frankie some shorts one day with the leftovers. This fabric is not cheap (this poplin is $20 a yard), which would have been an expensive mistake if you didn't order enough. When it arrived I immediately fell in love with the print, and the fabric itself felt decent quality, although not quite as soft as I was hoping for. I cut off a strip before pre-washing so I could compare the colour afterwards as my big concern with these printed services is that the design will fade significantly. I washed it at 30 degrees, which is what I wash everything on anyway, and the navy colour has faded a tiny bit, but not as much as I feared. It'll be interesting to compare after several washes... 


Pattern:

I think this fact deserves analysing in its own blog post at some point, but recently I've become obsessed with French-speaking sewing blogs, Instgramers and sewing pattern designers. Miraculously, this has coincided with Pat (Mr So Zo) teaching himself to speak and read French (he's going to train to be a French and Spanish teacher next year). Anyways, I bought this PDF pattern pictured below, named La Brune, by Delphine et Morissette. Thank goodness for Pat's French assistance because the method of purchasing her patterns involves messaging via a contact form and then completing the transaction via email, rather than through the predictable online shop format. For all I know she speaks perfect English, however I thought it was only polite to attempt to communicate in French.

(image source: Delphine et Morisette)

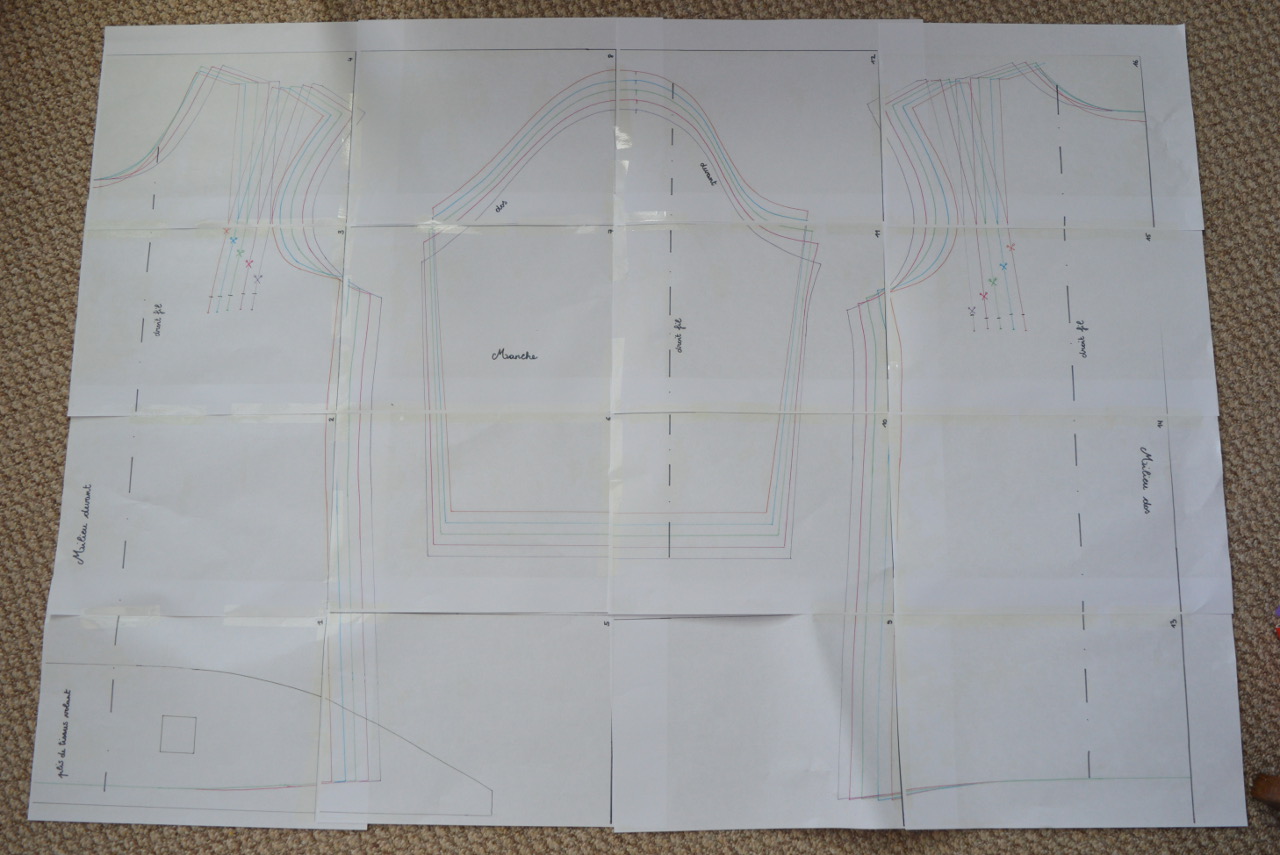
I must admit, considering how gorgeous and flawless her website, photography and garment designs are, I was surprised by the PDF I received. The instructions were a very basic Word type document with no step-by-step illustrations or photos. In fact, the construction steps weren't even numbered and, even if French was your native language, you'd have to have quite a lot of sewing experience under your belt before you tackled this pattern. For example, the pattern advises to apply bias tape to the neckline, with pretty much no more detail than that. So you'd have to have worked with bias tape previously, or be up for learning quick smart, before knowing how to finish the neckline. Pat and I translated hard and scratched our heads for some time over a few of the steps, but although I don't think the instructions were as clear as they could have been, it made sense to me once I had the pattern pieces cut out in front of me. 


The pattern itself (pictured above) had not been digitised, and with no clear borders it was tricky to tape together. I'm not dissing this pattern, or the work of the designer, but I'm trying to make clear what you'll get if you buy this pattern. I think that us sewers/sewists have developed certain expectations of PDF patterns, even from the most kitchen-table based pattern design outfit (like mine!), and we've become used to having our hands held through each step of the pattern prep and garment sewing processes. But equally, being able to make a nice, wearable garment from a pattern that makes you work harder is a great feeling.

A 1cm seam allowance had been included to the pattern pieces, however I would have liked a few more notches to help put the pieces together, particularly on the sleeve head. I found that my measurements spanned two sizes, so I graded between the 38 for the top part to a 40 at the hips. I ended up taking that extra in again so in the future I'd make a straight size 38. Before cutting the pattern I also compared the pieces to the Grainline scout tee so I could be certain that it'd fit me.


Having done a Google image search to check out other people's versions of this pattern, I decided to rein the volants, sorry ruffles, in a bit. I think I shaved off about 2.5cm at their widest so hopefully they don't look too much like wings, but I think I could have taken off a bit more considering the stiffness of my fabric. The shoulder line was a bit too angled for me, so I straightened that out a touch. I also widened the neckline slightly to make getting it on and off a bit easier (this blouse has no fastenings so needs to be pulled on and off over the head) and I reshaped the neckline to a more pleasing scoop, which I'm really happy with. The final pattern mod I made was to the sleeves. The original pattern design has 3/4 length sleeves, but when I tried it on, they felt too restrictive around my elbows so I shortened them to this half-sleeve length.


Thoughts:

Well, making this blouse was a real experience, I'm so grateful that I got the chance and the push to do so. Choosing my dream fabric print was fantastic, and also created quite a lot of pressure to get this garment right (particularly after my recent FAIL). I didn't have time to make a toile/muslin, so I had to avoid and/or iron out any issues with lots of measuring before choosing my size and trying it on multiple times throughout the construction process and addressing each necessary tweak. Having put the work in to figuring out the construction method, and in to getting it to fit nicely, I definitely intend to use this pattern again. On top of the changes I listed above, I'll also extend the bust dart so that it comes within vague orbit of my bust point (it's in a different galaxy at the moment), and I'll widen the bottom of the sleeves so I can make a 3/4 length sleeve version that feels nice to wear.

Would I order from Spoonflower again? Possibly. There are so many seriously incredible print designs on that site, and I'd like to get my hands on a swatch book to see what the other base fabrics are like. I would be tempted to order something again for a special project, but it would have to be a project that I had time to toile beforehand so that I could enjoy the construction process, rather than it being a bit of a white knuckle ride!


Related Posts Plugin for WordPress, Blogger...