Showing posts with label fitting. Show all posts

Sunday, 15 May 2022

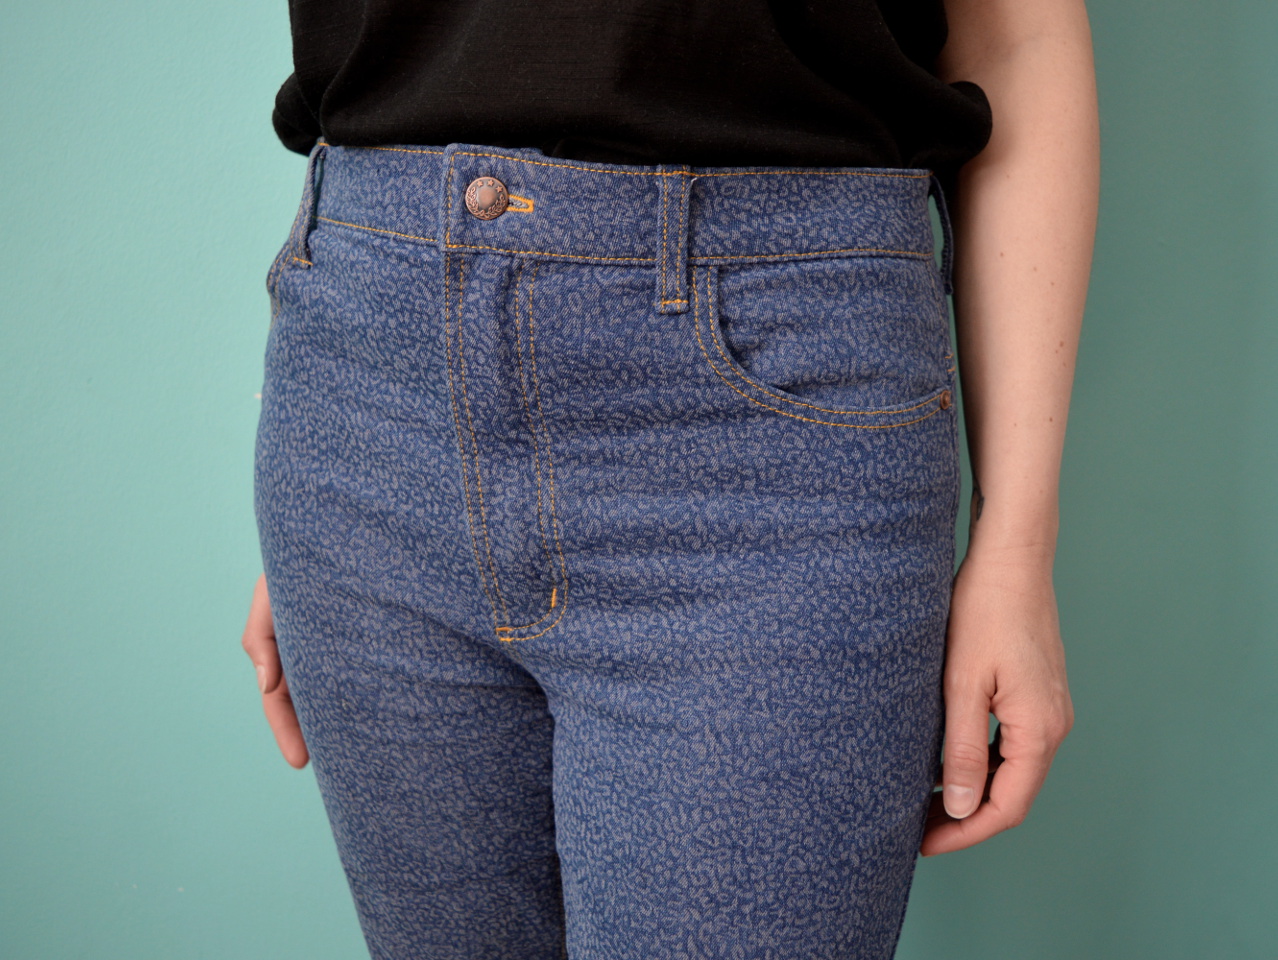
Leopard Print Ginger Jeans and a Realisation

It's slowly been dawning on me that I can't really wear the style of jeans that I prefer, and also feel comfortable AND have them stay on my body properly. And honestly, I think this has always been the case. What I mean by this is that, the slim/skinny legged jeans with a low-rise, hipster waistline which I love the look of just don't work for my body. I've always had a bit of a tum, even when I was in my 20s and weighed the least in my adult life. I've always found the waistline of jeans cut in to my tum uncomfortably. I got so used to undoing the top button of my jeans each time I sat down after years of doing so, but I've grown tired of that now. 

Through the power of sewing my own clothes, I tried to solve the issue by grading between two different sizes for the waist and the hips-downwards. This has never worked well because they end up too loose at the waist and often slip down a bit. 

Having gone on a journey which resulted in my workwear denim Lander pants, I came to the realisation that I need extra space around my tum only, not all around the waist. The full-tummy adjustment I did on the Lander pants worked really well, and for the first time ever I have a pair of fly-front jeans that I can sit down in without needing to undo the button of. 

Naturally, I wondered if I could apply the same magic to a slim/skinny legged pattern, seeing as that is the type of jeans I wear most often. And what I then realised it that I don't think I can make that adjustment on a low- or even medium-rise style and expect them to stay up. 

So what I ended up doing for this project was to trace the high-rise version of the Closet Core Ginger jeans pattern (which I have previously made with low- and medium-rises) as my starting point. I already own a medium rise version which are still in action, so I was able to try those on with the button and fly undone which allowed me to assess how much addition width I'd need to properly accommodate my tum, AND where the additional width should land. As I've discovered through watching videos and reading posts about full-tummy adjustments, I knew I'd also need to add some additional height at the front. 

Because the Ginger jeans pattern calls for stretch denim, I decided not to add the entire additional width it would appear I required, because the stretch content might result in them becoming too accommodating and therefore not staying up!

As you can see from the side view (pictured above), the side seam is pretty much in the correct position: perpendicular to the ground. That's one of the main clues that tells me this adjustment worked. The other is that I can sit down without having to undo the button!!! Woo hoo!!!!

The fabric I used was a seconds/remnant from Fabric Godmother. It's a very soft stretch denim with this super-cute leopard print pattern. I like how the jeans look like pretty standard blue jeans from afar, but the little leopard print becomes visible when you look closer. It was a remnant because a fade mark had occurred along the folded edge when the fabric was on the bolt. I was easily able to avoid the fade mark when cutting out these jeans, however. 

Although I still don't love the look or feel of high-rise jeans, I do love generally how comfortable these jeans are. I can wear them all day without wanting to take them off the second I get home. And honestly I never wear my garments tucked into my jeans as I am in the photos: I did that to show the fit of this garment around the tummy. I forgot to take a photo of these jeans shown seated, but I'm wondering if this adjustment might be of particular use to some wheelchair users who would like to wear skinny jeans but find them uncomfortable around the waist. I'm pretty evangelical about this adjustment because I don't think it's one that many sewers know about. 

Now that I have this adjusted pattern, I plan to make a couple more pairs in different colours to flesh out my wardrobe a bit. Currently I own a few tops and blouses that I love and would pair well with skinny jeans, but don't look good with the two blue pairs I know own.  

Friday, 15 December 2017

Jeggings Attempts #3 and #4


It's been a journey, guys. This post represents the large amount of time and mental energy that has been taken up by this quest for successful jeggings. Remember when I was talking about ways we can pursue making great, long-lasting garments, thus making sewing a more sustainable activity? Well this whole journey has definitely ticked a whole load of those boxes, although I certainly couldn't muster up the energy to attempt to perfect every project/pattern to this degree!

But let's back up. If you're interested in the details of where I'd got to with The Saga of the Jeggings, then please head to this post to read about my first and second attempts. The black pair (#2), despite their issues, have been worn HEAPS. Like, almost daily. The quality of the denim I used is amazing. The colour has faded quite a lot, as you'd expect with repeated wear and laundering, but they keep their shape so well, and by the end of the day they haven't sagged at all. But, if you already read that post then you know I was pretty stumped about where to go next with improving the fit.

A while ago I'd bought, but not fully watched, the Craftsy class called The Perfect Jeans with Jennifer Stern-Hasemann (my new favourite person). I returned to that class after a tipoff from TATB employee and general amazing lady Vanessa (who had read my Jeggings Attempts #3 and #4 post so knew of my troubles) that it may hold the key to my fit issues. I watched the relevant sections of the Craftsy class but still felt unsure of how to proceed. I then spent a number of evenings reading pretty much all the fit issue questions posted by viewers in the class notes and Jennifer's responses to them, partly because I was finding it fascinating, but mainly in the hope that someone would be having the same issues as me. Then it finally dawned on me: I could just bloody ask Jennifer myself! I was a little concerned that she'd tell me that her class was about fitting 'proper' jeans, not jeggings, but as a paying customer I was hoping that she'd throw me a bone and offer some advice anyway. She did.


Jennifer suggested I scoop out the crotch a bit (see the red line in the picture above that she helpfully drew on). The aim of this was to create more space for my bum so they didn't ride down so much at the back when I sat down, whilst also to picking up some of the excess length I had on my black (#2) pair. I also lowered the waistline by 2cm for comfort, shortened the leg length, tapered the leg at the ankle a bit and repositioned the pockets. The navy pair you see below are the result of making these changes.


Thoughts:

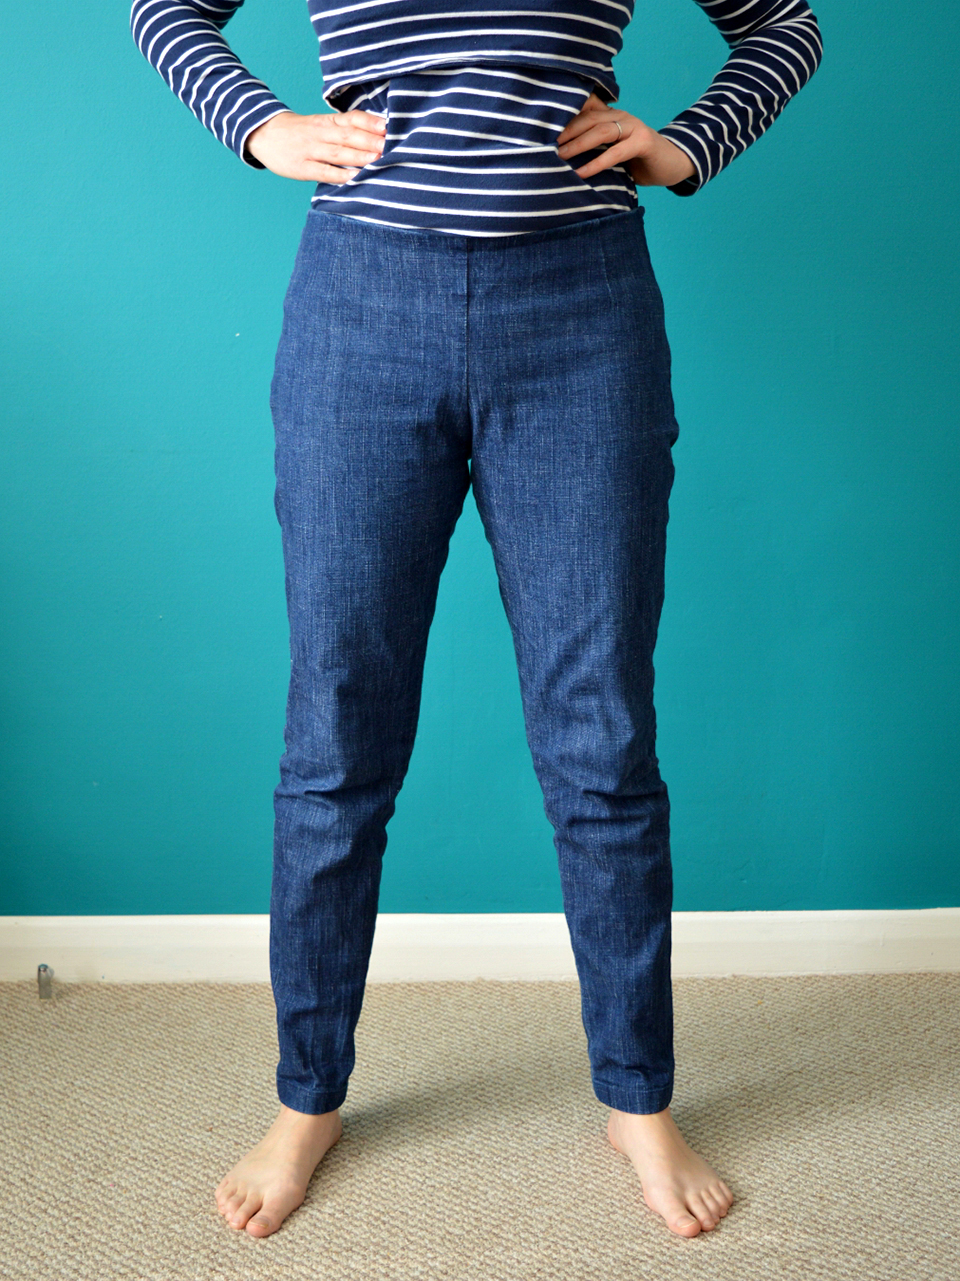
Better, no? I used some cheap stretch twill from Fabric Land in Brighton that has four-way stretch. I'm not sure I've knowingly encountered a woven with four-way stretch before, but it's made for very comfortable jeggings. They are basically the only pair of trousers/jeans/jeggings that I don't change out of as soon as I get home (I'm wearing them now, in fact). As for construction, I didn't bother with any real or faux felled leg seams this time, just closed ones on all seams. I also selected a very narrow lightning stretch stitch on my machine as a few stitches have popped around the waist seam on my black (#2) pair. I spent quite a bit of time creating some gently shaping around the calf so that they fit really nicely round there which I'm super pleased with. 

However, there's the following:
  • some excess fabric around the back thigh
  • they ride down at the back a fair bit when I sit down 
  • the pockets are still too low and too close to the side seam  
  • and now I've got some kind of knock-knee issue going on
Back to Jennifer...


She suggested I corrected the knock-knee by slashing both the front and back pattern pieces at the knee and shifting the bottom half towards the inseam about 1/2", then reshaping the leg seams (the adjustment in red labelled 1 in the picture above). (We decided against making the adjustment labelled 2 in the end.) I also extended the back crotch point, but only about 1/4", to help a bit more with the riding down at the back when I sit. Oh, and added some length back to the hem. The results (#4):


Thoughts:

Pretty good, I hope you'll agree. Well, that's what I thought when I first put them on. Then I wore them for a morning and they kept riding down at the back every time I bent down (which with a tiny toddling little guy around is OFTEN) and it was driving me crazy. I was so desperate to take them off as soon as I got home, that I must confess, I changed out of them before I even unclipped Frankie from his pushchair! 'AGH', I thought, 'They're a bust'!. I put it down to this cheap stretch twill (once again from Fabric Land, I'm not proud) that has only two-way stretch. 'Maybe I can only make this pattern in four-way stretch', I thought and prepared myself to chuck them in my textile recycling bag. Then I checked and found that the black denim that my #2 pair is made from only has two-way stretch (albeit much better quality), so I had a re-think. I went and bought some wider, sturdier and better quality elastic, then unpicked and remade the waistband with the new elastic inserted. It made the world of difference and these now stay in place as I move about, bend down etc. Phew! I think the lesson I need to take away from this pair, that I already mentioned in my sustainability post but clearly hadn't taken fully on board, it that quality fabric and notions can make a massive difference. 


Next step:

I don't think there's anything further I can do to this pattern. I've accepted the slight excess of fabric around the back thigh as necessary for being able to walk and sit down properly. This pattern is as close to perfection as I think I can get. Jennifer agrees. This week I went back to my black (#2) pair and re-hemmed them to make them a bit shorter, then unpicked and restitched the waistband having lowered the waistline by 2cm. Now I have three wearable pairs of jeggings: black (faded to grey), navy and red. I'm particularly thrilled to have red ones, despite it probably being the worst quality fabric of the three, but I've had my eye on owning some red trousers or jeans for years. That's probably a sufficient quantity of pairs of jeggings to own. It's great to know that I've got the pattern ready as and when any of these become unwearable. However, I've got a gorgeous piece of turquoise/blue stretch denim in my stash (this I think), and I fancy pushing myself a bit further. I'm talking 'proper' jeans. Like, with a yoke, belt loops, fly front, the whole nine yards. Jennifer thinks I can adapt this pattern a bit to become a proper jeans pattern, so watch this space for that.  

Thursday, 16 November 2017

The Unsustainability of Sewing


Have you heard about Earth Overshoot Day? Its definition (that I pilfered from this excellent website) is the date that marks when humanity’s demand for ecological resources and services in a given year exceeds what Earth can regenerate in that year. We maintain this deficit by liquidating stocks of ecological resources and accumulating waste, primarily carbon dioxide in the atmosphere. You want to know when 2017's overshoot day was? 2nd August. How depressing is that? So, seeing as governments and businesses aren't taking committed action fast enough to reverse this, it also has to be up to individuals to take steps, where we can, to cut our consumption and therefore the use of energy and raw materials. And let's face it, those of us who have the time to write and read blogs about sewing are probably lucky enough to live relatively comfortable lives, most likely in a developed country. We're the individuals that are in a position to make some changes.

(my newly shortened gingham ruffle Tova dress)

So I've been thinking a lot lately about the unsustainability of sewing, and it has lead to a fair dose of soul searching. I used to think that making my own (and more recently my children's) clothing was a way in which I was making a contribution to reducing my carbon footprint and being more sustainable. In fact, as you may have noticed, the sub-heading of this blog is 'Sewing Sustainably with Style'. (Granted, I came up with that when I was making a lot of garments out of reclaimed textiles, usually secondhand clothing that otherwise might be heading to a landfill, which is probably a more environmentally sound approach than making stuff from brand new fabric.)

My thinking was: if I was making my own clothing, then I wouldn't be contributing so much to all that energy used by hauling raw materials, fabric, trims and finished garments around the globe, from cotton field to the shop floor. I would only be contributing to the fabric production and distribution bit, and powering my sewing machine and heating my iron. And I guess that that is true to a certain extent, but more recently I've been facing up to the fact that sewing is an energy and resource hungry pass time, and that it is unlikely that the carbon and water footprint of the stuff we sew for ourselves is much different than something we may have bought from Topshop. For example, making things in many multiples rather than singly saves a lot of energy per item, and fabric through tighter layplans. A lot has been written in recent years about the ills of the fashion industry, but I have yet to hear about an energy and resource study that makes a direct comparison between mass-produced and home sewn garments, anybody know of one? If one has been done, sadly I don't think us home sewers/ists would come off lightly.

My feeling is that the most sustainable way to dress yourself has to be by simply wearing the garments we already have, and when those things wear out, replacing them with second hand items. However, I'm not advocating that we all stop making our own clothes; you'll have to prise my sewing machine and fabrics sheers out of my cold, dead hands. There are heaps of benefits to sewing your own clothing, Tilly unearthed many of them whilst researching her fascinating provocation paper back in 2011. So my thoughts turn to how can we make home sewing a more sustainable thing to do?


Whatever way I approach this question, I always draw the same conclusion: we have to use our skills to make things that we want to wear many many times, and that will last for years. Obviously, that's probably not going to be possible straight away if you are new to sewing, it's impossible to learn without making mistakes. But when you've got some skills under your belt and know a bit about what you like, here's some things we can all do to ensure that we're sewing as sustainably as possible:
  • Use the best quality fabric you can afford. I know that I definitely plan a project more carefully and take my time to get a great fit and finish when I'm using some really special fabric. Not only is the outcome likely to be more to your taste and body shape, but a better quality fabric will probably hold up to repeated wear and laundering. 
  • Make a toile/muslin. Although making a toile/muslin as well as the finished garment effectively uses twice the fabric than just ploughing ahead with your 'fashion fabric' (not sure why I hate that term so much), but that toile can help iron out any potential fit issues that will lead to a successful finished garment. A 'meh' garment that gets worn only a few times, or  never, may well have been avoided. Plus, once you've perfected the fit of a sewing pattern, you're more likely to make multiple versions that you know will be a success, so working through that initial toile/muslin would have been even more worth while.
  • Returning to an imperfect make. If you can dig deep and find the patience to rework a sewing project that wasn't quite right, you are likely to thank yourself later. Remember this gingham modified Tova dress I made a few months ago?  I eventually mustered up the arsed-ness required to make a very simple modification, raising the hem so that the proportions of the garment worked better, and now it is literally my favourite garment I own and I feel fabulous in it (see pics above). 
  • Analyse your style. Like many sewers, I use Pinterest to ascertain exactly what themes, styles and colours of clothing appeal to me. I then frequently refer back to my boards for inspiration and to check that a new garment project idea is likely to be something that gels with my style and I'll really want to wear. Personally, I collate images of RTW (modern and vintage), other people's creations, sewing patterns I'd like to own, kid's clothing ideas and lots of other categories. Of course, you then have to apply another layer of analysis to check that what you'd like to make is also something that fits with your lifestyle, but I really think that Pinterest has been a huge help in learning about myself and reducing my number of sewing fails. I wish Pinterest has been around during those first couple of years when I was making my own stuff...
  • Getting a good fit. This is linked to the point about making a toile/muslin, of course, but it's worth emphasising again I think! Making a garment that not only look good on you, but also that feels comfortable and non-restrictive, will keep you reaching for that garment rather than passing it over when you're getting dressed in the morning. Let's be honest, if a garment is really comfortable, we'll often even over-look the 'looking good' bit! Hands up who's continued to wear maternity clothing for more than a few weeks after your baby was born... There is a TON of fitting advice on the interwebs, as well as many amazing books on the subject. Recently, I subscribed to a jeans fitting class on Craftsy which includes access to an amazing teacher that you can post questions to and share photos with who will respond with expert advice. 
I'd love to hear from you about this. Do you think 'sustainable sewing' is possible? Is the impact of this pass time a concern you've had? Can you think of any other tips for eliminating sewing project duds and making long-lasting clothing you love wearing?

Thursday, 10 August 2017

Jeggings Attempts #1 and #2


By making my versions of the Luna pants pattern, I successfully created some very wearable trousers whilst neatly side-stepping the trouser-fitting headaches I was having in the spring. So I thought I'd try to pull off the same trick (making wearable trousers whilst side-stepping my trouser fitting issues) by recreating my favourite secondhand RTW jeggings. Here's how that went....


Version #1


Pattern and construction:

Because my old jeggings (the washed-out black ones pictured below) were very much on their last legs, I decided to cut them up so I could lay the shapes out flat, rather than trying to take a pattern from them still as a 3D object. I omitted the back yoke, which didn't seem to be adding anything in terms of shaping, and made the back in one piece instead.


I kept the cut up pieces of dissected jegging so I could take some hints for construction. I decided, as per the originals, to make faux-flat felled seams on the outer legs by making closed seams then pressing and top-stitching down the seam allowances towards the back. The inside legs are regular closed seams. I made the pattern full length, as per the originals, but my #1 copy were cropped due to fabric restrictions.


Fabric:

I've had my eyes peeled for decent jeggings-appropriate stretch denim for a while but it's been pretty illusive. Stretch-denim in general seems to be fairly common, but I need the really stretchy, four-way stretch stuff that's going to behave more like leggings fabric and can deal with an elasticated waist design, rather than the type of denim that you'd buy for making regular jeans that happens to have a small amount of give in it. There's probably a way to describe what I'm talking about using percentages of stretch, but I don't know what that's about yet. Anyway, when I found a 95cm remnant of suitable fabric at a Ditto sale, I snapped it up, even though it wouldn't be quite long enough for the pattern I had copied.


Thoughts:

Generally speaking, for a first attempt they weren't too bad, and I've worn them masses in the two months since I finished them. I even like the necessity-is-the-mother-of-invention cropped length, which has made them really useful for the summer. And I thought I could get winter use from them if worn with long socks and knee-high boots.

So, the bad stuff. The first thing that grabbed my attention was that the overlocking and my faux-flat felling of the outer leg seam felt very noticeable. I probably should have overlocked away at least 0.5cm of the seam allowance before the top-stitching. However, I don't know if it's the wearing and washing softening up the outer seams, or just sensory adaptation, but I realised the other day definitely don't notice it as much these days.


Also, I'd say that overall they are a little big, probably because the fabric of the originals didn't have quite as much stretch as the blue Ditto fabric so the pattern is a little bit too large for this particular fabric. And they are also way too high, particularly at the back. I like that I can bend over in a playground with absolutely no chance of scarring anyone for life, but I have to yank them up from time to time as I don't think it's helping the baggy-bumness.


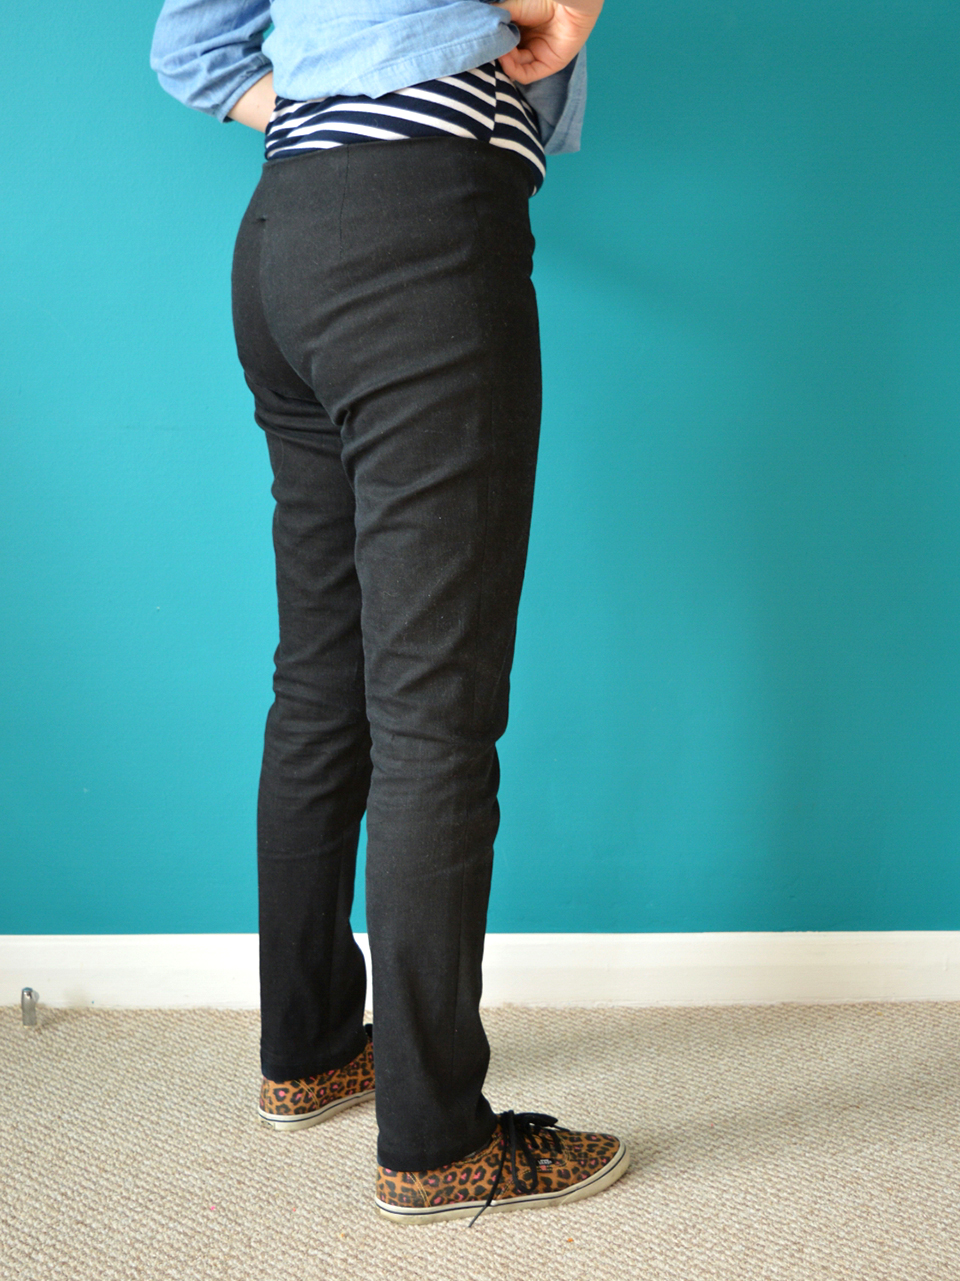
Speaking of which, check out the horrendous-ness of all those under-bum wrinkles in the image above. I was sooo tempted not to share the back view of these, but then I really need your hive-mind opinions. After all the wears and washes these have had so far, I think the fabric has got a bit saggy, especially by the end of the day which is when I got Pat to take these photos. However, I fear those wrinkles may not be all down to saggy fabric and that some pattern adjustment may be required. Annoyingly, I didn't give the under-bum much notice when I first made these so I'm not sure what the fit in that area was like when the fabric was still very fresh and new. I'm really hoping that it IS the fabric rather than an issue with the pattern, because considering all the hassles I had/am having with the fit of the slim-legged, side-zipped, Ultimate trousers, any visible pooling of fabric/wrinkles under the bum is making me feel like this:


via GIPHY


Version #2


Pattern and construction:

After the relative success of #1, which I view as a wearable toile, I was excited to crack on with another pair soon after. So I lowered the height of the waist by 2cm at the front and 3cm at the back (blending between the two at the sides). I decided to leave the overall size/width the same in case my next piece of fabric had a better recovery/wearability than the blue Ditto stuff. I was also excited to try out the full-length of my pattern, which I'd kept accurate to the originals in length and width round the ankles.


As for construction, I learnt my lesson and made proper flat felled seams on the outer legs to hopefully reduce/omit the discomfort in that area. I also chose a quicker and less faffy method of attaching the waistband/elastic channel than I did on #1 that I won't bore you with. I was also feeling pretty confident going into this version, so I decided to add some patch pockets for extra interest, seeing as I wasn't using contrast top-stitching this time round.

Fabric:

If it's possible to be in love with a piece of fabric, then that's what's happening here. This version is made from some super stretch denim from Fabric Godmother. I'd seen it at their studio space during our recent Portslade bloggers' meet-up, but I didn't buy any because I was on a budget (which obviously got blown anyway). But I kept thinking about it so emailed Josie to check she still had some in stock in advance of their July Open day, hoping she'd put some aside for me if it was running low. Because she is the more generous and thoughtful lady, she sent me a length for free instead! I'm not sure if she getting any more of this exact denim in stock (might be worth emailing her), but there are a lot of other fabulous similarly-stretchy denim on their site, including this blue that I also have some of.


Thoughts:

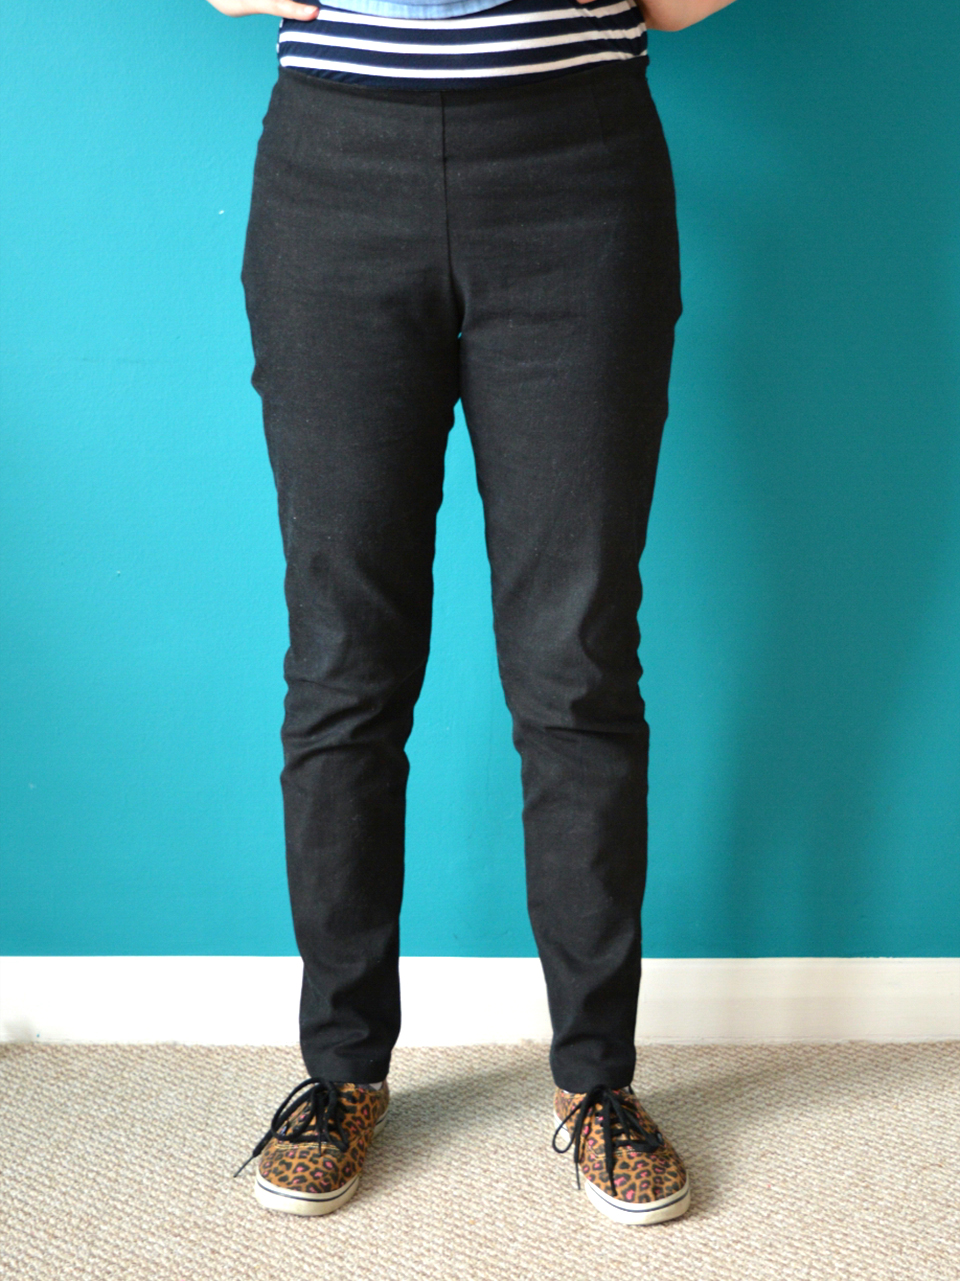
Ok, first the good points. These feel really comfy and generally I think they look pretty good, therefore I've worn them heaps since I finished them. These are a more recent make, they haven't had as much wear or washing as #1, however I'm pretty sure that they will fair better over time. These pictures were taken when they were fresh out the wash, but you'll have to trust me that the black denim doesn't get so saggy by the end of the day. The real flat felled seams have worked a charm and I don't notice the the outer leg seams at all.

Now for the faults that I think I can improve on without inducing a headache. They still sit too high on my waist. It may not look like it, either in the flesh or in photos, but this is a personal comfort thing. When I wear them now, I tend to roll the waistband down to get it sitting where it feels most comfortable to me. When I can muster the patience, I will go back and unpick and re-do it for a lower waistband permanently.

Another simple flaw is that my patch pockets are sitting too low and too far to the outer leg seams. The height doesn't really notice too much as I always wear tops that cover at least the waist area of these jeggings (I've just got my top tucked in for these photos so you can see what's going on), but for future versions I need to make a note to position them a touch higher.

I also think the wrinkles around the knee are because the jeggings are too long in the leg, so hopefully I can make those disappear easily enough.


Right, time for the tricky stuff. It may not have escaped your attention that, although not as pronounced at the rear view of version #1 there's still some wrinkles under the bum on this pair as well. I think this could be for one of three reasons (or a combination of the three):

1) After an aha-moment whilst listening to the Melissa Fehr episode of the Crafty Planner podcast, I wondered if those wrinkles are a pooling of fabric caused by the fabric being pushed down because the fit is too tight across my bum (although they don't feel it). If that's the case then I do not have a Scooby-do (Cockney for clue) how to change my pattern to correct that.

2) Perhaps less visible in these photos, compared to the originals, like version #1, version #2 still feels too room-y around the pelvis and thigh area. The waist fits fine because I adjusted the elastic to be the correct length so they pull in sufficiently at the waist, but if I were to take in the side seams a smidge from the waist to the knee my theory is that there's less likely to be any wrinkles if the fabric is stretched more across my body. I guess this route would lead to a tighter, more sprayed-on effect like you see many of the 'youth' rocking these days. Annoyingly, I can't simply nip these in to test that theory because of the flat felled seams.

3) The issue could be the same one that my trouser-fitting saga is throwing up. I might need to do some 'scooping out' of the back rise, or lowering the back crotch curve, or taking in the in-seam (although the latter may have cause me problems when I did that to my black pair of Ultimate trousers) because of some kind of low-bum issue or something.

One word:


via GIPHY

What is also clear, is that each different denim fabric would need its own unique sewing pattern to get the best version of jeggings possible. But without making a toile and the subsequent pair from the exact same fabric, I guess I'm going to have to forgo the real flat felled seams in favour of making a pair that can be adjusted at the seams to get a close-to-perfect fit for future versions.

Going forwards:

Having recently read through a lot of Tasha from By Gum By Golly's trouser-fitting trials and being inspired by her tenacity, I'm more determined than I felt for a long time to really get to the, umm, bottom of my trouser fitting endeavours. So now I've got two challenges: to perfect my jeggings pattern, and to perfect my Ultimate trousers pattern. Both these patterns require fabric with some stretch content, unlike Tasha who is aiming to get a great fit for wovens both with and without stretch. I don't feel comfortable in slim-legged trousers or jeans of any type made from fabric without the lycra/elastane/spandex/blah blah. So now when I find some nice woven-with-stretch fabric, I'll pick which of these patterns it'll probably be best suited to and push onwards...

As it stands, I feel the jeggings are closer, but I'm determined to nail both. Then Frankie will pack in breastfeeding and winter will come and I'll put loads of weight on and have to make a whole heap of new pattern changes! Oh, and one day I hope to find the 'proper jeans' sewing pattern that appeals and use that as a base to work on that type of garment too. Hopefully, by then, I'll have learnt so much about trouser fitting and my personal shape that I'll have a heap of knowledge I can transfer to that.

If you have any insights to my fitting issues, please do share your thoughts via a comment. And, how about you? Do you ever wonder if you should just go to a shop and buy some trousers/jeans/jeggings instead?! Have you gone down the trouser/jeans/jeggings fitting rabbit hole and come out victorious? Please let me know! 

Friday, 14 April 2017

Trousers Fitting Quest: Update and Please Help!

Please, for the love of god, help me. A combination of being woken up at least four times every night and my quest for nice fitting trousers is driving me insane. I'm hoping that some lovely blog readers could help me with the latter? (Or the former, if you're lactating and fancy looking after Frankie for the night?!) So, the story so far....


If you've read this blog for a while then you probably know that I've been going on and on about wanting to finally nail trouser fitting since 2015. So now that I'm no longer pregnant (YAY) and the shape and size of my body seemed to have more or less stabilised, I decided to pick up where I left off. 


I went back to Sew Over It's Ultimate Trousers pattern as it looks like a good, basic, no frills style with the slim legged look that I'm after. I traced off the pattern, blending between sizes as my measurements suggested I would need to, and made a toile (muslin). Generally, the fit looked pretty good, particularly from the front, but the back definitely needed some tweaking as there seemed to be too much fabric from the bum downwards. I tried bringing in the back inside leg seam at the top, which took away some of the excess fabric, but not all. I then tried taking in the same amount from the back inside leg seam the whole way down, not just at the top, and this seemed to work well. There were more waistline tweaks but I can't remember what they were and I don't think the are relevant to my main dramas. 


With these tweaks made to the pattern, I was feeling pretty pleased with myself so I made them up in some awesome blue stretch denim from Fabric Godmother. The resulting pair of trousers looked pretty good (IMO) and felt really comfy. So, although I know they weren't perfect, I was pleased that I'd made a wearable pair of trousers. But after some wears and washes, I realised that I was only happy with the fit when I wore them when they were tightest, straight out of the wash, rather than a wear or two later. 


So I went back to my pattern and skimmed 0.5cm off both side seams (removing 2cm in total) and tried making them again in some beyond-perfect black stretch denim, also from Fabric Godmother (sadly no longer available, *crying face*). I also shortened the length of the back darts because they looked crazy-long on the blue pair. 


The result of the black ones seemed pretty good: the slim fit I was hoping for in the nicest denim I have ever seen. And then Pat (Mr So Zo) took these pictures. WHY DIDN'T ANYONE TELL ME THEY LOOK SO SHITE FROM THE BACK?!?! The front view doesn't look great in these photos but I promise IRL they look ok. But the back? After some interrogation Pat confirmed that they really do look like this at the back. UGH! And now that I've got him to take pics of the blue ones too, I can see that they aren't all that either...


Correct me if I'm wrong (please please do!), but what I'm seeing here is a too-tight bum and a whole world of wrinkles under said bum. My mum, who is great help to talk with about fitting issues, came to visit and we tried to work out what to do about it whilst armed with Pants for Real People. However, that book didn't appear to address the issues my trousers seemed to be throwing up. And having thought about it since then, the style of trousers in that book aren't what I'm aiming for anyhow: slim legged styles don't seem to really be addressed at all, and I'm not sure if fitting/pattern tweaks for classic trousers would be the same as fitting/pattern tweaks for slim legged fits anyhow. 


Anyways, my mum suggested pinching out the under-bum wrinkles (kind of like this), but after some deliberation I'm not sure that that's the way forward. My hunch is that those under-bum wrinkles are the symptom of the problem, rather than the problem itself, if you know what I mean; that perhaps those wrinkles are a pooling of fabric caused by some other issue. Perhaps the shape and/or length of the rise on this pattern is wrong for my body? Memories of stuff I'd seen online and in Winifred Aldrich's Metric Pattern Cutting book lead me to develop...


Theory 1:

If I'm aiming for a slim, more jeans-like fit, then perhaps I need a more diagonal, straighter, jeans-like rise? Some participants in this extensive and rabbit-whole like thread would suggest so. Also, this blog post by Sew Chic Patterns says that this increasing of the angle of the back rise is advised for owners of a full butt. I'm wondering if that's my issue? It's a label that was applicable to me a number of years ago, but I thought that many many hours sat underneath feeding and sleeping infants had alleviated me of that 'problem', although maybe that extra junk just got redistributed a bit rather than disappearing. If this is my issue, then I'm assuming I can address it using this method

(image source: Sew Chic Pattern)


HOWEVER.... That Sew Chic Patterns post also suggests that a full bum requires some 'scooping out' of the rise (ouch) as pictured above. Surely scooping out means to remove fabric, so why would you remove fabric if you are trying to accommodate a full bum? And how are you meant to know how much slash-and-flaring to extend the back rise angle and/or 'scooping' out one needs to do? Or is it just trial and error?

(image source: Cation Design)

Theory 2: 

Further internet research lead me to reconsider the under-bum wrinkles issue. What if they are the problem, and their solution (the weird fish-eye dart extraction as generously and cleverly outlined in this Cation Design blog post) also results in the benefit of some 'scooping' out of the back rise/crotch curve (see below), as we discussed in Theory 1? Does this also extend the rise somewhat?

(image source: Cation Design)

In short: what the hell?! If any one can shed any light on these trouser fitting issues PUH-LEASE leave a comment below. I will of course need to do some more toiling and experimentation, but I really feel I need some more knowledge and advise before I know which path to go down. Many many thanks in advance...

Tuesday, 30 June 2015

Please HELP! Trouser Fitting Knowledge Required...

(slinky red capris: from Stop Staring)

So I kind of ear-marked the second half of 2015 for nailing trouser making and fitting. I can't help but notice that June is on it's way out, so it's time to get schooled. The thing is, I don't just want to make a couple of passable/wearable pairs for myself; ideally I'd like to go deep so I can really understand them to help other people with fit and figure issues that may be different to my own. Sewing bloggers of the world, PUH-LEASE can you direct me towards some knowledge?! I want to know everything, but in the meantime these are my specific areas of confusion:

(sailor skinnies: from La Redoute)

The Long and Short of it 

When making for myself, I've realised that there's one pattern alterations I will definitely need to make. My main fit issue seems to be my shortwaisted-ness (my natural waist line is a bit higher up than 'average'). To accommodate that I know I need to slash and spread the front and back trouser pattern pieces like this, but how much to spread? Presumably I'd need to know my rise measurement, however an evening (well, hour or so, I don't get much time to myself these days!) spent on Google and YouTube failed to unearth an accurate method to do so. Any ideas?

(epic 70's style denim flares: image source)

All Rise

Also, how do you know what rise shape you need? There seems to be such a variety of rise curves, in sewing patterns, particularly the back rise, surely they won't all fit your specific figure straight out the packet? I've read a couple of times on blogs and Instagram about sewers 'scooping out' more from the rise and things like that. WHY are they doing that?! How do they how much to scoop out? Plus, I've seen some jeans patterns that have a back rise that is not very curved at all, more a diagonal line than a classic 'J' shape. What's that all about? Is it related to how wide the legs are? Are the rise shapes of skinny-legged jeans and trousers different to the rise shapes of wide-legged trousers? Agh! My mind is close to explosion.

(galloon print slim legged trousers: from Orla Kiely)

Resourcefulness 

That Coletterie 'Pant Fitting Cheat Sheet' and enclosed links are a nice opener, but they don't really have the depth of explanation or detailed illustrations that I'm looking for. The cheat sheet post does recommend three books for further reading: 'Fitting and Pattern Alteration''Pants for Real People' and 'Perfect Fit: The Classic Guide to Altering Patterns'. Do you own any of these, or any other fit/pattern alteration book, and could you recommend it for trousers? Or have you found a particularly useful blog post, YouTube clip or something else that you think could start shedding some light on the baffling world of making well fitting trousers? Enormo-thanks in advance.

(why don't I own red sailor flares yet? image source)
Related Posts Plugin for WordPress, Blogger...