Thursday, 25 June 2020

Washed Denim Petites Choses Blouse


So here is another lockdown make. I'm not sure if I'd be achieving my current state of productivity if we weren't in lock down, it's not like I have much of a social life anyway. Almost all of my recent makes involve busting my stash, but this is one of the exceptions. Read on, if you please. 


Pattern:

I cannot be accused of being an impulsive sewing pattern purchaser. Most patterns have to grow on me over time. And even if I do like something straight away, I tend to take my time before buying it, often waiting to see a number of other people's versions before I crack open the Paypal coffers. This pattern is the Petites Choses blouse and dress pattern by French pattern company, Atelier Scammit. It was produced in collaboration with a popular and talented French Instagrammer named Fanny (@petites_choses__) who posts about her gorgeous sewing creations and interior decor skillz. I saw this pattern yonks ago, probably on IG, and I finally bought it many months later when Fabric Godmother started to stock some of Atelier Scammit's patterns in paper form.  


For me, the real genius of this pattern lies in the panels and gathering around the bust and on the sleeves. The pattern includes a number of style options that can be combined to create 24 different looks. I chose to make a top with the V-neck, full back and long sleeves options. The pattern is bilingual, English and French, and the the packaging is gorgeous. The only annoying part was that the pieces needed to be traced off before you can start. The step-by-step photos could have been clearer, but generally speaking I found the construction to be fairly straight forward and fun. 


Fabric:

This pattern had been burning a hole in my stash; once I'd finally bought it, I was desperate to make it. But I just didn't have anything suitable in my stash that felt special enough for this project. I randomly ended up on the Village Haberdashery website a while ago, looking at something completely different, and I chanced upon this anchor-embroidered washed denim. It's virtually the same base cloth as the washed denim that Fabric Godmother stocks, and having used it a number of times (here, here and here, for example) I knew it would be wonderful to both sew with and wear, as well as age nicely.


The only fly in the ointment was that the useable width of the fabric limited because the embroidered anchors started and finished a little way in from the selvedges. This was further hampered by the need to make sure that the anchors were placed symmetrically on all the pieces and panels. I really had to take my time positioning the pattern pieces on the fabric before cutting, and I was left with little more than dust from the 1.5m I ordered. 


Thoughts:

My version is definitely more English-mum's-tunic-top than French-Instagrammer's-chic-and-breezy-blouse, but I'm happy with it and I know that it'll see a ton of wear. I'm confident of the latter because it's effectively an updated version of my denim Tova top that I wore almost constantly for a few years (and still trot it out to wear to the allotment). Plus it gives me the opportunity to drop a double-denim look! I can definitely imagine using the pattern again at some point. I'd love to try it in a check or stripe, with the side panels cut on the cross grain to emphasise them more as others have done before me.


Saturday, 20 June 2020

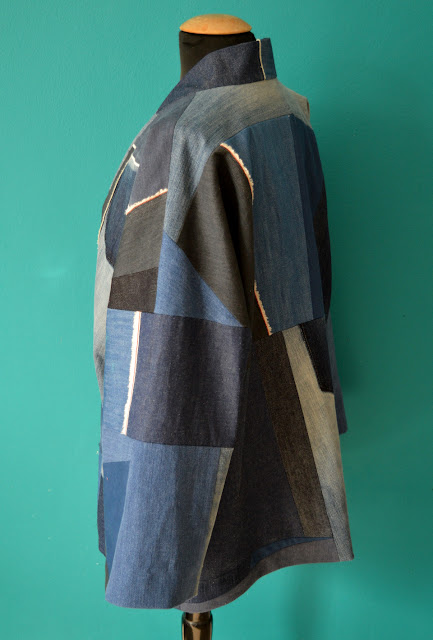
Patchwork Denim Coat


This coat. Well, lemme tell you two things about it. 1) it took a bloody age to make, and I loved almost every minute of making it. 2) I don't think I'm going to keep it. 


Ever since the success of my scrap-busting patchwork viscose Scout tee, I had in mind doing something similar with denim. I had masses of scraps and small pieces of denim left over from other projects. Denim scraps just aren't as useful as lighter weight fabric scraps for working into other garments or turning into useful gift-y things like schrunchies. I was inspired by a couple of upcycled denim projects that I'd seen on Instagram, including a haori-style jacket that I can't find now. So I decided to use my beloved La Trop Facile pattern by Delphine et Morissette as the base, but lengthen both the body and the sleeves.  


Next was the fun bit. I got all my denim pieces together, and spent a number of the evenings over a couple of weeks hacking them, matching them and stitching them together. I got to select the pieces I liked the best to feature more prominently, and tried to combine them so the overall effect was varied. I decided to include some of the lovely selvedges to break up the blue a bit, and to (hopefully) create an interesting, graphic effect. 


I started on a few sections, joined some of them together and expanded where necessary until I had panels large enough to fit my pattern pieces on. There was a massive back panel, two front panels, two sizeable sleeve-rectangles and a collar. I stitched the outer together, save for the collar, then made a lining. 


Because I was working very much from the angle of #usewhatyouhave, I used some turquoise silk lining from my stash. In hindsight, I don't think it was the best choice as it's very fine, and probably more suited for use in a dress. Anyways, I made the lining then spent a lot of time head-scratching, trying to work out how to insert it. Have done so, I then attached the collar, hand-stitching the inside seam. 


I soooo wish I was the type of person who would wear this. I love the idea and ethics behind 'making fabric' from fabric scraps, and I wish I could fully embody that by wearing this coat out and about. But I've come to accept that it just really isn't my style. It's just too jarring with the rest of my wardrobe.


Therefore I'm going to ask around my IRL friends to see if any of them would like it. I do not regret making it at all, it was such a fun project to work on. I loved exploring the concept of 'fabric from fabric scraps' further and I'm sure I'll do more in the future. 


Now, a tiny bit of house-keeping. I'm afraid I've had to turn off the comments on this blog, at least for a while. The amount of spam I've been getting is ridiculous, I even had two people actually message me about it via Instagram last week. I've exhausted the options within Blogger to curtail it, so I'm not sure what to do. I'm so sad to have had to take this step though, because I absolutely love reading the genuine comments and having a dialogue with my readers, but those comments usually get completely lost within the spam. Thanks so much if you are someone who has commented on previous posts, please know that I really appreciated them. If you would ever like to get in contact with me, my email address is available on my About Me page, and my IG handle is @sozoblog. 

Friday, 5 June 2020

Free Pattern Friday: Adult's Sorrento Bucket Hat


Welcome to my monthly 'Free Pattern Friday' feature, where I road test a free sewing pattern or tutorial: sometimes a children's one, sometimes an adult's one. I publish these posts every first Friday of the month, timed to provide inspiration for those who plan to get their sew on over the weekend. I firmly believe that, if you pick your projects carefully, sewing doesn't have to be a crazy-expensive way to clothe yourself and your family. Thanks to all the amazing pattern designers who have offered up their hard work for us to enjoy for free.

Well, I've done it. I've finally made good on my threat to make Pat (AKA Mr SoZo) a sunhat. He's long been convinced that neither hat nor shorts are for him. However, it can get pretty hot here in the south of England at times, so I personally believe that he needs both. Every summer he regularly suffers from sunburn, and this year I decided that enough was enough and made him a sunhat anyway. Now all four of us can go to the allotment or the beach in our me-made hats! Even though someone will undoubtedly take theirs off within two seconds.... Massive thanks to Lauren from Elbe Textiles for her hard work and sharing the Sorrento bucket hat pattern for free. It is easily accessible through the shop and check out on her site, no sign ups required.  

(image source: Elbe Textiles)

Pattern type:

The website says it best: 'The Sorrento Bucket Hat is a unisex design featuring a downwards sloping brim with optional top stitching detail. This hat is fully lined, with the ability to be reversible.'

Sizing info:

The hat pattern is graded to four sizes, 21"-24" head circumference. Based on his measurements, I made the largest size for Pat, although I never considered him to have a particularly big head. My 6.5yo daughter's head measures 20", so I think this pattern might work for kids from approx. 8 years and up also. If you required sizes larger or smaller, you could try adjusting the scale on your printer settings. I did this with success when making Elbe Textile's other hat pattern, the Serpentine hat pattern, for my daughter last year


Fabric info:

It is suggested that medium to heavy weight woven fabric like drill, canvas and denim work best for this pattern, as they hold their structure. I completely agree, however, I would stretch that to include linen and linen-blends, which might not hold their shape so well, but might be more pleasant to wear in the heat. 

I'm also very interested in making an adult hat pattern such as this in some waterproof fabric, like this child's bucket hat I made a few years ago. I think that having a waterproof hat stuffed into my bag would be preferable to having to carry a brolly around. These days are nearly over for me, but brolly carrying and pushing pushchairs don't mix, so a waterproof hat for those occasions could also be a game changer when it's raining. 

One of the things I really love about making hats is that you can use up leftovers and smaller pieces of fabric that might be tricky to use up otherwise. For Pat's, I used some brick-coloured denim, leftover from his Quadra jeans, which definitely has the body required for this hat. I chose some fun African wax print cotton scraps leftover from my Zadie jumpsuit for the lining. I love the contrast the print brings to an otherwise pretty utilitarian item. 


Findings:

Working with this pattern was a real pleasure. I've made a lot of bucket hats in the past, so I must admit that I didn't refer to the instructions constantly, but when I did, they were clear and easy to follow. This would make a great, confidence boasting project for a beginner, and a satisfying make for those more experienced with a scrap stash to burn. 

I chose to up the ante slightly and add the optional rows of top stitching around the brim. I really like both the look and stability that extra step brings to the party.

Despite his general misgivings about hats, Pat has really embraced this one. He's happy with the fit, and it must be comfortable as he has worn it numerous times in the month since I made it. Much of the back of his neck still remains exposed, but it does a great job of protecting his forehead and face.  


Customisation ideas:

  • Extend the brim for extra sun protection
  • Test the accurracy of your stitching by using contrast thread
  • Make a decorative strip for the band, either with contrasting fabric, grosgrain ribbon or some other trim
  • Insert eyelets to the band for some ventilation
  • Add straps to tie under the chin if it gets windy where you live/holiday!


Would I make it again?

Yes, for sure. If Pat needs another, or a gift is required, then I'd be very happy to whip up another. Plus I'll most likely to turn to this pattern in future years for Frankie, as the sizing of the Sorrento seems to start roughly where the Oliver + S bucket hat pattern leaves off. 

Related Posts Plugin for WordPress, Blogger...