Friday, 14 February 2020

Leopard Print Cardi: So Very Neutral


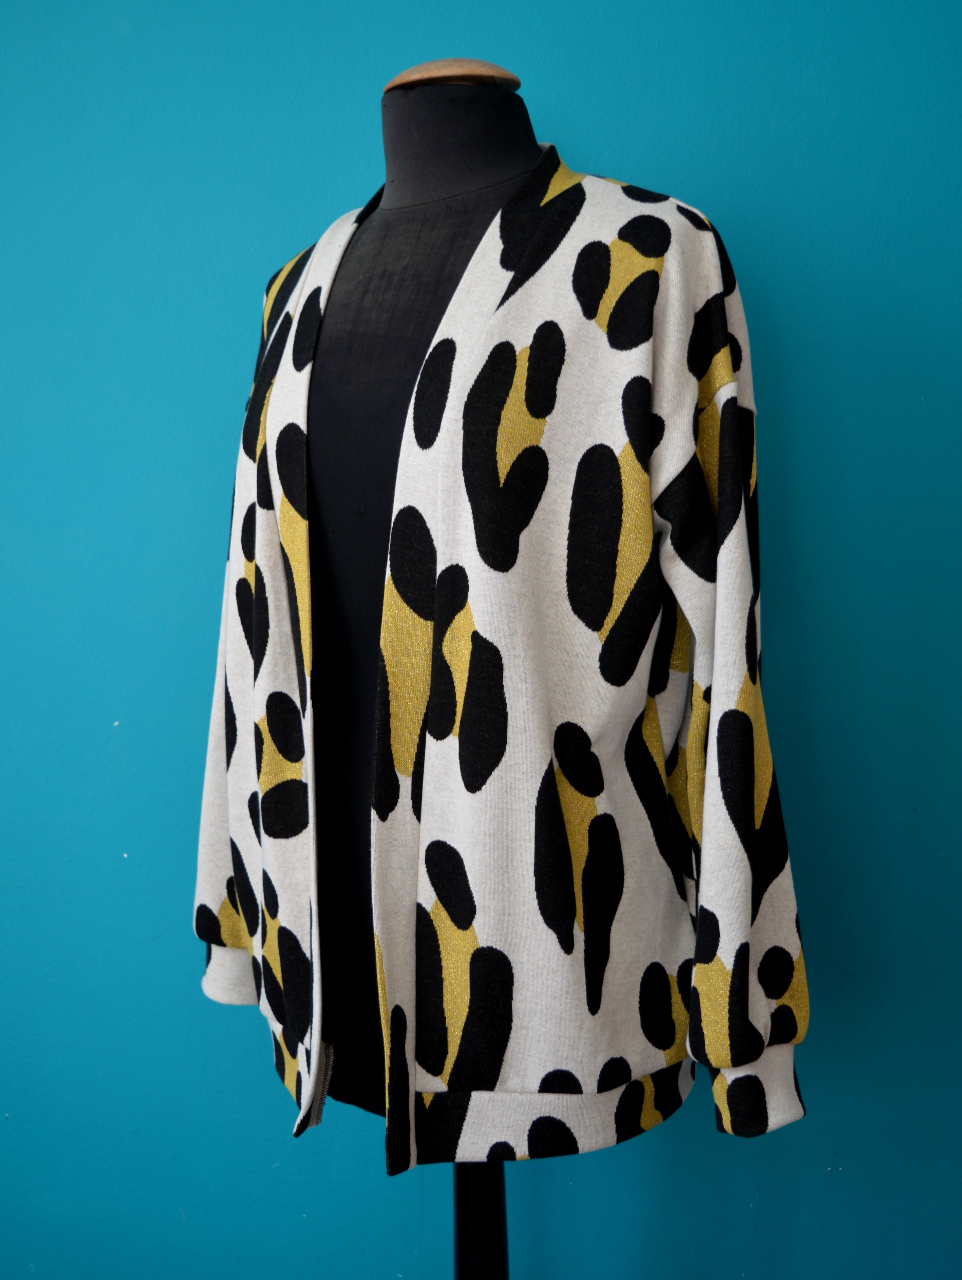
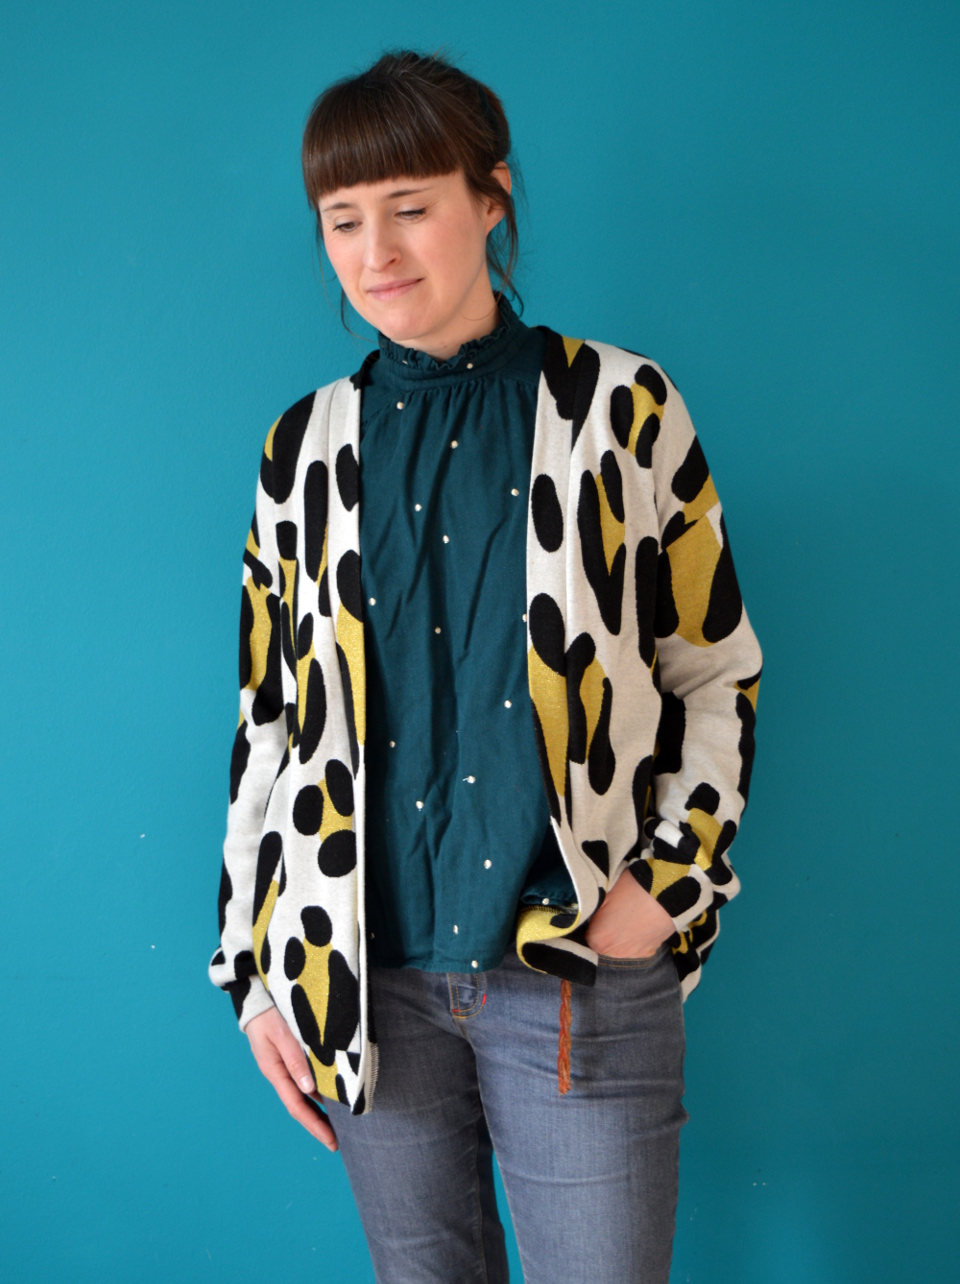
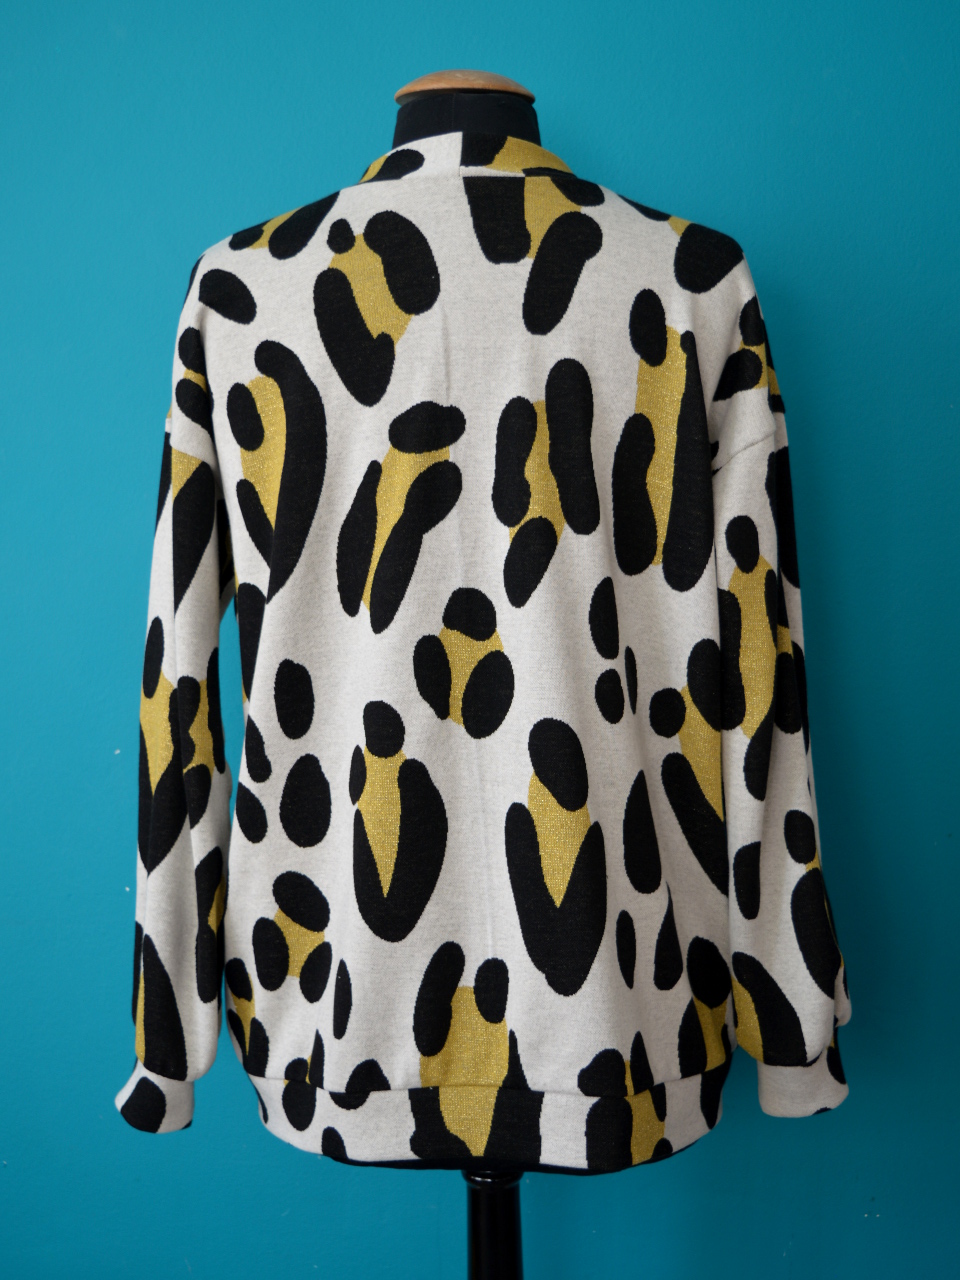
Here is the result of a recent experiment. I've been testing the limits of the popular theory that leopard print in a neutral. What could blend in to a wardrobe more easily than a simple, leopard print cardigan? See? I bet you hardly even noticed it in these photos!


Fabric:

So I've been regularly working part-time at Fabric Godmother for about a year and a half now (before that I would occasionally help out at their open days, plus I taught some classes there when they were running those). During the first year of the regular gig, being in close proximity to all the lovely fabric (plus access to a generous staff discount) meant that I bought more pieces of fabric that I'm entirely comfortable admitting to. Not a wild amount, but neither did I wait until I used each piece before I bought another. But then I got ahold of myself and put the breaks on. At the end of that first year, I vowed only to buy something if it is truly special, and when this leopard print ponte di Roma came along, I knew at a glance that it definitely fell into that category. 


This fabric is produced by German fabric company Albstoffe, who have a GOTS certification, meaning that their cotton fibres are grown organically and the fabric production passes a series of sustainable, ethical and fair trade requirements. It is also A-MAZING quality and (for some, including me) eye-wateringly expensive without the aforementioned staff discount.


So having bagged myself 1.5m of this special fabric, I really wanted to do it justice. How to turn it into a garment that would show off its attributes well, and also see a lot of use? One part of me envisioned some sort of awesome sweatshirt style top, with or without a ruffle thrown in to the plans. But ultimately, knowing how I like to dress, I decided a cardigan would get way more use. 


Pattern:

So having landed on a cardigan as my chosen garment style, I mulled over the question of what attributes the cardigan should have. I wanted something fairly loose that would fit over a variety of blouses, tops and dresses. There's a lot I love about Wendy Ward's Kinder cardigan pattern, likewise with the Ready to Sew Jamie cardigan pattern. But there are also a couple of things that I don't love about both. So I set about drafting my own cardigan pattern, that took inspiration from both, but ultimately had its own proportions and volume. Kind of like the Kinder and Jamie had a baby, if you will. 


Having finished the drafting process, I made a (hopefully) wearable toile in some ponte from my stash, so I could test out my design before cutting into the precious. I was so happy with the outcome that I decided zero tweaks to the pattern needed to be made. I'm going to send the wearable toile to a friend who loves a good cardi almost as much as I do!


Thoughts:

I'm soooo glad that I took the time to allow plans for this fabric to fully formulate. I love the final shape and style of this cardigan; it's exactly the type of garment I want to wear right now. I think it shows the crazy leopard print design off well; I deliberately chose to avoid patch pockets so as not to disrupt it too much. And the fabric feels sooooo nice to wear. My only hurdle now is to work out how to incorporate it into some outfits that don't always involve pairing it with a black top....

Friday, 7 February 2020

Free Pattern Friday: Women's Carine Tee


Welcome to my monthly 'Free Pattern Friday' feature, where I road test a free sewing pattern or tutorial: sometimes a children's one, sometimes a women's one. I publish these posts every first Friday of the month, timed to provide inspiration for those who plan to get their sew on over the weekend. I firmly believe that, if you pick your projects carefully, sewing doesn't have to be a crazy-expensive way to clothe yourself and your family. Thanks to all the amazing pattern designers who have offered up their hard work for us to enjoy for free.

Right, at the top of this post I should say that I've sort of messed it up this month. When I was deciding which pattern to write about, I figured it was high time I shared an adult's garment, as I suspect they are the ones that more of my readers are interested in. So I planned to review a free pattern that I used last year to make to my lovely friend Harriet a garment. Because she lives in Spain and I'm not sure of her current measurements, I tried the Carine tee pattern by Elbe Textiles, my thinking being that the loose-ish style made from knit fabric was likely to create a garment with fewer potential fit issues.


EXCEPT, now that I'm trying to write about this pattern, I discover that it is no longer available (*face palm!*). I messaged the designer to check that this was the case, and she confirmed that yes it was no longer downloadable as that pattern didn't reflect the unisex/menswear style she wanted to take her brand in. Fair enough. I discovered all this very recently, so didn't have time to make and photograph a different free pattern for this month. So I'm going to share pics of it anyway, but not go into all the usual details I put into a review. Therefore, I'm sorry if you like this T-shirt but didn't download the pattern when it was available! However, you could get a similar look by taking a basic T-shirt pattern with close fitting shoulders and sleeves then straightening and slightly flaring the side seams, and then drawing in a curved hem (the below flatlay pic gives you a clearer idea of the pattern's attributes). 


I was given this fun zigzag print jersey from my lovely friend Claire (@clairesews) a year or two ago. I'm assuming it is 100% cotton, and has reasonable stretch and recovery, but not enough for a more fitted garment style, so I thought it would work well for a garment such as this that it quite a boxy shape. I had enough leftover to squeeze out a pair of sleep shorts for Dolores (see below), which have been worn a lot. 


See you next month for another free pattern review that actually is available, and hopefully before then with more tales of my sewing shenanigans. 

Monday, 3 February 2020

Buffalo Check Coat: The Last Coat I'll Ever Make?


Well, let's be honest, it's probably not the last coat I will ever make, but right now that's how I feel. As I was starting this project, Pat (Mr SoZo) questioned, 'Didn't you say you were never going to make another coat again?', and he was right because I said exactly that during the construction of each of the five-ish fully lined coats and jackets I'd made before this one. Dreaming and planning them is fun, but I find the actually making process such a slog. However, I am relieved to be able to say that I LOVE this finished garment! Let me tell you about this coat and shower your screen with many photos of it....

Fabric:

This project was one of my #makenine2019 sewing plans, having had this lovely, soft, buffalo check coat fabric hanging out in my stash for far too long. I started this coat project towards the end of last year, but I knew it was going to be a beast of a project, so I allowed myself to take my time. It probably took close to six weeks in total. 


The fabric was originally from Fabric Godmother, bought about three years ago. It's long since out of stock, so I can't check, but I'm pretty sure it's polyester or some such synthetic fibre. I try to avoid synthetic fibres where possible these days, but because I already had it, plus a coat is less likely to get washed and therefore less likely to release micro plastics into the water system, I went ahead. This fabric is super soft, slightly fuzzy, and the perfect, bold, buffalo check. 


As you can imagine, cutting out the pieces for this project took an age. Not least because I only had about 2m of it, originally intending it for a jacket. But I was determined to make something that covered my bum because I just want to feel warm at this point. I googled 'Buffalo check coat' for advise on check placement, and found the awesome Comme des Garcons coat that is pictured below. Pattern matching at the side seams and top seams on the sleeves was pretty tricky because the fabric's fuzziness made the edges of the checks unclear, however I think the final look is pretty much spot on. I managed to get the hem and sleeve hems to finish on a check too. Oh, and there was one really hairy moment when I realised that I was missing one of my back sleeve pieces! I still don't know if I lost it, or failed to cut it out in the first place (I was cutting this out on the flat, not the fold because of the check and tight lay plan), but I managed to *just* squeeze another from the remainder of my fabric. Phew!

(image source: Comme des Garcons)

My intention for this coat was to make it warm enough to withstand the worst an English winter can throw at you at best, and warmer than my grey cocoon coat at the least. My first step to achieving this was to get the same fusible coat interfacing from the English Couture Company that I used for the cocoon coat. I've been so impressed by this stuff: the extra thickness and smoothness that it gives a coat fabric, and I recommend it to all my sewing students who are thinking of working on a coat project. I feel I should definitely mention that fusing this interfacing to this particular coat fabric did make my pieces shrink a bit. It didn't cause me any problems because the pattern was a little large for me anyway, but to avoid the risk of that happening, I'd advise block fusing the interfacing on BEFORE you cut your coat pieces out if you choose to use this stuff yourself. 

Having started construction, I swiftly found that this fabric didn't press very well. So I ended up slip-stitching every damn seam allowance down inside so that all my seams would lie nice and flat. Having used the fusible interfacing really helped with this, because I was able to slip stitch the seam allowances to the fusing rather than to the outer fabric so I didn't disturb the smoothness of the fabric from the right side. 


My second step on the path to snuggliness was to quilt the lining. I considered buying pre-quilted fabric to line it, but I already had this gorgeous, deep rust, viscose twill lining in my stash (also from Fabric Godmother, also out of stock, soz) so I decided to have a go at quilting it myself. I bought some fairly lightweight cotton batting from Little Miss Sew N Sew in Eastbourne, borrowed some spray adhesive stuff that quilters apparently use, and drew on some diagonal lines the width of a metre ruler. I was only quilting two layers, the lining and the batting, so I used a walking foot in my machine, with the batting side up. I quilted the full 1.5m before cutting out my pieces this time, and quilting that big section took what felt like most of my life. Also, note to self: do NOT use a sharpie pen to draw lines on fabric, because it's liable to bleed and will not wash off. Glad I learned that lesson on the lining! 


Pattern:

This amazing vintage pattern has been in my stash for at least seven years (most likely from eBay) and it was published in 1959! It was for a 37" bust, although I never know if vintage dress patterns refer to your full or high bust. Either way, 37" is a bit bigger than I am, but I thought I could bring it in at the side seams if necessary. As I mentioned above, the fusing shrunk the pieces slightly and the result was just the kind of fit I would look for in a coat of this type. 


As with many mid-century sewing patterns, this assumed a greater base level of sewing knowledge than patterns created today tend to. Which seems so unfair considering this was published way before YouTube. I don't know if it was me, the scant instructions or the combination of bulky outer fabric with lightweight pocket linings, but the welt pockets construction in particular was a real headache. It annoys me that there are some raw edges inside at the bottom of the welt, but from the outside they look fine. 


With a flash of maverick flair, I ended up ignoring the instructions on how to insert the lining. The pattern had you basically finish the whole outer coat (buttons, button holes, hemming and all) and then attach the lining. This seemed pretty bonkers to me, so I used the same method as my cocoon coat and the finish looks fine. 

I ummed and ahhed about using this project as an opportunity to finally get to grips with bound buttonholes. But ultimately, I felt that, with the pattern matching considerations and my bulky, fused outer fabric, I'd wimp out about go for the chunky press-stud option instead. The chunky press studs have worked so well with my cocoon coat. They make the coat so easy to put on and take off, plus after a year of heavy use, I have yet to have to restitch them (unlike the buttons of every other coat or jacket I've made), so I went on eBay and found the exact same type that I used before. 


Thoughts:

I really do love this coat. I think the fabric makes such a fantastic impact. The colours mean it goes with everything I'm likely to wear it with, however it's a bit more lively and fun than a solid black, white or grey coat would be IMO. I'm also really happy with how the buffalo check and the giant press studs give the vintage pattern a modern twist, so that it doesn't really look like a vintage garment at all. The interfacing and quilted lining have done the trick, and it is definitely warmer than my cocoon coat. I have clear 'winter' and 'spring/autumn' options now, which I'm grateful for. 


What I don't like, is that the under collar peeks out a bit, especially at the back. Oh, and that raw edge inside the pocket, but I'm trying to redefine those in my mind as the 'quirks' of a handmade garment over something made in a factory. So, on balance, I am thrilled with this garment, not least because it's finished!  


Thursday, 23 January 2020

Alex Jogger Pants


Yep. More rust coloured clothing. Although I've rebranded these as 'orange' because, as Frankie reminds me daily, orange is one of his two favourite colours. The other is red, FYI. Anyways, although the colour of this new creation may not surprise you, what may come as a shock is that I shelled out actual money for a kid's sewing pattern!


Pattern:

It goes to show that offering up sewing patterns for free really is a good way to get potential customers to appreciate your products, and eventually part with money for something. Misusu Patterns have a generous array of free downloadable sewing patterns. You can read my reviews of the Rowan tee pattern here and Olli shorts/pants pattern here

I'd liked the look of the Alex jogger pants pattern for a while, and when the pattern recently got an update and re-release (plus a discounted early bird price), I bought it. I'm a fan of the unique design of the kangaroo pockets (there are two versions of the kangaroo pocket plus a more regular hip pockets style), and the gusset to provide ease of movement. 

(image source: Misusu Patterns)

For this, my first go with this pattern, I made the version with the kangaroo pocket that extends up into the waistband, and omitted the optional waist tie to make them quicker to get on and off. If memory serves, I made the size 98 which is a bit bigger than he currently wears to give them a long lifespan, which is why they are gathering around his ankles a bit. 

I've made many a pair of leggings and joggers in my six years of parenthood so far, and I think this is the first pair I've made with a gusset. I stuck closely to the instructions and used my regular machine to insert it accurately as the instructions had you do it. Next time, however, I think I'll fudge it a little and insert it with my overlocker so there's less switching back and forth between machines, although this strategy may be a little less accurate.  

The instructions for this pattern are fantastic. The step-by-step diagrams are incredibly clear and easy to follow. Plus there's all manner of additional info on blending sizes, sewing with knits and such. 


Fabric:

I've got a sizeable stack of knit fabric leftover from previous projects that I've earmarked for the kids when they could do with something new. This speckle sweatshirt fabric in rust was originally from Fabric Godmother (they still it have it in other colourways) and was leftover from Pat's much-used Apollon sweatshirt. The contrasting forest green pieces were cut from more leftovers, this time some Ponte Roma given to me by my lovely colleague Linda. The combo came from playing about with my stash, it's not a colour combo I would have come up with in my head, but I'm very much enjoying it.


Thoughts:

I'm very pleased to have this pattern in my arsenal, not least because it goes up to approx. age 14. It's ripe for all manner of scrap busting and colour blocking, and I'm excited to play around with further possibilities in the future. However, it is a bit more complicated, and therefore time consuming, than the jogger patterns I usually use. So truth be told, I'll probably use the Alex pattern for my kids only and turn to more simple styles when making gifts. I'm already hatching plans for Frankie's next version...


Tuesday, 14 January 2020

More Heyday Dungarees of Dreams


I don't know why I'm looking so moody in these pics. Clearly I've forgotten that I'm wearing the bestest dungarees! I made this pair a few months ago, but getting photos has been a challenge. But now that I have, let me flood your screen with pics of them.  


Fabric:

I saw a couple of projects on Instagram made from this rust coloured twill, and my 'want' alarm went off VERY loudly. I found that it was this Ventana cotton twill by Robert Kaufman, stocked by Sew Me Sunshine. I've been trying to slow my fabric buying fabric right down lately, but this was so perfect and ticked so many of my boxes that I decided I could justify getting some. It took a while because it was out of stock for ages, but when it arrived I was not disappointed. It's the nicest quality and the perfect shade of brick/orange/rust. 


Pattern:

Before the fabric arrived, I had planned to use it to make the Republique du Chiffon Danielle dungarees pattern, which I have in my stash. However, upon arrival I discovered that the fabric was a lighter weight IRL than I feel would be suitable for the Danielle pattern. So instead I reached for the Made by Jack's Mum Heyday dungarees pattern that I made previously in black linen twill and have worn to near-death.  


As with my lack version, I used the pattern's bib and back pocket pieces, but used my own self-drafted pocket shape for the front hip pockets. I added a cute little piece of woven ribbon from Textile Garden to create a little label/tab for an extra personalised detail. 


The only other difference between this pair and my black ones, was to make two fabric loops rather than buttonholes to thread the straps through. The loops make this pair look more like Lucy & Yak dungarees I realise, and in general my dungers have ended up very similar to theirs (see below). It's a resemblance I'm more than happy with!

Lucy & Yak Dungarees Organic 'Umi' Cotton Dungarees in Rust Orange
(image source: Lucy & Yak)

Thoughts:

These are the best, most comfy dungarees and I'm in love with them. Today I'm wearing them with this wool top underneath because it's pretty chilly out (and in my work place), but I can't wait for warmer days so I can comfortably wear them with lighter tops and different footwear. 


Friday, 3 January 2020

Free Pattern Friday: Unicorn Cushion/Pillow


Welcome to my monthly 'Free Pattern Friday' feature, where I road test a free sewing pattern or tutorial: sometimes a children's one, sometimes a women's one. I publish these posts every first Friday of the month, timed to provide inspiration for those who plan to get their sew on over the weekend. I firmly believe that, if you pick your projects carefully, sewing doesn't have to be a crazy-expensive way to clothe yourself and your family. Thanks to all the amazing pattern designers who have offered up their hard work for us to enjoy for free.

Happy New Year!!! I've gone a bit off piste with this month's Free Pattern Friday pattern choice. I decided to pick a pattern that I could use to make a non-garment Christmas present, so I went with this kitschy unicorn's head shaped cushion by Rebecca Page that I made for my 6yo daughter. Thanks to them for sharing their hard work for free. If you have a child, or kitsch-loving adult in your life with a birthday on the horizon, then you may wish to bookmark this bonkers project... 

(image source: Rebecca Page)

Pattern type:

This cushion/pillow/toy pattern is easily accessible by adding it to your cart and going through the checkout on the Rebecca Page website. The downloadable PDF includes both the pattern pages and instructions in one. The instructions feature step by step photos, plus there's a cheat sheet for those who wish to wing it a bit, or are making it for the second time. You can also leave off the horn to make a horse version. 


Sizing info:

Unsurprisingly, this pattern is for a single sized item. The finished size is approx. 10"/25cm wide by 15"/38cm high. Mine may have ended up in being a bit smaller because I took a more sizeable seam allowance than the suggested 1/4 inch. 

Fabric info:

The pattern advises using woven, non-stretchy fabric for the main part, including cotton, felt and fleece. I had this remnant of corduroy knocking about that I chose to use to give it a lovely texture. For the mane and fringe I used some synthetic transparent stuff that I was given by someone having a clear out a few years ago. I went with some leftover pleather from my lovely colleague Linda for the horn. I'd recommend doing a Google image search to see some of the other people's versions out there for inspiration. Some people have gone really disco with their choice of fabrics for the mane/fringe and horn sections! Please note that I trying to keep things pretty toned down so I left off the suggested braid from the horn and additional ribbon/braid detail from the mane.


Findings:

I'll be honest with you, I have no idea how long this took to make! I was doing it in tiny windows of time when Dolores with either out at school or had gone to bed. The trickiest bit was the eye detail. They suggested a few options to do that, but I ended up using a wide satin stitch on my machine. It was made trickier because of the texture of the cord, and I'd definitely recommend practising on a scrap of fabric whichever technique you go for as it's such a noticeable feature. 

My only real complaint was the aforementioned teensy seam allowance. At one point you're sewing through a LOT of layers (two layers of the main head, plus ears, horn and mane), and taking less than 1cm would have been very tricky I feel, even if your chosen fabric was thinner than mine. I also found the exact positioning of the horn, mane, ears and fringe to be a bit vague, so I kind of made it up by looking at other completed examples. 


Customisation ideas:

Ohmygoodness. As I suggested before, do a Google search to see how other people have interpreted this pattern. There are so many ways this pattern could go. I do feel that a horn-free version for a horse lover would be very cute. 


Would I make it again?:

No offence to the Rebecca Page crew, but probably no. Unless Frankie develops a love of unicorns or horses, I can't imagine I'll return to this pattern. It was ever so fun to make though, a great scrap buster, and Dolores loved the resultant cushion more than I thought she would, so yay!

Friday, 6 December 2019

Free Pattern Friday: Kids' Ester & Ebbe Top


Welcome to my monthly 'Free Pattern Friday' feature, where I road test a free sewing pattern or tutorial: sometimes a children's one, sometimes a women's one. I publish these posts every first Friday of the month, timed to provide inspiration for those who plan to get their sew on over the weekend. I firmly believe that, if you pick your projects carefully, sewing doesn't have to be a crazy-expensive way to clothe yourself and your family. Thanks to all the amazing pattern designers who have offered up their hard work for us to enjoy for free.

If you're into making kids' clothes, then you're in luck. I've got an awesome and very useful pattern to share with you today. We're talking a unisex pattern in a wide size range that's thoroughly customisable. AND it's available in Swedish as well as English. You're welcome! Obviously, full thanks should actually be extended to the generous designer: Threads by Caroline. If there's a scamp in your life that likes comfy clothes, do read on...

(image source: Threads by Caroline)

Pattern type: 

The Ester & Ebbe top/T-shirt pattern makes a great, basic, close-fitting, knit top. The side seams are straight (no shaping), the neckline is finished with a knit band. Two sleeve lengths are included as well as optional sleeve-head ruffle and patch pocket pieces. 

Sizing info: 

The pattern is graded between EU sizes 74 - 146, which equates to height in cms. This translates to approx. 9 months to 11 years. I've found the sizing to be spot on, aside from the length (more on that below in 'Findings').  

Fabric info: 

It is advised that knit fabrics with at least 30% stretch are used. With a close-fitting style such as this, ignoring that recommendation would probably result in an uncomfortable top that needs to be wrestled on and off! Caroline has helpfully included two neck band pattern pieces, depending on the amount of stretch your chosen fabric has, so you could go for a rib knit neckband if you wished without fear of a baggy neckline. Phew. 


For most of the versions I've made that you can see in this post, I used fairly light-weight jersey with elastane/Lycra/spandex content. The pink and red deer fabric used for the long-sleeved version made for a 6-year-old's birthday present (pictured above) doesn't include elastane, but I think the jersey had sufficient mechanical stretch to work ok. However I didn't trust the 100% cotton jersey for the neckband, which is why I went for a contrast effect using a jersey with elastane for that crucial piece.  


Dolores's stripy long-sleeved top (pictured above) started life as an adult's Boden top that my best friend no longer wanted (pictured below). The glittery lightning flash print was awesome, and I love how its scale is so massive on 6 year-old Dolores's top! I also used the Ester and Ebbe pattern to get me out of a minor parental emergency when it was announced that Dolores and her friend Samuel's class would all need to wear plain black tops for their school dance concert. Samuel's mum and I were determined not to promptly file into H&M or Primark like the other parents, so I volunteered to whip up two of the these tops from repurposed fabrics instead. Dolores's was cut from a previous adult-top-project-FAIL, and Samuel's was made from one of Zoe's old nightdresses and a bleach-stained old maternity dress! 


Findings:

You can access the Ester & Ebbe top pattern by signing up for their (unobstrusive) newsletter in either English or Swedish. Both the top pattern and their free Vera skirt pattern will be emailed to you shortly after. Alternatively, you can access both patterns by signing up to their Facebook group, if FB is your jam (it is not my jam). Both patterns include print-at-home and copyshop files, plus the print-at-home version of the Ester & Ebbe includes the layers function, which stops you wasting ink by allowing you to print only the size(s) you require. Both the pattern files and instructions document are beautifully produced: it really feels like you're accessing a high quality product for free. 


I've made a fair few knit tops in my time by now, so I must admit that I didn't follow the instructions word for word, however they appeared very thorough and seem to give clear guidance for each construction step, including how to add the optional shoulder ruffles and chest pocket. I have yet to try out the shoulder ruffle style because I recently made a similar top also with a shoulder ruffle for Dolores and the jersey curled quite a lot, and I didn't trust any of these jerseys not to do the same. 

As for the garments themselves, I think the number I've made so far shows that I'm a big fan of the finished product. I love the skinny fit through the body and sleeves. The shoulders are quite narrow, which suits my little scamps but might be something to keep in mind if your child is a bit squarer. The first two I made were Dolores's long-sleeved, upcycled, lightning flash version, and Frankie's short-sleeved, black-and-white-with-lemon-pocket version. As you can see in the pictures of Frankie above and below, this pattern does come out pretty long (I may go back and shorten his before the summer), and I have removed 4 or 5 cms from the length for all subsequent versions. 


Customisation ideas:

Aside from the two sleeves lengths, shoulder ruffle and chest pocket options already included, you could get yet more mileage from this pattern by trying the following:

  • Add a gathered rectangle skirt at either the empire line, waistline or dropped-waist/hip line to make it into a dress. 
  • Try 3/4 sleeves, as per the bird box stencil version pictured below.
  • Make different patch pocket shapes, eg, hearts, animals, clouds and so on. A classic hoodie-style kangaroo pocket would also be cute.
  • Get seriously scrap-busty and use a different jersey for each pattern piece to make a crazy (or subtly tonal) patchwork-esque version.
  • Screen-prints, decals, patches, applique would all pack a punch this simple garment style. I plan to add a cute, shop-bought, unicorn patch to jazz up Dolores's aforementioned plain black version, now that her dance concert is over.


Would I make it again?

Yes. Clearly, yes. This has become a firm favourite, and I can't imagine needing another skinny-fit tee pattern until they have grown out of the largest size. Between this and the more boxy, oversized (also free) Rowan tee, I feel that basically all my kids' jersey top pattern needs are covered. 
Related Posts Plugin for WordPress, Blogger...