Thursday, 24 January 2019

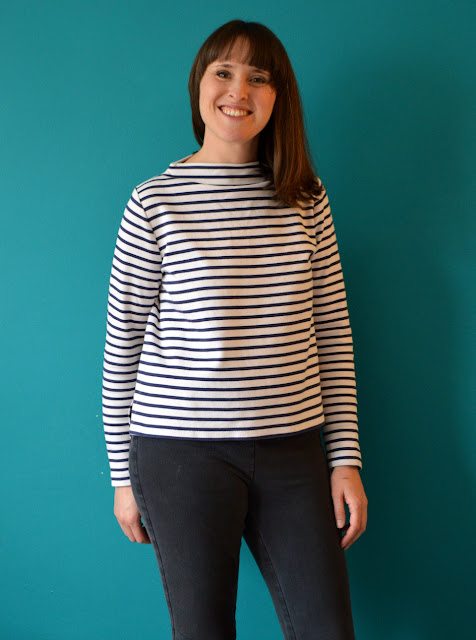
Toaster Breton


There I go: progressing towards my aim to make every variation of a Breton-style top imaginable! I jest of course, but I really was feeling a hole where a long-sleeved striped top that's a bit more sophisticated than my fleece version should be.

Pattern:

I must admit, I wasn't an instant convert of either view of Sew House Seven's Toaster sweater pattern. However, a mixture of sensory adaptation brought on by near-continuous exposure to Toaster sweaters on Instagram, and my on-going lack of chilly-weather garments resulted in my giving it another look. I became intrigued, in particular, by the boxy silhouette and grown-on funnel neck of version 2, and when I realised my fabric stash already contained a strong candidate, a project was born.


Aside from using my overlocker to finish the raw edge of the neck facing, I atypically used my regular sewing machine for this knit project. I wanted the slower speed, and therefore control, to successfully match the stripes at the side and sleeve seams, plus I knew that creating the side slits would be easier if I didn't try and overlock some of the seam. I made the straight-up size M, and made no alterations aside from shortening the sleeves a bit. It was a fun and simple make, although granted I made it more difficult by the need for stripe matching.


Fabric:

It was during a self-imposed, fabric-buying ban that I came across this perfect Breton ponte at C&H (mini-chain of old-lady homeware and craft shops) at some point last year. It was such a lovely, thick, stable ponte that I almost had a little cry. My lovely mum saw that I was having some kind of internal crisis and very sweetly bought 2m for me. I'm not sure if technically that's cheating, but I have no regrets and I haven't seen it in there since. Annoyingly I didn't pay attention to the information on the tag so I have no idea of its fibre content.


If I recall correctly, my initial leanings for this fabric were towards some kind of casual dress. But the truth is, I so rarely wear dresses that aren't pinafores, that zero ideas for what to do with it bubbled up as it sat forlornly in my stash. So when the possibility of a Breton-friendly top pattern (the Toaster) appeared, it was a no-brainer for the Breton fabric to become a Breton top.

Another bonus of this gorgeous quality fabric is how wide it is: almost 2m wide in fact (I checked). I cut the Toaster pieces out carefully (which usually calls for 1.5m fabric), and I'm pretty sure I'll have  enough for some kind of jacket/cardigan as well.


Thoughts:

As soon as I finished this top, it immediately went into regular rotation. The fabric washes beautifully, and even though this top has been both worn and washed multiple times, to me it still looks hot off the sewing machine. I'm very pleased that I remembered to add one of my 'Me-Made' woven labels from Dutch Label Shop (pictured above) to the back neck, but I talked myself down from adding any overt nautical touches like the small label at the hem made from woven anchor ribbon that I was considering.


The only criticism I have of this top is that I have found the neckline to be a touch too wide for comfortably wearing a cardigan over the top. I do anyway, but I prefer wearing it without. Bring on spring, in that case...

Friday, 18 January 2019

Eat, Sleep, Sew Repeats: Rust Viscose Elisabeth Blouse


Anyone in the Northern Hemisphere finding it near-impossible to get decent photos at this time of year? Yep, me too. I've finally managed to get some pics of this blouse that I made about six weeks ago, which is a relief because I've been itching to share it with you. The colour of the fabric isn't quite as orangey in real life, but it's close enough so that you get the idea. 


Pattern:

I was so in love with how my Elisabeth blouse Fabric Godmother ambassador project came out, that before it even got its first proper wear (I was saving it for Christmas), I bought some fabric to make another. I wanted to see what the Elisabeth blouse pattern by Republique du Chiffon would look like in a really drapey fabric (my first first was made in double gauze), so when this very reasonablly priced viscose twill arrived at Fabric Godmother, I bought the 2m required for this pattern. 

The size I'd picked first time round (a 40 I believe) was fine, so I cut the same again but added 5cm  length at the hem. Having made this pattern before, I knew to keep and eye out for the gathers where the front piece joins the shoulder yokes. When I made my green double gauze version, I found that the dimensions of the front piece resulted in less gathering along the shoulder area than around the neck, so I tried to condense the shoulder area gathers a bit more on this version. I did a good job on one side, but it looked barely gathered at all on the other so, although I'd already finished my seam allowances inside, I ended up unpicking and redoing it, which I'm please I did as it looks more gathered and equal now.


Fabric and buttons:

I'm a recent convert to viscose. Yes, it's a b*tch to work with: slipping around all over the place and creasing at the earliest opportunity. But it moves with such lovely fluidity and feels so slinky to wear. This twill-weave viscose is slightly thicker than the last viscose I worked with, which is why I thought it'd be perfect for a long-sleeved blouse that could be worn in cooler months than most viscose fabrics seem to be suitable for. 

I've had these buttons in my stash for at least six years. They are leopard printed shell and I got them from Sew Over It when I used to work there. I love them so much but had never found quite the right project to pair them with. It's made me so happy to finally get use from them. 


Thoughts:

I finished this blouse in time for going away at Christmas. With family get-togethers, house parties and an early celebration of Mr SoZo's 40th birthday, I knew I'd have plenty of opportunity to wear both my Elisabeth blouses, and wear them I did! I can report that the flow-y drape of this rust one was particularly good for having a dance in. Plus, they made me feel quite sexy in a prim, put-together kind of way when balanced out with tight fitting jeggings. Now that the parties are over with for a while, I've been trying various outfit combos to get them into daytime rotation. 

I probably don't need a third blouse from this pattern in my wardrobe, however if a slinky viscose with a bold print crosses my path that I fall in love with, I'll definitely keep this pattern in mind for yet another. 

Friday, 4 January 2019

Free Pattern Friday: Kids' Knit Skirt


Welcome to my monthly 'Free Pattern Friday' feature, where I road test a free sewing pattern or tutorial: sometimes a children's one, sometimes a women's one. I publish these posts every first Friday of the month, timed to provide inspiration for those of you who plan to get their sew on over the weekend. I firmly believe that, if you pick your projects carefully, sewing doesn't have to be a crazy-expensive way to clothe yourself and your family. Thanks to all the amazing pattern designers who have offered up their hard work for us to enjoy for free.

Happy New Year everyone!!! I hope you had a great Christmas/holiday period, and are feeling rested, relaxed and inspired for the year ahead. I'm feeling very excited about all the things I'm planning to achieve in 2019, so let me start by getting back on track with my monthly review of a free sewing pattern. 

Pattern type: 

I haven't tested a kids' pattern in a while, so let's talk about this simple skirt pattern by Small Dreamfactory that has the potential to be a great stash/scrap buster. It's a basic little A-line skirt style consisting of two pattern pieces: a front/back piece and a waistband piece. The author of Small Dreamfactory has published two blog posts relating to this skirt pattern which feature slightly different instructions, depending on if you intend to use knit or woven fabric (more on fabric choices in a bit), however the actual pattern files are currently accessible via the woven fabric post only. Thanks to Small Dreamfactory for sharing this pattern and their hard work for free. 

(image source: Small Dreamfactory)

Sizing info: 

The sizing range spans Newborn to 10Y / Euro sizes 56 to 140 (which relates to the child's height in centimetres). The sizing has been split into three documents: Newborn to 9 months, 12 months to 6Y, and 7Y to 10Y. I used the size 5Y with the size 6Y length for Dolores (aged almost five in these pictures). 

Fabric info:

So this is the confusing bit: this pattern is apparently suitable for both knit and woven fabrics (or 'jersey' and 'cotton' as they are referred to in the posts). I would definitely say it is more suitable for knit fabrics because I think it would be too tight if it were made in a woven: difficult to get on and off and potentially uncomfortable to wear. I reckon a nice, stable jersey would work well, as would interlock (which is what I used here). You could even go as thick as french terry or sweatshirt fabric, as long as it had a fairly decent stretch and recovery, but you'd probably want to use jersey or rib for the waistband. 


Findings: 

This is a lovely, basic, free pattern for making quick and easy little skirts, and because you add your own seam and hem allowances, the pattern can be printed on just two pages (for sizes Newborn to 6Y) or four pages (for sizes 7Y to 10Y). The instructions are brief, but illustrated, and take the form of a blog post so you can easily follow along on a smart phone.

Personally, I used the instructions as a guide and veered away from the described method of attaching the waistband. For my version, I inserted the loop of elastic inside my completed waistband, then pinned and stitched the waistband to the top of the skirt in one go, then the three raw edges are neatened together. My method is quicker and less fussy, IMO, plus avoids having a visible row of stitching through the waistband which could look a bit messy if it wasn't done carefully.

I also think it's worth emphasising that this pattern is for a really short style of skirt, and even though I picked a size up for the length, I'd probably lengthen this pattern further still for future versions.


Customisation ideas:

This simple skirt would be a fantastic canvas for all manner of customisation. Some ideas are:

  • applying pockets. Any pocket style could be added, but I'd be tempted to try a kangaroo hoodie-style pocket on the front
  • contrast fabric/colour waistband
  • appliques, iron-on transfers or stencils
  • add ribbon, lace, ricrac or other trim around the hem (remember that this might restrict the stretchiness of the skirt)
  • piping inserted into the side seams of a solid coloured skirt would look really sporty


Would I make it again?

If I had a small amount of knit in a solid colour, I'd definitely consider making my daughter another skirt using this pattern. I appreciate that this pattern goes up to size 10Y, and could easily be graded out further still. Free patterns for older children as not as easily found as free patterns for toddlers and smaller kids, so I might keep it on the back burner for when she's grown out of a lot of the others.

Related Posts Plugin for WordPress, Blogger...