Showing posts with label me-made-living. Show all posts

Thursday, 28 June 2012

Jersey Maternity Tops


Here are a few garments I made back in April that I've been dying to share with you, but had to keep mum (nice pun, eh?) for a while. When the super-lovely and generous Emily of the Botterman Empire offered to help me realise my dream to make a pair of shoes, we discussed how I could in turn make her  something by way of thanks for giving up her Saturday to spend it at her workplace.   


At first she mentioned her love of my denim sailor trousers which I would have happily reproduced for her, but then she confided that she was 'a little bit' pregnant! Too soon to officially announce, which is why I kept these creations under my hat until Emily had had a couple of scans and the all-clear. I wracked my brains and consulted two recently pregnant friends in an attempt to figure out how to materni-fy the sailor trouser pattern, but with time and expertise constrictions (not to mention I'd never met her in the flesh at that point so couldn't envision her body shape), we agreed that I would create some comfy maternity tops made from jersey instead. 


Using some advise from my then-pregnant boss who had made a few maternity garments for herself, I altered a semi-fitted T-shirt pattern to accommodate a bump. Forgive the poor approximation of a belly bump in these photos! I had to pad up the tailor's dummy with some folded fabric giving a rather lumpy effect, but it gives you the general idea. 


I gave Emily a rough run-down of the types of jersey I had in my stash or had access to at that time and she gave me her preferences on fabric and style options (sleeve lengths, necklines etc) and I was away. The first top I made (pictured at the top of this post) used some super-soft tonal red fabric that I procured at the Brighton De-Stash Meet-up back in February. I think it initially belonged to Rehanon. I made a short-sleeved scoop neck style using the alternate stripe direction for the neckline binding and the waistband. 

The second version was a good old basic black option with 3/4 sleeves and a scoop neck. I wanted to provide her with a garment that would be super-versatile to wear on its own or under a cardigan, seeing as her baby is due in November when it's often super-chilly. Unfortunately, the black knit I used was quite thick and didn't have very much stretch content, the result was that it was too tight and restrictive for Emily to wear. A couple of months later I made her a new black version from stretchier, lighter black jersey fabric which I believe performs much better. 


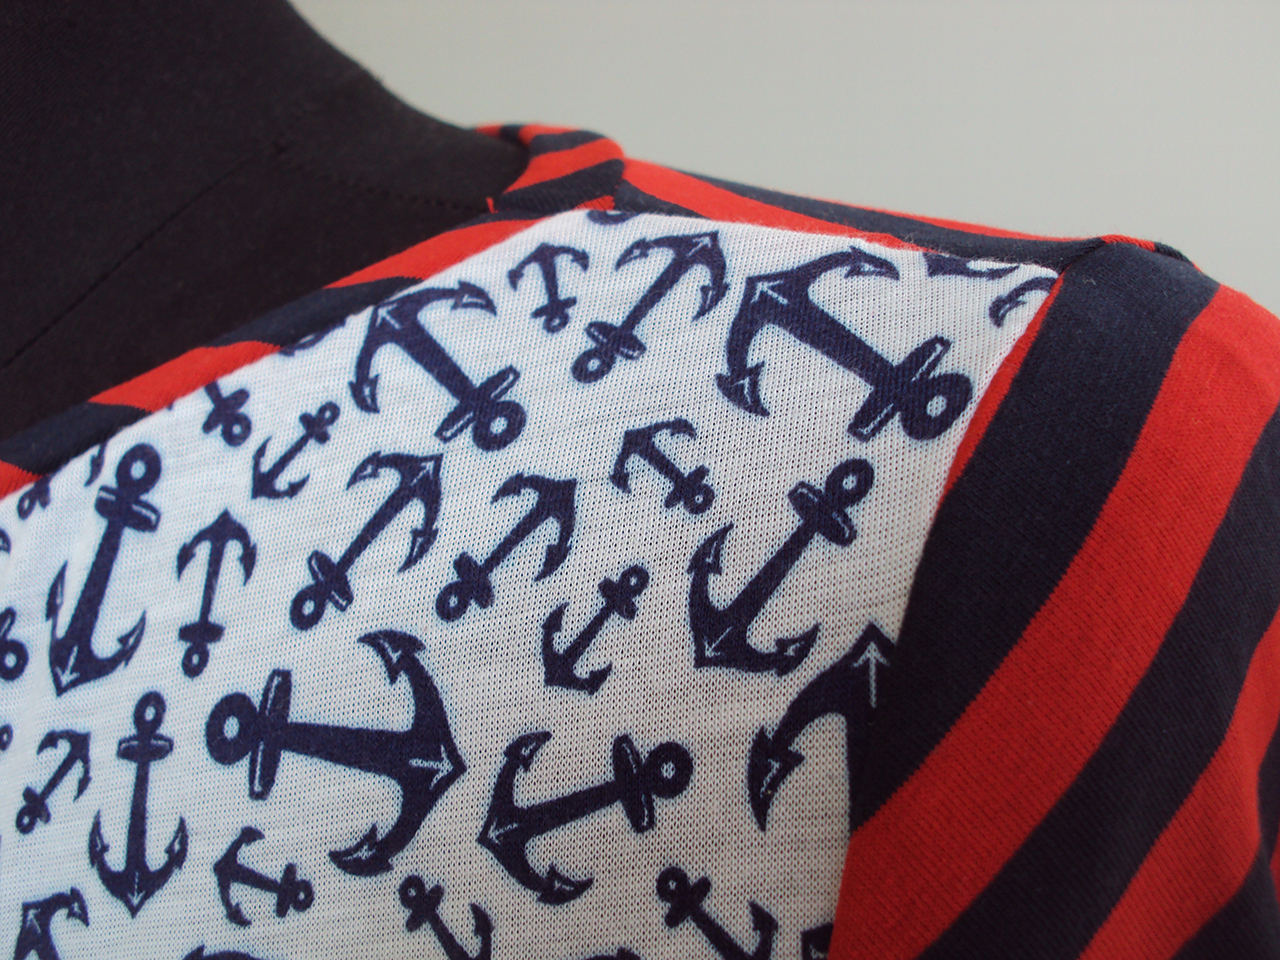
The last version, you may not be surprised to learn, is my personal favourite. Emily gave me the green light to create the ultimate in nautical maternity wear! If I ever get pregnant, you know this is the type of garment I'll be wearing. Style-wise, it has 3/4 sleeves with contrasting direction cuff bands and a slash neckline. The red and navy striped jersey is super slinky with a high elastane content so it should be really comfortable and pleasant to wear. The upper yoke panel uses a piece of anchor print jersey that appeared in a delivery at work. I considered adding gold buttons somewhere too, but chose to err on the side of caution just this once! 


If anyone is interested, I'll be happy to produce a tutorial on how to pattern cut your own maternity-bump friendly jersey tops. If that is something you'd like to see on this blog in the future, leave a comment on this post and if the idea  has sufficient appeal, I'll get on it over the next few weeks.

Tuesday, 19 June 2012

The Hem-isphere Project: The Parisienne Blouse


So here it is: my answer to Round 2 of Cecile and my Hem-isphere project. If you require or would like an update about why we chose what project starting points we sent each other for this round, please check this post. In short, the theme was 'Parisienne' and this is what I received from Cecile:


The package contained some black and white striped drapey synthetic crepe, some facetted black buttons and a 1970s Simplicity tunic sewing pattern. 

Pattern Description:

I decided not to go with the pattern Cecile included in the package. I really liked the style but it didn't look like it would a cardigan would fit over those loose sleeves very well. I hadn't yet found the right fabric to try out Simplicity 2601 (pictured below), but when I saw the black and white stripey stuff Cecile sent, I thought now might be a good opportunity. I think this pattern has a timeless look to it, it seems simultaneously retro and contemporary, which seems very much in-keeping with the Parisienne vibe. I chose the collared neckline and the short puff sleeves but omitted the sleeve band ties. 


Did it look like the photo/drawing on the pattern envelope once you were done sewing it?


Is it arrogant to say that I think mine looks better?! Better than the version in the envelope photograph anyhow. I was warned that this pattern sits very high up on the waist, but considering I have a high natural waist it sat well on me.  

Were the instructions easy to follow?


Yep. Although I went a bit off-piste in a hurry to move this project forward and had to go back and re-do a couple of steps. 

What did you particularly like or dislike about the pattern?


I feel it's quite a deceptively simple pattern. I guess it's the midriff band, which is self-faced, and the button placket fastening that makes the pieces add up and makes the cutting out stage may never end! I like how well is works with the application of piping, although this added A LOT of time required to get this project done, which has left Cecile twiddling her thumbs for me to wrap up Round 2 of our project.


I dislike how the button placket finishes quite high leaving an opening right where I feel most conscious: my belly! I usually wear a vest under tops anyhow because I'm always chilly, but a vest underneath this blouse will be compulsory.   


Fabric Used:


The thin stripey crepey stuff previous described. It has a lovely drape which I thought would work week for the gathered bust are of the upper bodice and the skirt section. However, something less fine and floppy would have been nicer to work with for the sections that require interfacing or doubling up, and the thinness also posed quite a challenge when applying the piping. I took my time though, discovered new reserves of patience and made it work the best I could. 


I was pleased that this panelled pattern allowed me to play with the direction of the stripes. The result is more evident when you see the blouse in the flesh as the fine stripes in the photos do that strange TV thing.     


Pattern alterations or any design changes you made:


Normally, the standard changes I make to sewing patterns are raising the waist line and adding more width at the hips. Neither of those were necessary in this pattern so the only pattern change I made was to redraft the sleeve band. The design changes were the addition of piping and altering of grain lines to create different directions for the stripes.

Would you sew it again? Would you recommend it to others?

Umm, yep I would make this again but in quite a few years time as I have a stack of other blouse patterns still to try. It might be cool to try it with a contrast fabric for the collar, sleeve bands and midriff section, perhaps a floral with a solid for the rest of it. I'd like to see that. Yes I would recommend it to others, but I would alert them to its high-waistedness and belly-gap!


Conclusion:


I'm not sure quite how close this final blouse remains to the initial vision of 'Parisienne' Cecile held. However, taking the inspirational starting word or phrase and then the materials each other has provided, and then running with them in whatever direction feels right is a big part of the actualisation of this project. So whatever the look and form of the final garment, as long as it exists then it has been a successful round. Plus I have already worn this blouse twice in real life and it was very comfortable and lovely to wear. So if that isn't the definition of a successful creation, then I don't know what is! 


A massive thanks to Cecile for creating these darling little Hem-isphere Project labels to put in our creations from this project! They make the garment super-special!

Sunday, 17 June 2012

New Flickr Group: Me-Made-Living


I'm very excited to announce the creation of a new flickr group called Me-Made-Living. Towards the end of the recent Me-Made-May '12 challenge, some of the members of the MMM'12 flickr group mentioned that they would be sad to loose the interaction and support that had developed during May in the group. If the peops are making requests, I'm listening! So here's a new group where people who create their own clothing and/or accessories can hang in-between me-made/self-stitched challenges.

Like the Me-Made and Self-Stitched flickr groups, this new group is a place to share the documentation of outfits/garments that you've worn that consist of or include self-made stuff. Like the other groups, this is for things that actually get worn in real life, and NOT a place to simply show off your latest creation. This group is a place to see how other members are rocking their self-made things, to get inspiration and discuss relevant topics.

Unlike the Me-made ad Self-Stitched flickr groups that have gone before, no 'signing up' to any pledge is required. You can join the group with more ease, no-one needs to accept your membership. It's totally up to you how often or infrequently you participate and share your photos. If you have been/are  interested in getting involved in the me-made/self-stitched challenges but have yet to feel you have enough self-made or refashion things to commit to a whole month, this group could be just the ticket to start sharing the outfits you put together which include a handmade item and get involved in the me-made community. Remember: Me-Made's are for LIFE, NOT just for MMMay or SSSeptember!!!!!

Personally, I plan to share one photo a week on the new group and also on this blog. I want to continue to work out new wearable combos of my self-created garments and I'll share my favourite/most-success of the week, each week.

This week my favourite outfit has been this one: 


Me-mades:
Red short sleeved remade sweatshirt (shown in MMMay'12 posts but not yet properly blogged)
Pants (knickers)
Vest (camisole)

This wholly me-made outfit may not look like I've embarked away from previous combinations, but i assure you it's a new one. I've never worn this short-sleeved sweatshirt without a long-sleeved T-shirt underneath and I was worried I'd get cold. But it was actually fine and very comfy. This jacket has really started to be something I rely on. It fills a certain role when the weather is fairly warm but changeable. It's quite light so if I take it out and it's not needed, it fits in my bag without being too hefty. 

Hope to see you over at the new Me-Made-Living flickr group!
Related Posts Plugin for WordPress, Blogger...