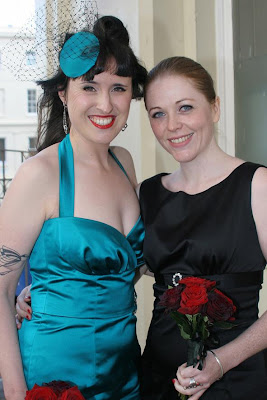
Ok peops, here it is! The most important, most photographed and most stressful garment I'll ever make: my wedding dress! Thank you to everyone who expressed a desire to see the pictures, here you are.
Style:
Those of you who have read my previous posts on the planning of my dress will know that I was always going for a mid-century retro look. By the time I'd narrowed down my research, I was definitely erring towards a wiggle silhouette made from a separate skirt and bodice and lots of shoulder/decolletage on show. Above all else, this dress had to make me feel special, so it didn't seem like a time to hold back on the sexiness or glamour! Pat's Best Man told me on the night 'a bride's job is to make other men feel sad you're no longer on the market'! Apparently.
Pattern:
I chose the
Burdastyle bustier/bombshell dress pattern (pictured below) as my basis because it had the general wiggle silhouette, waist seam and tight fitting bodice I knew I wanted. I ignored the cups sections and proceeded with toiling the bodice (with frequent fitting help from the ever-amazing
Rehanon) again and again until we achieved a really good fit. Instead of the faceted bust of the original pattern, I wanted to recreate a draped, gathered bust effect something like the white Modcloth dress pictured below (underneath the next paragraph).
For that I knew I'd have to attempt some draping using my own body as the mannequin. With lots of encouragement and pin-passing from Rehanon, I finally got a good shape for the bust panels. It was very scary deconstructing my draped bodice toile to make a the bust piece pattern, I can tell you!
As for the skirt, I was initially going for a draped effect like Gertie's bombshell version of this pattern, but it kind of, umm, evolved in a different direction. What I mean to say is that the gathered skirt toile to look very good and I felt unsure how to approach getting a nicer effect. Time for completing this dress was getting tight, especially with all the other elements planning a DIY wedding entailed, so I decided to go for a straight wiggle skirt. As soon as I took that headache away, I breathed a sigh of relief and knew I'd done the right thing. I love the sleek, straight skirt in these pictures, and I think it allows the gathered bust design to really stand out.
Fabric and colour:
My mum and I planned to buy the fabric for my dress and my best mate's bridesmaid dress in one of the fancy-fabric purveyors on Berwick Street in London, knowing that if we drew a blank, we still had all of Goldhawk Road to plunder. For my dress I went with an open mind, but knew it needed to have some structure, be a bit special (AKA, shiny or something) and red. I also had one eye out for a nice brocade. In one of the silk shops I was drawn to some fantastic red silk that had a vintage-y embroidered flower motif but it was very narrow and a squillion pounds per metre. The search continued...
In
Borovick Fabrics, I found the most perfect red acetate duchess satin stuff (its official name escapes me) at about £30 a metre. Hurrah! I thought. I glanced at the other colours it came in and was instantly drawn to an incredible peacock colour that really shone out. The sales guy was really helpful and pulled a long length of each colour of the rolls and held it up to me so I could see in the mirror which worked best with my colouring. He even dimmed to lights to create for me a night time effect, bless him! Both looked great, so he cut a swatch of each and we went off to have some lunch and a margarita to deliberate. Rather wonderfully, whilst my mum and I were staring at menus in the windows of potential lunch venues, I spotted Kat, the editor of the only wedding website I allowed myself to read:
Rock n Roll Bride!
We thought and ate, chatted and drank, and although Mum was on 'Team Red' at the beginning of the meal, she'd switched over to 'Team Peacock' by the end. Uncharacteristically, I felt pretty relaxed about having to choose between them. I think it was because I thought both were so lovely, I knew whichever I picked would have looked fantastic. The peacock won because it was just so vibrant and special.
Construction:
My goodness this dress took some work. For example, the bodice is underlined in calico to give extra support and structure, and there was so much hand-stitching, including a belt section that I eventually removed. Following
Gertie's Bombshell Dress class, I added boning to the lining, effectively making an inbuilt corset.
I made the whole thing in secret away from Pat because I didn't want to see it before our wedding day. I didn't even want him to know that I'd gone for a different coloured fabric than the red he (and almost everyone else) was expecting. I had planned to make this dress at work, but when the TRAIDremade studio closed down, I had to make it in our bedroom on my own with the door closed! I wish I had a pound for every time I said to Pat, 'Don't go in there'! I repeatedly vacuum the carpets and went around picking up tiny threads because the raw edges fray constantly.
Accessories and extras:
Early on in our engagement, I went to a posh vintage dress shop to try on some of their stock (even though I had absolutely no intention of buying anything) to get some idea. I saw an amazing head piece thing that was apparently called a 'bubble veil' which was basically some netting which covered most of the face only attached to a small fascinator/hat base. Then after attending a vintage-themed wedding fair in Hove back in the Spring with my friend Kirstin where we saw another, she declared she would make me one! She ordered heaps of supplied from Etsy and started playing about figuring out how to get the right look.
When I bought the peacock fabric instead of red, it was back to the drawing board a bit, because Kirstin had initially bought red netting because we thought it would show up well against my dark hair. She got some black netting and requested some of the fabric to cover the base, and she made me the most awesome veil that clipped onto my hair with a big hair clip.
I decided very early in in the wedding planning that I would do my own hair and makeup. Getting someone else to do those things seemed like an unnecessary expense when we were trying to keep to a small budget, plus I just didn't trust anyone else to get the kind of look I've spent years practising and feel most 'myself' with.
For my hair, I had to consider the placement of the hat/veil above anything else. I even got my fringe cut twice to get it to look correct with the veil. On one side at the top I made a victory roll, and on the other side I pinned the side of my hair up and towards the back so my veil had something to be clipped on to. The length of my hair was left to hang loose having mastered heated rollers to get relaxed, vintage-y curls.
My makeup was a variation of my usual 'going out' look, but with recently acquired additions of mac highlighter for the inside corners of my eyes and on the brow bone, greyish-brown shadow on my eye lids and a light tinted moisturiser/foundation to give a more even skin tone.
For jewellery, I'd wanted some vintage costume diamante pieces but my Etsy and Ebay hunts just weren't unearthing the right things. I thought a swallow brooch would be nice, but all the ones I found online were either too new and trashy looking, or old and beyond wearable. It was incredibly serendipitous that I found the perfect 1950's diamante swallow brooch at a local street fair in August!
I knew I wanted some dangly diamante earrings, but all the ones I'd found online had screw or clip-on backs. I wanted some for pierced ears but that didn't seem to be an option with the vintage earrings. New diamante earrings seemed to look quite tacky or were really expensive, so I was delighted when my friend Sarah leant me the perfect pair of dangly earrings for pierced ears. Hurrah!!!
I wore a pair of black heels that I love, are vaguely comfortable, and suited the style of dress really well. I wore them with some Pamela Mann love-seamed tights:
So there you go my friends! That's the low-down on my wedding outfit. Please keep your eyes peeled over the next few weeks for more wedding-related posts, there are lots of other handmade elements that made my wedding wonderful that I'd like to share with you all.


