Showing posts with label Stash Bustin'. Show all posts

Tuesday, 12 March 2024

Honeymoon Leopard Twill Pinafore


Over the last few months, I've been doing a lot of thinking about the fabric that lives in our stashes. A lot of the thoughts have become podcast episodes, including Fabric Goals for 2024, Seasonal Stash Organisation, and Sew the Precious with Stephanie Canada from Backroom Finds. I'm more convinced than ever that leaving our fabric sitting on a shelf or inside a tub or drawer, is an enormous waste. Participating in the Last Sewist Standing challenge led me to face some of my own long-term stash residents, and a clear out in advance of attending a fabric swap in London helped me address what I genuinely wanted, and what needed to be passed on to another sewer. 


Fabric:

I took my two oldest stash dwellers (and my pal Catherine!) to the London Fabric Destash Swap, and I have no regrets. The were both amazing quality, deadstock fabrics from Burberry that had been in my stash for about thirteen years. I'd used half of both of them and I just couldn't see myself using the rest. Well, with those lengths out of there, this length of leopard print twill took on the status of oldest stash dweller!

I bought about yard or so of this stretch twill from Mood Fabrics in New York during our honeymoon in 2012! I had a very Rockabilly-inspired look at the time, and I bought it with the intention of making a knee-length pencil skirt. However, soon after our return, I became pregnant, and that skirt never got made. I continued to enjoy the fabric, even as my personal style shifted away from Rockabilly, but the limited quantity made it tricky to find a use for it. 


(image source: L. F. Markey)

Pattern:

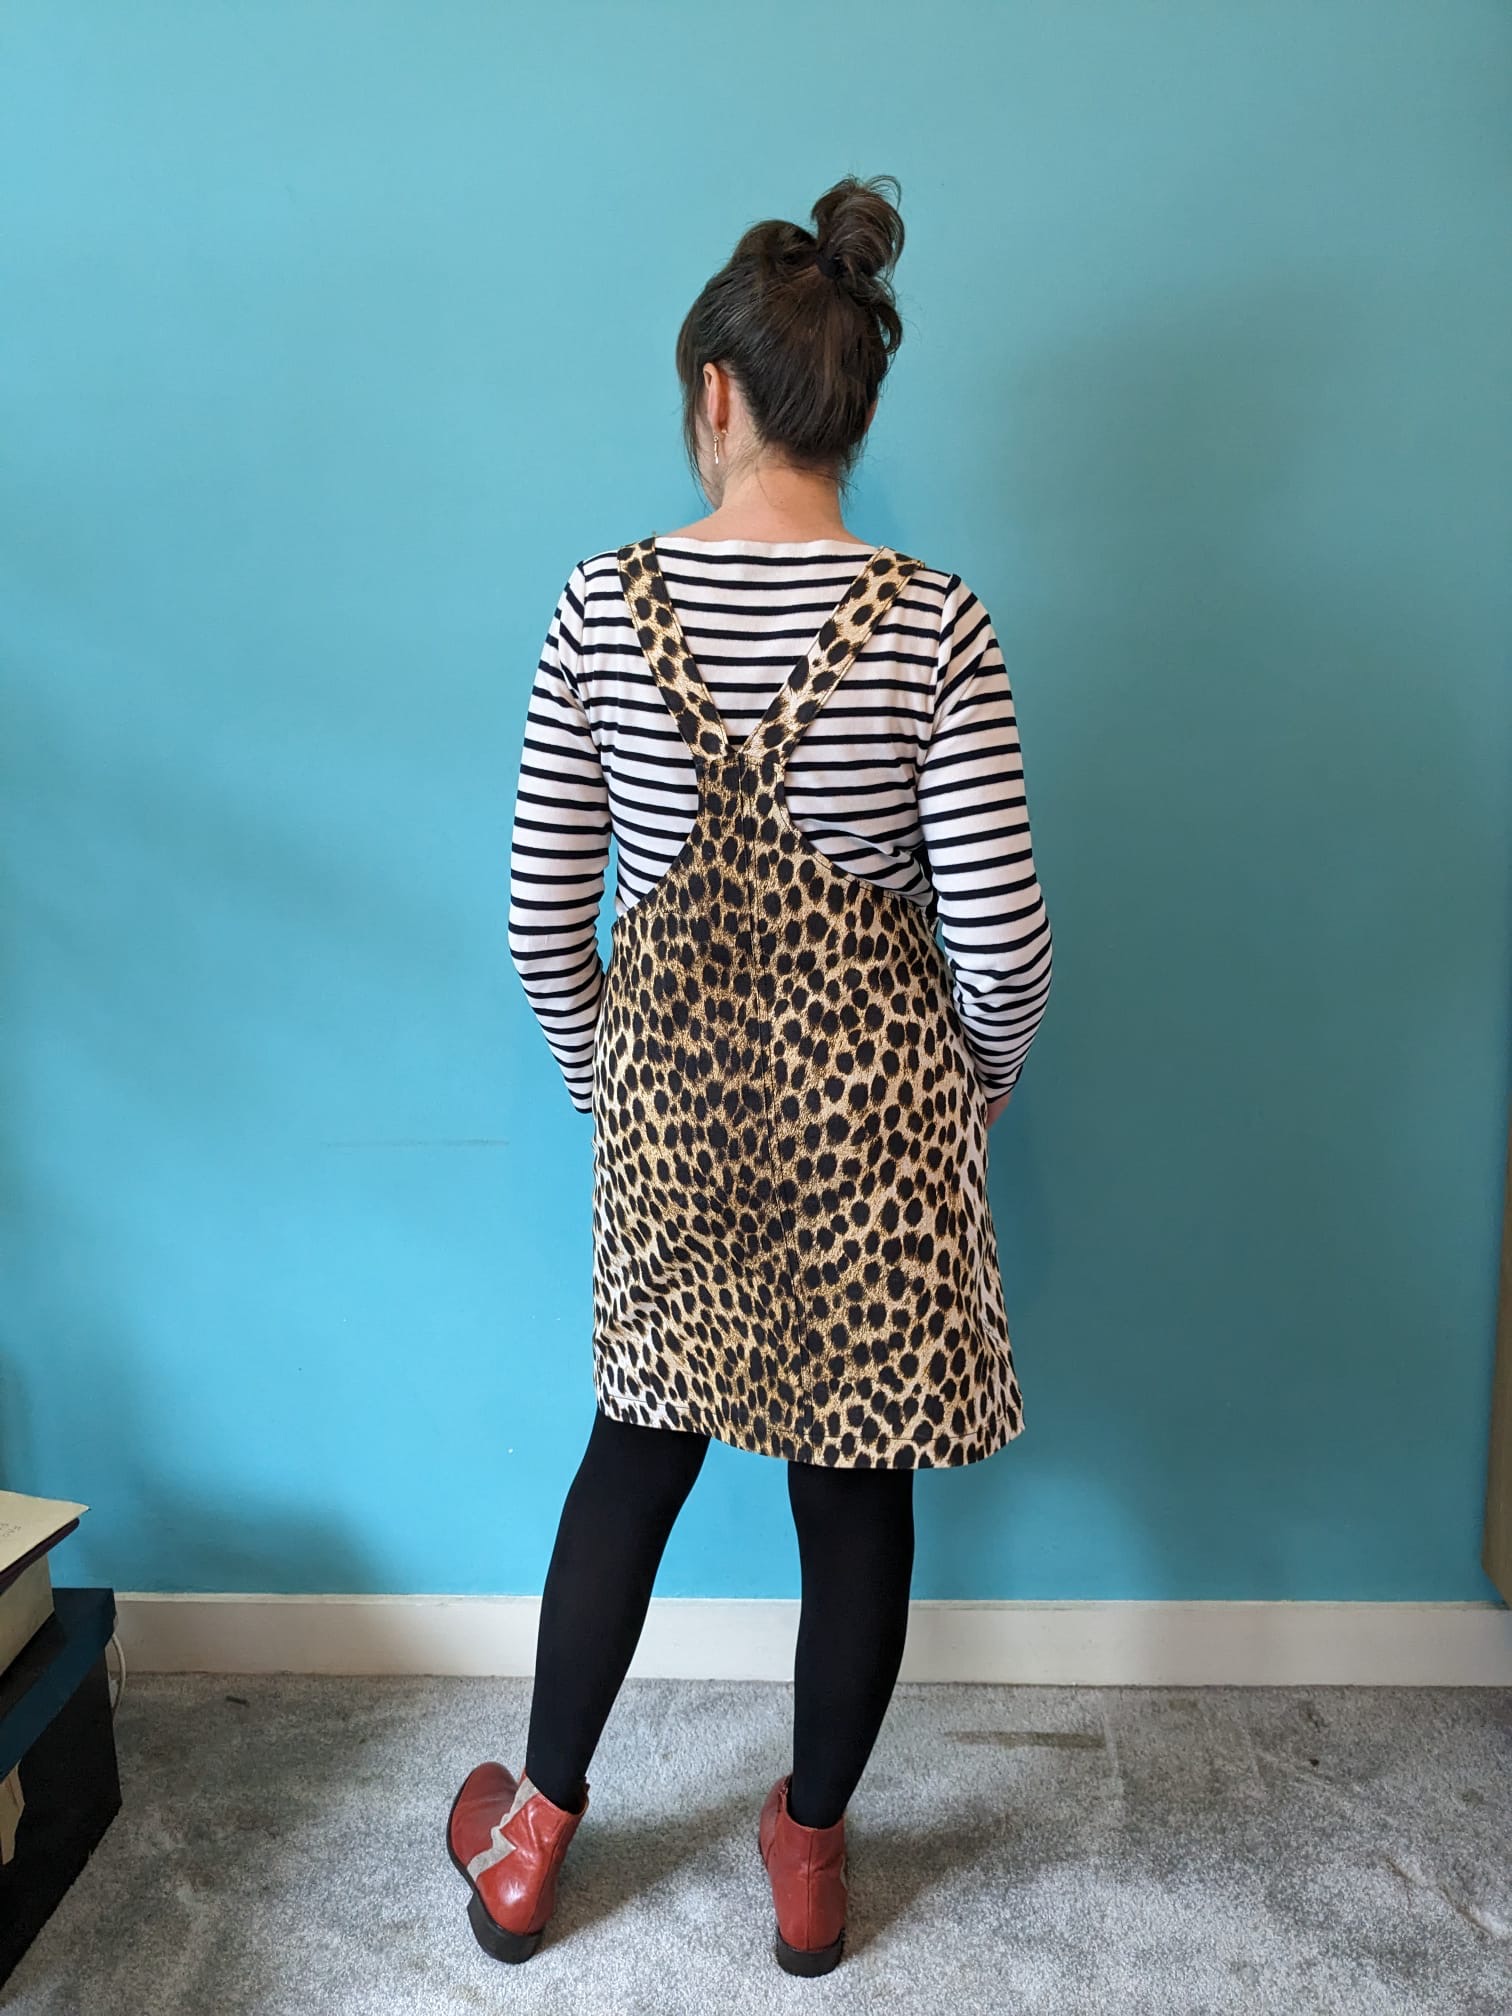
A couple of months ago, lightning eventually struck and the idea of a pinafore emerged! I'd recently had to declare my much-loved and often-worn black denim Cleo pinafore unwearable due to body changes, so I was missing a pinafore in my wardrobe. Then I saw an advert for the L. F. Markey dungarees pictured above, and found the shape of the bib really inspiring. So I unearthed my Tilly and the Buttons Cleo pattern pieces and drafted a new bib shape, and new pocket shape for it for good measure. 


The project: 

Cutting the pinafore from the limited fabric was a challenge. The leopard print fabric had two darker sections running parallel down the length of the fabric, and it required a bit of Tetris-ing to get the front pieces, back pieces, pockets and straps out of the fabric in a way that suited the darker and lighter parts of the design. The facings were cut from a remnant of dark blue stretch denim because there was no way to squeeze those out of the main fabric as well. 

I decided to alter how the garment was constructed. I wanted to future-proof this garment and make it as easy as possible to let it out if necessary as and when I change shape again. I learnt so much from making the two Sewing for Body Changes episodes (Part 1 and Part 2), and I've tried to apply those lessons where possible. During a mid-way fit session, it became clear that I had to take it in at the side seams a lot, so I now have very generous side seam allowances, which is great!


Thoughts:

I'm soooo happy that this pinafore now exists! I've worn it quite a bit since completion, and it's so nice to have the fabric on my body rather than in my stash. I figured out that that length of fabric has moved homes with us five times in those twelve years! I'm hoping it'll soften up a tiny bit through wear and washing, and I have no reason to suspect that it won't. 

Friday, 5 March 2021

Free Pattern Friday: Kid's Clementine Nightie


Welcome to my monthly 'Free Pattern Friday' feature, where I road test a free sewing pattern or tutorial: sometimes a children's one, sometimes an adult's one. I publish these posts every first Friday of the month, timed to provide inspiration for those who plan to get their sew on over the weekend. I firmly believe that, if you pick your projects carefully, sewing doesn't have to be a crazy-expensive way to clothe yourself and your family. Thanks to all the amazing pattern designers who have offered up their hard work for us to enjoy for free.


This pattern has been on my 'Free patterns to try' list for yonks. Designed as a nightie, the Clementine pattern by Sewpony can also be the basis for a great Summer dress (or even colder-weather pinafore if made in a thicker fabric and worn with a top underneath). There was snow on the ground here when I started prepping this project. And even though we're a long way from Summer warmth, I thought other Northern-hemisphere dwellers might also like a dose of warm-weather sewing inspo, and Southern-hemisphere dwellers might have time to squeeze this project in. Thanks heaps to Suz from Sewpony for sharing this pattern for free. It is easily acquired via the checkout on the Sewpony website (no payment required). 

(image source: Sewpony)

Pattern type:

The Clementine nightie (or dress) features a lined bodice with tie straps, and a gathered skirt with optional hem ruffle. There are no fastenings: it pulls on and off over the head. 


Sizing info:

The pattern is graded between 12 months and 12 years, equating to 80cm to 152cm in height. There is no layer function to avoid printing out sizes that you don't need. However, you can avoid printing unnecessary pages by only printing the ones that include the bodice and strap pieces, and using the measurements in the instruction document to draw the skirt and ruffle pieces directly onto the fabric.  

Going my the height of my model, I used the size 8 pattern pieces for my first version (the coral one). It came out wayyyyyy too big, however that does have a lot to do with my fabric choice (see below). 


Fabric info:

This pattern could be suitable for a wide range of fabrics, including most lightweight wovens and knits. I love that Sewpony recommend using an old duvet cover to make it, which would be lovely and soft if it's been well used and washed multiple times. 

I didn't have any suitable woven fabrics in my stash, so I turned to some very lightweight, very slinky jersey instead. I'd been scratching my head over what I should use this jersey for for at least eight years ever since my lovely friend Claire gave it to me. It's super thin so would most likely highlight lumps and bumps, but because the bodice of the Clementine is lined, I thought it just might work for this. As you can see, the finished garment ended up very wide and the armholes are very deep. I feel that the pattern should have included the suggestion to size down if using a knit, particularly those with quite a lot of stretch. 

This pattern would also be very sweet if made up in a needlecord or denim and worn as a pinafore.


Findings:

As with every Sewpony pattern I've tried, the instructions and the pattern itself were a joy to use. Both are so clear and unfussy, with just the right amount of explanation included in the instructions. A beginner with a couple of previous sewing projects under their belt would have little trouble following along. 

As I mentioned above, my coral version ended up way too big. It's possible that my slinky is on the outer limits of suitability, but I also feel that sizing down if using knits should be recommended. However, it did feel that the slinky jersey did look really good in the gathered skirt and ruffle by providing fantastic drape and movement. 

I decided to try another slinky jersey version because I've been trying to find a use for my scraps and leftovers of that type of knit. I sized down two sizes but kept the bodice length the same as the size 8. I also raised the armholes by about 3cm. I wanted more drama for this version, so lengthened both the skirt and ruffle pieces at bit, but kept the widths the same. I cut sections of knit (observing the grainlines as far as I could) of differing widths but the same length which I seamed together to form the skirt and ruffle. I think the result is pretty awesome and I've busted a masses amount of my slinky jersey scraps by making this dress. Dolores loves it, however, she does liken it to something Cinderella might be found in!


Customisation ideas:
  • Experiment with shortening or lengthening the bodice, skirt and/or ruffle pieces to create different looks and proportions.
  • Create a V at the neckline on the front and/or back.
  • Use three different fabrics, one each for the bodice, skirt and ruffle. A tonal effect would look amazing!
  • Shorten the skirt piece a lot and omit the ruffle to make a peplum top (I plan to try this).
  • Make it in needlecord or denim and add cute patch pockets to the skirt, or even one on the front of the bodice.


Would I make it again?

Absolutely! I definitely want to try making a peplum top based on my adapted version of this pattern. I can also see other versions for sleep and day wear, it's a great basic shape. 

Monday, 10 August 2020

Ankara Roberts Collection Jumpsuit


I've been getting a lot of satisfaction recently from using some of the older pieces from my fabric stash. This African wax print (AKA Ankara) fabric has been in there for at least 8 years, and became many different project in my mind before I actually made it into this jumpsuit. 


Fabric:

To finally get this fabric out of my stash and into my wardrobe, I added it to my #2020makenine plans (which you can see in this post). As Ankara/African wax print fabric goes, this one is pretty stiff, so finding the right project for it had taken me some time. I'd pre-washed it twice to see if it would soften up, but I think that's only going to come with lots of wear and the sporadic washes it will receive over (hopefully) years. 


As you can see, this fabric as a bold, large-scale print. I had quite a bit of it, but full-length jumpsuit patterns are hungry for fabric, so I didn't have the luxury of trying to match sections of the print at any point. I think the random-ness and resultant placement looks fine though. 


Pattern:

I've been in love with the Roberts Collection pattern by Marilla Walker for yonks. You get a lot of bang for your buck with this one, as the pattern includes a jumpsuit, dungarees, pinafore and top patterns. I finally decided to buy it in paper form from Fabric Godmother just before lockdown. 

(image source: Marilla Walker)

I traced the pieces for the jumpsuit off as I wanted to retain the original. I knew I'd been making some adjustments, plus you never know if you'll need a different size somewhere further down the line. Firstly, I altered the shape of the back pieces, to change the inverted V-shaped seam (see the line drawings below) into a regular, straight waist seam. I always have to remove length from the torso of tops, dresses and jumpsuits, and even though I then folded out 2cm from the front and back pieces to account for this, I wanted the option to add some length back or remove more length, should a mid-way fitting deem it necessary. 

(image source: Marilla Walker)

Thoughts:

I was hoping that the unfussy, casual style of the pattern would prove a suitable canvas for this intense print, and overall I think it just about works. There's a slight vibe of sleeping onesie/pyjamas about it, but that doesn't bother me at all. I could have positioned the lowest button slightly higher, which I would alter next time. Plus there's something slightly off with the fit around my bum (it often needs readjusting after leaning forwards) but it's not a major issue, and I reckon I could sort that out for future versions by comparing the rise of this pattern with the rise of the Heyday dungarees pattern. Ultimately though, I'm very happy with this make and wearing it is a lot of fun. I've got more older-stash items busting to share with you soon. 


Wednesday, 15 July 2020

They Said it Could Never be Done: A Hawaiian Zadie Jumspuit


I appears that most manifestations of the Zadie Jumpsuit pattern are made in lovely, earthy, solid-coloured linens. And whilst I fully agree that those look incredibly, I decided to head towards the other end of the taste spectrum for this, my second version of the Zadie pattern. 


My first version, if you recall, was made in some wonderful lock-and-key print African wax fabric (AKA Ankara). I adore that jumpsuit and it's one of my very favourite garments to wear. I love both the way it looks, and the way it feels. The only pattern alteration I made was to fold out 2cm from the bodice pieces to account for my short-waistedness, which I feel was a success. 


This Hawaiian print cotton poplin has been in my stash for almost six years. It came from Fabric Godmother, before I worked for them in any capacity. I've long been a big fan of Hawaiian print fabric, so it's a surprise to me that I hadn't used it sooner. I nearly used it a number of times during my several-year-long Rockabilly phase, yet I came out the other side of that phases with the fabric remaining unused, so I put it into my #2020makenine plans (you can see the full nine in this post).

The most head-scratching part of this project for me came at the beginning, trying to position the pattern pieces onto my limited amount of fabric. Not only was my length of cotton shorter than the pattern called for, but I wanted to cut the back piece on the fold (rather than in two halves) so as not to break up the print. In general I had to be very careful about print placement, positioning two sections of the print too close to each other, for example, would be super noticeable. To make it work, I ended up omitted the hip pockets, which was a shame but a necessary sacrifice. I also made the length shorter, but I had wanted to do that anyway.  


I constructed this jumpsuit mainly through the recent, very excellent, online Sewing Weekender event (organised by Charlotte from English Girl at Home along with Kate and Rachel from the Foldline), which I was very proud to contribute, adding my own little talk about saving money and resources whilst sewing. I hadn't expected to the chance to enjoy any of the content (basically due to the kids being around), yet I managed to watch quite a bit of it. Because I had already made this pattern before, I didn't need to concentrate on my project too much which really helped. 

As for this jumpsuit, I really like it! The print and colours are a bit intense, but when the sun is shining, I think it works well. I can definitely see yet more Zadie's in my future. Maybe a subtle, earthy-toned linen one should be next...

Tuesday, 19 May 2020

Biro-Ink Pivoine Blouse


Here's a new little blouse that kind of got made by accident. I had both the fabric and the pattern sitting in my stash for over six months, and finally I made the connection that they might work well together. And by Jove, they did!


Pattern:

As I've have proclaimed many times before on this blog, I'm a big fan of Delphine et Morissette patterns. And although I'd had my eye on the Pivoine pattern for some time, it wasn't until I saw a few versions on Instagram without the collar that I was truly sold. 


In essence, it's a sweet little loose-fitting blouse. There's gathering into the yoke on the front and back, plus an interesting, sloping yoke seam that piping can be inserted into, should one desire. The armholes are finished with simple, turn-back cuffs. The original pattern includes a rounded collar, but I used bias binding to finish off the neck edge instead. 


The construction of this garment was straight-forward and enjoyable. The instructions are in French, so I copy-and-pasted chunks into Google translate to guide me through.


Fabric:

Isn't it weird how differently the colour of this fabric looks in these two sets of photographs? IRL, it's a biro-ink, navy blue: somewhere in between the two colours that have come out in my pics. The colour aside, what I can tell you is that it's a crepe, most likely viscose. It came to me in the form of a remnant without a label, just over 1m in length. Even though the pattern called for 1.5m, because I was leaving out the collar pieces, I was just about able to squeeze the blouse out of my length of fabric with basically only dust to spare. 


I'd held onto this remnant for about a year because I wasn't sure I'd even wear a top in this colour. I tend to wear dark-coloured bottoms, so I didn't think I could make a navy top work in an outfit with the rest of my clothing selection. But having recently made the fawn-coloured Harper pants, I realised that I do have something suitable now. 


I love garments with simple, contrasting buttons. I went with these basic, two-hole, plastic ones from my stash so that they'd add contrast but wouldn't effect what other colours I could wear this top with too much. 


Thoughts:

I'll admit, I haven't fully integrated this top into my wardrobe yet, and I've only worn it once so far. However, I am currently working on some more bottoms that I hope will look good with it. As for the pattern, I can definitely imagine using it again. I'd like to try it in a cotton lawn, or a double gauze perhaps. 

Thursday, 14 May 2020

Frankie Baseball Tee in Isewlation


This garment was the first thing I sewed during lockdown. That was just seven weeks ago, but emotionally speaking, it feels like a whole year may as well have passed. Seven weeks ago I was definitely in shock, but also trying hard to make the most of the situation, and had a Blitz-era, 'What would Nella Last do?' spirit about me. I decided it would be a great opportunity to tackle my fabric stash, and make what I could from the things I already owned safe from the temptations of new fabric, seeing as I wasn't going to work. Pat was still at going to work during that first week, so I had decided to carve out an hour to spend sewing each day, when I would plonk the kids in front of some CBeebies and give myself a little break.

But the following week brought a less chipper attitude about the whole lockdown/global pandemic/thousands of people dying/the world being broken situation. Plus, Pat had to start working from home, so my sewing area became a permanent 'office' set-up in the daytime, as our bedroom is the only place we can shut the door on the kids and be able to concentrate. No daytime sewing for me anymore.

I've still be working through my stash, and making some great things, but it's all been in the evenings when I'm exhausted and sadly it feels like more of a slog. Anyways, I'm soooooo lucky in so many regards. Including having this great new baseball tee! (See how I brought things round there? Pretty smooth, eh?!)

Fabric:

You may recognise this fabric from a previous creation. I used some of this amazing hands-print interlock a couple of years ago to make a Freya top, and I had a weird-shaped piece left over that was burning a hole in my stash. The interlock came from Cotton Bee, a fabric printing service based in Poland that is similar to Spoonflower. They kindly offered me a voucher to test out their process and products to help promote them amongst my readers. I had been dwelling on how best to use the funny-shaped leftovers, and it eventually dawned on me that I could combine it with something else to eek a new, adult-sized garment out of the situation. 

This black knit, also an interlock, has been lurking in my stash for sometime too. In fact, I cannot reliable tell you how it got in there, or when. It's thinner than the hands-print, which concerned me a little, but they seem to behave well together. The black interlock is particularly soft and makes this garment the very definition of 'secret pyjamas'. 


Pattern:

I can't see a baseball tee and not think of my best friend. We've both been fans of them since the 90s, and she still has one or two, I believe. However, when I first received the Stretch! book by Tilly, the Frankie baseball t-shirt (despite being one of my very favourite names!) wasn't one of the patterns that jumped out at me. Then, more recently, one of the women who attends the sewing class I teach made a couple of fantastic Frankies, and I was sold. The fit looked great, casual and comfy but flattering. It's funny that I ended up making two garments from the same fabric, both using patterns from the same sewing book. Yet they perform quite different functions in my wardrobe. The Freya looks and feels a bit more formal to wear. It works very well under pinafores. Yet the Frankie definitely wants to be paired with jeans.

To make this Frankie, I made my usual pattern alterations. I blended between sizes, going up a size for the waist and hips, and I folded out 2cm from the length of the body to account for my short-waistedness. The only other monkey-ing that this project required of me, was to create a seam in the back because because my limited fabric wouldn't allow me to cut it in one piece. You can see the join in the image above, but I doubt you would have noticed unless I pointed it out. No offence. 


Thoughts:

So this will probably always be my 'Isewlation' garment, when we were all a bit excited in the early days of lockdown about how much sewing my might possibly get to do. Although there has been, and will be other garments made during this time, this is the one that I will remember as having been made in the strangest of circumstances. Whilst I was making this top, I would have been shocked to learn that almost two months later, little has changed. Apart from having made over 150 face masks. Also from my stash! But that's another post. 

Thursday, 7 May 2020

Candy Cane Emergency Growth-Spurt Pyjamas


The presenter on a podcast I was listening to the other day was urging their listeners to not spend this lockdown focussing on 'when all this is over', and to remember that although life is super weird for most of us right now, it is still life. As someone who has a habit of concentrating on the future, and frequently forgets to 'live in the now', the presenter's comment really struck a chord with me and I've been trying to bring it to the forefront of my mind from time to time. And my kids have been reminding me that life is very much still happening, by getting bigger!


Without warning, suddenly all Dolores's pyjamas were looking decidedly short in the ankle and sleeves. I realised that I had to pause the mask-making for a while and address the situation with what I could find in my stash. 


Fabric:

I've been whittling my stash down somewhat this year, and the jersey section in particular is starting to look a bit sparse. The last suitable piece big enough for my 7yo-sized-6yo was this printed jersey that was kindly given to me by my friend Claire a couple of years ago. It was a sizeable length that she rescued from the bin at a clothing company, and by this point I'd already made three kids' T-shirts from it. After this set, I've probably got enough scraps to make one pair of children's undies, then I really can declare this fabric busted from my stash. 


It's a single jersey, probably a cotton/elastane mix. The stripes are printed on, which gives it a slight stiffness. I couldn't tetris the pattern pieces to also include the bands, so I used a scrap of solid white jersey as contrast for those. 


Applique:

I decided to add a cute design to make these pyjamas feel more special. Using some more of the white jersey and some double-sided bondaweb, I cut out a cloud shape that I first designed for these dungarees. My sewing machine has a faux-blanket stitch option that I've used with some success in the past, so I stitched round the edges of the cloud with that. Finally, I embroidered a very basic sleeping face with some embroidery thread I found lurking deep in my sewing area. Making the whole applique, from start to finish, took less than an hour, but I think it really packs a (very gentle) punch.


Patterns:

For the top, I printed off the next size up of the free Ester and Ebbe top pattern by Threads by Caroline. I removed a few centimetres of length from the body, but otherwise made no changes. For the trousers, I used the mini Hudson pants pattern by True Bias. I'd recently made some mini Hudsons for Dolores from some scraps of stretchy french terry (as yet unblogged), and I love the fit. I thought the roomy crotch area would translate to being really comfy as pj bottoms. I omitted the front pockets, and narrowed the width of the waistband to accommodate the only suitable elastic I had in my stash. 


Thoughts:

Well, Dolores seems to really enjoy wearing these pyjamas, and the fact that this entire project cost me zilch gives me added pleasure. Even the faux-waist tie cord, which I added so she could quickly identify the front from the back, used to be the handle of a carrier bag. I love that I was able to fulfil my child's clothing need with just two or three hours work. Thankfully the pjs are large enough so she should be able to wear them for a couple of years, and hopefully they're gender neutral enough that her brother will also want to wear them in a few year's time! 


Friday, 23 August 2019

Summer Hat-aganza!


Where we live, it felt like summer 2018 consisted of three months of back-to-back, warm, sunny days. No doubt due to climate change, the consistency of the sunshine and warmth was unlike any summer that I can remember. If this alarming trend is here to stay, then I'm going to have to up my skin-protection game. I'm very good at putting sun hats and sunscreen on my fair-skinned kids, but I'm pretty rubbish about protecting myself, and last summer I frequently came home from a park or beach session with a sunburnt scalp and hairline. So at the beginning of this summer, I set out to make sun hats for one and all. 


Frankie's bucket hat:

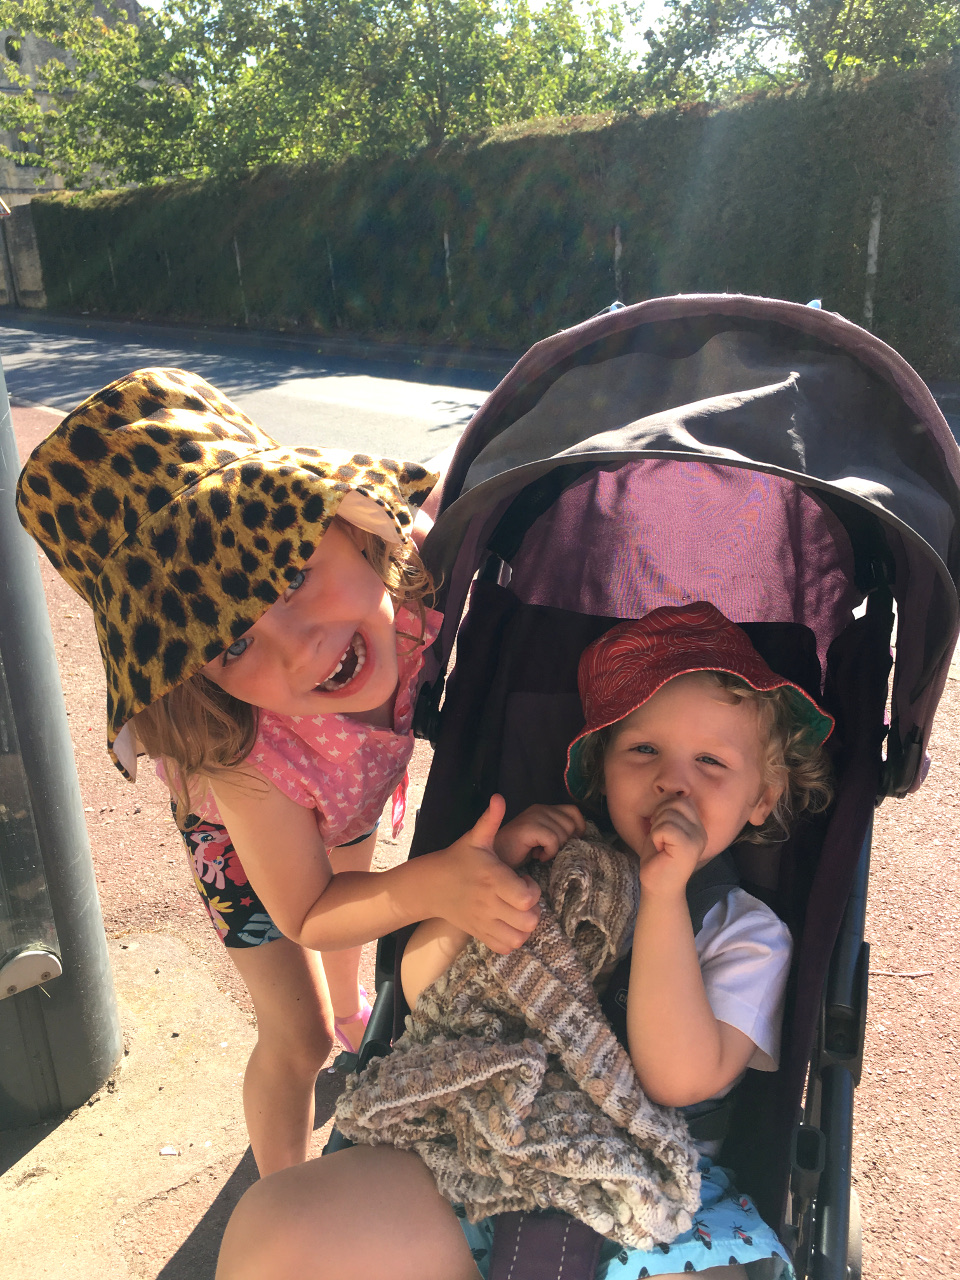
Frankie still fit in Dolores's old sun hats but most of them are looking a bit ropey, so I decided to make him a fresh one. I reached for my TNT bucket hat pattern, the excellent and FREE Oliver + S Reversible bucket hat pattern (that I have previous used here, here, here and here). I made him the size Medium with no changes. I was determined to use fabric from my stash of woven scraps and small pieces for all the hats I planned to make. I had a sizeable piece of this tomato-red and white canvas-y stuff that I bought for one of the samples of my Anya shoulder bag pattern, and after an extended session of pattern piece Tetris, I was able to squeeze both Frankie and Dolores's outer hat pieces from this one small piece of stash. I used another scrap for the lining, this time some solid teal/turquoise/green quilting cotton that had been leftover from a commissioned sewing project from a few years ago. 


Dolores's Serpentine hats:

Although Dolores still fit into the crown of her bucket hats, the brim was no longer actually protecting her face from the sun. I could have extended the bucket hat's brim piece of course, but having tried that approach here, I wasn't sure that the proportions would look very good. I'd already had my eye on the Elbe Textiles Serpentine hat pattern for myself, but I had a minor revelation and realised that it might work well for Dolores also. Her face would be suitably protected from the sun, plus I felt that she would enjoy the drama of a wide-brimmed hat! 


Unsurprisingly, her 5yo head was too small for this adult's pattern. I did some measuring and calculated that printing out the pattern at 95% scale and cutting the smallest size should fit, which it did very well. The first version (red with white print) fit her well around the crown, but the brim, which I had interfaced with two layers of medium-weight fusible interfacing, was too wide and floppy. The lining was a scrap of awesome quilting cotton that I scored long ago at a fabric swap. It had a repro print of 1950s children playing, and although it had been initially okay-d, she later claimed to dislike it. She tended to wear this hat with the brim folded back, 1990s Blossom Russo style, and actually got a fair bit of use from it until she left it at school on the last day of the school summer term (sigh).


With version 1 locked up in a classroom for the duration of the summer holidays, I quickly had to make another before we left on our trip to France, a few days later. I was running out of suitable scraps of fabric that she approved of, but thankfully she gave the thumbs up to this leopard print fabric that was left over from this coat that I made several years before she was born. I used some solid cream cotton twill for the lining, reduced the depth of the brim a bit, and interfaced with fairly thick, sew-in interfacing instead of the fusible, which keeps the shape far better. 


Mum's Serpentine hat:

Full disclosure before you marvel at all this selfless sewing: the Serpentine hat that became my mum's was actually intended for me. My head measurement corresponded with the size Small, so that's what I made, despite being skeptical as my head has never been described as small! Using scraps from this pinafore and this dress, and using the thick-ish sew-in interfacing, annoyingly for me, it came out too small. But my loss became my mum's gain when she declared that she could make some use from it. Hurrah!


My Serpentine hat:

My second version was made from red canvas fabric that I'm guessing is a cotton/something-synthetic blend that I have no recollection of entering my stash. I used the same fabric for the outer and lining because by this point I just wanted to get the damn thing finished. The fit is much better, but I dislike the look of the fabric, especially now it's spent time crumpled up in my bag. 


Thoughts:

This summer hasn't proved as sunny as last year's, and none of these hats became as indispensible as I thought that they would be. They did get some moderate use, plus who knows what future summers hold, so I don't feel that making them was a waste of time or fabric. I'm a big fan of the Serpentine hat pattern though, and I'm pleased that I bought it. Before next summer, I'd like to make myself another, probably in denim, perhaps with gold jeans-style topstitching. Then we should all be set for hot weather head wear, unless Frankie has a growth spurt and I need to bust out the bucket hat patten in a Large. 


Related Posts Plugin for WordPress, Blogger...