Showing posts with label dress. Show all posts

Thursday, 22 June 2023

Fabric Godmother's Peony Dress Pattern


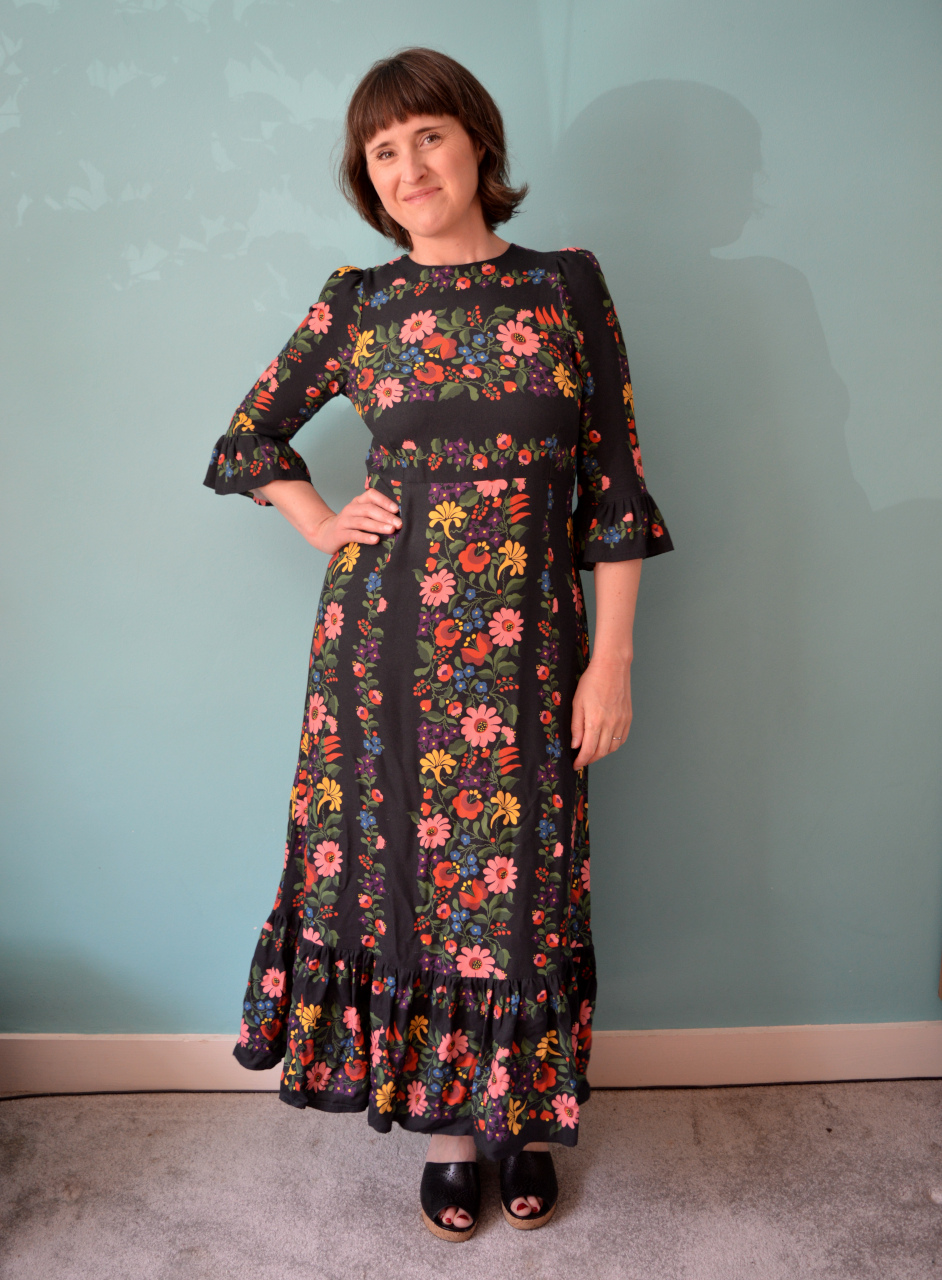
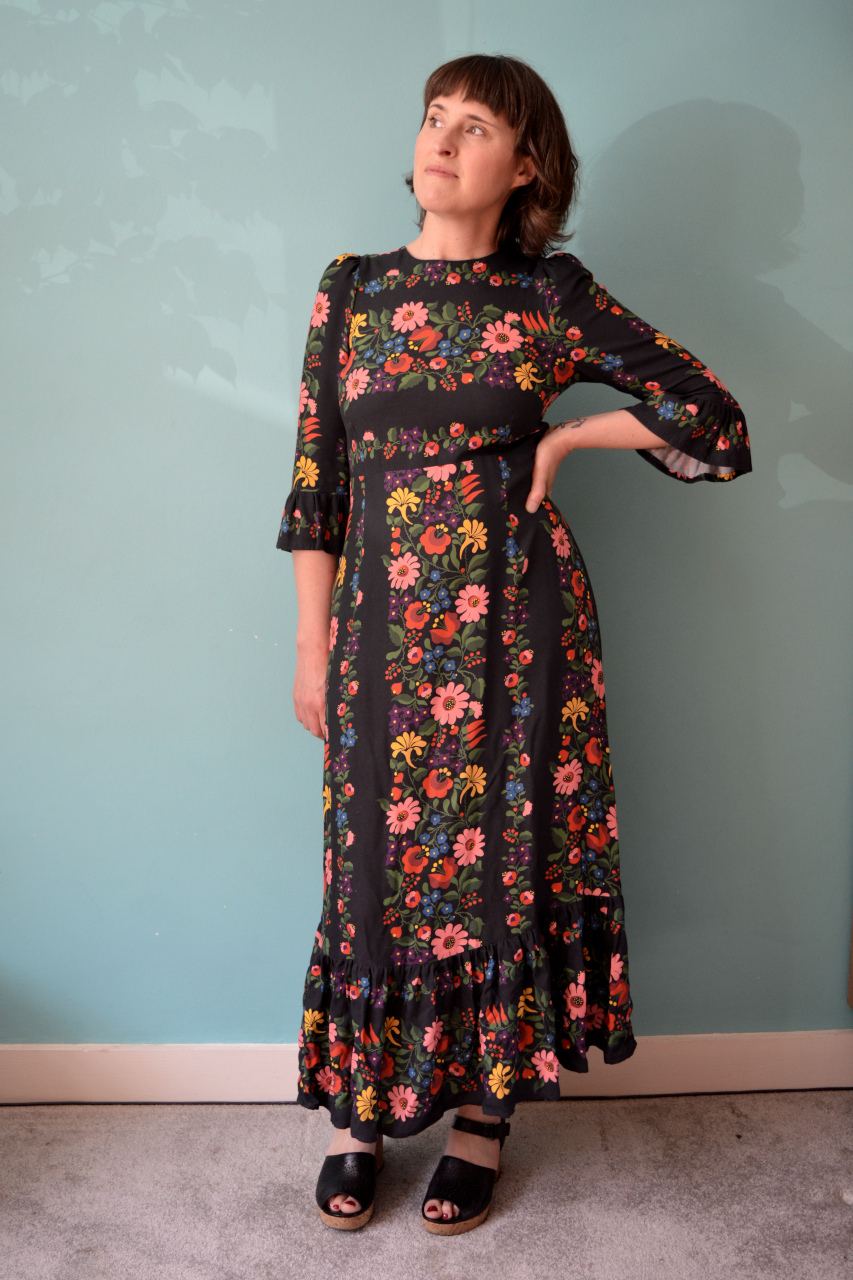
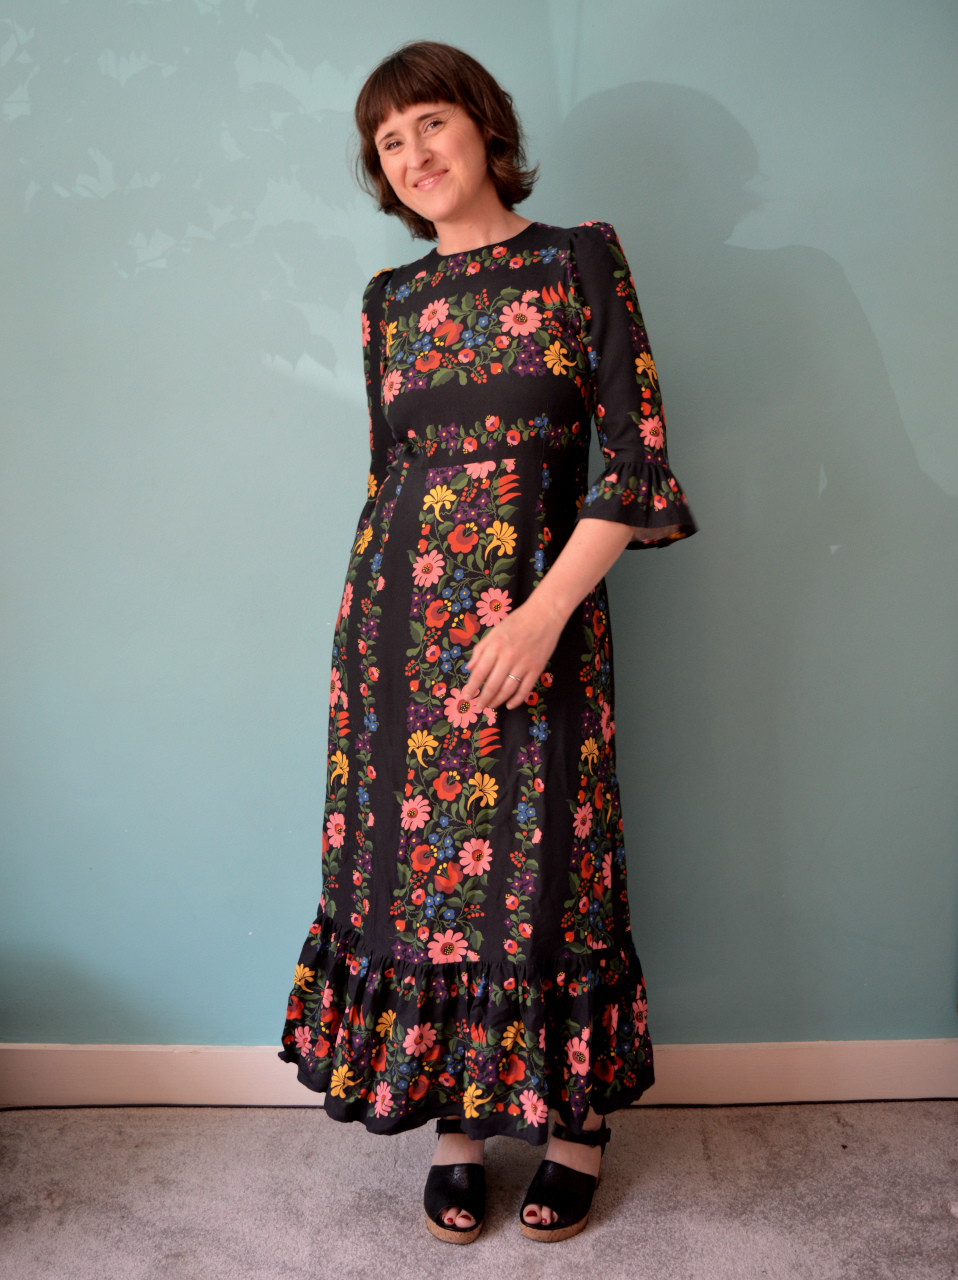
Try to suppress your surprise at the fact that I've made a dress! This is my version of a brand new sewing pattern that isn't even available just yet. Fabric Godmother, where I've been working part time for nearly five years, has had this pattern in the works for yonks. It's named the Peony dress pattern and it'll be available to buy on 29th June. I have been only lightly involved in its production, however it's been super interesting watching its development behind the scenes. 


Pattern testing:

The point at which I got involved was when FG invited us members of staff to have a sewing day to test the pattern out. This was a very clever move on their part, because it gave them an opportunity to see how sewers with different levels of experience found the instructions, and how the pattern worked on a variety of bodies. We got to choose our fabric in advance, then we picked which view of the pattern we wanted to make and got cracking. We were asked to make notes on anything we found tricky or confusing with the instructions and pattern itself. About a week later, once we'd had a chance to finish up our garments, we each had a lengthy debrief to share our findings. 


Fabric:

Very generously, we were able to choose any fabrics we liked to make up our versions. However, because I didn't want to feel I was cheating my Last Sewist Standing challenge pledge, I chose a fabric that had a flaw in that wasn't actually on sale to the public. This is the Joni ECOVERO crepe, which looks and behaves a lot like viscose. The particular roll I cut mine from has a problem with the selvedge, which was totally fine to use for this project, but couldn't be sold as is. 

Despite florals really not being my thing, I have used a Joni print fabric previously to make this well-used Vali top. Therefore, I knew I was going to have to allot extra time and fabric to making a well considered print placement. I'm really pleased with how the print sits on this dress. I actually had to make the sleeve ruffles slightly narrower than the pattern, and the hem ruffle slightly deeper to fit with the dimensions of the print design.


Thoughts:

It was a really interesting experience to be part of the production of this pattern. Despite it not being particularly 'me', I do love my finished dress. I have even managed to wear it already, to a talk I gave at the social sewing event at Fabric Godmother earlier this month about sewing more sustainably


Friday, 5 March 2021

Free Pattern Friday: Kid's Clementine Nightie


Welcome to my monthly 'Free Pattern Friday' feature, where I road test a free sewing pattern or tutorial: sometimes a children's one, sometimes an adult's one. I publish these posts every first Friday of the month, timed to provide inspiration for those who plan to get their sew on over the weekend. I firmly believe that, if you pick your projects carefully, sewing doesn't have to be a crazy-expensive way to clothe yourself and your family. Thanks to all the amazing pattern designers who have offered up their hard work for us to enjoy for free.


This pattern has been on my 'Free patterns to try' list for yonks. Designed as a nightie, the Clementine pattern by Sewpony can also be the basis for a great Summer dress (or even colder-weather pinafore if made in a thicker fabric and worn with a top underneath). There was snow on the ground here when I started prepping this project. And even though we're a long way from Summer warmth, I thought other Northern-hemisphere dwellers might also like a dose of warm-weather sewing inspo, and Southern-hemisphere dwellers might have time to squeeze this project in. Thanks heaps to Suz from Sewpony for sharing this pattern for free. It is easily acquired via the checkout on the Sewpony website (no payment required). 

(image source: Sewpony)

Pattern type:

The Clementine nightie (or dress) features a lined bodice with tie straps, and a gathered skirt with optional hem ruffle. There are no fastenings: it pulls on and off over the head. 


Sizing info:

The pattern is graded between 12 months and 12 years, equating to 80cm to 152cm in height. There is no layer function to avoid printing out sizes that you don't need. However, you can avoid printing unnecessary pages by only printing the ones that include the bodice and strap pieces, and using the measurements in the instruction document to draw the skirt and ruffle pieces directly onto the fabric.  

Going my the height of my model, I used the size 8 pattern pieces for my first version (the coral one). It came out wayyyyyy too big, however that does have a lot to do with my fabric choice (see below). 


Fabric info:

This pattern could be suitable for a wide range of fabrics, including most lightweight wovens and knits. I love that Sewpony recommend using an old duvet cover to make it, which would be lovely and soft if it's been well used and washed multiple times. 

I didn't have any suitable woven fabrics in my stash, so I turned to some very lightweight, very slinky jersey instead. I'd been scratching my head over what I should use this jersey for for at least eight years ever since my lovely friend Claire gave it to me. It's super thin so would most likely highlight lumps and bumps, but because the bodice of the Clementine is lined, I thought it just might work for this. As you can see, the finished garment ended up very wide and the armholes are very deep. I feel that the pattern should have included the suggestion to size down if using a knit, particularly those with quite a lot of stretch. 

This pattern would also be very sweet if made up in a needlecord or denim and worn as a pinafore.


Findings:

As with every Sewpony pattern I've tried, the instructions and the pattern itself were a joy to use. Both are so clear and unfussy, with just the right amount of explanation included in the instructions. A beginner with a couple of previous sewing projects under their belt would have little trouble following along. 

As I mentioned above, my coral version ended up way too big. It's possible that my slinky is on the outer limits of suitability, but I also feel that sizing down if using knits should be recommended. However, it did feel that the slinky jersey did look really good in the gathered skirt and ruffle by providing fantastic drape and movement. 

I decided to try another slinky jersey version because I've been trying to find a use for my scraps and leftovers of that type of knit. I sized down two sizes but kept the bodice length the same as the size 8. I also raised the armholes by about 3cm. I wanted more drama for this version, so lengthened both the skirt and ruffle pieces at bit, but kept the widths the same. I cut sections of knit (observing the grainlines as far as I could) of differing widths but the same length which I seamed together to form the skirt and ruffle. I think the result is pretty awesome and I've busted a masses amount of my slinky jersey scraps by making this dress. Dolores loves it, however, she does liken it to something Cinderella might be found in!


Customisation ideas:
  • Experiment with shortening or lengthening the bodice, skirt and/or ruffle pieces to create different looks and proportions.
  • Create a V at the neckline on the front and/or back.
  • Use three different fabrics, one each for the bodice, skirt and ruffle. A tonal effect would look amazing!
  • Shorten the skirt piece a lot and omit the ruffle to make a peplum top (I plan to try this).
  • Make it in needlecord or denim and add cute patch pockets to the skirt, or even one on the front of the bodice.


Would I make it again?

Absolutely! I definitely want to try making a peplum top based on my adapted version of this pattern. I can also see other versions for sleep and day wear, it's a great basic shape. 

Friday, 14 August 2020

Hawaiian Helios Dress


I'll be honest with you, I don't remember too much about the construction of this sewing project. These photos were taken a year ago, shortly after I made this dress, and my memory of the blow-by-blows is hazy. The reason I waited a year to blog about it is because this week was the first time I got to wear it. The dress was made to showcase a new fabric design (more on this in a sec), and was on display at a couple of fabric and sewing shows. Seeing as large-scale shows (both trade and public) are not happening for the foreseeable future, the dress resurfaced and I got to give it a whirl during this week's heatwave. 


Fabric:

I was given the opportunity to sew with some of the first batch of fabric produced by Fabric Godmother. All their prints have been developed using vintage pattern designs derived from textiles, wallpaper and even floor tiles. They were all lovely, but this amazing Hawaiian design called 'Hula' sung out to me the loudest.

The base cloth is a viscose crepe, which is a fabric type that I have little experience using. As you'd expect with a viscose, it can be quite slippy, so I really had to take my time cutting out the pattern pieces. Stitching it wasn't too challenging, but pressing flattens the texture somewhat, hence the slight fluted appearance of the sleeve hems in these pictures. They'll lay flatter once the dress has been washed, I have no doubt. 


One of the things I love about this fabric is the scale of the print. The designer has clearly thought about it carefully, and with garment sewing firmly in mind. It's large enough for the images to be recognisable from afar, but not so large that it limits the types of garments you can make from it. 

The colours are great too. As a lover of Hawaiiana and Hawaiian-inspired fabric, I'd be the first to admit that the colours are usually very bold. But the colour palette in this feels more wearable, and makes me think of vintage postcards sent from holidays long passed. 


Pattern:

Fabric Godmother also allowed me to choose a pattern to use to try out their fabric. Historically, I don't gravitate towards flow-y fabric to sew with, so I had to give my pattern selection a lot of thought. I have, however, experienced many hot days, both on abroad and in the UK, when I wished my warm-weather clothing selection was a bit bigger. A floaty dress that skimmed my body would have been very welcome. 

Eventually I opted for the Atelier Scammit Helios dress pattern, because it had the breezy style that would suit a viscose, plus it had a cinched-waist silhouette that I feel my body needs. As with most Atelier Scammit pattern designs, the Helios dress pattern offers multiple style possibilities (see below). There are two sleeve variations and three lengths. I went for the less dramatic sleeves, and picked the tier-free skirt shape but lengthened it to hit just below my knee. 

(image source: Atelier Scammit)

Elastic is inserted into the back half of the waist, and the front is pulled in with a drawstring, meaning that although it defines the waist, it's still really comfy and can be adjusted easily. Of course, I had to position the waist channel higher than the pattern recommended to account for my short-waistedness. 

As you can see, the neckline is a deep V-shape. I normally dislike V-shaped necklines on me (unless it's at the back!), but I think the width and depth of this one looks nice.


Thoughts:

As you can tell, this project and garment took me out of my comfort zone. Sewing with an unfamiliar fabric pushed me, and since this project I have taken on a number of viscose and slinky fabric projects. The style still isn't something I'm immediately drawn to, but when I wore it during this week's heatwave, it felt fantastic. This also raises the dress-tally of my wardrobe to two (discounting two shorter ones that I now wear as tunics over jeggings)!


Wednesday, 12 August 2020

Lola's Remade Sundress


About a third of my stash consists of clothes destined to be remade in some way. The original version of this dress (pictured below) was made using some vintage Laura Ashley printed cotton and a vintage Simplicity sewing pattern. I made it 9 years ago, but truth be told, the fit wasn't very good. Why I didn't just toile up the front and back bodice pieces, I don't know.  


Because of the poor fit, it only got a couple of wears, so the fabric was still in excellent condition and prime for remaking. This summer, Lola was short on warm-weather clothes. She loves wearing dresses that have a fitted bodice and a full skirt, which I felt I could easily create from this similar-styled garment. I carefully unpicked the original dress, retaining the side seams and binding of the skirt section. 


To make a pattern for Lola's version I started off with the bodice pieces from a children's pattern from a recent edition of Burdastyle magazine. Lola likes the waistline of her clothes pretty low so I lengthened the pieces. I want it to last two summers, and therefore needs to survive at least one grow spurt. I did what I should have done for the original dress and made a toile of the bodice to assess the fit. This told me I needed to reduce it across the width, but otherwise it looked alright. 


Because the adult version's skirt was obviously going to be too long, I had a bit of fabric from the top of the skirt section to play with which became the straps. Unlike the original dress, I decided to line the bodice of this incarnation. I lined it using some red poly/cotton from my stash (that had been table clothes at Pat and my wedding!), inserting the straps into the seam at the neckline at the front. 


Next I attached the skirt. The original skirt was never very full, so I used the full width of what was available. The original dress had the zip inserted into the side seam but I wanted to position the it in the centre back this time round, which meant that the other, former, side seam ended up at the centre front. Thankfully my original pattern matching wasn't bad, and it's largely hidden amongst the gathers anyhow. 


With the skirt attached and zip inserted, it was time to sort out the other end of the straps. My first thoughts were to have the straps simply going over the shoulders. I got her to put the dress on, and after some playing around, I discovered that a cross back style was possible. I planned to stitch on some buttons at the back as a decorative feature, however, when I realised that it was going to be too tricky for her to get the dress on and off with the straps stitched in place, I added buttonholes and made the buttons functional. It adds some additional future-proofing too, as I can restitch the buttons a little further down on the straps in the future.


Thoughts:

What often surprises me about adult's-to-kid's clothes refashions is how little fabric there is left over! I guess this is especially so now that my six-year-old is almost in eight year old-sized clothing! I'm thrilled that the lovely fabric got to have another life, and she definitely enjoys wearing it. If I say so myself, I think I nailed the fit of the bodice: it's fitted (as per her liking), but not too tight (as per my liking!). Remaking garments always throws up challenges that a regular sewing project that started with an adequate length of fabric wouldn't have. But working out how to roll with those, and coming out with a wearable garment that the recipient enjoys wearing is super satisfying. It also feels like a 'free' project!  

Saturday, 28 September 2019

On The Fence: Fringe Dress


So, this dress. I have a lot of conflicting feels about this dress. I actually made it one whole year ago, to wear to my children's 2nd and 5th birthday party. Next week they will turn 3 and 6, but have yet to share this dress until now. I just couldn't work out how I felt about it, and therefore, wasn't sure what to write. Having failed to fall in love with it during its first outing, the weather then turned too cold to wear it again that year. When I saw it hanging in my wardrobe during the colder months I'd have some vague thoughts about cutting it up, harvesting the larger sections of fabric to combine with the short length I have left, and making a top instead. But then this summer came rolling round, and I ended up wearing it a ton, which kind of muddied those plans.


Pattern:

No prizes for recognising that I've used the Chalk & Notch Fringe dress/blouse pattern here. It was a smash hit in 2018, so I had ample opportunity to see lots of different versions on social media. I am really NOT a dress person, but I do sometimes fantasise about breezing around in a dress. I was struck by the clever proportions of the Fringe's loosely-fitted bodice, and the not-super-gathered skirt, plus the gently shaped skirt hem. I really dislike wearing fit-and-flare dresses because I feel too 'little girl in her party dress' in them, but I was intrigued but this pattern's updated take on that style. 

(image source: Chalk & Notch)

The Fringe dress pattern includes two neckline/bodice variations: a V-shaped, button-up front and this dramatic cut out. I appreciate the button-up version for a nice day look, but the cut out appealed to me the most. You can also choose where (or if) you insert the waist ties. I chose to insert them in the front waist darts, so they tie up at the back. 

Normally I pinch out a couple of centimetres from the length of bodices and tops to account for my short-waistedness, but the waistline of the Fringe dress seemed to hit somewhere slightly north of the natural waistline anyway, so I decided to leave it be this time. Although it was a year ago, I remember really enjoying the construction of this dress. That's largely because my fabric behaved so nicely, but I can only conclude that the instructions must also have been clear and logical. 


Fabric:

An embarrassingly long time ago, I was offered a voucher code to try out the fabric printing service offered by Cotton Bee. Thanks so much for them for their generosity. I apologise if this is inaccurate, but from what I understand, Cotton Bee offer the same type of fabric print-on-demand service and products as Spoonflower, but are based in Poland. Which was a real benefit for UK-based sewers before Spoonflower opened a new branch that ships out of Germany. I haven't made any comparisons between prices or details of service and products, but I can say that ordering through the Cotton Bee site was easy and very fun. I managed to make my voucher stretch to two lengths of fabric, the other one being this amazing hand print interlock that became a TATB Freya top.   


Both the fabrics I ordered from Cotton Bee used prints by the same designer. I've since been on the site and was unable to access the function that allowed me to look through all the work of a specific designer, which may well be my fault, so I'm afraid I can't link to her collections in this post. I was obsessed with most of it though. I chose this jewels and gem stones print because of the gorgeous colours. The site allows you to monkey with the scale of the print, so I tried to replicate a kind of ditsy, Liberty-esque design in which the jewels wouldn't be completely noticeable unless you were up close. 


Thoughts:

I went for the cotton lawn type base cloth and it is gorgeous quality. I think is the one they call cretonne, but I'd advise you to order a swatch book before you place any orders to be sure you're getting what you want. Anyways, it's not quite tana lawn-level amazing, but easily as good as basically any other cotton lawn I've encountered. I took a long time to pull the trigger with this fabric and cut into it for this project. I love it so much but, for a couple of reasons, in the end I'm not convinced I made the best choice of use for this fabric.

Firstly, I just don't know that this dress generally suits or fits me that well. I guess the suiting-me bit is entirely subjective, and to be honest I'm not sure what I would tweak to improve the fit. Secondly, and more specifically, I don't think the busy, ditsy print works very well with that cut out neckline. Or maybe it's that the base colour doesn't offer sufficient contrast with my skin tone. Either way, a bolder, solid colour would have packed more of a punch to help the cut out detail really shine. 


But as I say, I have ended up wearing this dress a lot this summer and it does feel lovely to wear, so it wouldn't make sense at this point to dissect it. I do have just under a metre left of this fabric. Enough to squeeze a Scout tee, or some kind of woven tank. What would you think I should make from the remainder? Enquiring minds need to know....

Friday, 3 May 2019

Free Pattern Friday: Kids' Dulcie Dress


Welcome to my monthly 'Free Pattern Friday' feature, where I road test a free sewing pattern or tutorial: sometimes a children's one, sometimes a women's one. I publish these posts every first Friday of the month, timed to provide inspiration for those who plan to get their sew on over the weekend. I firmly believe that, if you pick your projects carefully, sewing doesn't have to be a crazy-expensive way to clothe yourself and your family. Thanks to all the amazing pattern designers who have offered up their hard work for us to enjoy for free.

Something I'm currently struggling with is this: I love to sew for my daughter, but she doesn't really need any new clothes at the moment. My genius plan of making most of her garments a little bit large is having the desired effect, and most of her clothes tend to last her at least two years. So all the garments I've sewn over the last year or so, along with the odd hand-me-down and some charity shop additions, mean that she already has a good amount of clothes for this summer. However, I really do enjoy sewing for her and want to make her clothes whilst she's still small enough to allow me to do so. Yet, from a sustainability standpoint, I can't justify making her more garments when her wardrobe is adequately populated. 

An argument (read: justification) that I thought of the other day for sewing her more summer stuff anyway, is that there are a couple of younger girls we know that we regularly pass things down to. So even if my daughter doesn't wear the shizzle out of something, it means it might be in better condition for passing on to others. Anyways, if you have any thoughts on this issue, I'd LOVE to hear them, so please leave me a comment. 


In the meantime, I've side-stepped that whole debate by making this free pattern road-test into something she really could use: a school summer dress. One of my favourite children's pattern designers is Sewpony, and when I found that they offer the Dulcie dress pattern for free when you sign up to the newsletter, I was all 'hold the phone'. Thanks heaps to Sewpony for sharing their hardwork for free.

(image source: Sewpony)

Pattern type:

Let's be honest: free sewing patterns are usually for pretty basic garment styles: knit leggings and simple T-shirts for example. However, this looked like a 'proper' pattern, the type that I'd happily spend £7 or whatever on, so it feels extra exciting to be able to access it for nothing more than a few clicks of the mouse. Designed for woven fabrics, the Dulcie dress has a boxy bodice with dolman/kimono/grown-on sleeves and a choice of neckline, a gathered skirt and optional patch pockets and collar. There is also info for adding contrast piping if you wish. The bodice is lined and it fastens at the back with an invisible zip.


Sizing info:

The pattern is graded for a generous size range of 12 months to 10 years. Dolores is now five and a half, but seems to be taller than the rest of her classmates at the moment, so I went for the size 5 for width and size 6 for skirt length. I felt that the roomy fit of the bodice would give it a couple of summer's worth of use if the dress remains long enough. 

Fabric info: 

Any light- or medium-weight cotton/cotton blend fabric without stretch would work for this pattern. I used a cotton gingham in Dolores's school's colour scheme that I bought from a local haberdashers along with some plain white shirting I had in my stash to line the bodice, and a wee length of stashed white piping to highlight the pockets. 


Findings:

The pattern and instructions were a great advert for the rest of Sewpony's patterns, in fact I went on to buy another of their patterns straight after getting this one because sewing it was a joy. I picked the square neckline because I felt it complimented the boxy shape of the bodice and referenced the checked fabric. I like a collar as much as the next person, but I feel the collar piece included in this pattern doesn't look like it sits very well on the bodice, so I probably won't use that option in the future.

Despite her joyful appearance in these photos, frustratingly, Dolores hasn't been keen on this dress so far. I'm pretty sure that what she dislikes about this dress is exactly what I do like about it: the modern, casual fit of the bodice. I think she prefers more traditional, fitted bodice shapes for her dresses. Anyhow, she was forced to wear it the other day when her other school dresses were dirty, and I hope that that has 'broken the seal' and that she will embrace it going forwards.


Customisation ideas:

This dress pattern already includes quite a lot of design options, however some additional ideas for personalising this pattern are:
  • Draft fun shaped patch pockets like hearts, cat heads, rockets, strawberries and so on
  • Make a contrast band around the bottom of skirt. This could also be a useful way to add length if your child has a growth spurt
  • Make a self or contrast tie belt attached at the side seams that can be tied at the back or front
  • Because the bodice is lined, you could fairly easily make scalloped edges of the armholes 
  • Add additional braid, ricrac, ribbon or pompom trim around the hem of the skirt and across the pockets

Would I make it again?

If this dress becomes fully embraced by Dolores, I'd definitely reach for this pattern again in the future, either for more school dresses or for casual dresses. It's nice to know that we've got quite a few years left in the sizing range for this pattern, so it may well get revisited. 


Wednesday, 12 September 2018

The York Pinafore


I know that it's common to find the statement 'This new thing I made is all I want to wear right now' on sewing blogs and Instagram posts, but I can't help that. This pinafore IS my favourite thing to wear right now. The pattern appeared, as if by magic, in my inbox, sent by its designer Helen from Helen's Closet as a freebie shortly after she released it. I was under no obligation to sew it up, but as soon as I saw a few modelled versions pop up on the interwebs, I knew I had to make it when the right fabric came my way.... 

Pattern:

The York pinafore is a clever little pattern. Despite the number of pinafore and dungaree type patterns out there these days, I think it's unique. Part of its brilliance, IMO, it how simple it is: consisting of just a front and a back piece, and a couple of pockets. The neck and armholes are bound so there's not even facings to deal with. Once you've printed it out and stuck it together, there are three choices you need to make: which neckline (I went with the higher, but I adore the lower option too), pocket style (I love these big, scoopy ones, but there's also a cute hoodie-style, kangaroo version) and hem length (I picked the longer length so it'd be more suitable for chasing and wrestling with small children). 

(image source: Helen's Closet)

Going into this project, I remembered the realisation I came to during my Gemma tank escapades, that simple garments need to fit really well to look fantastic. I made a toile of this pinafore in some stable cotton to try and figure out if some pattern alterations would need to be made. I have to say at this point that the York pinafore pattern instructions may be the best pattern instructions I have ever encountered. This is in part because they include is a sizeable section on what to look for when fitting this garment, which is incredibly useful and makes this a wonderful pattern for helping beginner sewers to level up. I toiled the size M, and although the general size was fine, I found that the hip area sat too low on my body. This was unsurprising because I'm both short-waisted and an inch shorter than the height the pattern was designed for. I pinched out 3cm total (split into two places, as per the lengthen/shorten lines on the pattern) from the bodice are on both the front and back pieces. Plus, although I don't think it applies to me, I really liked how Helen explained an easy method for adjusting the pattern for larger bust sizes.  


The only other modification I made was related to the bias binding. I bought ready made bias (the instructions include how to make your own if you wish), but I picked a narrower width than suggested and applied it using the Grainline Scout tee method because I find it gives a nicer finish  around curved areas. But in short: the whole construction was super simple, and took very little time. 

Fabric:

I knew that I had nothing suitable in my stash for this pattern, so the next time I visited Fabric Godmother, I was in the look out. I didn't have a clear vision of what I was aiming for, other than I wanted a solid. With some guidance, I landed on this linen twill. I'm going to go out on a limb here and say that this may be the best fabric/pattern match I've EVER made! I've never worked with or worn linen before, let alone a linen with a twill weave, but it feels soooo nice on, kind of slinky but stable, I really love it. I'm struggling with the urge to go back and buy up the rest of the roll like some hoardy fabric-Gollum. 


Top:

With the pinafore complete, I couldn't ignore the desire for a new, super plain top to go with it. I already had this white cotton/spandex jersey in my stash that I'd procured from Girl Charlie UK for a different project that I later changed my mind about. I reached for my well-used copy of TATB's Agnes top pattern, and the perfect plain white knit top was born, that can also be paired with heaps of my other garments. 


Thoughts:

As you can probably tell, I adore this pinafore, and the outfit generally. Style wise, I'm not sure how you'd describe this whole vibe; the linen and the silhouette of the pinafore makes me think of art teachers, which is a direction Mr SoZo would probably argue I've been heading in for a while. I now own TWO floaty scarves which I wear quite a lot, and I've decided to allow my hair to go grey without dyeing it. Anyways, I don't think you could describe this pinafore as sexy, it gives my bum a kind of teletubby look (see below), but thankfully that's not an adjective I often aspire to. I wish I'd had this pinafore in my wardrobe when I was breastfeeding. I think it would give you sufficient boob access without too much outfit rearrangement required. I got so fed up of the limited collection of separates I wore for over a year, and it would have been great to have a dress option in the mix. 


I'm very happy with the tweaks I made to the fit, and the finish I achieved during construction. The only criticism I have for this garment, and it's a very mild one, is that I often find it shifts backwards a little, and I have to rearrange it slightly so the shoulder seams sit back on top of my shoulders where they belong. Anyone have any idea why that might be happening, or what I can do about it? I'd really love to make another of these early next year, probably with the lower scooped neckline and perhaps in a soft denim. I saw a version on Instagram made by @twodogs_and_a_sewingmachine where she had added centre front and back seams and went to town with topstitching, which looked really amazing. Helen has shared some great blog posts with other pattern hack ideas for the York pattern, as well as releasing an expansion pack to turn it into an apron. What fabric would you make this pattern in and what tweaks would you suggest? 

Sunday, 29 July 2018

Pauline Dress Perfection


Despite being a very active and fearless little girl, my daughter likes to wear dresses or skirts whenever it's an option, and the girlier the better. Ever since I compiled the blog posts listing heaps of independent children's pattern companies, I've been keeping an eye on the output of Elegance & Elephants. I think most of the patterns hit the sweet spot between 'classic' and 'modern', with a decent dose of 'girly' if that's what you're looking for. Until recently, the free Retro Sweatpants pattern was the only one of theirs that I'd actually made, then they released the Pauline dress/tunic pattern. You know me, I've got a weakness for ruffles, plus I felt confident that it was generally a style that Dolores could also get behind. So when the pattern's release was shortly followed by a handily timed sale, I splashed the paypal-cash quicker than you can blink.  


Pattern:

The Pauline dress is an A-line shaped garment with a nicely-proportioned, rounded yoke and ruffle detail. There is some gathering at the centre front and centre back where the lower sections are joined to the yoke. This gathering adds a bit more fullness and volume, making this woven garment very easy to wear and move around in. Most of the versions pictured on the site, including the pattern testers' versions, are sleeveless, but there is also a sleeve pattern piece included for long or three-quarter sleeves.

Dolores is presently a couple of months away from her fifth birthday, so I made the size 5 but the size 6 length. I'm pleased to report that it fits her well at the moment, but should see her through next summer as well. 

(image source: Elegance & Elephants)

In general, the construction was fun and the steps were explained well, with clear photos for each. However, there were two bits that I didn't love that I would probably change for future versions. The first concerns the back neck fastening. I was surprised to find that the back yoke and facing are cut on the fold. A small piece of elastic forms a button loop, and ends up being inserted at the edge of the key hole/slit. To be honest, I couldn't really visualise how it was going to work, but I bumbled along ok. The key hole/slit is created by stitching a very tight V shape that you then are meant to snip into and turn the whole through with the right side facing out. I found the instructions for how not to get the elastic caught up in the V stitching were a bit lacking. As for the V shaped stitching and turning through, I have no idea how the samples on their website look so neat, because I definitely couldn't! I ended up stitching a narrow rectangle that could be snipped into more easily, and the result looks pretty good. 


The second part I didn't like was related to the facing. The instructions for the sleeveless version have you stitching the facing to the armhole by encasing the whole top part of the garment and turning though. It's not a method I have used before, and the instructions includes a handy link to a more detailed Youtube video tutorial (which you can see here). Here's the rub: once complete, I found the facing ended up too large and peeped out through the neck hole. I fixed the issue later by stitching-in-the-ditch through the ruffle seam. I'm not blaming the method used for attaching the facing, and in fact it was fun to try something new, however I think trying this less-known-to-me method meant I wasn't able to spot a potential problem until it was too late. It's possible that the facing wouldn't be too large or peek out if I simply pressed rather than understitched-then-pressed the neckline, which creates a neat neck hole but essentially pushes the facing further inside. In the future, I would trim the facing away at the armholes by about .75cm before applying it to the outer garment. 


Fabric:

Let it be known, this is NOT the fabric I would have chosen if I had given myself free rein. However, Dolores has made it clear a number of times how much she likes this ditsy floral cotton lawn, which has been lurking in my stash for about six years. It's the same fabric I used to line these bubble shorts and there's still over 1m left, so you'll probably see it again at some point. It's a kind of faux-Liberty print and is really nice to work with, and most likely very pleasant to wear in the heat wave we've been having of late. 

I have found in the past that details, particularly gathering, can get really lost in a small, dense print like this. Therefore, I picked some contrast white fabric that was residing in my scraps tub for the ruffle instead.  


Thoughts: 

Although I wouldn't have chosen this fabric, it is undeniably pretty and I think she looks lovely in this dress. It's been a winner so far and she wore it a couple of times on our recently holiday to France. I'm excited to make more versions of this pattern; next up will hopefully be an autumn blouse using the tunic length with long sleeves. I'll definitely be trimming the facing piece down a touch. The lawn worked really well, but I'd like to try it in lighter and slightly heavier (but drapey) weight fabrics. What type of fabric would you try making this dress in?
Related Posts Plugin for WordPress, Blogger...