Sunday 18 December 2022

Scrap Busting Apollon Sweatshirt

I can't remember precisely where the idea for this project came from, but it has served to solve two issues. The first was Mr SoZo running low on clothes, and the second was my own excess of sweatshirt scraps. In many ways, it's an extension of the scrap busting jersey T-shirts I made for him and our daughter last year. This project follows the same principles and largely the same technique. 

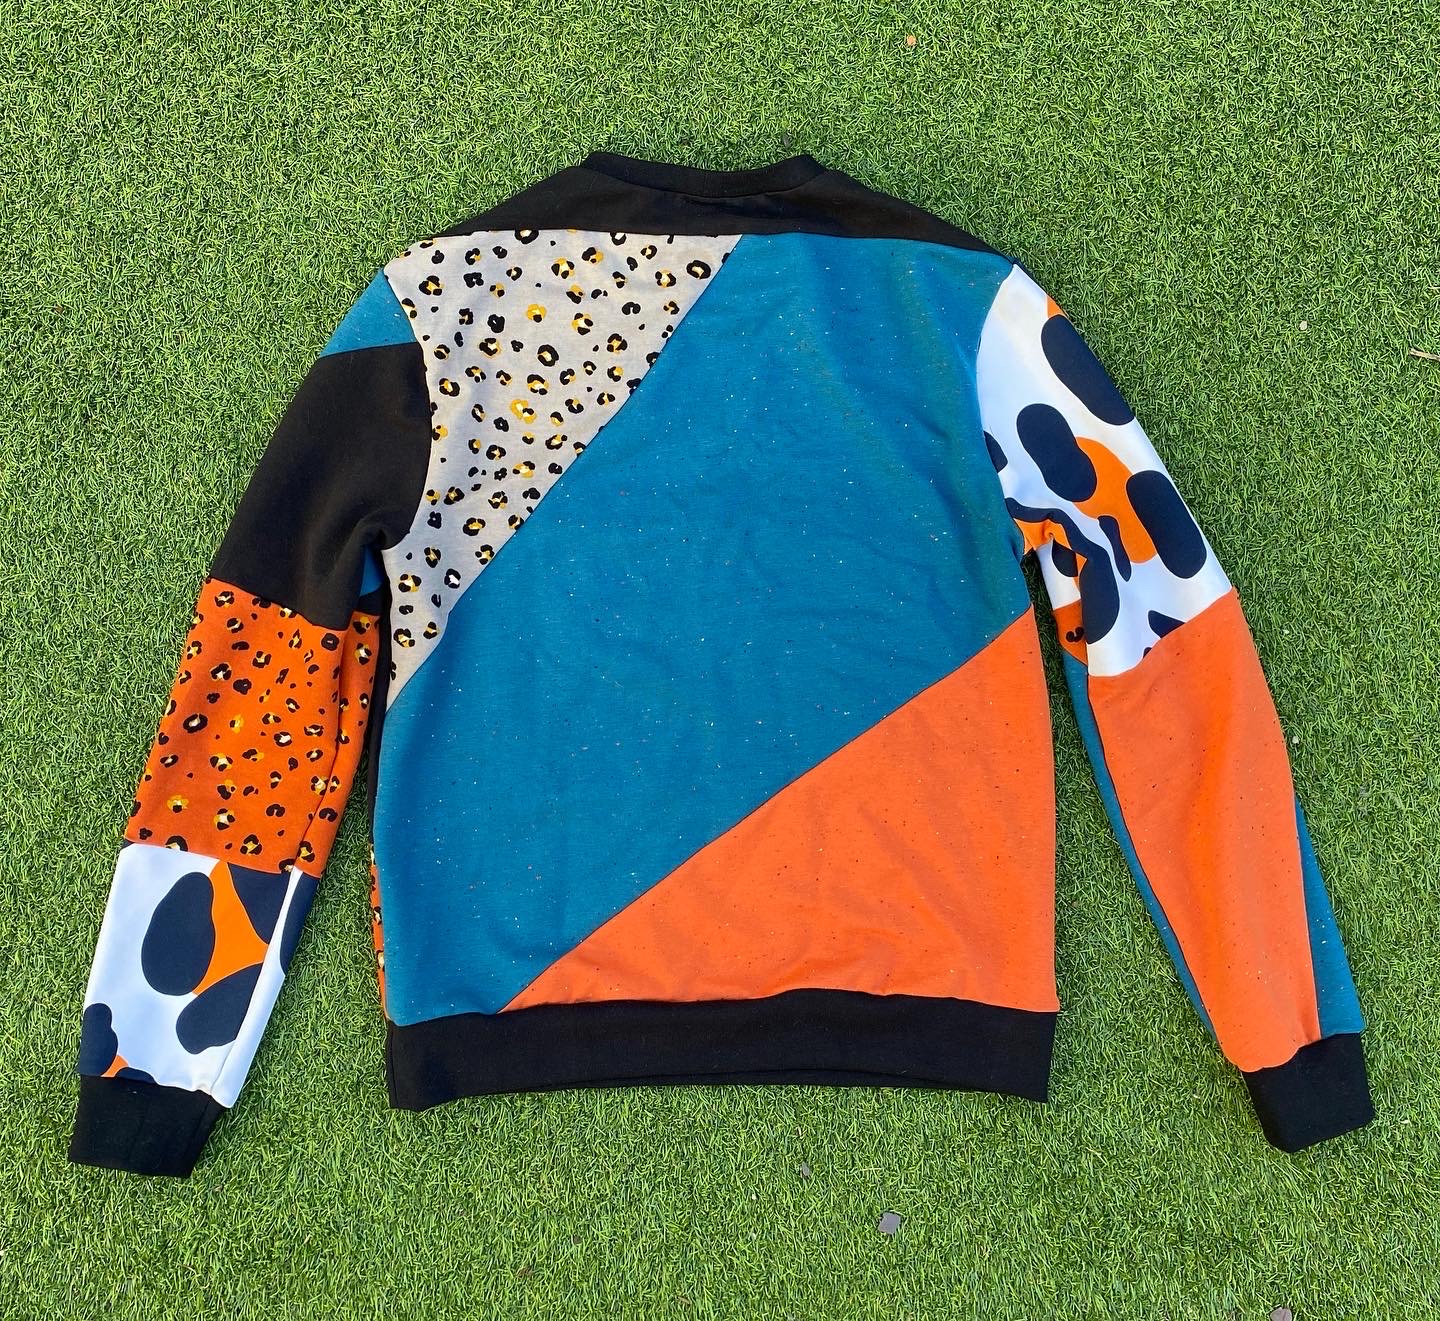
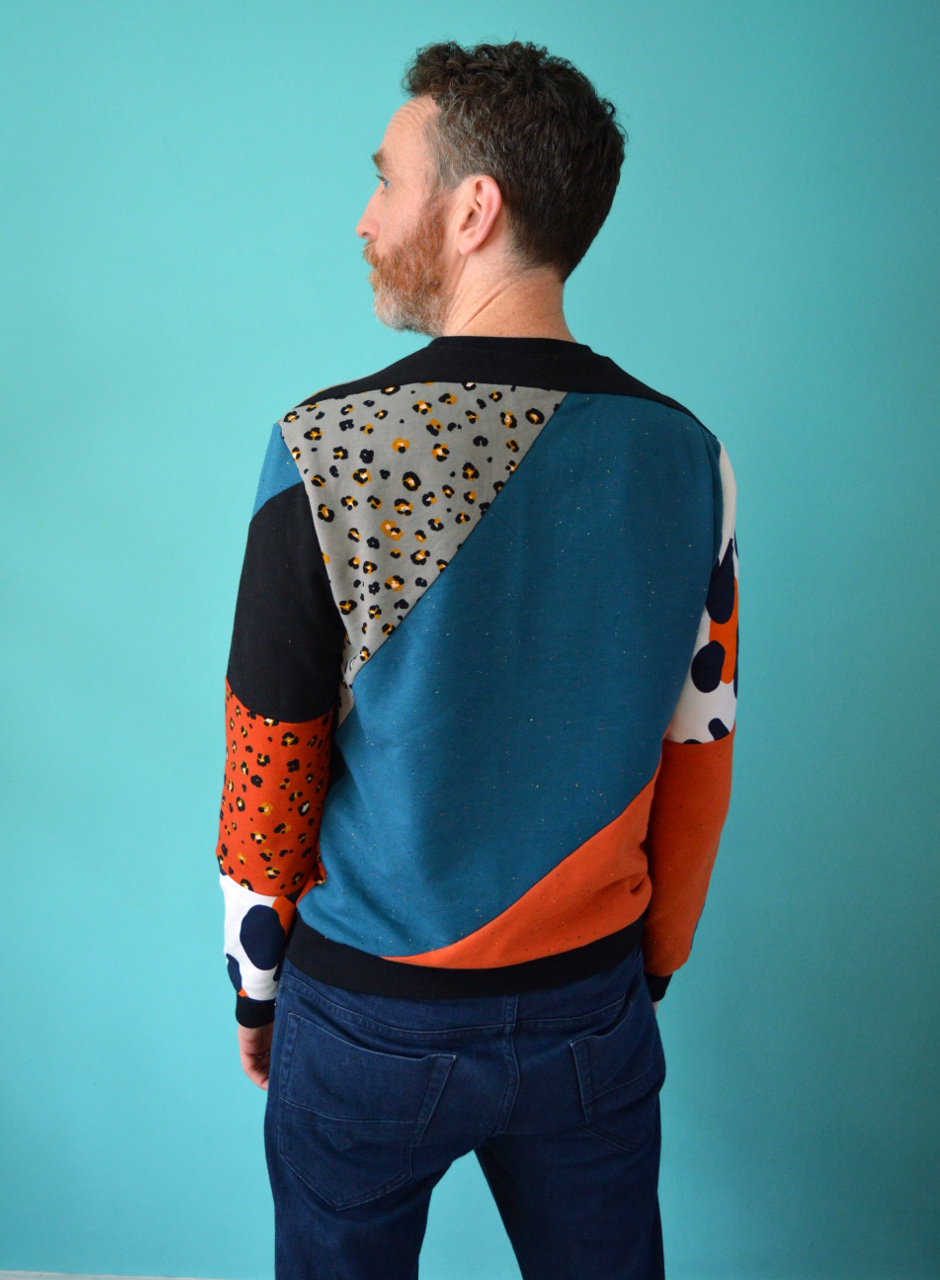
I was becoming aware that my collection of sweatshirt scraps was taking up a sizeable chunk of space in my fabric stash. I started out by getting all my sweatshirt scraps and remnants out and getting Mr SoZo to pick out any that particularly appealed to him. We then messed around with combinations until we had developed a pleasing colour palette. Some of the scraps came from sweatshirts I'd made for him previously, so were already within his existing wardrobe colour scheme. However, having made him the very wild scrap T-shirt that he is happy to wear, I knew I could push the combination further than many people might be comfortable with!

Here's some things I've learned about scrappy garment projects:

  • Make sure you're using a TNT pattern. You need to know that the fit will be spot on: now is not the time to try something new that may require tweaks. The pattern I used for this is the Apollon sweatshirt for men by I Am Patterns that I have used at least six times for him previously.
  • Limit your colour palette, unless you're really doubling down on the scrappy look.
  • Keeping the scraps large results in a bold look, reduces the amount potentially-annoying seams in the inside, and makes the process of piecing MUCH quicker.
  • For this project I kept an eye on the direction of the grain line of each piece, and tried to keep them vaguely in line with each other. However, with sweatshirt fabric you can probably get away with ignoring grain lines altogether.
  • Keep joining scraps until you have shapes large enough to fit your pattern pieces on. Keep your pattern pieces to hand so you can keep checking. 
  • Be aware that the additional seams create additional bulky bits inside. It doesn't bother Mr SoZo at all, but when I made a pieced sweatshirt fabric cardigan for my daughter, she refused to wear it because she found the seam allowances on the inside uncomfortable. If making tighter fitting garments, or garments for kids or sensitive folk, top stitch down the seam allowances as you go to reduce the bulk. 
  • When you have made sections large enough to fit your pattern pieces on, try flipping them 180 degrees to see which way looks best. I tried this and found the upside down version of what I'd been creating looked way cooler. 
  • If your combination of scraps is pretty bold, using one colour for any neckbands, cuffs and waistbands can create a nice 'frame' and make the whole garment look more intentional. 


If you're interested in creating something along similar lines, I hope these pointers helped. And above all, have fun!!!!! Pieced fabric garment projects are more time consuming than 'regular' sewing projects that use a length of virgin fabric, but can be so much more creatively fulfilling. 

Friday 2 December 2022

Free Pattern Friday: Bowl Cover Tutorial


Welcome to my monthly 'Free Pattern Friday' feature, where I road test a free sewing pattern or tutorial: sometimes a children's one, sometimes an adult's one. Or in today's case, something for the home. I publish these posts every first Friday of the month, timed to provide inspiration for those who plan to get their sew on over the weekend. I firmly believe that, if you pick your projects carefully, sewing doesn't have to be a crazy-expensive way to clothe yourself and your family. I also firmly believe that pattern designers deserve to be properly paid for their work, so if you enjoy using a pattern and can afford to do so, make sure you support that designer. Some designers' websites offer the option to make a donation, alternatively you can buy one of their paid-for products. If you can't afford to do so, you can support the designer by sharing your project via social media to help draw more attention to their work. Thanks to all the amazing pattern designers who have offered up their hard work for us to enjoy for free.


(image source: Hearth and Vine)

I've had my eye on this tutorial for yonks, and have mentioned it a couple of time in my podcast Check Your Thread. This project is a great potential scrap-buster (tick), quick to make (tick), could be used to make cute and useful gifts (tick tick) AND helps you to be more sustainable in your everyday life (TICK!). Bowl covers can be used instead of single-use cling film or tin foil to keep food covered in the fridge, on the table, on the kitchen counter or at picnics. You can chuck them in the washing machine and use over and over again instead of frequently adding to landfill. They obviously doesn't provide a vacuum seal, but they certainly will help to keep things fresher for longer and keep insects or animals (and perhaps even small kids!) off the contents of the bowl. I'm posting about this now in case you're on the look out for quick stocking filler/gift ideas to make for friends and family, but equally these might be lovely as a home warming gift. Thanks so much to Patti from Hearth and Vine for sharing this tutorial for free. 


Pattern type:

This tutorial shows you how to make cute, reusable, washable bowl covers to protect your food. 


Sizing info:

The awesome thing about this project is that you can make custom covers for the bowls you already own. I make homemade pizza dough and usually use a tea towel to cover my bowl whilst the dough is rising. However, this is a better option because I was able to make a cover to exactly fit the mixing bowl I always use. I also made a smaller one that fits the cereal-sized bowls we own to protect leftovers and such. 


Fabric info:

The tutorial recommends using quilting cotton for this project. You really want to use something with a tight weave to keep the food as fresh as possible, and that can withstand high temperatures when washing, so woven cotton is likely to be your best bet. Although, I think you could expand the recommendation to include cotton lawn, poplin and shirtings. Obviously, I'm always going to urge you to use what you already own, however, if you had nothing suitable in your stash or you really wanted to personalise the bowl covers, particularly if making them for a gift, you could buy fat quarters that represented the style of the recipient and their home. The red sailboat fabric used in these pics is a scrap of Atelier Brunette cotton poplin leftover from some pyjama shorts I made myself earlier this year. The pinup cowgirl fabric was a piece of quilting cotton I got in a fabric swap years ago. It had already been cut into a circle for making wax wraps, but I never got round to it. You will also need 1/4" elastic and making thread. 


Findings:

This was an incredibly quick and satisfying project! Within an incredibly short amount of time I had made two super useful bowl covers from fabric and elastic I already had in my possession. The explantion was clear and very easy to follow. 

The post/tutorial also includes a small Q&A section answering any queries you might have about making or using these covers. That was very helpful, however, I disagreed with one point. The tutorial recommends washing these in cold water. Cold water is not as effective at killing bacteria as hot water, so I wash mine in a 60 degree wash along with my tea towels and surface cleaning cloths, and they've held up perfectly well so far. 

My ongoing findings revolve around discovering different uses for them. For example, I was recently given a large bag of figs which I planned to make into jam (pictured above). I processed the figs, many of which were already soft and mushy, and used the bowl cover to keep the fruit flies (which my kitchen is plagued with) at bay until I had time to make the actual jam. 


Would I make these again?

Absolutely! It was a very pleasing project and the outcome is genuinely useful. 

Related Posts Plugin for WordPress, Blogger...