Showing posts with label free dress pattern. Show all posts

Friday, 5 July 2024

Free Pattern Friday: Wide Strap Maxi Dress for Adults


Welcome to my monthly 'Free Pattern Friday' feature, where I road test a free sewing pattern or tutorial: sometimes a children's one, sometimes an adult's one. I try to publish these posts every first Friday of the month, timed to provide inspiration for those who plan to get their sew on over the weekend. I firmly believe that, if you pick your projects carefully, sewing doesn't have to be a crazy-expensive way to clothe yourself and your family. Thanks to all the amazing pattern designers who have offered up their hard work for us to enjoy for free.

I'm guessing that most sewers who have been at it for a while are aware of the wonderful treasure trove that is Peppermint Magazine's sewing pattern collection. With each edition of the Australia-based magazine, they work with an independent pattern designer to produce a sewing pattern that gets included with that issue. All the previous patterns are also available via their website. They all used to be free, but more recently they have introduced a pay-what-you-can system, which I love. 


(image source: Peppermint Magazine)


The Wide-Strap Maxi Dress pattern, produced by Lauren Boyle from pattern brand Elbe Textiles, caught my eye some time ago but I wasn't really sure if it was 'me'. But at some point I realised that it could be worn like a pinafore with a T-shirt underneath, plus I could shorten it so I wouldn't feel like I was drowning in fabric. I am in the lucky position to be able to afford sewing patterns, so I picked one for the paid options. I would really like to encourage anyone who can afford to pay to do so. It helps keep this wonderful magazine, and it's collection of fantastic patterns, afloat. But if you really can't afford to pay for the pattern, don't feel guilty for accessing it. See if you can support them in other ways, for example by posting about the pattern and magazine on social media. Massive thanks to both Peppermint Magazine and Lauren Boyle for creating and making this pattern available for the community to enjoy. Also, big thanks to Ruby for taking these pro photos of me in my dress!


Pattern type:

The pattern is for an A-line maxi dress with side splits and a elasticated back. I shortened the length by about 20cm so mine isn't quite as 'maxi'.


Sizing info:

The pattern is graded from 30" bust to 51" bust. My measurements put me in the 'D' size, but when I tried it on near the end of construction, I found it very loose around the bust. Thankfully, this is very easy to adjust, you just need to make the elastic tighter at the back. 


Fabric info:

There isn't much guidance given on fabric selection. There's nothing on the webpage, other than a link to the particular linen they've used for the sample photographed. In the instructions PDF is specifies 'Midweight woven fabrics – linen, cotton, hemp, rayon'. For my version, I used the Riviera viscose & linen blend in 'Olive' from Fabric Godmother (not sponsored but I get a staff discount). Aside from needing to be ironed every two minutes, I think it was a great choice for this pattern. My initial fear was that it might be too lightweight, but it has such a nice drape and feels very breezy on hot and sticky days. 


I bought a cone of Tencel thread from James Tailoring. So aside from the elastic at the back, this garment is, theoretically, biodegradable. 


Findings:

As with the other Peppermint Magazine patterns I've tried, I found this pattern to be very well produced. I love that the pattern file includes the layers function so I could specify which size I wanted when I got it printed in A0 format. The instructions are lovely and clear, with very helpful diagrams to illustrate the steps.  

The construction method for this project is really fun. It looks like a really simple garment, but the designer walks you through creating a really lovely finish with french-seamed everything! To my surprise, I didn't use my overlocker to finish a raw edge once. It makes this simple-looking garment really elevated. That said, there is a down-side with the method: there are practically no opportunities to assess and adjust the fit or length until it's practically finished. You're going to have to make a toile/muslin (I did not) or baste/tack everything together first to be able to assess the fit and length. 


As mentioned above, the saving grace is that the elastic that brings the top back in can be easily adjusted, which will effect the closeness and volume to some degree. But if you've cut a size that turns out to be too small, there's not much you can do about it, plus you won't be able to change the overall length. I would very much advise you study the finished garment measurements before selecting your size/s, and hold the paper pattern pieces up to your body to decide on your preferred length before any scissors slice any fabric. 


Customisation ideas:

Here's some ideas to get more from this pattern:

  • cut the length even shorter for a mini-dress or top
  • ignore the in-seam pockets and add patch pockets at the thigh, and even to the front bib area, for a more utilitarian look
  • make the straps narrower for a more delicate look
  • cut the bodice around the waist and add a gathered skirt or gathered peplum
  • insert gathered frills into the seams of the straps


Would I make this again?

I'm low-level keeping my eyes peeled for a drape-y lightweight denim type fabric to make another in. It'd be tempting to add gold/orange top-stitching to give a nod to classic denim garment. 


Friday, 6 October 2023

Free Pattern Friday: Avelia Bomber Jacket for Adults


Welcome to my monthly 'Free Pattern Friday' feature, where I road test a free sewing pattern or tutorial: sometimes a children's one, sometimes an adult's one. I publish these posts every first Friday of the month, timed to provide inspiration for those who plan to get their sew on over the weekend. I firmly believe that, if you pick your projects carefully, sewing doesn't have to be a crazy-expensive way to clothe yourself and your family. Thanks to all the amazing pattern designers who have offered up their hard work for us to enjoy for free.


Ok, so this probably isn't a very useful post because I didn't actually road test this free sewing pattern very thoroughly. The pattern is for a lined bomber jacket, but I wanted to use pre-quilted fabric, so I had to basically chuck the instructions out the window and make the construction up as I went along. What might be useful for you to know, however, is that the Avelia Bomber jacket pattern is one of 300+ free sewing patterns available via the Mood Fabrics website when you sign up to their newsletter. The Mood Sewsciety is the section of the Mood Fabrics website dedicated to supporting sewers with how to actually their fabrics and develop their skills. That's where you'll find all the patterns and the instructions that come in the form of supporting blog posts. Thanks to Mood for sharing all these patterns for free, the variety of the range is really impressive. 


(image source: Mood Fabrics)

Pattern type:

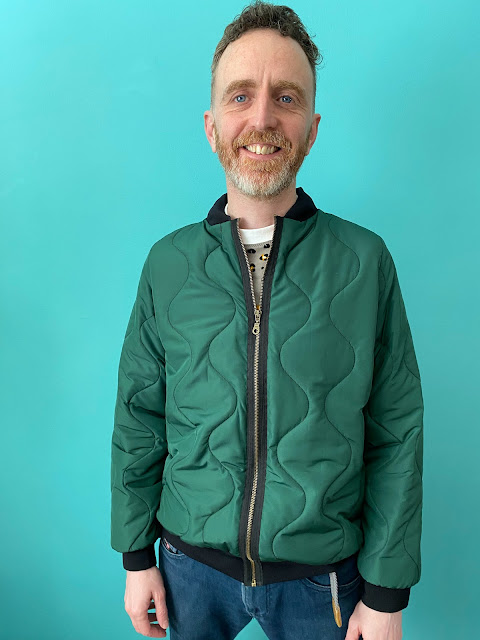
I promised Mr SoZo a new jacket for his birthday back in January (this was finished in February). Until that point his only outerwear garments were one puffy winter jacket and one incredibly flimpsy unlined jacket (I can hardly bring myself to describe that thing as a jacket, it's so thin!) and nothing inbetween. So I brought him to my work at Fabric Godmother at the end of an open day I was helping out at, and together we selected some cool reversible pre-quilted fabric.

He loves bomber style jackets, largely thanks to Karamo, but a thorough trawl of the internets didn't bring up as many options as you might expect. There's one excellent-looking one by a French (maybe Belgian actually) pattern company but they don't sell PDF versions. The shipping and taxes on goods coming from France these days is eye-watering ('thanks' to Brexit), so I decided to continue my search. 

When I chanced upon the Avelia Bomber jacket pattern, I thought it might give me some bones to work with. Mr SoZo is quite narrow in the shoulders, so a pattern drafted for a more feminine frame wouldn't require a huge amount of reworking, were my thoughts. The original pattern is for a fully lined, zip-up jacket with faux zip pocket, designed in particular to show case the futuristic, oil-effect, reflective fabric pictured above. 


Sizing info:

Here's where things get a bit tricky. The pattern is graded from a US 2 - 30, with sizes 7 and 9 thrown in for good measure. Body measurements are included in the blog post, however finished garment measurements are not. Word on the street, and by 'street' I mean this blog post, is that Mood's patterns' sizing and fit are all over the place. My assumption is that they have many different pattern makers creating patterns for them, seeing as they have so many on offer, and there isn't any consistency across the range. My recommendation would be to measure the pattern pieces themselves and compare with similar style pattern or garment you own before selecting a size. I ended up combining sizes and adding a significant amount of length to the body and some to the sleeves. 


Fabric info:

As I say, this pattern was created to promote this specific fabric, so the only fabric referred to in the list of materials required is that particular one. So you're kind of on your own with fabric choice, but my thoughts are a mid-weight woven with little-to-no-stretch, or even a hefty knit such as a very dense sweatshirting or scuba might work. It also suggests a polyester lining and a thick type of rib knit trim, with links to where you can buy it on their site. As I say, I was using a pre-quilted fabric so I didn't need lining, but I did have to buy some heavy jacket ribbing and found some fairly cheap on eBay. 

Because I lengthened the body, I half-made the garment before measuring for the length of zip I required. Annoyingly, the length I'd created was in between two lengths available on Zipper Station. I wasn't about to start trying to shorten a brass tooth zip, so I went for the longer one and tried to ease it in as best I could.   

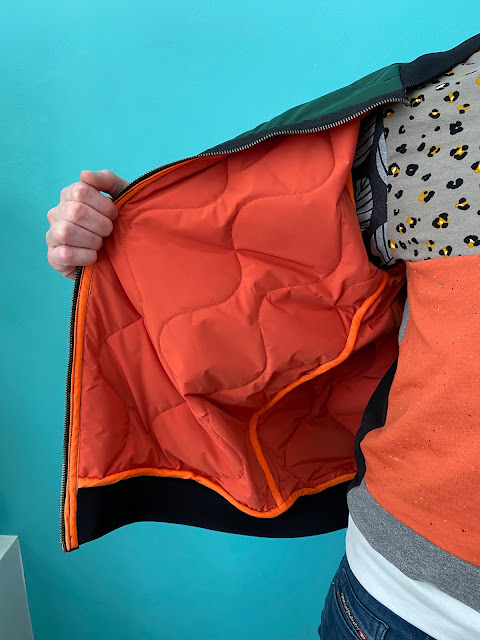
I also had to buy a million metres of orange bias binding to finish all the seams. But I only have myself to blame for that. 


Findings:

I can say this because the whole process was several seasons ago and I now have some distance, but this was NOT an enjoyable sewing project. I love sewing for Mr SoZo, but this project was not fun. Obviously, choosing the pre-quilted fabric created a big headache because I had to created my own construction method. But also I disliked the drafting on this pattern. I didn't like the shapes and proportions for any body. Plus the zip being a bit long threw things off a bit, and I don't like how the neckline looks where the zip joins with the collar ribbing. Thankfully, after months of wear (and there HAS been months of wear), the neckline has softened a bit and doesn't look as stiff and awkward as it does in these pics that were taken when it was first made. 

I had to hand stitch the bias binding to cover the seams which took FOREVER. I'm still spotting places where the orange stitching is visible on the outside against the green where I made my stitches too deep. AGH!


Would I make it again?:

Would I make Mr SoZo a bomber jacket again? Yes. Would I use this pattern to do so? No. It was a bold move to use a fabric that was not prescribed for the pattern - a risk that partially paid off. However, I'd like to make another with a regular lining with a different pattern as the base. 

What worked out really well, however, were these tablet cases I made with some of the leftovers for my children! They've prevented a lot of scratches I reckon...


Friday, 7 January 2022

Free Pattern Friday: School Cool Dress for Dolls


Welcome to my monthly 'Free Pattern Friday' feature, where I road test a free sewing pattern or tutorial: sometimes a children's one, sometimes an adult's one (or even a doll's one!). I publish these posts every first Friday of the month, timed to provide inspiration for those who plan to get their sew on over the weekend. I firmly believe that, if you pick your projects carefully, sewing doesn't have to be a crazy-expensive way to clothe yourself and your family. Thanks to all the amazing pattern designers who have offered up their hard work for us to enjoy for free.

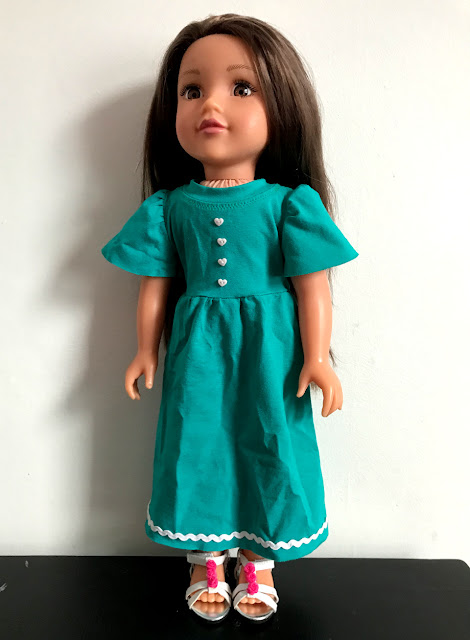
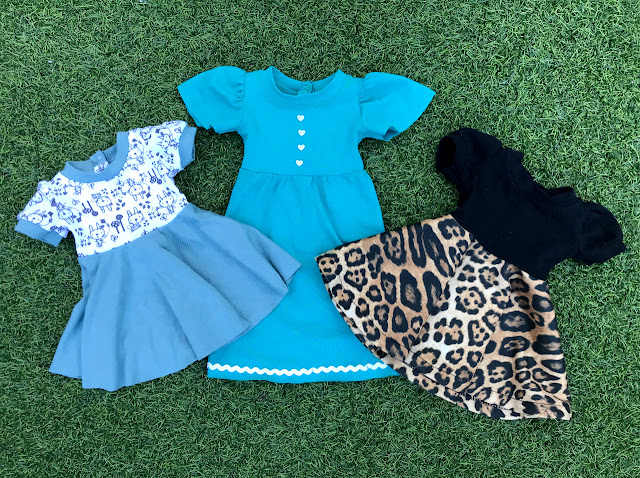
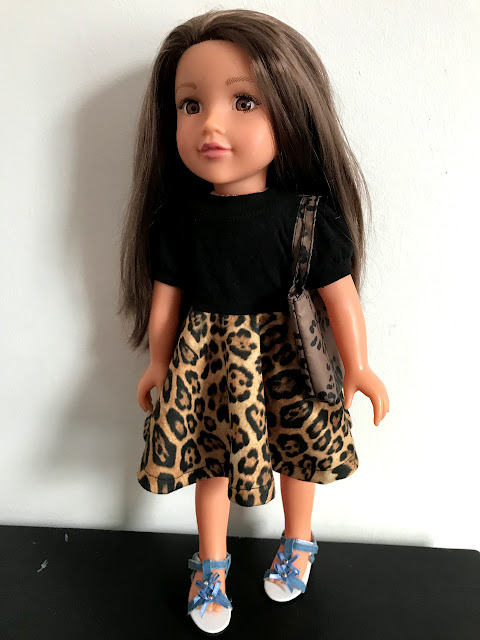
Ok, so the free pattern that I've road tested today may not be of interest to everyone. However, it's a really great little free that pattern that will be a delight for some people. Ellie & Mac have a whole heaps of patterns available for adults, kids and home projects, one of which is a kid's dress pattern called the School Cool tunic and dress. And they have generously made a doll's version available for free. The idea, of course, is that you can make matching tops or dresses for your child and their favourite doll. But whether you choose to go down the matching route or not, the School Cool doll's version is a fantastic scrap buster. I made three versions for my daughter for Christmas to clothe a doll she bought herself from a charity shop. Thanks heaps to Ellie & Mac for sharing their hardworking on this pattern for free. 


(image source: Ellie & Mac)

Pattern type:

This jersey dress pattern has an impressive number of variations. It includes four sleeve options (tank, puff short sleeves, flutter sleeves, and long sleeves) and two lengths (tunic and dress lengths). However, it is incredibly customisable so you can play around and make a variety of garments that all look completely different. I tried the puff short sleeves and the flutter sleeves options. Skirt-wise, I used the standard skirt pattern piece for two versions, but my scrap of the teal colour wasn't the right size or shape so I made a basic gathered skirt in a longer length for that. 

Sizing info:

The pattern has been graded for 15" and 18" dolls. However, the doll I made these clothes for is a bit smaller so I simply adjusted the percentage that I printed the pattern out to a bit smaller. I think that this tactic would work well for pretty much any doll larger than a Barbie sized doll. Things might start to get frustratingly fiddly any smaller than that, but of course you're free to try! 


Fabric info:

The pattern recommends knits with 50% 4-way stretch. However, I think that pretty much any single jersey would be fine. The white/grey bunny print jersey I used for the bodice and sleeves in the top version was a 100% cotton jersey harvested from a little T-shirt my daughter wore when she was two, and it has very little length-ways stretch. The sage-y green fabric I paired it with is a scrap of very stretchy bamboo jersey. The leopard print skirt that I paired with the black bodice is a double knit of some kind, which works fine for the skirt but would probably be too bulky for the top part. What I'm saying is that I think there's some wiggle room to play about with the scraps in your stash. If you're making a gathered skirt to go on the bodice, you could get away with a woven fabric for the skirt as it doesn't really need to stretch to get the garment on and off. Woven might work for the original skirt pattern piece also, but I'd have to try it to say so with confidence. 


Findings:

The pattern is easily accessible via the webshop on the Ellie & Mac website (no payment needed). There's no signups required or anything else. The pattern is professionally produced and easy to use. The instructions offer extra tips for sewing with knits, and I appreciated the many photos of different versions to help you choose which style variations to pick, and which fabrics might look good. 

Cutting out and making this little pattern is pretty fiddly, but the instructions make the construction as simple as possible. I couldn't find any of the hook and loop tape that they recommend for the back fastening, so I bought some tiny press studs to use instead. I also realised after my first one that the jersey isn't going to fray so I stopped bothering to hem it which made the process quicker. 

The finished dresses are incredibly cute. Small things are just so satisfying aren't they? I think for future versions I'll lengthen the bodice slightly to suit the proportions of my daughter's doll a bit better. 


Customisation ideas:

  • Add trim to the hems, or along the centre front like a faux contrast button stand
  • Use small buttons, little decals or even do a some miniature embroidery to create a detail
  • Play around with mixing and matching colours and prints from different scraps for the different pattern pieces
  • Increase or decrease the scaling when printing to make the patterns suitable for a wider range of doll sizes
  • Cut a wide rectangle and create a gathered skirt rather than the circle skirt included in the pattern
  • Turn the bodice round and have the fastening at the front

Would I make it again?

Definitely! Although I feel my daughter's interest in dolls may be on the wane. If it is revived at some point, I'd love an excuse to bust this pattern out again and try the other two sleeve variations. 

Friday, 5 March 2021

Free Pattern Friday: Kid's Clementine Nightie


Welcome to my monthly 'Free Pattern Friday' feature, where I road test a free sewing pattern or tutorial: sometimes a children's one, sometimes an adult's one. I publish these posts every first Friday of the month, timed to provide inspiration for those who plan to get their sew on over the weekend. I firmly believe that, if you pick your projects carefully, sewing doesn't have to be a crazy-expensive way to clothe yourself and your family. Thanks to all the amazing pattern designers who have offered up their hard work for us to enjoy for free.


This pattern has been on my 'Free patterns to try' list for yonks. Designed as a nightie, the Clementine pattern by Sewpony can also be the basis for a great Summer dress (or even colder-weather pinafore if made in a thicker fabric and worn with a top underneath). There was snow on the ground here when I started prepping this project. And even though we're a long way from Summer warmth, I thought other Northern-hemisphere dwellers might also like a dose of warm-weather sewing inspo, and Southern-hemisphere dwellers might have time to squeeze this project in. Thanks heaps to Suz from Sewpony for sharing this pattern for free. It is easily acquired via the checkout on the Sewpony website (no payment required). 

(image source: Sewpony)

Pattern type:

The Clementine nightie (or dress) features a lined bodice with tie straps, and a gathered skirt with optional hem ruffle. There are no fastenings: it pulls on and off over the head. 


Sizing info:

The pattern is graded between 12 months and 12 years, equating to 80cm to 152cm in height. There is no layer function to avoid printing out sizes that you don't need. However, you can avoid printing unnecessary pages by only printing the ones that include the bodice and strap pieces, and using the measurements in the instruction document to draw the skirt and ruffle pieces directly onto the fabric.  

Going my the height of my model, I used the size 8 pattern pieces for my first version (the coral one). It came out wayyyyyy too big, however that does have a lot to do with my fabric choice (see below). 


Fabric info:

This pattern could be suitable for a wide range of fabrics, including most lightweight wovens and knits. I love that Sewpony recommend using an old duvet cover to make it, which would be lovely and soft if it's been well used and washed multiple times. 

I didn't have any suitable woven fabrics in my stash, so I turned to some very lightweight, very slinky jersey instead. I'd been scratching my head over what I should use this jersey for for at least eight years ever since my lovely friend Claire gave it to me. It's super thin so would most likely highlight lumps and bumps, but because the bodice of the Clementine is lined, I thought it just might work for this. As you can see, the finished garment ended up very wide and the armholes are very deep. I feel that the pattern should have included the suggestion to size down if using a knit, particularly those with quite a lot of stretch. 

This pattern would also be very sweet if made up in a needlecord or denim and worn as a pinafore.


Findings:

As with every Sewpony pattern I've tried, the instructions and the pattern itself were a joy to use. Both are so clear and unfussy, with just the right amount of explanation included in the instructions. A beginner with a couple of previous sewing projects under their belt would have little trouble following along. 

As I mentioned above, my coral version ended up way too big. It's possible that my slinky is on the outer limits of suitability, but I also feel that sizing down if using knits should be recommended. However, it did feel that the slinky jersey did look really good in the gathered skirt and ruffle by providing fantastic drape and movement. 

I decided to try another slinky jersey version because I've been trying to find a use for my scraps and leftovers of that type of knit. I sized down two sizes but kept the bodice length the same as the size 8. I also raised the armholes by about 3cm. I wanted more drama for this version, so lengthened both the skirt and ruffle pieces at bit, but kept the widths the same. I cut sections of knit (observing the grainlines as far as I could) of differing widths but the same length which I seamed together to form the skirt and ruffle. I think the result is pretty awesome and I've busted a masses amount of my slinky jersey scraps by making this dress. Dolores loves it, however, she does liken it to something Cinderella might be found in!


Customisation ideas:
  • Experiment with shortening or lengthening the bodice, skirt and/or ruffle pieces to create different looks and proportions.
  • Create a V at the neckline on the front and/or back.
  • Use three different fabrics, one each for the bodice, skirt and ruffle. A tonal effect would look amazing!
  • Shorten the skirt piece a lot and omit the ruffle to make a peplum top (I plan to try this).
  • Make it in needlecord or denim and add cute patch pockets to the skirt, or even one on the front of the bodice.


Would I make it again?

Absolutely! I definitely want to try making a peplum top based on my adapted version of this pattern. I can also see other versions for sleep and day wear, it's a great basic shape. 

Related Posts Plugin for WordPress, Blogger...