Showing posts with label menswear. Show all posts

Friday, 6 October 2023

Free Pattern Friday: Avelia Bomber Jacket for Adults


Welcome to my monthly 'Free Pattern Friday' feature, where I road test a free sewing pattern or tutorial: sometimes a children's one, sometimes an adult's one. I publish these posts every first Friday of the month, timed to provide inspiration for those who plan to get their sew on over the weekend. I firmly believe that, if you pick your projects carefully, sewing doesn't have to be a crazy-expensive way to clothe yourself and your family. Thanks to all the amazing pattern designers who have offered up their hard work for us to enjoy for free.


Ok, so this probably isn't a very useful post because I didn't actually road test this free sewing pattern very thoroughly. The pattern is for a lined bomber jacket, but I wanted to use pre-quilted fabric, so I had to basically chuck the instructions out the window and make the construction up as I went along. What might be useful for you to know, however, is that the Avelia Bomber jacket pattern is one of 300+ free sewing patterns available via the Mood Fabrics website when you sign up to their newsletter. The Mood Sewsciety is the section of the Mood Fabrics website dedicated to supporting sewers with how to actually their fabrics and develop their skills. That's where you'll find all the patterns and the instructions that come in the form of supporting blog posts. Thanks to Mood for sharing all these patterns for free, the variety of the range is really impressive. 


(image source: Mood Fabrics)

Pattern type:

I promised Mr SoZo a new jacket for his birthday back in January (this was finished in February). Until that point his only outerwear garments were one puffy winter jacket and one incredibly flimpsy unlined jacket (I can hardly bring myself to describe that thing as a jacket, it's so thin!) and nothing inbetween. So I brought him to my work at Fabric Godmother at the end of an open day I was helping out at, and together we selected some cool reversible pre-quilted fabric.

He loves bomber style jackets, largely thanks to Karamo, but a thorough trawl of the internets didn't bring up as many options as you might expect. There's one excellent-looking one by a French (maybe Belgian actually) pattern company but they don't sell PDF versions. The shipping and taxes on goods coming from France these days is eye-watering ('thanks' to Brexit), so I decided to continue my search. 

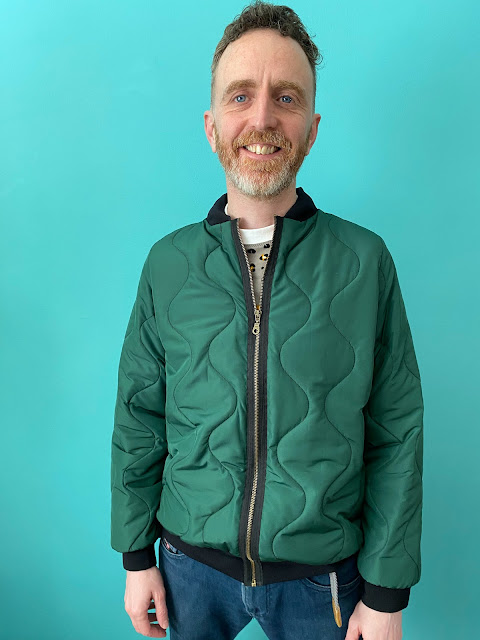
When I chanced upon the Avelia Bomber jacket pattern, I thought it might give me some bones to work with. Mr SoZo is quite narrow in the shoulders, so a pattern drafted for a more feminine frame wouldn't require a huge amount of reworking, were my thoughts. The original pattern is for a fully lined, zip-up jacket with faux zip pocket, designed in particular to show case the futuristic, oil-effect, reflective fabric pictured above. 


Sizing info:

Here's where things get a bit tricky. The pattern is graded from a US 2 - 30, with sizes 7 and 9 thrown in for good measure. Body measurements are included in the blog post, however finished garment measurements are not. Word on the street, and by 'street' I mean this blog post, is that Mood's patterns' sizing and fit are all over the place. My assumption is that they have many different pattern makers creating patterns for them, seeing as they have so many on offer, and there isn't any consistency across the range. My recommendation would be to measure the pattern pieces themselves and compare with similar style pattern or garment you own before selecting a size. I ended up combining sizes and adding a significant amount of length to the body and some to the sleeves. 


Fabric info:

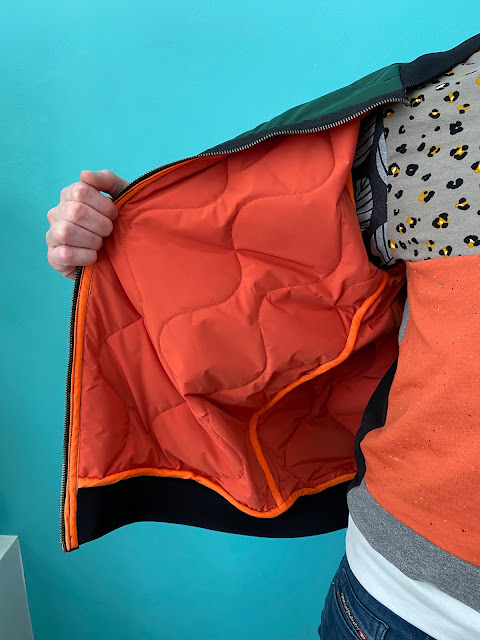
As I say, this pattern was created to promote this specific fabric, so the only fabric referred to in the list of materials required is that particular one. So you're kind of on your own with fabric choice, but my thoughts are a mid-weight woven with little-to-no-stretch, or even a hefty knit such as a very dense sweatshirting or scuba might work. It also suggests a polyester lining and a thick type of rib knit trim, with links to where you can buy it on their site. As I say, I was using a pre-quilted fabric so I didn't need lining, but I did have to buy some heavy jacket ribbing and found some fairly cheap on eBay. 

Because I lengthened the body, I half-made the garment before measuring for the length of zip I required. Annoyingly, the length I'd created was in between two lengths available on Zipper Station. I wasn't about to start trying to shorten a brass tooth zip, so I went for the longer one and tried to ease it in as best I could.   

I also had to buy a million metres of orange bias binding to finish all the seams. But I only have myself to blame for that. 


Findings:

I can say this because the whole process was several seasons ago and I now have some distance, but this was NOT an enjoyable sewing project. I love sewing for Mr SoZo, but this project was not fun. Obviously, choosing the pre-quilted fabric created a big headache because I had to created my own construction method. But also I disliked the drafting on this pattern. I didn't like the shapes and proportions for any body. Plus the zip being a bit long threw things off a bit, and I don't like how the neckline looks where the zip joins with the collar ribbing. Thankfully, after months of wear (and there HAS been months of wear), the neckline has softened a bit and doesn't look as stiff and awkward as it does in these pics that were taken when it was first made. 

I had to hand stitch the bias binding to cover the seams which took FOREVER. I'm still spotting places where the orange stitching is visible on the outside against the green where I made my stitches too deep. AGH!


Would I make it again?:

Would I make Mr SoZo a bomber jacket again? Yes. Would I use this pattern to do so? No. It was a bold move to use a fabric that was not prescribed for the pattern - a risk that partially paid off. However, I'd like to make another with a regular lining with a different pattern as the base. 

What worked out really well, however, were these tablet cases I made with some of the leftovers for my children! They've prevented a lot of scratches I reckon...


Tuesday, 28 March 2023

Autumnal Scrappy Apollon Sweatshirt

 
Towards the end of last year, I made Mr SoZo a sweatshirt out of scraps and leftovers. It was pretty wild, and despite his insistence that he liked it, I wondered exactly how much he'd wear it. Around the house only perhaps. Well, turns out, he wears it almost every single day, in all the places!


It has received a lot of compliments also, which can only have bolstered his confidence in wearing what he terms as 'post-apocalyptic chic'. Anyway, he's started to worry that it is going to look tatty very soon due to the amount of wear it receives. We only wash garments when they actually need it round these parts, however, it will start to look faded before long, so it made sense to make hime another. 


I've been going through all my fabric scraps and leftovers lately due to my participation in the Last Sewist Standing challenge. For that challenge, I have pledged to try and not buy any new fabric for a year, starting Valentine's Day 2023. I truly believe that scraps and leftovers are a wonderful resource for garments sewers, although the speed at which they build up can be alarming, and it is easy to feel overwhelmed by them. Part of my motivation for taking part in the challenge was the push it'd give me to get my scraps under control, and turn many of them into awesome, useful items. 


So having sorted through all my sweatshirt scraps recently, I was able to quickly pull some out that I didn't have plans for and create this fairly pleasing colour palette. I like the autumnal vibes it's giving me, which also suit his colouring well. I took the same approach as I did with the previous sweatshirt, piecing the scraps together on my overlocker until I had shapes big enough to cut the pattern pieces from. 

The only issue I encountered was with the ribbing. My original plan was to use black ribbing for the neckband, waistband and cuffs to create a 'frame' around the mishmash of prints and colours within. I think using a single colour for these makes the whole thing look more intentional and considered. Except, I didn't have enough black ribbing in my stash, and to buy some would send me into the lightweight division of the Last Sewist Standing challenge, which I'm desperate to avoid. I searched through my scraps of Ponte Roma and other double knits, in the hope of finding something solid black that I could substitute for ribbing to make the waistband, but to no avail. During my hunt, however, I discovered a small amount of ivory ribbing that I didn't know I had. There was just enough for this project, phew! 


Sunday, 19 May 2019

A Trio of Apollons


Umm, exactly HOW selfless has my sewing been lately?! Bloody selfless. Although, if I'm honest, I didn't make these three sweatshirts back to back. But I did get them all done within about a month, so I can still claim some sort of prize, no?!

Anyway, when the weather started to warm up and we began to claw our way out of winter, Pat (AKA Mr SoZo) discovered a major hole in his wardrobe. This hole existed between the wool jumpers (or sweaters, if you prefer) and the T-shirts, where some cotton-y long-sleeved tops should have been residing. Somehow he found he had just one fine cotton jumper that his mum had bought him that fit the criteria. And that had a very visible hole in the neckline at the front, and a matching one at the back from where he'd cut out an itchy label. TBH, I disliked that jumper so I struggled (and failed) to find the motivation to fix the holes before they got too large. 


Pattern:

I was just about to hit the charity shops on his behalf when French pattern company, I Am Patterns launched a mini collection of styles for men, including a men's version of their super simple women's Apollon sweatshirt pattern. I was immediately very excited because the proportions looked perfect for Pat's slender frame. I atypically bought a paper copy (I normally buy PDF patterns for the immediacy, and lower price) from Fabric Godmother and got prepping.  

I chose not to dive straight in wielding the scissors, and took Pat's measurements carefully, comparing them to the pattern. I expected to have to make adjustments for his relatively narrow shoulders, however, the XS size seemed like it was going to be fine, so I went straight ahead and made it with no adjustments (the army green version). Both Pat and myself were super happy with the fit, and I love the balance of the the resultant widths of the neckband, waistband and cuffs. Going forwards, I decided to make the cuffs and waistband a little tighter and I think you can see the improvement in the rust and grey versions. 

(image source: I Am Patterns)

The only other change I made to the pattern was adding a stage to the construction to stabilise the shoulder seams. I used cotton twill tape on the army green version, but then I found I had some clear elastic in my stash that I used for the other two. I prefer the look of the clear elastic, but it is a total faff to apply. 

The construction of these is embarrassingly straight forward (which is in no way related to why I made three in quick succession!). The seam allowance included is very narrow, which encourages the use of an overlocker to make these, if you have one. The last time I sewed with sweatshirt weight knit on my overlocker, I had major hassles. The seams were stretching out, and because you can't adjust the differential feed on my machine, I was left with no way to prevent it (a call to my favourite sewing machine repair guy confirmed this) and serious steaming with my iron was doing nothing to improve the situation. After some experimentation with my regular machine, I found an overcast stitch that looks and functions similarly to the stitch off an overlocker. And because the seam allowance included in the pattern is so narrow, there was no excess fabric that would need to be trimmed away. For my third version (the grey one), I decided to test my overlocker again, just in case. Miraculously, it seemed to be working with the fabric fine, so the seams on the last one are sewn with the overlocker.  


Fabrics:

I scoured the shelves at Fabric Godmother for sweatshirt fabric that I thought Pat would be happy to wear. His colouring is on the ginger spectrum, so the army green cotton french terry seemed an obvious choice. I think they must have sold out because I couldn't find it on their site to link to, however it's a thick, hefty, excellent quality fabric that feels good and solid, if you know what I mean. My second choice was a bit of a wild card. This speckled sweatshirt fleece (pictured below) is a really bold, almost orange shade of rust. I told him I would happily use it for me if he didn't like it, but no, he was fine for me to go ahead. It's a lighter weight than the french terry, with a lovely soft reverse side. When Pat first wore this version, our daughter told him he would be in trouble with me because she thought he'd already got it dirty! I also bought a length of the navy version, which I believe is the the same as the fabric used for the sample pictured on the I Am Patterns site. I bought it with the intention of making another Apollon sweatshirt, but I've since hatched a slightly different plan for that. Watch this space...

(image source: Fabric Godmother)

The final version of this batch also counts as one of my #2019makenine projects. I had a length of this fun lightning flash french terry kindly given to me by Girl Charlee UK, and although I really love it, I wasn't quite sure what it should be. I'm not really into wearing sweatshirts these days, so my plans were erring towards a cardigan. But when I randomly decided to hold it up to Pat whilst tidying my fabric shelf, the scale of the print looked really good on him so I realised I had to help it fulfil it's destiny as a sweatshirt for him. Once again, I think it must have sold out as I can't find it on the Girl Charlee site, but that's perhaps not surprising as it featured on the most recent series of GBSB. 

Back to the sweatshirt (who knew there was so much to say about such simple garments!). I find that tops that have bands that have been made in self fabric can look a bit weird if the print is a large scale, so I went on the hunt for some matching plain ribbing. I hit the jackpot when I chanced upon this pale grey marl rib, which is near-as-dammit an exact colour match. 


I can't remember exactly how much I had of the lightning flash french terry, (the Apollon pattern requires 1.5m), but I had just enough to squeeze a pair of joggers for Frankie out of the remains. I'm in love with this new-to-me joggers pattern so I'll blog about it separately soon, however needlessly to say, I'm finding it beyond adorable that they are matching. Of course, it's not the for the first time.....

Thoughts:

Ok, so please no one tell Pat exactly how easy these types are garments are to make. It's, like, the exact same amount of work as making this or this. You could fancy things up with topstitching the seams/seam allowances around the neckline, cuffs and waistband. If I had a cover stitch machine (yes please, universe!), or if I'd have more success with a twin needle, I would. But I haven't so I didn't.

As for the pattern itself, I'm so happy to have one that I can easily turn to whenever suitable fabric crosses my path. I'd love to see experiment with fine sweater knits and potentially rustle up some fancier looking garments. The only thing that I dislike about it, is that there isn't a sleeve head notch to help with the sleeve insertion. The sleeve pattern doesn't have a front or back: the curves are the same on both sides. And I measured the armholes of the front and back pattern pieces, and they aren't the same, so it's not a case of simply folding the sleeve head in half and making a snip. But really it is a tint gripe that effects only one process of the construction. Anyways, I can happily report that all three of these sweatshirts are in regular rotation, and I'm excited to make more.   

Wednesday, 20 June 2018

Koi Shirts X 2


I have a hefty backlog of sewing projects going back months that I want to share with you, but these two recent makes are jumping the queue today because they are making me so happy! So, a little background....

I don’t mind doing a bit of selfless sewing when the mood strikes me. However, I don't throw my sewing skills around willy nilly. If I’ve made you a garment, or mended/altered anything for you, even if you paid me in food for something, then it means that you are VERY special to me. The first garment I made for Pat (Mr SoZo) was a western style shirt, created not long after we moved in together. After that, I vowed to make him one garment per year that we were together. However, the last garment I made for him (another crazy western shirt) was FIVE years ago, whilst I was pregnant with our daughter, and I must admit that I hadn’t made him a garment since. There just seemed so much sewing for this new small person (later, people), and for my new body and lifestyle, to do. Plus, I generally made him shirts that he’d wear to go out in the evening. And the new small people has meant that there's been very little going out in the evening in the last 4.5 years, so new shirts seemed a bit pointless. I felt a bit guilty about this complete transference of my creative energies away from him, but I assuaged that guilt by reminding myself that instead of some annual new shirts, I’d just made him some ACTUAL CHILDREN.


Fabric:

Then, this fabric came into my life, thanks to the generosity of Josie from Fabric Godmother. She very kindly gave me this fabric when I was struggling to justify buying all the pieces I wanted during one of their open days last year. Originally, I intended for it to become a jumpsuit to wear to my sister-in-law’s wedding last summer. But a toile of the proposed jumpsuit pattern taught me two important things: A), the pattern was going to require some major tweaking if it were to look flattering and provide sufficient coverage to hide my ugly old nursing bra, which I just didn’t have time for, and B), the fabric probably wouldn’t have worked very well for the style of pattern.


This koi print cotton poplin (also available with ivory, blue or jade backgrounds) has a similar weight and handle to a medium-weight quilting cotton. I rarely wear prints myself, but I know a good one when I see one. The print design is really detailed and has been created using some metallic inks so that parts of it have a subtle iridescence (no, I didn't spell that correctly first time). Because the original jumpsuit pattern was full length, I came away with 3m, which is nearly double the amount of fabric that I usually acquire when buying fabric (I usually make separates). Having that sizeable quantity of stunning, free fabric just sitting there dormant on my fabric shelf weighed heavily on me. I must have been refolding my fabrics (which I do with embarrassingly regularity) and Pat mentioned that it was cool. Before I even thought about what I was saying, I offered to make him a shirt out of it. The offer was met with a favourable (but probably skeptical!) response, and a plan was born. And thanks to the abundance of fabric, I was able to squeeze a mini version out of what was left over from Pat's!


Patterns:

Probably the most successful, and certainly the most used, of the garments I’ve made Pat is this check, short-sleeved shirt, a tweaked version of Burdastyle's Jakob pattern. I used the exact same pattern pieces for this koi version, but turned the sleeve cuffs under instead of outward, and omitted the breast pockets because it looked like it would disrupt the print unnecessarily. Thankfully he seems to have changed size or shape very little in the last eight years, because the fit seems to me to be fine. Looking at these pictures, however, I'm wondering if the sleeves, in this slightly stiffer fabric at least, are a little full. I've got another shirt planned for him now, and I may make an adjustment to narrow them slightly, which should also have the beneficial effect of raising the height of the sleeve head.


I made Frankie's shirt using Burda 9851 (which seems to be purchasable on eBay), the same pattern I used to make this comic book print version, made whilst he was still in utero. Thanks again to Catherine from Clothes and Sewing for giving me the pattern when her youngest son grew out of the size range. To make that comic book print one, I used the size 9 months pieces, however, currently at 20 months, he's only just starting to grow out of that one. For this koi print shirt, I went with the size 18 months pieces, and I think he should get at least a year's worth of wear from it.


Thoughts:

I made these shirts along side each other so that I would need to do less switching between the regular sewing machine and my overlocker. It was fun to see them progress at roughly the same rate, although the construction methods were somewhat different. And there's nothing like making two at a time to remind you just how much work making a button up shirt actually is! 

It's probably no surprise when I say that I love these shirts. I really benefitted from having a couple of successful TNT sewing patterns ready to reach for, so using this amazing fabric wasn't much of a gamble. It's been such a joy to make them for my boys, and hopefully they'll both get lots of wear from them, although perhaps not always at the same time!

Wednesday, 29 May 2013

The Cowboy Comedy Shirt


It may surprise you to learn that there's actually been a fair amount of selfless sewing (i.e. not for me) going on up in here recently. I'll get round to blogging them all eventually, but I'd like to start with showing you this shirt I made for Patty (AKA Mr So Zo) which I finished last week. 

You may or may not know that I endeavour to make Pat one garment each year we're together. First there was the Brokeback Balcony shirt, then came the Book Launch shirt (both of which were made whilst we were living in Barcelona). Third up was a Rockabilly Bowling shirt I made him for Christmas 2011, and last year I made his waistcoat that he wore for our wedding. Seeing as we'll be mighty busy with a new little person in four short months time, I thought I'd get on his fifth item before everything else gets put on the back-burner. 


Pattern:

I picked up this vintage Western shirt pattern (Simplicity 6693) some time ago from eBay (pictured below) with an eye to expanding the Western shirt section of his wardrobe (don't all dudes have a Western shirt section?!). Published in 1974, this pattern is actually a 'teen-boy' pattern, which is handy because Pat is a slender chap. I Frankensteined this Simplicity pattern with the my adapted version of the Burdastyle Jakob shirt pattern that I've been slowly tweaking and perfecting the fit of each time I make Pat a shirt.  


Fabric Choice:

I knew from the offset that contrast yoke sections, pocket flaps and cuff facings had to be made in this awesome Dia de los Muertos dancing skeleton print quilting cotton that I'd bought half a metre of yonks ago. The obvious complimentary colour for the main body of the shirt would have been black, but Pat has quite a few black Western style shirts now, so I thought I'd find something a bit less obvious. In the end the rest of the shirt was made from a fine teal cotton (it's actually more teal and less blue in real life but my camera has a problem accurately depicting jade/teal/emerald/turquoise shades) that I picked up at a fabric swap in Walthamstow towards the beginning of the year. The colour really suits his gingery/browny/peachy colouring. I was a bit concerned about how such a fine cotton would work alongside the thicker quilting fabric, but with the application of fusible interfacing on all relevant parts made the teal fabric suitably stable where it needed to be. 


Detailing:

I had quite a bit of hassle with the topstitching on this shirt because my new-to-me sewing machine hasn't quite got the same secure foot pressure that my last machine had, resulting in a fair bit of slipping about and therefore unpicking! At least I wasn't going for a contrast topstitching effect like with the BrokeBack Balcony shirt, I'm not sure my machine will be up for any of that lark. 

No Western style shirt would be complete without pearly snap fastenings. I bought the four-piece snap things from eBay and messed about with the pliers-like contraption required to fit them that I was surprised to learn I already owned from my uni days. 


The occasion:

My aim was to get this garment finished before Pat's third and final performance at the Brighton Fringe festival last Friday. At this point I should probably explain that Pat has recently taken to being a stand-up comedian having completed a stand-up comedy course I bought him a couple of months ago. The 'look' he is cultivating for his stage persona involves a Western shirt and puffing out his hair into an enviable 'fro! Apologies for the crappy i-phone pictures, but above is him wearing his shirt on stage, and below is in the bar after his performance. If you are interested, you can see his first ever performance on YouTube here

Thursday, 25 April 2013

Undies Update


At risk of making you jealous, I recently went on a lovely mini-break to Berlin. The highlight of the weekend for me was going to an fantastic flea market on the Sunday attended by what appeared to be most of Berlin's under-40's. It was more than a flea market though, it was also a vintage fair, designer-maker handmade event and food market all rolled into one - heaven!!!


I was transfixed by the stall pictured at the top that sold handmade pants (knickers/undies) and vests (camisoles/singlets) in a rainbow of colours and eye-assault of patterns. The items in question are made in Berlin by the ethically-minded company Berlin Underwear. Even though I am more than capable of making my own pants and vests, I wanted to support their work and ethos so bought the beautiful pair pictured above.


I've found it really interesting looking at their cutting and construction method. They haven't used any elastic, instead used strips of jersey or dance-wear fabric with a high elastane content to form the leg holes and waistband. They have also used their overlocker on a setting that creates a stitch that is visible on the outside, I've totally forgotten what that technique/stitch is called though! Anyone?


Berlin Underwear's super colourful approach inspired me to get a teensy bit more creative and colourful with my own undies makery. I've found that recently some of my smaller pants no longer fit (which I'm hoping is the result of pregnancy rather than cake-intake!) plus the expansion of my belly and rib cage has had a similar effects with my vests, so I made a new set (pictured above). I used my free downloadable pants and vest patterns (of course!) for these. Normally I'd use the size 12 pants pattern if the fabric I was using had a decent elastane/lycra content, and the size 14 if the fabric didn't (e.g. if I were using an old mens T-shirt to make the pants). This time I went straight to the size 14 even though the fabrics I used were plenty stretchy. 

Similarly, the vests I've made in the passed have been created using the size 12 vest pattern graded out to the size 14 around the hips. To accommodate my newly expanded form, I cut the size 14 at the top graded out to the size 16 around the belly and hips plus I added a couple of extra cms to the length. Most of my previously made pants and vests are still more than wearable so far, so I'm hoping I'm not going to need to make crap-loads of new sets before this baby decides to evacuate! 


That said, I also made another set of pants from a scrap of this beautiful Liberty floral print jersey and matching grey-blue FOE (fold-over elastic) I had in my stash. This is such a lovely weighty jersey, these are now my favourite pants. I was careful not to pull on the FOE too much when applying it so the leg holes didn't end up too tight (something I find I've done with some of the pairs I've made in the past). 


But don't think it's been all self-stitchery round these parts lately. Patty's pants collection was also in dire need of an update. I think I've finally perfected the fit, dimensions and construction method of the dude pants I've been making, and was able to make the two pairs (once again from Liberty jersey) pictured below in about an hour and a half. 


The last pair were made using a small scrap of black striped jersey I'd had lurking in my stash for yonks. This time I used some grey camouflage print elastic, which I hope don't look too 'teenage boy'! As you can see, I cut the front and bum panels on the opposite grain so the stripes run vertically, because I isn't fancy trying to match stripes up on a pair of undies! Life is just too short, surely?! 


If you are interested in making dude-pants for your own dude, all you need to do is snaffle away a pair of existing pants that they find comfy and trace a pattern from them. This is, of course, far easier to do if you 'decommission' that existing pair entirely and cut them up along the seam lines so you can trace around the panels. Don't forget to add seam allowance and hem allowance, and give yourself some extra cms around the waist for attaching the elastic. Whether or not you create an 'access window' in the front panel is up to you. Mr So Zo wasn't that bothered about having one of those so I haven't been arsed to figure out how to incorporate that into my pattern, but I'm sure it'd be easy enough to create of your dude wanted that. 

Happy undies-making my friends!!!!


Tuesday, 22 May 2012

Handmade Dude Undies


I've been really excited about writing today's post. There is pretty much nothing that excites me more than figuring out how to make a new type of garment, then doing so successfully. The idea being that, once I know how to make each type of garment, there is no need for me to buy one again, basically becoming self-sufficient in whatever that item is. This excitement is particularly heightened when it is a type of garment that the wearer relies on lots and lots during their everyday lives. To figure out how to make a pair of undies, a vest (camisole, which I wear every day except for the vey warmest days) or pyjamas is way more exciting to me than making a pretty dress that will probably be worn a few times a year at most. it's probably how some people feel when they successfully grow carrots or make jam for the first time.


Back in early 2010 I worked out how to make successful undies for myself prior to my first me-made challenge: Me-Made-March which I undertook solo. Since then I have altered and perfected my pants (knickers/undies) pattern and haven't bought a pair of undies in a shop since. Speaking of which, I plan to share my undies pattern for free before long so if you are one of the lovely readers who have expressed interest in that, then keep your eyes peeled. But that is a topic for another day...


For a few months now I've been wanting to work out how to make undies for Patty (Mr So Zo) too. So I asked him which of his existing pants are his most comfortable (the tatty greying black pair pictured above). Initially I planned to do as I'd promised him: use my tracing wheel to draft pattern pieces from his undies, then return them unharmed. But when they came into closer scrutiny than doing the laundry usually requires, I realised they were pretty shoddy and on their last legs anyway (why do dudes find it so hard to cast off dead undies?!) so I cut them up and traced round the pieces instead. I think Pat was a little upset at what he considered their untimely demise, but I explained that they were sacrificed to spawn an infinite number of new pairs!


So with the pattern pieces created and seam allowanced added where necessary, it was time to select appropriate fabric. For the fist pair I chose some Liberty jersey, really nice and thick, and an unwanted blue T-shirt for some solid contrast. I harvested the bottom hem of the T-shirt to create bands to finish the legs of the undies and set to work with my trusted overlocker. I top-stitched the pants seam allowance down so they wouldn't stick out too much on the inside, but in hindsight I don't think that was necessary. All of the dudes pants I've come across (oh and there have been many! I JEST Mum, I jest!) that are this style and made of jersey are constructed using a cover stitch machine or something, but I don't have access to any of that fancy machinery but I think I was able to create a really good effect with my overlocker and normal flat lock machine.


I picked up the elastic for the waist band when I went to the Walthamstow meet up in April. It was super cheap but decent quality and naturally a bit stiffer than the old stuff on the dead undies. It turned out to be a bit too tight, so I unpicked it and reattached it having extended the overall length from the generous overlap I initially added. After that adjustment, Patty was able to wear these comfortably ALL DAY on Sunday 13th. YAY!!!!! Success.

Time for second pair. This time I added 2cms around the top to make them sit slightly higher on his waist. This pair also used some awesome Liberty jersey sourced from the stash at work, and some super soft contrast khaki jersey for the centre panels. There are so many different print/plain combinations I want to create, now that I know the general fit is fine. These were also deemed a major success by Patty. Possibly the fanciest of pants he's ever had!


You may have noticed that, aside from the vastly more exciting fabric choices and slightly different stitching, my versions are not the same as the original pair. Mine do not have the hole/access/slit/whatever-the-hell-you-call-it that the original pair had. I wanted to make sure I got a decent overall shape and comfortable fit before I started to monkey around with trying to add that element into the mix, which I'll probably try to make at some point in the future. However, I have been told they function fine without that hole, so maybe I won't rush to figure that out when I could be playing with fun fabric combos instead!

But that none of this technical chat is really the point of this post though. The point is that I can make dude-pants. As long as I have access to jersey, thread, elastic and electricity to run my sewing machines, theoretically Pat needn't buy undies ever again! It can be argued, and I would probably be one of those doing the arguing, that this is a political act. Undies, for most peops, are something that is worn every single day of your life. To be able to extract yourself from the accepted role of consumer of this essential item is quite a powerful thing. It is often argued in Feminist studies that 'the personal is political'. What is more personal than the most intimate of garments?!

Monday, 14 May 2012

MMMay'12 Other People: Week 2

I enjoyed creating last week's 'Other People' MMMay'12 round up so much. It was really fun to see my loved ones wearing something I'd stitched each day, even if extracting and collating the documentation was a bit of a headache! Ok, so let's check out the second week's wears...


Day 8 (Tuesday)

On Tuesday my best mate Vic rocked a sheer floral tunic that I actually made for myself two years ago. Upon realising that my arse has out grown said tunic, I knew Vic would look great in it so gave it to her. I think she has proved me correct. 


Day 9 (Wednesday)

Ha! Look at Mumma E loving the camera! She wore a scoop neck T-shirt I made her as an experiment just before we went on holiday together to Venice in January. You can't really see it but the print on the jersey is leaves and insects. It was an experiment because it was the first stretchy garment I have made her and without having her close by (Mumma E lives in Essex, holler!) it was a real guess. Being considerably tinier than me, the proportions and dimensions were difficult to judge, but aside from needing to be taken in a bit at the waist, it was an overall success. Plus Venice was FREEZING when we went, so she was thankful for an extra layer of clothing!


Day 10 (Thursday)

On Thursday Patty wore his Brokeback balcony shirt, the first I ever made him, and the most complex garment I have ever made for anyone other than myself! This shirt, now over two years old, has faded a fair bit but is still going strong. The topstitching still looks ace and it was long enough ago for me to forget all the swearing that accompanied stitching it all!


Day 11 (Friday)

Friday's garment is a sneak preview of a Poetry & Clothing project garment that I have yet to blog about. I'll go into it further when that post eventually materialises. I was pleased to hear that Harriet had been getting some use from this as, being pretty loud, it was a bit of a wild card creation for someone else.


Day 12 (Saturday)

As Vic put it when she sent me Saturday's picture, this garment is a blast from the past! Do you remember when making skirts from pair of jeans was the most exciting thing ever? This is from then. Probably over six years ago. The one I made for Vic has an 'ok' sign appliquéd to the right back pocket area. I used to machine satin stitch these 'ok' appliqués all over the place at the time, usually to little tote bags and shoulder bags that I made to sell. Well, apparently doing an 'ok' with your hand is a thing people do to signal to each other when diving, which is Vic's hobby. She often wears this skirt on holiday, often diving holidays, and on Saturday she wore the skirt with her dive club's sweatshirt having spent the morning handing out leaflets for her dive club. I'm spotting a theme...


Day 13 (Sunday)

Ok, Sunday was quite a special day for MMMay'12 round these parts. Not only did Patty wear TWO Zo-made garments, but one of them was a brand new type of garment altogether!!!!! I'll blog about this in full later this week, but in short: I've figured out how to make dude-pants! Now is not the time to fully express just how exciting and life-changing this new endeavour is for me, but let me tell you that they performed their task well and were worn for the whole day. Patty also wore his Book Launch shirt, which I wasn't expecting him to do because I thought the pants might be enough to concentrate on, but he wore the shirt as well voluntarily.


Day 14 (Monday)

Ms Monday (AKA Kirstin) spent today in a fabulous collaborative handmade ensemble. The Zo-made element is the tweedy shorts I made her for Christmas but she is also wearing a beautiful blouse made by her lovely friend Amy and a cute pair of swallow brooches made by Kirstin herself.

So there you have it. Another week of other peops wearing Zo-mades! Aside from hanging out on the flickr group and seeing how the other participants are getting on, this is totally my favourite part of the Me-Made-May '12 challenge for me.
Related Posts Plugin for WordPress, Blogger...