Showing posts with label #2020makenine. Show all posts

Monday, 10 August 2020

Ankara Roberts Collection Jumpsuit


I've been getting a lot of satisfaction recently from using some of the older pieces from my fabric stash. This African wax print (AKA Ankara) fabric has been in there for at least 8 years, and became many different project in my mind before I actually made it into this jumpsuit. 


Fabric:

To finally get this fabric out of my stash and into my wardrobe, I added it to my #2020makenine plans (which you can see in this post). As Ankara/African wax print fabric goes, this one is pretty stiff, so finding the right project for it had taken me some time. I'd pre-washed it twice to see if it would soften up, but I think that's only going to come with lots of wear and the sporadic washes it will receive over (hopefully) years. 


As you can see, this fabric as a bold, large-scale print. I had quite a bit of it, but full-length jumpsuit patterns are hungry for fabric, so I didn't have the luxury of trying to match sections of the print at any point. I think the random-ness and resultant placement looks fine though. 


Pattern:

I've been in love with the Roberts Collection pattern by Marilla Walker for yonks. You get a lot of bang for your buck with this one, as the pattern includes a jumpsuit, dungarees, pinafore and top patterns. I finally decided to buy it in paper form from Fabric Godmother just before lockdown. 

(image source: Marilla Walker)

I traced the pieces for the jumpsuit off as I wanted to retain the original. I knew I'd been making some adjustments, plus you never know if you'll need a different size somewhere further down the line. Firstly, I altered the shape of the back pieces, to change the inverted V-shaped seam (see the line drawings below) into a regular, straight waist seam. I always have to remove length from the torso of tops, dresses and jumpsuits, and even though I then folded out 2cm from the front and back pieces to account for this, I wanted the option to add some length back or remove more length, should a mid-way fitting deem it necessary. 

(image source: Marilla Walker)

Thoughts:

I was hoping that the unfussy, casual style of the pattern would prove a suitable canvas for this intense print, and overall I think it just about works. There's a slight vibe of sleeping onesie/pyjamas about it, but that doesn't bother me at all. I could have positioned the lowest button slightly higher, which I would alter next time. Plus there's something slightly off with the fit around my bum (it often needs readjusting after leaning forwards) but it's not a major issue, and I reckon I could sort that out for future versions by comparing the rise of this pattern with the rise of the Heyday dungarees pattern. Ultimately though, I'm very happy with this make and wearing it is a lot of fun. I've got more older-stash items busting to share with you soon. 


Friday, 24 July 2020

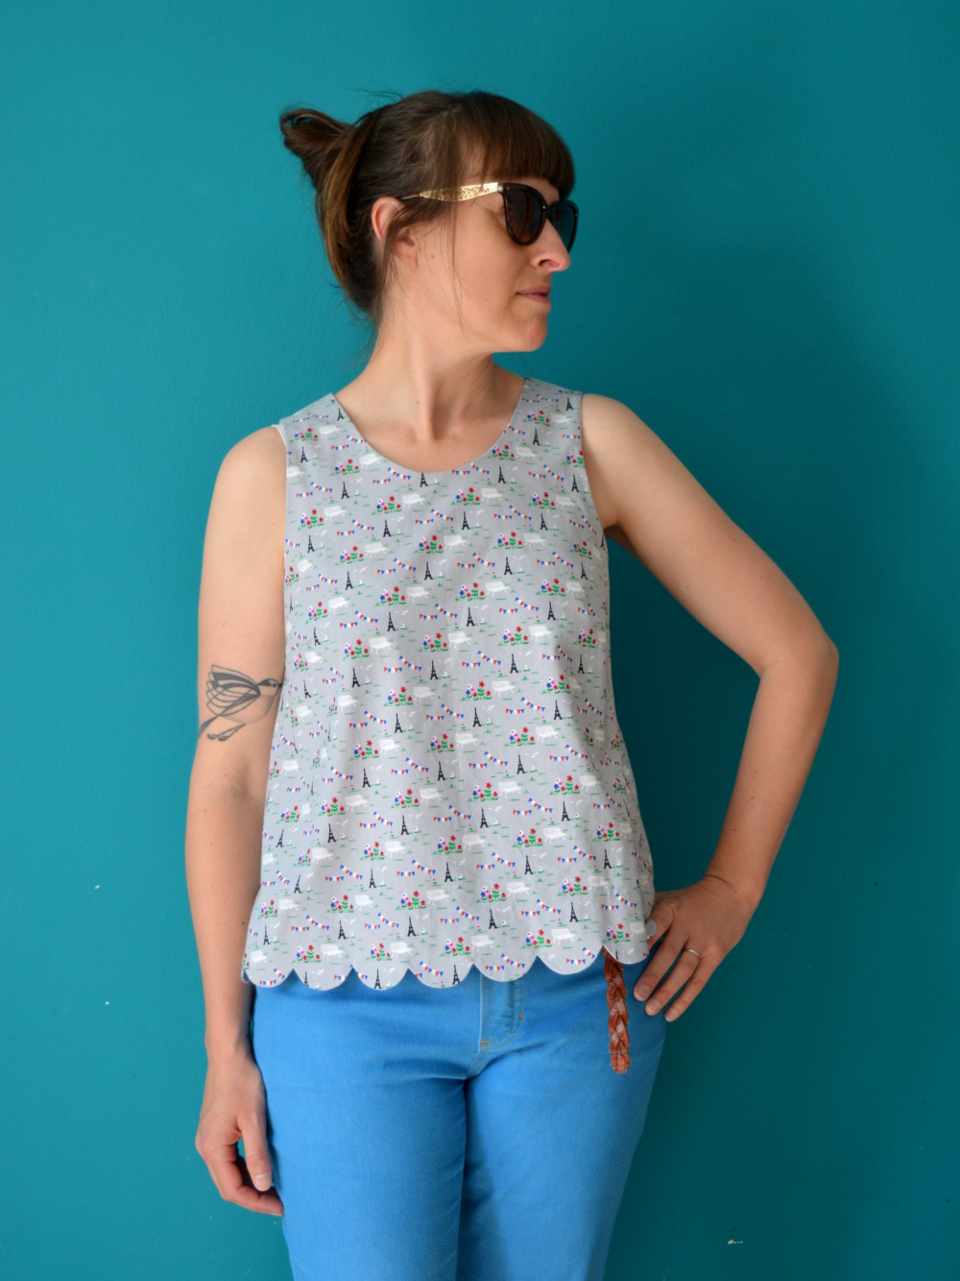
Scallop-hem Ashton Top Hack


During Me-Made-May this year I saw a lot other participants wearing lovely tops made using the Ashton Top pattern by Helen's Closet. I've always got one eye out for a great-looking woven tank pattern because they are almost as comfy to wear as a T-shirt and only require a small amount of fabric. I remembered that I already own this pattern, having been sent it for free shortly after its release (with no expectation of making or reviewing it, I may add). And with some nice pieces of woven cotton fabric in my stash itching to be used, this project was asking to be made!

(image source: Helen's Closet)

Pattern:

This pattern is a shift style, with a simple rounded neckline and hem facing. Included are two bust size options, two length options and two neck-and-armhole finishing options (bound or faced). I chose to start with the longer length and according to the size chart, my measurements made me a size 10 at the bust and size 12 at the waist and hips. 


I dutifully blended between the sizes and folded out 2cm from the length on the torso, as I always do. Because I was planning to use some fairly precious fabric, I made a quick toile (muslin). That first toile came out too big, so I started again with a size 8/10 combo which a second toile told me was much better. 


The basic pattern is lovely as it is, but I felt that it would also be a great basis for some pattern hacks. So I decided to have some fun and try making a scallop hem, which is something that I've been thinking about trying in a project for a while. To make a scallop hem, you need to create a facing, but seeing as this pattern already includes hem facings, that was one less step to take. 


I also wanted to play around with the neckline a little, so I drafted a V shape at the back (and altered my facing piece accordingly). I love the V shape detail of the Peppermint magazine peplum top, and what better way to expose a ropey, faded early-2000's star tattoo?!


Fabric:

For yonks I've been the owner of two small-ish lengths of lovely Atelier Brunette printed poplin. I put them both in my #2020makenine sewing plans (which you can see in this post) because they've been in my stash for years and really should be enjoyed out in the world. This cute little Paris print on a grey background came from M is for Make at least five years ago. I bought the end of the bolt, which I think was about 90cm. Although it's a bit cuter than anything I'd buy for myself these days, however I still really love the print and TBH I couldn't think of anything else to do with it.  


Thoughts:

I'm very pleased with how this top came out and I've worn it a couple of times since completion. Making the scallops added an extra level of challenge to the project, and I had a lot of fun working out how to make them as neat as possible (the key is A LOT of perilous clipping into the curves). I'm not sure if the V-shape is a total success: it looks nice but I'm not sure if it quite fits with the scallop hem detail. The only actual annoyance I feel with this project is that, as you can see in these pics, one of my bra straps is almost constantly visible. Next time I use this pattern, I'll probably build up that area a bit, as I'm never going to wear a strapless bra. Ultimately, it's a win. The overall fit is great and I'm so pleased I was able to find a use for this crisp poplin after so many years of hoarding it. 

Wednesday, 15 July 2020

They Said it Could Never be Done: A Hawaiian Zadie Jumspuit


I appears that most manifestations of the Zadie Jumpsuit pattern are made in lovely, earthy, solid-coloured linens. And whilst I fully agree that those look incredibly, I decided to head towards the other end of the taste spectrum for this, my second version of the Zadie pattern. 


My first version, if you recall, was made in some wonderful lock-and-key print African wax fabric (AKA Ankara). I adore that jumpsuit and it's one of my very favourite garments to wear. I love both the way it looks, and the way it feels. The only pattern alteration I made was to fold out 2cm from the bodice pieces to account for my short-waistedness, which I feel was a success. 


This Hawaiian print cotton poplin has been in my stash for almost six years. It came from Fabric Godmother, before I worked for them in any capacity. I've long been a big fan of Hawaiian print fabric, so it's a surprise to me that I hadn't used it sooner. I nearly used it a number of times during my several-year-long Rockabilly phase, yet I came out the other side of that phases with the fabric remaining unused, so I put it into my #2020makenine plans (you can see the full nine in this post).

The most head-scratching part of this project for me came at the beginning, trying to position the pattern pieces onto my limited amount of fabric. Not only was my length of cotton shorter than the pattern called for, but I wanted to cut the back piece on the fold (rather than in two halves) so as not to break up the print. In general I had to be very careful about print placement, positioning two sections of the print too close to each other, for example, would be super noticeable. To make it work, I ended up omitted the hip pockets, which was a shame but a necessary sacrifice. I also made the length shorter, but I had wanted to do that anyway.  


I constructed this jumpsuit mainly through the recent, very excellent, online Sewing Weekender event (organised by Charlotte from English Girl at Home along with Kate and Rachel from the Foldline), which I was very proud to contribute, adding my own little talk about saving money and resources whilst sewing. I hadn't expected to the chance to enjoy any of the content (basically due to the kids being around), yet I managed to watch quite a bit of it. Because I had already made this pattern before, I didn't need to concentrate on my project too much which really helped. 

As for this jumpsuit, I really like it! The print and colours are a bit intense, but when the sun is shining, I think it works well. I can definitely see yet more Zadie's in my future. Maybe a subtle, earthy-toned linen one should be next...

Monday, 4 May 2020

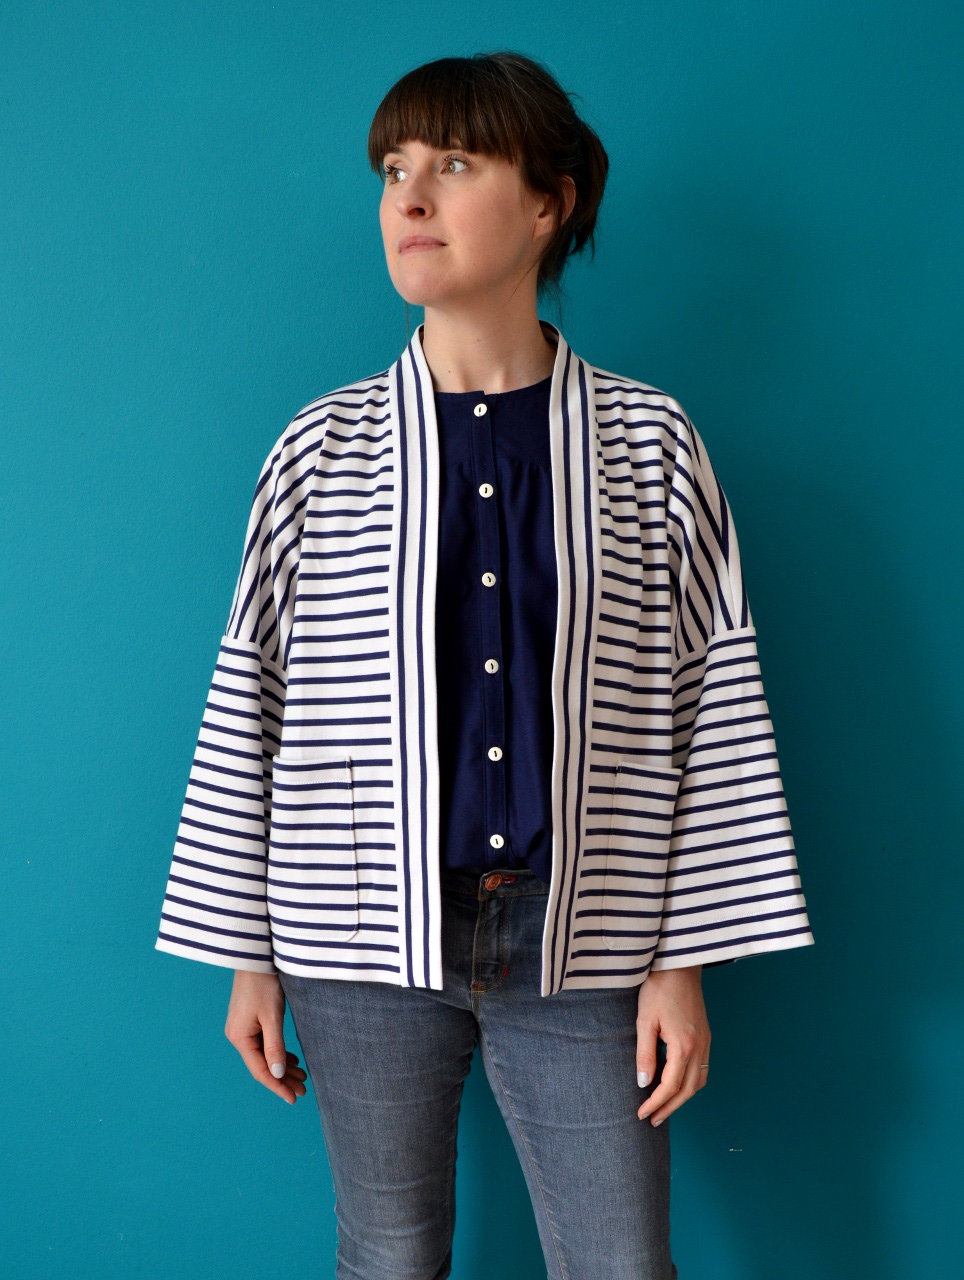
Stripy La Trop Facile Jacket-igan

"Is this a jacket, or a cardigan? Jacket? Cardigan? Jacket-igan?"

Well, dare I toot my own horn and say that I'm smashing my #2020makenine plans?! I do dare! In January, the epic leopard ponte became an oh so subtle cardigan. In February, I scratched my boiler suit itch with some gorgeous, rust, sanded twill. In March, I made my Romero trousers (further tweaks may still be made) from the nicest denim I've ever encountered (and I've encountered A LOT of denim). And now I present to you April's creation: some stripy ponte turned into a jacket. Or a cardigan. I'm not sure. Anyways, here it is. 


Fabric:

If you feel you may have seen this fabric before on this blog, then you are both correct and super observant. Fifty points to you. My sweet and lovely mum bought me 2m of this lovely, striped, cotton ponte/doubt knit a couple of years ago from C&H fabrics. Some of it became my Breton toaster sweater, but because the fabric was soooo wide (over 2m!) I was also able to squeeze this jacket pattern out of it as well. It's clearly softer and slightly more fluid than the fabric I used for my first La Trop Facile, so I think it gives this garment a very different look to my first version. 


I added a tiny little anchor patch that Tilly (of TATB fame) bought me back from Japan years ago. I forgot to take a photo, but I also used some anchor print grosgrain ribbon to visibly stabilise the shoulder seams, and to form a hanging loop at the back neck. The devil is in the details, after all. 


Pattern:

My original La Trop Facile jacket is about 2.5 years old now, and it remains one of the garments I enjoy wearing the most. The pattern is by Belgian designer Delphine et Morissette (pattern shop here), and I'm obsessed with her many patterns. All but one or two are only available in French, so Google translate and I are good friends at this point. The La Trop Facile is a genius combination of elements that I didn't know I was looking for until I made my first version: it has volume, but isn't overwhelming, and it looks and functions like a jacket but is feels more like a comfy cardigan. 


For this stripy version, I had to omit the turned-back sleeves detail due to fabric restrictions. The heaviness of the turn-backs might not have worked too well with the knit fabric anyhow. As the name would suggest, this pattern is a very quick make, especially for a jacket. Obviously, I had to pattern-match the hell out of the seams and pocket application, which slowed the construction process down a touch. 


Thoughts:

Generally speaking, I very happy with this garment. I'm not entirely sure that this pattern and this ponte were a match made in heaven though. It's likely that the garment style would be better suited to a fabric with a touch more structure, but I think I've just about got away with it. The stripes also make this garment a little harder to pair with other tops underneath. I'm hoping that Me-Made-May will help me discover a few tried and tested combos so it gets the amount of wear that it deserves.  


Thursday, 9 April 2020

Romero Trousers: Work in Progress


May I present to you the March project from my #2020makenine sewing plans?! Like last year, at the beginning of 2020, I chose nine pieces of fabric in my stash and promised to sew them up throughout the course of the year. Having just realised that I never shared my 2020 plans here on my blog, check it out below:


Fabric:

The piece of fabric in the middle of my 2020 selection is some AMAZING, mid-blue denim that I bought from Merchant & Mills in Rye last year. It's broken twill weave (my fave!), medium weight and just the nicest quality ever. I bought it without a precise project in mind. I have a self-imposed rule of only buying fabric if I can envision what I'll make from it, however I'm so glad that I ignore that rule this time. The medium weight lends itself well to a spring/autumn weight garment. The buttons I used were also from Merchant & Mills, from a separate trip. I was running low on blue thread and determined not to buy another reel, so I stitched them on with contrasting red thread. 


Pattern:

I'm very rarely an early adopter when it comes to sewing patterns. Sewing pattern styles usually have to grow on me, and I like to see other people's versions pop up on the interwebs before I, myself, commit. This pattern was somewhere in between for me though. It's not a newly released one (so I had the joy of exploring the hashtag), however I knew I wanted it as soon as I saw it. I felt my beautiful, medium-weight denim would work well for the cropped/'trans-season' style. I don't have any cropped trousers in my wardrobe currently, but I chose to keep the length as per the pattern (rather than follow my instinct to lengthen the pattern pieces to ankle length) so that this garment would fulfil a different function to my broken twill Lander pants

(image source: Pauline Alice)

I am a ginormous fan of sailor style trousers. I even made a pair almost exactly ten years ago! I wore those a lot, until the cheap, nasty fabric I used shrunk and faded. That was at the beginning of my Rockabilly phase, and even though I'm out the other side of that now, I still love that nautical-style button detail. 

Once I'd bought the PDF pattern, I took the rare (for me) step of getting the A0 file printed out in large format using the Fabric Godmother printing service. I usually print out the A4 file at home and spend an evening sticking all those sheets together, but this felt like a special occasion! Before cutting out my pattern, I laid my Lander pants pattern pieces over the top to compare them. I could see that I would need to alter the crotch curve of the Romeros a bit, and I preemptively curved the back waistband so it would sit nicely against my lower back. 


I haven't used a Pauline Alice pattern before, and it was fun to try out a new-to-me company. I believe her patterns are available in English, French and possibly also Spanish, which is awesome. The instructions were fairly clear, although the pocket/button stand construction was pretty complicated, and I had to wing it at a couple of points. 

(image source: Pauline Alice)

Thoughts:

Now that we're in lockdown in the UK, I'm rarely out of leggings and joggers at the moment. However, I made myself wear these on a recent trip to the shops so I could analyse the fit. Generally, they were great and I was super happy with them. However, there was one thing that was bothering me. Because of the construction of the pockets and fastening method, the side seam at the pocket mouth isn't straight, and the pocket facing won't sit very flat. You can even see this happening on the sample pair on the Pauline Alice website (pictured above), as well as in my pair (below). As much as I like having the pockets, I've decided to try to remedy this by stitching through the pocket and button stand, which will seal the pockets shut but should help that whole area sit more neatly. 


Another issue that I think I can improve on, is the rise. I didn't notice until I was going through these pictures, but the back rise is too high. I didn't even want to share that picture here because the look is a bit embarrassing if I'm honest. I'm going to scoop the crotch away a bit to give my bum some more space, which should fix this issue. I love these trousers and the fabric so much that I really want to go the extra mile and finesse them as much as I can. 


There's also something a bit weird going on with the fabric around the front crotch area. It's particularly noticeable in the image above. I'm not sure if it's a tightness caused by not enough space in the front rise (some kind of rounded pubis (!) situation?) or a pooling of fabric due to some other factor. If you have any ideas, please leave a comment! I may not try and address this last issue in this particular pair, but I'd like to learn from them for future versions.


It may not surprise you to learn that I plan to use this pattern again, with tweaks. Or I may frankenstein the fastening pieces onto the Lander pattern, seeing as I achieved a better fit generally with that pattern. I'd love to make some shorts next, perhaps in red twill or linen. It seems that my renewed sailor pants obsession is here to stay for a while...
Related Posts Plugin for WordPress, Blogger...