Showing posts with label playsuit. Show all posts

Friday, 2 August 2024

Free Pattern Friday: Cabana Tie Playsuit for Adults


Welcome to my monthly 'Free Pattern Friday' feature, where I road test a free sewing pattern or tutorial: sometimes a children's one, sometimes an adult's one. I try to publish these posts every first Friday of the month, timed to provide inspiration for those who plan to get their sew on over the weekend. I firmly believe that, if you pick your projects carefully, sewing doesn't have to be a crazy-expensive way to clothe yourself and your family. Thanks to all the amazing pattern designers who have offered up their hard work for us to enjoy for free.


As I type this, my part of the UK is experiencing its hot and sticky phrase of the year. I'm so happy I had the foresight/luck to make this playsuit in advance, because it's all I want to wear right now. If your part of the world has its own hot and sticky phase, I recommend you download this pattern. In fact, even if your area doesn't really have a phase like that, download this anyway because it looks cute worn with a T-shirt underneath. You can access the Cabana Tie Playsuit pattern via the Matchy Matchy Sewing Club website by going through their cart and check out process, as you would with any other order. This pattern is available on a sliding scale, pay-what-you-can situation, from $14 to free. If you have the means to pay for this pattern, please choose a paid option. If you don't, then I really hope you access this pattern for free, and enjoy making and wearing it. Big thanks to Matchy Matchy Sewing Club for sharing this accessible sewing pattern with the sewing community. 


Pattern type:

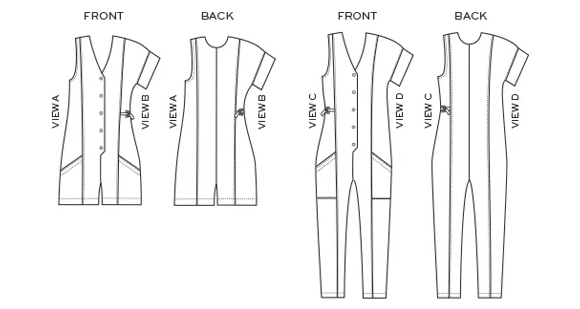
The website says it best: 'The Cabana Tie Playsuit is an easy to sew, effortless jumpsuit. The fit is slightly oversized and relaxed with wide, voluminous legs and a dropped crotch. It includes inseam pockets and a drawstring style shoulder strap that can be adjusted to your desired length and finished off in a large bow or knot.' The original pattern is ankle length, however, I cropped mine by about 20cms because I prefer the proportions of calf length with this type of garment. 


Sizing info:

As with all MMSC patterns, this one is generously graded. It includes sizes XXS - 6XL, which corresponds to Bust 31” - 64” / 79cm - 162cm. The loose, gathered nature of this pattern gives you lots of wiggle room, so you don't need to stress too much if you find yourself in between sizes. 


Fabric info:

The one downside of the MMSC website is the don't give much recommendation for suitable fabrics. They link to some fabrics that they sell, so you can to read between the lines a bit for fabric advice. For the Cabana they link to their linens, however, I would really recommend looking for very drape-y fabrics. I used a light-weight woven viscose with slightly slubby texture that I got at the London Destash Fabric Swap earlier this year. I'm not massively into wearing prints, but this garment could be a great canvas for a large-scale print. 


Findings:

This is my second experience sewing a Matchy Matchy pattern, and it was just as enjoyable as my first. The instructions are super clear, with excellent illustrations to guide you through. Even though this is a free/low-cost pattern, it produces a garment that is anything but basic. It feels really nice to wear, both in terms of comfort and in terms of feeling stylish. I don't have a well-fitting strapless bra at the moment, so in these photos you can see I'm wearing a regular bra which should give you an idea of the coverage of this pattern. Today I'm wearing it with  slim-fitting T-shirt underneath because it's a little (only a little) cooler. 


Customisation ideas:
  • Mess around with the leg lengths to get the perfect level for you. 
  • Try turning it into a dress or top
  • Rather than using self-fabric for the tie, use a contrasting fabric, or wide ribbon or rope. 

Would I make this again?

I would absolutely consider using this pattern again if the right fabric came my way. A slinky, solid black version would be lovely...

Friday, 6 August 2021

Free Pattern Friday: Adult's Playsuit (Hacked)


Welcome to my monthly 'Free Pattern Friday' feature, where I road test a free sewing pattern or tutorial: sometimes a children's one, sometimes an adult's one. I publish these posts every first Friday of the month, timed to provide inspiration for those who plan to get their sew on over the weekend. I firmly believe that, if you pick your projects carefully, sewing doesn't have to be a crazy-expensive way to clothe yourself and your family. Thanks to all the amazing pattern designers who have offered up their hard work for us to enjoy for free.

It's the second month in a row that I'm posting about a free sewing pattern from the amazing resource that is the Peppermint Magazine's sewing pattern range. Can you blame me?! There's so many summer-friendly styles that are quick to make and easy to wear. The patterns are really easy to access; the A4 and A0 pattern files plus instruction documents are downloaded directly from each style's webpage, with just a sign up to their newsletter required (which you can obviously unsubscribe from, should you wish). It is also easy to donate a few quid to say thanks and to support this wonderful resource if you can afford to.

A couple of months ago I saw a woman in my local park walking her dog whilst wearing some black, linen-y cropped dungarees that looked amazing. I immediately identified them as the kind of summer dungarees that I wanted in my life! After giving it some thought, I realised that I could create something similar using the Peppermint Magazine playsuit pattern as the basis.... 


(image source: Peppermint Magazine

Pattern type:

This summer playsuit pattern, designed by Emily from In The Folds, is a cute little romper with tie straps, patch pockets and a concealed side-zip fastening. The fit is designed to be close fitting around the bust, with more looseness around the waist and hips with additional ease. 

As you have no doubt noticed, I lengthened the legs to mid-calf length. Where I live, the weather doesn't reach roasting-hot many days during the year, so I felt that I'd get more use from a longer version. 


Sizing info:

This pattern is graded to ten sizes, from 30" to 51.5" bust and 33" to 54.5" hip. I usually I have to grade out between by bust and waist/hips, but because there's more design ease through the waist and hips anyway, I made the straight size D and the fit worked out fine for me.


Fabric info:

The pattern advise is as follows: 'Consider using light to mid-weight fabrics such as: linen, linen blends, cotton, gauze or chambray. You could also consider sateen, silk (crepe de chine or habotai), tencel or viscose (rayon) for a dressier look. For a boxier silhouette, consider light-weight denims or heavy-weight cottons.' 

For mine, I used a light-weight, cotton canvas curtain that I found in a charity shop. It's pretty soft, and has just the right amount of body to avoid VPLs or anything like that. 


Findings:

I got this pattern printed using an A0 printing service, so I already set myself off on the right foot with this project! As with the other Peppermint Mag patterns I've tried, including others designed by In The Folds, this was a pleasure to use. The instructions are lengthy enough to impart all you'll need to know, without being overly fussy and confusing. Overall, I found the construction process was logical and straight forward. 

I'm pretty happy with the finished item. The model in the photos is wearing the sample without anything underneath in most of the photos, which I think most people (and definitely me!) would find uncomfortably revealing. I love wearing mine as seen here, with a basic, tight-ish fitting knit top underneath. 


Literally my only criticism is that I think there should been a small bust dart positioned from the armpit. That area gapes a little, and for any one fairly full-busted, I'd recommend making a toile/muslin, or at least having a fitting before cutting out the front facing piece, to see if it's something you could use. 

Would I make it again?

Hmm... possibly? There's a lot of dungarees patterns out there that are on my radar to try, but I wouldn't rule out using this again as the basis for another project. 

Monday, 10 August 2020

Ankara Roberts Collection Jumpsuit


I've been getting a lot of satisfaction recently from using some of the older pieces from my fabric stash. This African wax print (AKA Ankara) fabric has been in there for at least 8 years, and became many different project in my mind before I actually made it into this jumpsuit. 


Fabric:

To finally get this fabric out of my stash and into my wardrobe, I added it to my #2020makenine plans (which you can see in this post). As Ankara/African wax print fabric goes, this one is pretty stiff, so finding the right project for it had taken me some time. I'd pre-washed it twice to see if it would soften up, but I think that's only going to come with lots of wear and the sporadic washes it will receive over (hopefully) years. 


As you can see, this fabric as a bold, large-scale print. I had quite a bit of it, but full-length jumpsuit patterns are hungry for fabric, so I didn't have the luxury of trying to match sections of the print at any point. I think the random-ness and resultant placement looks fine though. 


Pattern:

I've been in love with the Roberts Collection pattern by Marilla Walker for yonks. You get a lot of bang for your buck with this one, as the pattern includes a jumpsuit, dungarees, pinafore and top patterns. I finally decided to buy it in paper form from Fabric Godmother just before lockdown. 

(image source: Marilla Walker)

I traced the pieces for the jumpsuit off as I wanted to retain the original. I knew I'd been making some adjustments, plus you never know if you'll need a different size somewhere further down the line. Firstly, I altered the shape of the back pieces, to change the inverted V-shaped seam (see the line drawings below) into a regular, straight waist seam. I always have to remove length from the torso of tops, dresses and jumpsuits, and even though I then folded out 2cm from the front and back pieces to account for this, I wanted the option to add some length back or remove more length, should a mid-way fitting deem it necessary. 

(image source: Marilla Walker)

Thoughts:

I was hoping that the unfussy, casual style of the pattern would prove a suitable canvas for this intense print, and overall I think it just about works. There's a slight vibe of sleeping onesie/pyjamas about it, but that doesn't bother me at all. I could have positioned the lowest button slightly higher, which I would alter next time. Plus there's something slightly off with the fit around my bum (it often needs readjusting after leaning forwards) but it's not a major issue, and I reckon I could sort that out for future versions by comparing the rise of this pattern with the rise of the Heyday dungarees pattern. Ultimately though, I'm very happy with this make and wearing it is a lot of fun. I've got more older-stash items busting to share with you soon. 


Wednesday, 15 July 2020

They Said it Could Never be Done: A Hawaiian Zadie Jumspuit


I appears that most manifestations of the Zadie Jumpsuit pattern are made in lovely, earthy, solid-coloured linens. And whilst I fully agree that those look incredibly, I decided to head towards the other end of the taste spectrum for this, my second version of the Zadie pattern. 


My first version, if you recall, was made in some wonderful lock-and-key print African wax fabric (AKA Ankara). I adore that jumpsuit and it's one of my very favourite garments to wear. I love both the way it looks, and the way it feels. The only pattern alteration I made was to fold out 2cm from the bodice pieces to account for my short-waistedness, which I feel was a success. 


This Hawaiian print cotton poplin has been in my stash for almost six years. It came from Fabric Godmother, before I worked for them in any capacity. I've long been a big fan of Hawaiian print fabric, so it's a surprise to me that I hadn't used it sooner. I nearly used it a number of times during my several-year-long Rockabilly phase, yet I came out the other side of that phases with the fabric remaining unused, so I put it into my #2020makenine plans (you can see the full nine in this post).

The most head-scratching part of this project for me came at the beginning, trying to position the pattern pieces onto my limited amount of fabric. Not only was my length of cotton shorter than the pattern called for, but I wanted to cut the back piece on the fold (rather than in two halves) so as not to break up the print. In general I had to be very careful about print placement, positioning two sections of the print too close to each other, for example, would be super noticeable. To make it work, I ended up omitted the hip pockets, which was a shame but a necessary sacrifice. I also made the length shorter, but I had wanted to do that anyway.  


I constructed this jumpsuit mainly through the recent, very excellent, online Sewing Weekender event (organised by Charlotte from English Girl at Home along with Kate and Rachel from the Foldline), which I was very proud to contribute, adding my own little talk about saving money and resources whilst sewing. I hadn't expected to the chance to enjoy any of the content (basically due to the kids being around), yet I managed to watch quite a bit of it. Because I had already made this pattern before, I didn't need to concentrate on my project too much which really helped. 

As for this jumpsuit, I really like it! The print and colours are a bit intense, but when the sun is shining, I think it works well. I can definitely see yet more Zadie's in my future. Maybe a subtle, earthy-toned linen one should be next...

Wednesday, 8 July 2020

Jill Jumpsuit: It's Officially Summer!


It's unlikely to come as a shock to learn that I do not shop at Primark. (For readers who haven't hear of Primark, it's a fast fashion, high street clothes shop selling cheap, low-quality clothing for adults and children. The company is regularly accused of using garment factories whose workers have few rights, receive very low wages and work in unpleasant and dangerous conditions.) However, last summer Primark displayed a child's playsuit in the window that my daughter loved. No, I didn't buy it for her. I made vague noises about how I would make her one similar, and I counted on a rapid turnover of window display to help her forget about it and get me off the hook. 


Pattern:

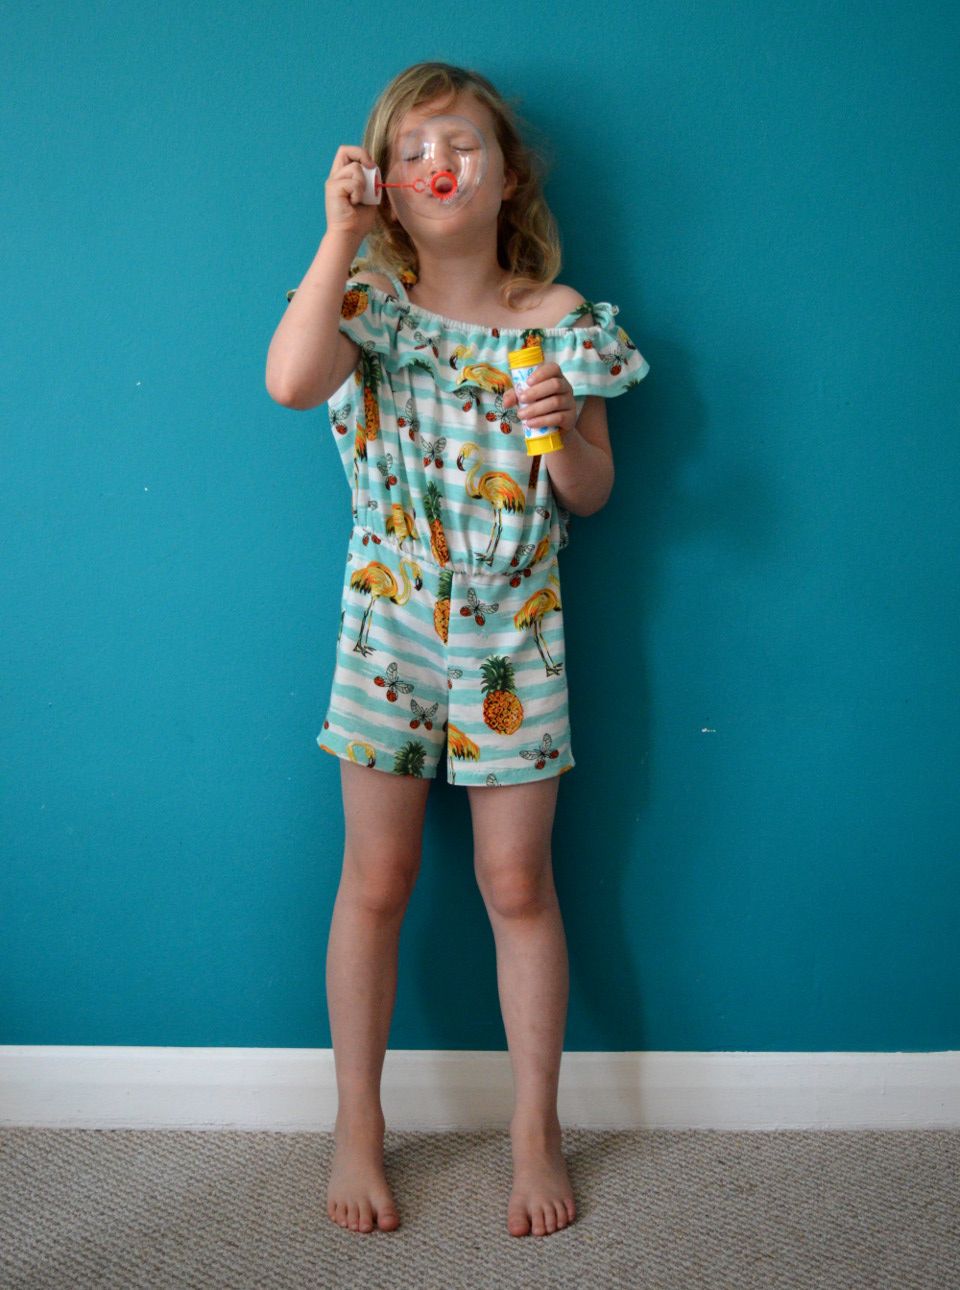
Shortly after, the sewing pattern company, Rebecca Page, released the Jill Jumpsuit pattern for women and children. The style is the spit of the playsuit that we saw in the Primark window: same ruffle round the shoulders, same shoulder ties, same blouson top. Actually, I think that the Primark version was made from something woven and the Jill jumpsuit is designed for knits. Anyway seeing as I had a couple of lengths of suitable slinky jersey in the stash, I had no excuse not to make it for her! 

(image source: Rebecca Page)

For this, my first attempt at this pattern, we went for the short length option and size 7-8 (she's 6.5 years old at the moment), hoping that she'll get two summer's worth of wear from it. I constructed it during a series of small windows of opportunity using both my regular machine and overlocker and it was easy enough. I wasn't keen on the method they suggested for binding the armholes but did it anyway, and in hindsight I don't think they look the greatest, not that you can see them really when its being worn. The pattern also includes pockets in the side seams, but I hate the way in-seam pockets tend to look in jersey (in fact in general), so I left those out. 


Fabric:

My lovely friend Lisa had a recent clear out of her fabric stash, and I was the very grateful recipient of lots of kid-friendly pieces, including this one. This summery jersey with a flamingos/pineapples/butterflies print on a stripe-y background is perfect for this hot weather style garment, and there was just enough for the short length version. I'm really pleased that this pattern was designed for knits rather than woven fabrics, because there are few garments less comfortable than an ill-fitting playsuit!


Thoughts:

Honestly, I wouldn't have chosen to make this style of garment for her if I had full control. I was a little concerned initially that this style could be viewed as 'flirty', which is not an adjective I want applied to my 6yo's clothing. But I feel strongly that children should be given an age-appropriate amount of autonomy on certain decisions that apply to them, and clothing is an important method of self-expression and experimentation. I'm hoping that this particular playsuit falls on the side of 'cute' rather than 'flirty', but either way, it cannot be denied that she LOVES it. During the recent heatwave she wore it almost every day, and drew pictures of herself wearing it, which were eye-wateringly adorable (to me). 

Finding a middle ground between what I'd like to make her/dress her in, and what she'd like to wear is important, and something that we're evolving with time. I can see a time in the very near future where she helps with the actual construction, and will, no doubt, play a bigger role in selecting styles and fabrics. 


As for this pattern, I plan to use it again, but with some tweaks. There's a slight bit of pulling/tightness at the side seams, and I need to have a look at the pattern pieces to work out if it's the shorts/trousers side seams that need elongating, or if it's the side seam at the top that's creating the issue. I'll also lengthen the rise on the front and back by a small amount, and possibly remove some of the fullness of the top section. In this version, I ended up removing and repositioning the shoulder ties further in because they kept falling off her shoulders (they still do on occasion), and I think that reducing the volume in the top will allow me to make a ruffle-free version more easily also. 

Sunday, 27 October 2019

African Wax Print Zadie Jumpsuit


Basically, it's been raining solidly for about three weeks, so getting some half-way-decently-lit photos of my more recent projects has been impossible. Finally, it wasn't too miserable for a couple of hours yesterday, so now I can show you my new Zadie jumpsuit! 

I'm sooooo thrilled with this make. I got it finished in time for a staff night out and my kids' joint birthday party, which happened in the same week. If it hadn't been such terrible weather ever since, I'd probably have worn it every day since as well. 


Pattern:

Is the Paper Theory Zadie jumpsuit pattern actual magic? IMO, there is not one single version out there on the internets that doesn't look amazing, and it seems to work on every body shape. I knew I had to make one at some point, it was just a matter of finding the right fabric (more on that below). I bought the pattern through Fabric Godmother (where I work part time), because they had offered me a free A0 pattern print out, and this seemed to be the right pattern to cash in that offer. I've never had an A0 version of a sewing pattern printed out before. I've always felt it was an extra expense I couldn't justify, but I was very grateful to get to skip sticking multiple A4 pages together this time.

(image source: Paper Theory Patterns)

It felt like a real treat to have the pattern printed out all big, however I did feel under pressure to pick the right size. Having got the A0 version, it would have felt disheartening and a real waste if I'd had to print out another copy if I chosen the wrong size to cut out. I'd heard that the pattern comes up a little large, and I think it was reading about Fiona's (Diary of a Chain Stitcher) stunning cotton Zadie that ultimately pushed me to just go for it and cut out a whole size smaller than my measurements suggested. My measurements also suggested I should blend between sizes, however the fitting notes of the pattern hinted that blending wouldn't be necessary as you can adjust the fit somewhat with how tightly you tie it up.


The one change I did make was to fold 2cm out of the length of the bodice, which is my standard adjustment for my short torso/high natural waistline. The construction was super simple, and not nearly as time consuming as I was expecting it to be. Applying the binding around the front edges was probably the fiddliest part, but in no way headache inducing. 

Fabric:

It took me months of lusting after Zadie jumpsuits on Instagram before I realised that I had potentially the perfect fabric already sitting in my stash. This amazing African wax print cotton was in my #2019makenine plans to use this year, but I just didn't know what to do with it. I bought it a few years ago from Goldhawk road, but I can no longer remember what my initial plans were for it, if I had any at all. I had already used some to make an (un)wearable toile for a different project a year or so ago, but I still had several metres left. As you can imagine, the Zadie jumpsuit is a fairly fabric hungry pattern, and I basically had just enough for this project. 


I adore African wax print, especially the more nutty print designs. This lock and key design is by no means the most bonkers subject matter I've seen used for this type of fabric, and the background pattern here is also fairly subdued. I had been trying to find something more crazy than this on that particular shopping trip, but now I am so glad that I didn't because I think it fits this garment style fantastically, and I couldn't be happier with the combo. Sometimes it really does pay to let a length of fabric live in your stash for a while...


Thoughts:

As I've mentioned a few times already in this post, I could not be happier with this garment. I love the look of it, and it feels comfy to wear but also quite put together. There's a slightly odd, unintentional pattern matching/placement thing happening along the front legs, but I can totally live with that without it bothering me. I'm pretty desperate for the weather to warm up again so I can wear this alllllllll the time. I'm concentrating on sewing from stash for the foreseeable future, however, next year I can definitely see me buying some gorgeous linen to make a solid version as well.

Friday, 9 August 2019

Tricolour Yari Playsuit


I've still got a sizeable list of warm-weather garments that I hope to make before the summer is out. I decided to prioritise this playsuit because I really wanted to be able to wear it on the trip to France that we went on last week. In my attempt to save time, I decided to forgo making a toile/muslin (doh! How many times must I relearn this lesson?!), my thinking being that, with all those seams, any alterations would be a case of a simple pinching-out here or a small letting-out there. WRONG....


Pattern:

I snapped up the True Bias Yari Jumpsuit pattern using the discount code during the last week of Me-Made-May 2019. I've wanted a playsuit for years, so it was time that I FINALLY make myself one. I planned to make View B: the shorts-length with extended sleeves (although I didn't have enough fabric for the sleeve bands) with the waist ties (but no D-rings) to create some shape at the middle. The size chart put me at a size 8 for the top half, blending out to a size 10 at the hips, so that's initially what I did. Having looked at at the hashtag on IG, I saw that a lot of people's versions came up a bit long in the body, with the crotch a bit too low. However, when making trousers, I usually have to 'scoop out' the crotch, so I decided to proceed with the pattern as-is. 
(image source: True Bias)

I tacked/basted it all together and tried in on. Oh. Not good. I wish I'd taken a picture at that point for you to see, but basically the whole thing was too big, and the crotch was wayyyy too low. I went back to the pattern and graded between the size 6 and 8 (rather than the size 8 and 10), and pinched out 2cm from the length at the waist to bring the crotch curve up to nearer where it belonged. I unpicked the whole thing and recut each piece, and removed the 2cm excess length by folding it out and stitching at the waistline so, when all the panels were joined back together, it would just look like a waist seam. After making all those tweaks, the 'proper' construction was a breeze, and it all came together easily. 


At the tacked-together fitting stage, I decided the waist ties weren't going to be for me. I wasn't convinced that they would bring the waist in without creating some odd folds or tucks at the sides, so I decided to stitch some elastic in at the sides of the waist to bring in that fullness more evenly. 

Because I didn't have enough fabric for the sleeve bands, I finished the armholes with bias tape as per the instructions for the sleeveless version. 


Fabric:

As you can see in the photo above, this fabric has an awesome chevron-y print in red, white and blue. The base is a medium-weight woven fabric that I suspect to be a poly/cotton blend, and I it has lived in my stash for a million years. I have had so many plans for this fabric over the years, but I'm pleased to have finally turned it into a useful item, even if this project really made me work for that outcome! It's likely that this fabric is actually vintage, from the 1970's perhaps, as it was really narrow. The limited amount meant that, not only did I have to omit the sleeve bands, but I also had to use something else for the for the neck line facing. I used a scrap of 4oz washed denim instead, I really like contrasting facings though, so it's possible I would have used a different fabric for the facing anyhow. 

The gold-coloured metal buttons also came from my stash, having previously been used on this cardigan. I harvested the buttons from that Jenna cardigan before it was sent it to the textile-recycling bin due to pilling fabric and not having worn it in years. 


Thoughts:

Why oh why do I not ALWAYS make toiles when attempting new sewing patterns?! In the end, this garment has turned out pretty well and is definitely wearable. But it would have been so much better to have ironed out all the fit issues on a separate toile before snipping into my precious final fabric, rather than stressing myself out by trying hard to salvage my final fabric/only version.  

So, after all the faff, have I nailed the fit? I'm not sure. The Yari jumpsuit is a lovely design, and it I think it successfully walks a difficult line between loose and fitted. I do find though, when I wear it, that I have what feels like excess fabric around the front crotch/hip area. I think that could be reduced by making an adjustment to shorten the front rise, however I'd be fearful to over-fit this and make it too restrictive and therefore uncomfortable to wear. Although it doesn't look like it in these photos because my photographer is taller than me, this playsuit is really short! Wearing it whilst sitting down, I was repeated alarmed to be presented with so much of my own thighs! It kind of felt (and I fear, looked) like I was just wearing my pants!

All that said, it is a successful garment and I'm happy to have it in my wardrobe. I'm tempted to try the pattern again, probably the longer version in a solid black or navy linen. But I'm on a fabric buying ban until my stash has been substantially whittled down, so future Yaris are likely to occur next Spring at the earliest. 

Sunday, 7 September 2014

Holly Playsuit


Oh hai peops! Here's a little something that I made a whole bunch of weeks ago. It's my version of the new By Hand London Holly Jumpsuit pattern. Those crazy cats asked me, along with a great pile of other awesome sewers, if I'd like to test the pattern to help them with its development. Seeing as I have yet to act on my playsuit/jumpsuit dreams I, umm, jumped at the chance (sorry, I couldn't avoid that). Please note that this is NOT a review of this pattern, as a tester I was obviously sent the pre-tweaked beta version of the pattern, so what you get if you buy it now will be a bit different. 


Pattern:

I greatly admire the By Hand London girls, their attitude and their business. But usually I find the style of their patterns to be too contemporary for my personal taste so I haven't sewn any of theirs before. However, I could see the retro potential in the sleeved and shorts version of the Holly (pictured above, image from the By Hand London website). To start with I made a few of the standard pattern alterations that I always make to give myself a fighting chance of a well fitting garment. I made the size 12 but graded out to the 14 at the waist. This probably wasn't necessary but I HATE feeling restricted round my belly. Secondly, I extended the back rise by 1.5 cm to accommodate my junk, as usual. And thirdly, I reduced the length of the bodice by about 1.5 cm due to my short-waistedness. 


After a mid-way fitting sesh, I noticed that the waistline was coming up VERY high, so clawed back as much of my bodice-shortening adjustment as I could by making the seam allowance as small as possible. If I were to make this again, I'd probably actually add a little bit to the length of the bodice. I also found the bust darts to be VERY high. Like, at least 6 cm too high. I know I have slightly saggy mum-breast-feeding boobs now and the application of a decent fitting bra will probably do wonders, but I feel that all but the most pert among us would have found these darts pointing north of your bust points to some degree. I'm not sure if the final version of the Holly pattern addressed these two issues, but I'd keep an eye out for them. 


The final issue I found was that the shoulder/neck area is very wide and quite 'gapey', making my bra straps visible a lot of the time. I think you can see the gapiness a bit in the picture at the top of this post. I haven't done it yet, but I intend to move the top few buttons over a touch to see if that closes up the neckline and reduces the gaping effect. If I make this garment again, I'd be tempted to 'fill in' the neckline on the pattern a little around the shoulder/neck area. 

One change I do know that By Hand London made since the testing process of this pattern, extra room was added to the butt area. I didn't find any issues with that on my version, but then maybe my additional 1.5 cm to the rise negated the tightness that other testers must have found. 

But that's the negatives out the way. There is a lot I love about this pattern. You can't see too well in the pictures of my version because of the busy print, but it has a delicate row of tiny buttons down the front. Those buttons are functional as well as decorative: you need them along with the side zip to get in and out of the thing. I also love the proportions of the little turn ups on the sleeves. In general wearing this garment feels fun and a bit cheeky! But it's not great for quick visits to the loo, just sayin'. 


Fabric:

So that we testers didn't need to delve into our fabric stashes to make the Holly pattern, we were very helpfully paired up a fabric purveyor who supplied us with fabric to sew our versions in. I was paired with the UK based Fabric Godmother. I got to hunt through their stock and had my choice to make my playsuit in. Oh. My. Goodness. That was a fun process. As I've mentioned in previous posts, in normal circumstances I try to sew exclusively from my fabric stash or by sourcing second-hand textiles, often from unwanted clothing. But when I do get offered free new fabric, I'm not mental, I say thank you very much. 


My first choice was out of stock so I went with this Tui Bird & Pohutakawa print cotton (close up below, image from the Fabric Godmother website). Seeing as this was free fabric, I wanted to go with something outstanding! The lovely lady at the Fabric Godmother got in touch with me a little while later and offered me a length of my first choice of fabric for free when she received a new delivery, as long as I mentioned where it came from when I blogged about my creation, which I promise I will. 


Although the fabric I used for my playsuit was my second choice, it has more body than the Aloha fabric and therefore worked better for this project which I feel needs a bit of structure. The buttons I used for my playsuit were some little fabric covered ones I'd had in my stash for a squillion years. Their turquoise colour is the same as the main part of the little birds in the print. So this project only required me to buy a zip. Hurrah! 

Thanks both to By Hand London and the Fabric Godmother for helping my finally get round to making a wearable playsuit!  

Thursday, 19 June 2014

Liberty Cord Baby Romper


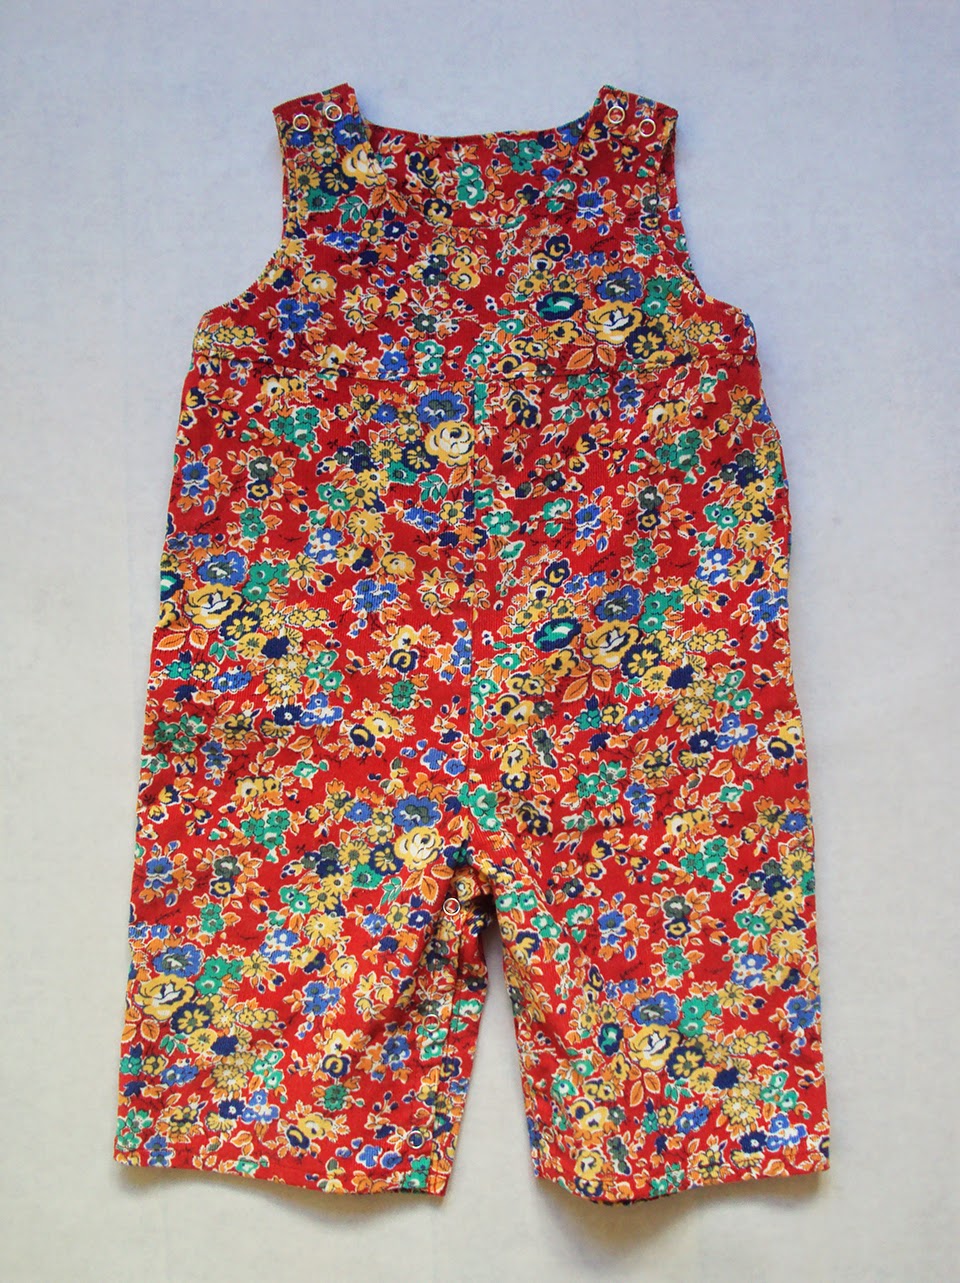
You know when you've had a sewing project in your mind for so long that you kind of start to think that it's already been completed? This is one of those. I had the pattern and the fabric for months and whenever I opened Dolores's clothing drawers, I was kind of surprised to find the romper not in there. So last month I eventually got round to making it IRL. 


Pattern:

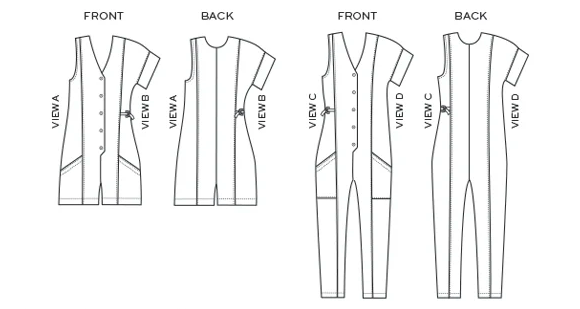
I was given this sewing pattern by Jenna (who has recently started up an AWESOME new blog, Just Sew Jenna). Quick backstory: I 'met' Jenna when she was the winner of a giveaway/competition I hosted last year. She won 1 metre of her choice of fabric from Sewbox.co.uk. She was sweet enough to indulge my request to see what she made from it (you can see her gorgeous top here) and we've continued to email ever since. She also came to one of the Renfrew t-shirt classes I taught at The Village Haberdashery (the next Renfrew class is on Saturday 2nd August, BTW!) when she made this fabulous garment. Anyways, Jenna is a massive inspiration to me as she sews most of her daughter's clothing herself. This Burda 9652 romper pattern (pictured below) is one she used regularly when her little girl was littler, and she kindly gave me a spare copy she had.  


It really is an easy pattern, and a good basis for your own customisation if you so desire. I made view B without the pockets (I felt my fabric would be too busy for the pockets to be noticeable) but I did hack the pattern to include poppers around the inside leg seams for easy access when nappy changing. I eyeballed a hand-me-down romper of Dolores's for how to approach the hack and basically ended up applying a self-bias strip along the inside leg seam to form a base for half of the poppers. The only other change I might make in the future is to elongate the body a bit, as Dolores is a relatively tall and skinny baby (takes after her papa).   


Fabric:

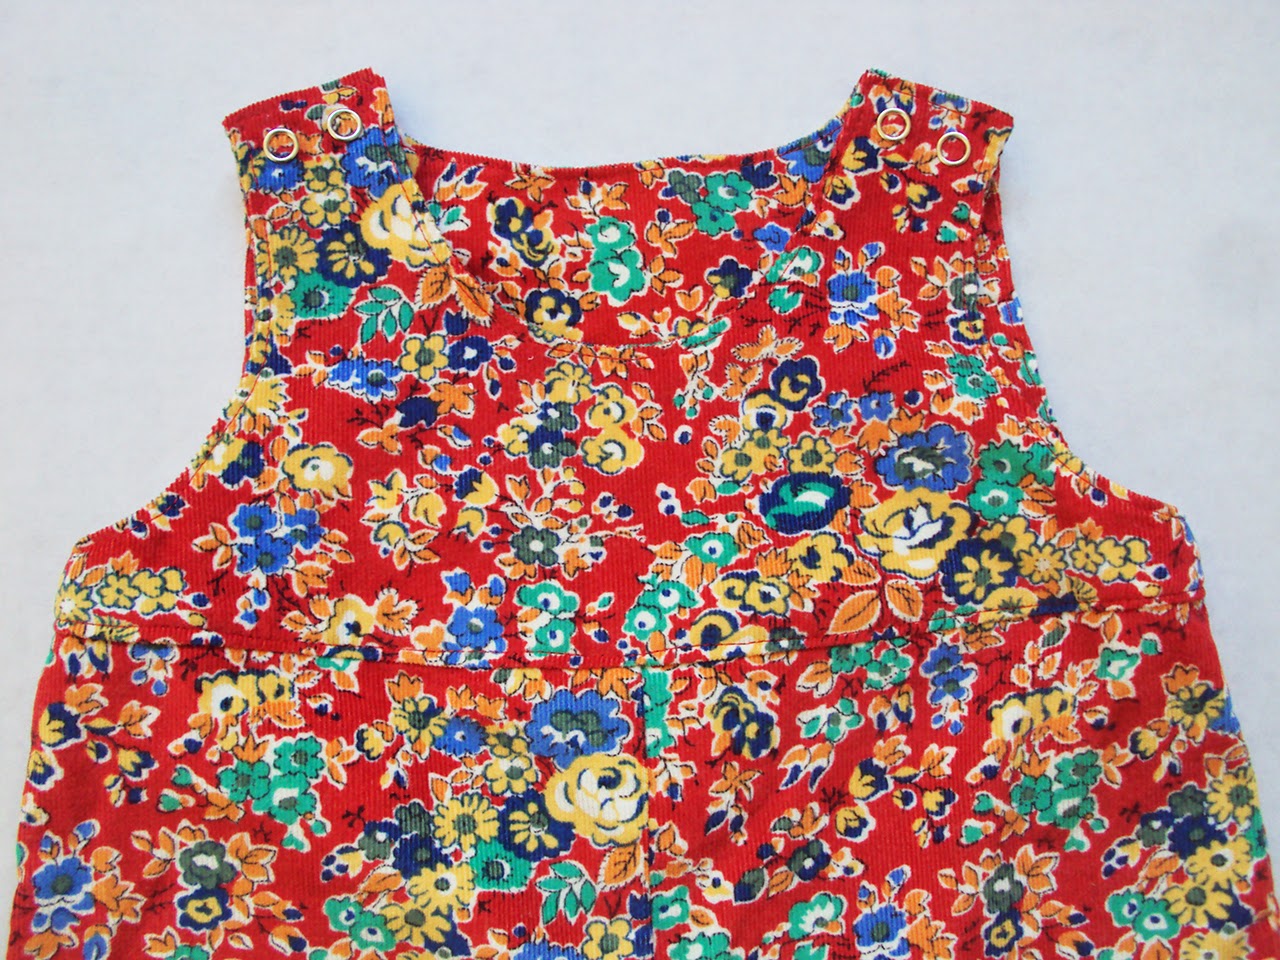
Speaking of Sewbox.co.uk, this super-soft baby cord was a given to me by them. Susan, owner of Sewbox, sent me lots of samples of her impressive array of baby cord and I picked my fave. This is Liberty Kingly Cord - Tatum Trail and you can snaffle your own here. It is an ideal fabric for babies: it's really soft but also holds its shape, AND the garment doesn't need ironing (IMO) after being laundered. I chose this print because it reminded me of the 70's baby/children's garments that kids were still wearing in my youth (early 80's). 


Thoughts:

It seems, if my explorations on Pinterest are to be believed, a big trend in children's wear is to look as much like mini-adults as possible! This freaks me out somewhat. I love that this garment is firmly a baby's garment. Is isn't close fitting, she can move around in it with ease. She can wear it on its own when its warm, or layered with onesies/vests and tights when it's chilly, and various combinations in-between. With poppers at the shoulder straps rather than buttons, it's a really practical garment that is relatively easy to get on and off, helped in part by its roomy fit. I'll definitely be using this pattern again in the future. How cute is it going to be when she's toddling around in it?!


Related Posts Plugin for WordPress, Blogger...