Showing posts with label blouse. Show all posts

Friday, 6 February 2026

Free Pattern Friday: Onil Square Neck Blouse for Adults

Welcome to my monthly 'Free Pattern Friday' feature, where I road test a free sewing pattern or tutorial: sometimes a children's one, sometimes an adult's one. I try to publish these posts every first Friday of the month, timed to provide inspiration for those who plan to get their sew on over the weekend. I firmly believe that, if you pick your projects carefully, sewing doesn't have to be a crazy-expensive way to clothe yourself and your family. Thanks to all the amazing pattern designers who have offered up their hard work for us to enjoy for free.

You might have noticed that I've been reviewing a ton of underwear patterns lately, which is a reflection of my current sewing interests and wardrobe needs. But I know that won't be the same for everyone, so this month I've picked a non-underwear pattern to road test. In fact, it's what I would consider a 'proper pattern': not a quick basic that pattern companies often put out to gain interest but doesn't require them putting in a ton of development time. This pattern would be a great, fairly quick win for a confident sewer, and likely a satisfying challenge for a more beginner maker. 

Huge thanks to designer Pauline Alice for sharing the Onil Blouse pattern for free, which is easily accessible by adding it to the cart on their website. There are also some excellent blog posts on hacking this pattern to create different looks including an asymmetric button front, a dress with gathered skirt, lengthening the sleeves and an A-line dress with shorter sleeves. That is a lot of potential bang for your (zero) buck. It's also translated into Spanish, French and English. How cool is that?!


(image source: Pauline Alice)

Pattern type:

The Onil blouse pattern has a square neckline with elasticated sleeves above the elbow, and a curved hem. There are also bust darts for subtle shaping, which can, of course be adjusted if necessary to accommodate different bust sizes. As mentioned above, there are also tutorials on the blog to use this pattern to create different styles of garment. 

Sizing info:

This pattern, by current sewing pattern standards, is somewhat size inclusive but not quite as inclusive as many designers strive to be these days. It has been graded for busts measuring 31.5" - 47" (approx. EU 34 - 52). Helpfully, finished garment measurements are listed to guide you when selecting your size/s. My body measurements put me as a size 38 for my bust, and size 40 for my waist and hips. However, having checked the finished garment measurements, I decided not to grade out and make a straight size 38. More on how I found that below. 

Fabric info:

It is suggested that you use light to medium weight fabrics, such as cotton poplin, linen, viscose, chambray. I used a embroidered cotton voile from Fabric Godmother. They no longer have the white but it is available still in other colours, the closest being ecru. Because of the bulky embroidery, I used a scrap of white cotton lawn for the facing. 

As you can see, I decided to add some broderie anglais trim that my mum recently donated me, having had it her stash for probably around forty years! 

Findings:

As I say, this is a 'proper' pattern: well drafted and professional with good instructions. However, there was a couple of parts in the instructions that I felt could have been described in more detail to make this project more beginner friendly, particularly around the trimming of the neckline and facing. 

Because my fabric was pretty special, I decided to make a toile to check the sizing and fit before cutting into it. I found that the fit across the bust was fine, but the shape was way too dramatically A-line for my liking. I ended up removing 10cm in total from the width of the hem. I might have decided not to do that if my fabric was very drapey. I'd definitely recommend making a toile in a fabric with a similar behaviour to your final fabric choice as I don't think the line drawing on the website is very representative of the actual, finished garment. I also decided the finished length was a bit short, another reason to add the trim at the hem, to gain a tiny bit of extra length. 

Would I make this again?

Possibly, if the right piece of fabric came along. Speaking of fabric, in the size I made at least, I found I didn't need as much as was stated. Anyway, I'd definitely consider making a buttoned version of this blouse, and lengthen it so I can tuck it into trousers, jeans or skirts. 

Tuesday, 1 November 2022

Ermine + Norma = A Fibre Mood Blouse Mashup


Another of my Autumn sewing plans is a wrap! I'm a big fan of a blouse. Just type 'blouse' into the search box on this blog and you'll see how many of the damn things I've made over the years! They make my usual jeans or dungarees look a bit more grownup and me generally more put together. 


Fabric:

I'd had my eye on this awesome printed viscose for well over six months before I finally gave in and bought some. I bought it from Fabric Godmother (not sponsored but I get a staff discount), but I can't link to it sadly because it has sold out now. 

I'm not a natural print wearer, I guess in part because I predict I'll get bored of a particular one before long. Prints can tie you, stylistically, to a time and place in your life in a way that solids don't seem to. And that can limit the amount of use a garment will see. Which is why I approached this fabric with caution. I had to wait to check that I really did adore it enough to want to put it on my body, rather than to just enjoy like you might a poster on your wall for a while. 

What I particularly enjoy about it the indoors theme of this print! Many prints are floral-based, but I really enjoy the domestic setting and mid-century vibes going on here. It's not dissimilar to my own home! And the design includes lots of colours that I enjoy wearing (rust, mustard, navy and possibly even emerald green). But whilst I'm suitably convinced that I won't for out of love with the design any time soon, I'm not entirely convinced the peachy-pink background colour does anything for my skin tone. 


Patterns:

As I say, I love a good blouse. Fibre Mood magazine invariably has at least one I like in every issue. I missed the availability period of the issue that included the Ermine blouse pattern, however we started to stock it at work as a standalone product. My boss, Josie, decided it was a good candidate for a Dream Wardrobe box. I made the sample garment for that month, so I got to test out the construction and even try it on before committing to making my own. 

My conclusions were: I liked the delicate gathering into the yoke, the size M was too big and the sleeves could be more exciting. So I decided to go ahead with it but made the size S and swapped Ermine's sleeve pattern for the more voluminous piece from the Norma blouse pattern (also by Fibre Mood). 
 

Conclusion:

This blouse, as with anything of course, is not perfect. I don't like how there are two green chairs on the front yoke pieces, and the neckline feels a little too wide, despite picking a size smaller than my measurements would have led me to make. And as I said above, the main colour isn't great against my skin tone. But I do really like this blouse and have enjoyed wearing it a number of times since completion. I think it's going to have a long and happy life in my wardrobe. 

Thursday, 25 November 2021

Denim Shirt Anthea Blouse


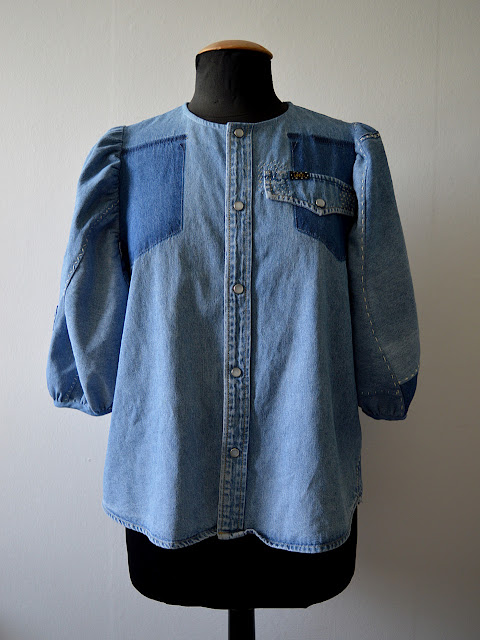
I'm so excited to finally share this project with you because more went into it than most of my projects. More time and more techniques, and a lot more thought. This was an idea-itch that I had to scratch, and I was more invested in manifesting my idea than the actual outcome. However, I do love the outcome also!


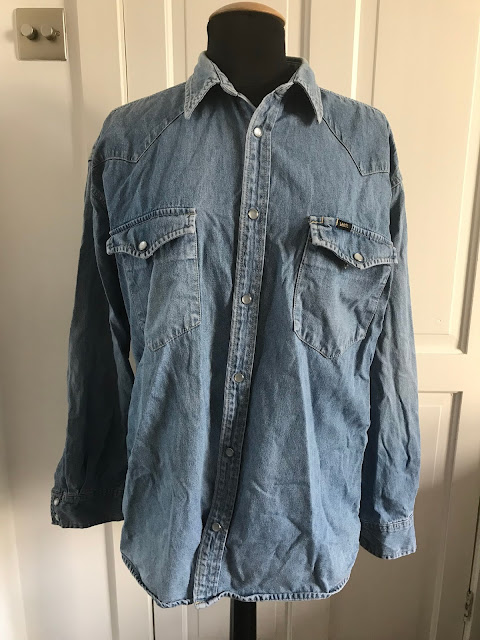
This secondhand denim shirt has been in my stash for a shameful ten years! I feel bad about that because it's possible that someone else could have been during that time. Anyhow, I was keeping it out of landfill at least! I've always loved those pearly snaps and knew that they had to be included in whatever it was to become.


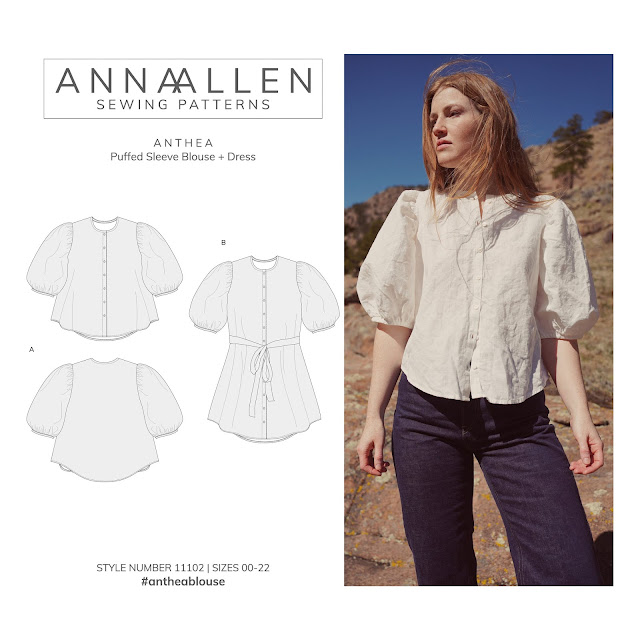
I'd had my eye on the Anthea blouse pattern by Anna Allen (pictured below) as soon as I clapped eyes on it. I have adored every single version I've seen on Instagram. And it's been a very popular pattern so there are a TON of versions to behold! 

(image source: Anna Allen)

The problem was that I didn't have any pieces of fabric in my stash suitable for the pattern, and I couldn't justify buying a new pattern AND new fabric when I already own a lot of both. I'm not exactly sure where the idea came from to use the denim shirt, but I've been having so many inspiring conversations with interesting people lately for my podcast, Check Your Thread, that my mind is kind of permanently in this kind of zone these days. 


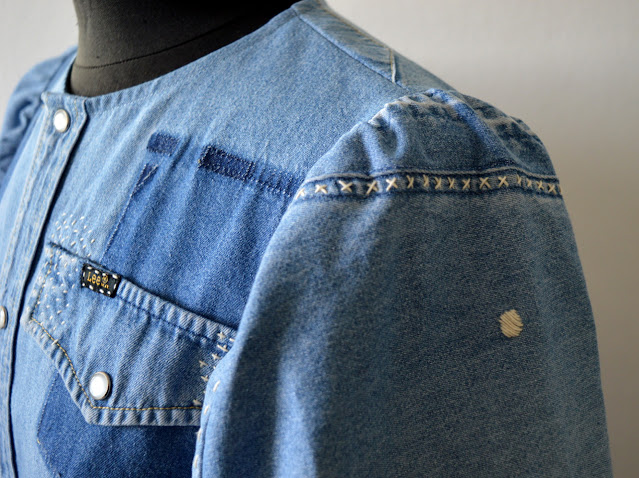
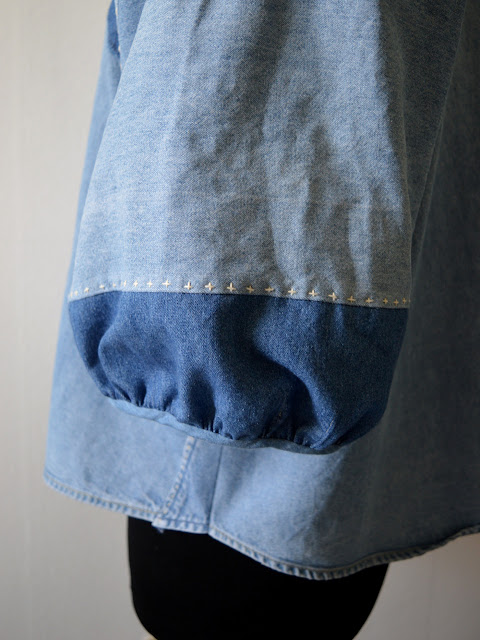
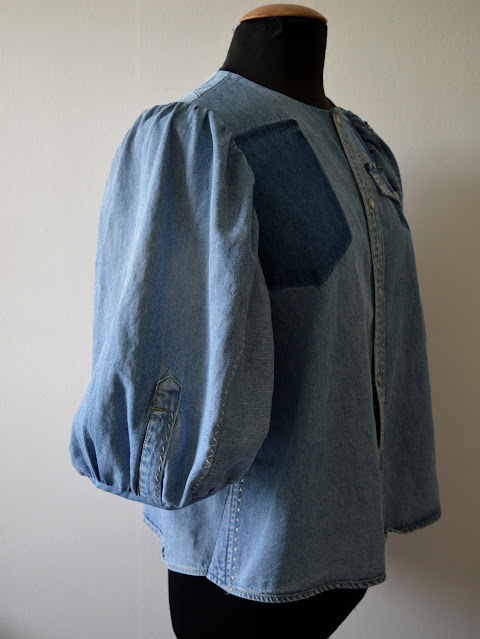
I removed the front pockets so I could fit the Anthea front pattern pieces on, and I love how a shadow of the pockets remain. I reapplied the pocket flap on one side to reference the removed pockets, and stitched it into position with random sashiko style stitching. For this I used some 'proper' sashiko thread that I bought on eBay a couple of years ago but had yet to try. That spot on the sleeve is a hole that I covered with satin stitch to stop it getting any bigger.


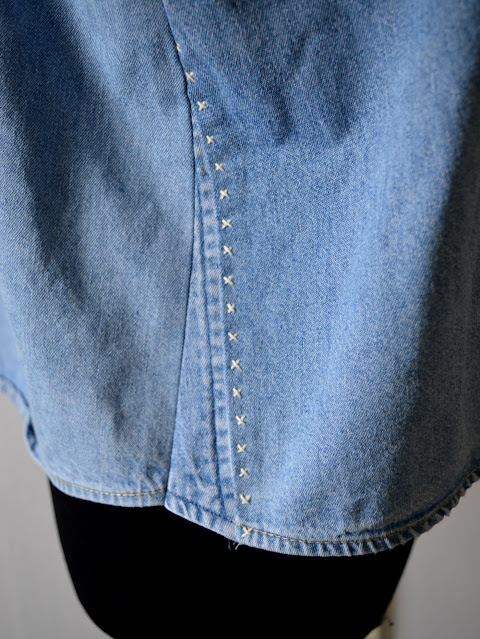
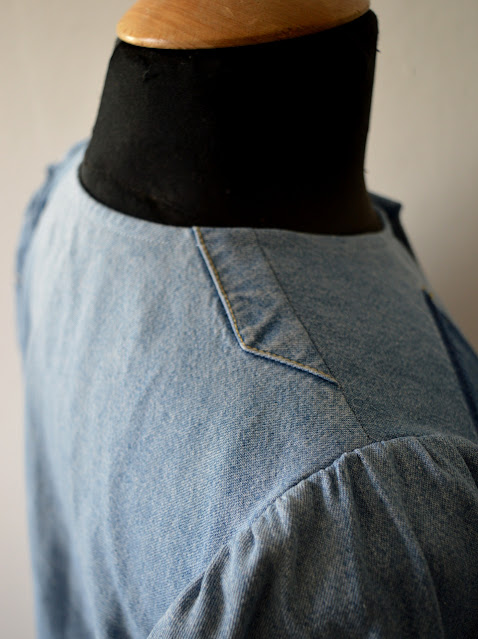
As you can probably imagine, this project was not without it's challenges, but I like how the challenges determined the aesthetic in some cases. For example, the pattern pieces for the body were wider at the hem than the original shirt. So I ended up piecing together the side seams with sections of the original collar (see above). I then decided to highlight the join with another row of sashiko-style stitching, which is a theme that I continued throughout the project.


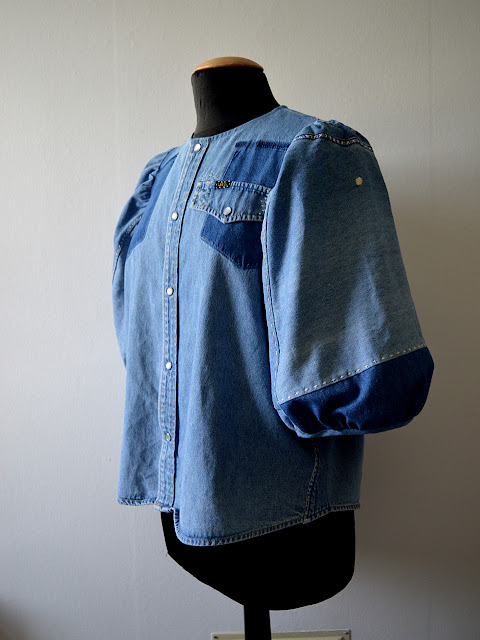
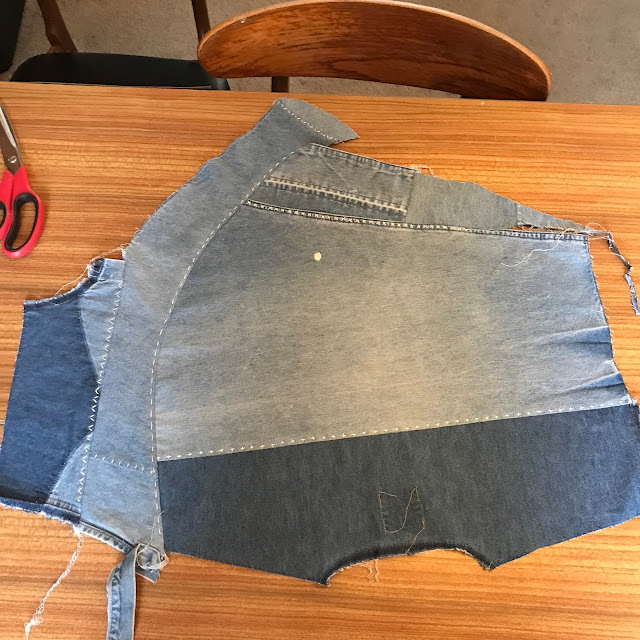
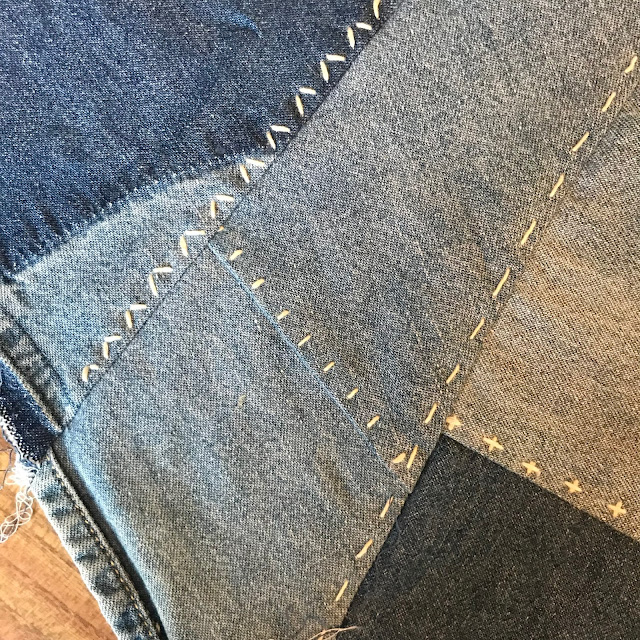
The sleeve pattern pieces on the Anthea are pretty massive, far larger than the original shirt's sleeves. So to form a sufficient area of fabric, I had to piece together pieces of the original sleeves with lots of other pieces harvested from the original garments. I didn't think about it too much, just joined the edges with my overlocker, then 'topstitched' down the seam by hand using a mixtures of stitching styles that I was totally winging. 


I really like the hints of shading and differing colours that existing in the original shirt. However, I tried to play down the patchwork vibe a little, I'm not sure if I quite hit the right balance. 


I made binding from some scraps of lightweight washed denim from my stash. That was used to finish the neckline and the sleeve hems. I don't really like the bias for the sleeve hems and I think the opening is a bit wide. I think I'll go back at some point and make cuff bands instead. 


What is incredibly pleasing is the little pile of scraps that remain from this project. I really wish that I'd weighted the original shirt, and then weighed the scraps to see if I beat the industry average of 15% of fabric wasted during the cutting process.  


The lack of available fabric meant that I couldn't really overthink the placement of various elements in this garment. That felt pretty freeing actually, and I just have to accept the outcome and find elements to enjoy. 


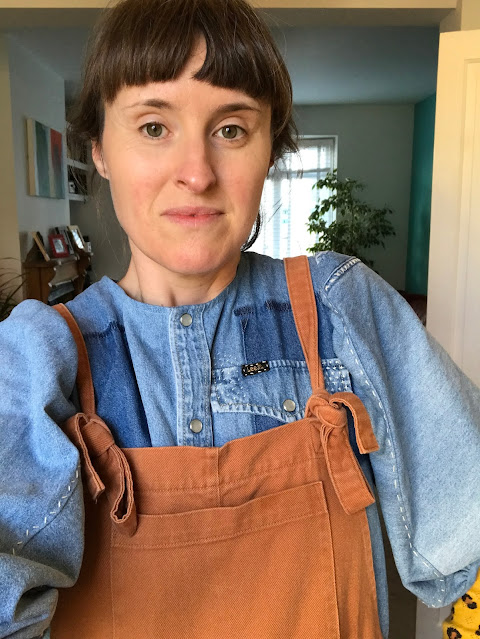
I haven't owned a proper denim shirt since I was a teenager, so I was very surprised by how warm it actually is. Pictured below is how I've enjoyed wearing it the most since I finished it: layered with a long sleeved thermal top underneath and dungarees on top.  

Saturday, 29 August 2020

The Inevitable Lola Top


I loves me a top with ruffles, so obviously I fell in love the Lola top pattern by Fibre Mood as soon as I saw it. However, I've already made plenty of tops that feature ruffles, plus I'm trying to curb my sewing-related spending, so I decided not to buy it. Then I saw Kate from Time to Sew's (@timetosew) lovely versions, and my decision was overruled. And the fact that it has the same name as my daughter seemed to be further confirmation that I should make it.


Pattern:

Fibre Mood pattern magazine is sold by The Foldline, but they were out of stock when I looked for it. I then saw that the individual PDF pattern was on sale for €5 via the Fibre Mood website. (I later discovered that Fibre Mood is stocked in my local WHSmith, grrr!!!) So it would appear that with Fibre Mood, you receive a link to download the pattern files via email after purchase (as you'd expect), however, the instructions then have to be downloaded via the website (as you would not expect, perhaps). After a million attempts I just couldn't seem to log on to access the instructions though, and feeling like I was going crazy. Finally, I found out that the account you set up to make a purchase is different to the account you make to access the website and community (roll-y eye emoji). 


Anyways, this pattern intrigued me as it had a few features that were unlike other ruffle tops I've made. The back half is comprised of various panels which help create a sweet open-back section. The top is fastened with a tie at the back neck so the garment is loose enough to get on and off over your head, whilst still looking fairly fitted.


As per usual, I made a couple of changes to the pattern. Firstly, I blended between sizes, sizing up at the waist and hips. My ability to do this is the reason I could never go back to buying clothing in shops! I also pinched out 2cm from the length of the torso to account for my short-waistedness. After holding the front paper pattern piece up to my body, I chose to lower the bust dart. But after trying on the finished garment, I think this was unnecessary. 


Fabric:

I've been on a massive stash-busting kick lately, and digging deep to unearth some pieces that have been in there for many years. This fabric is some light-to-medium weight cotton sateen, and its slight reflective quality is what's making it look a bit weird in these photos I think. The fabric is a gorgeous tomato-red colour, and if I recall, it was given to me by my friend Claire at least eight years ago.


Thoughts:

Making this top was really fun, and took a bit more time and concentration than most of the projects I've undertaken recently. I found that the lower edge of the cut-out section was a bit gape-y and my bra strap was clearly visible. To combat this, I unpicked it a bit and tightened the elastic. This has helped a lot, but my strap is still visible at times (so I hear). For a future version, I would raise the height of that lower centre back panel. 


'Thanks' to semi-lockdown, I haven't found an opportunity to wear this top since I completed it. I feel that the sateen makes it a too fancy for day wear, but maybe that's just my perception and I could change it. It really feels like Autumn has kicked in now, so unless I find myself going out in the evening some time soon (unlikely!), this top may not see much wear util 2021. 

Friday, 24 July 2020

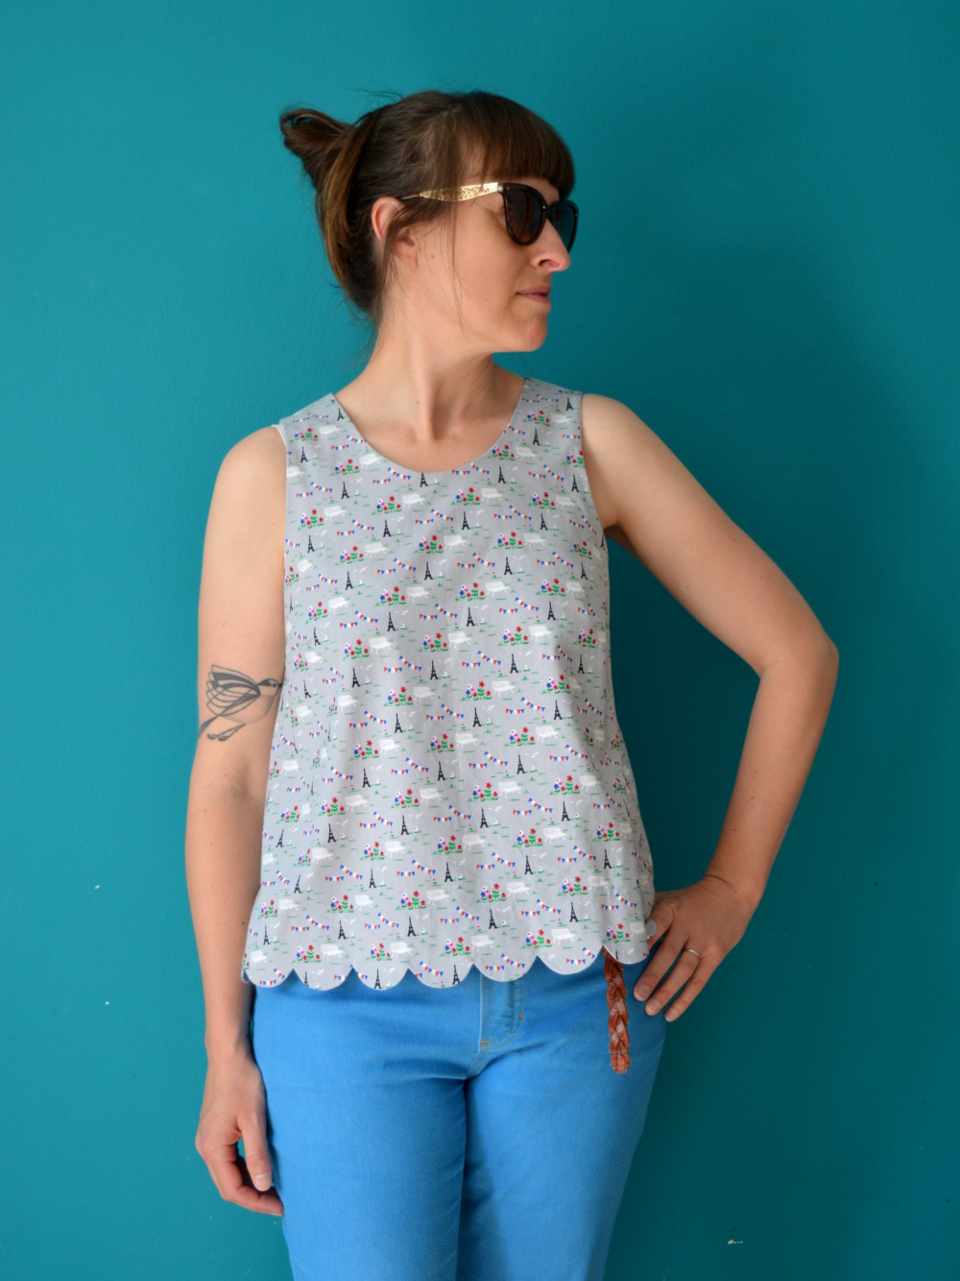
Scallop-hem Ashton Top Hack


During Me-Made-May this year I saw a lot other participants wearing lovely tops made using the Ashton Top pattern by Helen's Closet. I've always got one eye out for a great-looking woven tank pattern because they are almost as comfy to wear as a T-shirt and only require a small amount of fabric. I remembered that I already own this pattern, having been sent it for free shortly after its release (with no expectation of making or reviewing it, I may add). And with some nice pieces of woven cotton fabric in my stash itching to be used, this project was asking to be made!

(image source: Helen's Closet)

Pattern:

This pattern is a shift style, with a simple rounded neckline and hem facing. Included are two bust size options, two length options and two neck-and-armhole finishing options (bound or faced). I chose to start with the longer length and according to the size chart, my measurements made me a size 10 at the bust and size 12 at the waist and hips. 


I dutifully blended between the sizes and folded out 2cm from the length on the torso, as I always do. Because I was planning to use some fairly precious fabric, I made a quick toile (muslin). That first toile came out too big, so I started again with a size 8/10 combo which a second toile told me was much better. 


The basic pattern is lovely as it is, but I felt that it would also be a great basis for some pattern hacks. So I decided to have some fun and try making a scallop hem, which is something that I've been thinking about trying in a project for a while. To make a scallop hem, you need to create a facing, but seeing as this pattern already includes hem facings, that was one less step to take. 


I also wanted to play around with the neckline a little, so I drafted a V shape at the back (and altered my facing piece accordingly). I love the V shape detail of the Peppermint magazine peplum top, and what better way to expose a ropey, faded early-2000's star tattoo?!


Fabric:

For yonks I've been the owner of two small-ish lengths of lovely Atelier Brunette printed poplin. I put them both in my #2020makenine sewing plans (which you can see in this post) because they've been in my stash for years and really should be enjoyed out in the world. This cute little Paris print on a grey background came from M is for Make at least five years ago. I bought the end of the bolt, which I think was about 90cm. Although it's a bit cuter than anything I'd buy for myself these days, however I still really love the print and TBH I couldn't think of anything else to do with it.  


Thoughts:

I'm very pleased with how this top came out and I've worn it a couple of times since completion. Making the scallops added an extra level of challenge to the project, and I had a lot of fun working out how to make them as neat as possible (the key is A LOT of perilous clipping into the curves). I'm not sure if the V-shape is a total success: it looks nice but I'm not sure if it quite fits with the scallop hem detail. The only actual annoyance I feel with this project is that, as you can see in these pics, one of my bra straps is almost constantly visible. Next time I use this pattern, I'll probably build up that area a bit, as I'm never going to wear a strapless bra. Ultimately, it's a win. The overall fit is great and I'm so pleased I was able to find a use for this crisp poplin after so many years of hoarding it. 

Thursday, 25 June 2020

Washed Denim Petites Choses Blouse


So here is another lockdown make. I'm not sure if I'd be achieving my current state of productivity if we weren't in lock down, it's not like I have much of a social life anyway. Almost all of my recent makes involve busting my stash, but this is one of the exceptions. Read on, if you please. 


Pattern:

I cannot be accused of being an impulsive sewing pattern purchaser. Most patterns have to grow on me over time. And even if I do like something straight away, I tend to take my time before buying it, often waiting to see a number of other people's versions before I crack open the Paypal coffers. This pattern is the Petites Choses blouse and dress pattern by French pattern company, Atelier Scammit. It was produced in collaboration with a popular and talented French Instagrammer named Fanny (@petites_choses__) who posts about her gorgeous sewing creations and interior decor skillz. I saw this pattern yonks ago, probably on IG, and I finally bought it many months later when Fabric Godmother started to stock some of Atelier Scammit's patterns in paper form.  


For me, the real genius of this pattern lies in the panels and gathering around the bust and on the sleeves. The pattern includes a number of style options that can be combined to create 24 different looks. I chose to make a top with the V-neck, full back and long sleeves options. The pattern is bilingual, English and French, and the the packaging is gorgeous. The only annoying part was that the pieces needed to be traced off before you can start. The step-by-step photos could have been clearer, but generally speaking I found the construction to be fairly straight forward and fun. 


Fabric:

This pattern had been burning a hole in my stash; once I'd finally bought it, I was desperate to make it. But I just didn't have anything suitable in my stash that felt special enough for this project. I randomly ended up on the Village Haberdashery website a while ago, looking at something completely different, and I chanced upon this anchor-embroidered washed denim. It's virtually the same base cloth as the washed denim that Fabric Godmother stocks, and having used it a number of times (here, here and here, for example) I knew it would be wonderful to both sew with and wear, as well as age nicely.


The only fly in the ointment was that the useable width of the fabric limited because the embroidered anchors started and finished a little way in from the selvedges. This was further hampered by the need to make sure that the anchors were placed symmetrically on all the pieces and panels. I really had to take my time positioning the pattern pieces on the fabric before cutting, and I was left with little more than dust from the 1.5m I ordered. 


Thoughts:

My version is definitely more English-mum's-tunic-top than French-Instagrammer's-chic-and-breezy-blouse, but I'm happy with it and I know that it'll see a ton of wear. I'm confident of the latter because it's effectively an updated version of my denim Tova top that I wore almost constantly for a few years (and still trot it out to wear to the allotment). Plus it gives me the opportunity to drop a double-denim look! I can definitely imagine using the pattern again at some point. I'd love to try it in a check or stripe, with the side panels cut on the cross grain to emphasise them more as others have done before me.


Monday, 25 May 2020

Endless Summer Dorothie Blouse


A year ago I made one of my very favourite me-made garments of all time. It was a sweet little blouse made using the Dorothie Blouse pattern by Slow Sunday Paris, in some mustard viscose twill. I loved it so much and wore it a lot. But sadly it started to literally come apart at the seams along the collar/lapel in a way that was not repairable. 


Later that year I made another Dorothie blouse with longer sleeves, but it didn't work out quite how I pictured it would. My mum has that one now, after virtually remaking the whole thing because she's much smaller than me! 


Pattern:

So, third time lucky? This time, I went back to those gathered, mid-length sleeves that drew me to this pattern in the first place. I omitted the weird split, bias-finished hem of the original pattern, and hemmed the whole bottom edge with a simple double turn. I also raised the armholes by 1.5cm, which was a faff but totally worth it. I would have raised them even more but that would have risked messing with the yoke seams.


Fabric:

Oh, this fabric. I cannot properly explain how much I love it. If you could reach inside my head and pull out the most perfect fabric design for me, it would likely be something just like this. I adore the kitsch Americana, the nod to vintage postcard designs and visions of exciting road trips.  


I bought it from Fabric Godmother last summer. It also came in a navy background version, but both have long sold out. The 1.5m length had been sitting in my stash for many months whilst I tried to figure out how best to use it. 


I included it in my #2020makenine plans (which you can see in this post), because I didn't want it to become one of *those* fabrics that live in my stash so long that eventually my tastes change and I end up not being all that into it. The little red plastic buttons are vintage ones that have been in my stash forever. I was careful this time not to position them too far away from the front edge, like I did with my original mustard Dorothie. 


Thoughts:

There are definitely things I could point to on this blouse to prove its imperfection. But that would be silly, because, overall, I've made a lovely blouse and I'm very excited to wear it. Although my style is far less vintage/retro inspired these days than it used to be, this somehow still feels very 'me'. I can't wait to wear it with my Romero trousers and some sandals and go somewhere that isn't my home! 


Related Posts Plugin for WordPress, Blogger...