Showing posts with label Helen's Closet patterns. Show all posts

Friday, 1 March 2024

Free Pattern Friday: Sam Apron for Adults


Welcome to my monthly 'Free Pattern Friday' feature, where I road test a free sewing pattern or tutorial: sometimes a children's one, sometimes an adult's one. I try to publish these posts every first Friday of the month, timed to provide inspiration for those who plan to get their sew on over the weekend. I firmly believe that, if you pick your projects carefully, sewing doesn't have to be a crazy-expensive way to clothe yourself and your family. Thanks to all the amazing pattern designers who have offered up their hard work for us to enjoy for free.

To be honest, I haven't done a great job this month in actually showing you what my chosen free pattern actually looks like made up. I've omitted the pockets and created my own 'fabric' for it that makes it tricky to see what's actually going on. ANYWAY. Hopefully you will get a sense of the proportions at least, and also the versatility of this pattern as a canvas of sorts. If you want to get a clearer idea of what this pattern can look like, I'd recommend checking out Amy from Craft and Thrift's awesome versions (here and here). But what am I even talking about? Let me introduce you to the Sam Apron pattern by Helen's Closet. Thanks so much to Helen for sharing this (and a number of others) for free. There are many free apron patterns and tutorials out there on the interwebs, but I wanted to highlight this one specifically because of the interesting details and multiple sizing options. In my experience, Helen's Closet patterns also have excellent instructions. You can access the Sam Apron pattern through the webshop on their site (no payment is required).


(image source: Helen's Closet)


Pattern type:

The Sam Apron is cleverly designed to be suitable for lots of activities. I can imagine cooks, bakers, barbers, hairdressers and all manner of artists and crafts-people wearing a version of this apron. It includes chest and waist pockets, towel loops, and two strap options. But what is really unusual about this pattern over most free apron patterns is the graded size range and instructions for creating a custom fit based on your width, height and even bust size. 


Sizing info:

The apron fits sizes 0-34 (up to a 62″ / 157.5 cm hip) which has been broken down into five size bands. There are also five height options, from less than 5" to over 6". My plan was to make a cooking apron that would fit both Mr SoZo and myself. Helpfully, our hip measurements are similar so I cut the size 8-12. He's taller than me, but I don't think a cooking apron needs to be knee length anyhow, so I used the length that's shorter than both of us. Included are instructions for adjusting the bib section to accommodate a larger bust. Not something I need personally, but I appreciate that they included that for others. 


Fabric info:

The pattern recommends medium to heavy-weight woven fabrics with no stretch. Cotton broadcloth, denim, linen, cotton twill, quilting cotton and canvas are all suitable options. Waxed Canvas can also be used for a water-resistant apron. I didn't have any suitable fabric in my stash (thanks Last Sewist Standing challenge!) so I 'made' fabric by combining scraps of non-stretch denim and twill. It's basically the same technique I used for my denim patchwork dungarees. If this approach to scrap-busting is of interest to you, I have an episode of my podcast planned for next month with an accompanying downloadable guide that will talk you through using scraps for garment making. 

I used a lighter weight denim for the straps, because I thought a heavy weight fabric would be difficult to tie. You could also use twill tape, wide ribbon, braid or cord for the straps. 


Findings:

Ah I love a Helen's Closet pattern. Your hand is so thoroughly held and it feels like no detail has been overlooked. Presumably, their free patterns have been created to give potential paying customers a sneaky peek into what their patterns and instructions are like, and they deserve to get a good conversion because the quality is high.

I literally found only one thing that didn't work well. I found that the bias strip pattern piece that's used to finish the side curves was too narrow if using the 1cm seam allowance that is suggested. It would have resulted in the bias strip being too thin to cover the seam allowance when you flip the bias over to the wrong side. I used a narrower seam allowance and trimmed down the seam allowance to prevent that happening. 


The finished apron is pretty cool though. The denim is perhaps a bit thicker than necessary for a kitchen apron. And if I were to make it again, I'd add velcro to one end of the neck strap so it could be tighter but we'd still able to get it on and off with ease. 


Would I make it again?

If I ever had the need for another apron, then yep. I'd give more thought to fabric suitability depending on the intended use however. 


Wednesday, 15 September 2021

Slub Linen Arden Pants


I wanted to drop a quick post about the trousers that I was wearing in my last post about the Lou Box Top, because I feel they deserve some attention of there own. These days I only buy fabric if I have a very clear idea of what it'll become. Sometimes I even have a specific pattern in mind, sometimes not. And when I do by some fabric, I really try (but often fail) to use it before long, so it doesn't become another piece of stashed fabric. With this linen, I DID manage to use it within a few weeks of purchasing. WIN! Zoe, 1 : Stash, 0. 


Fabric:

A few months ago, Fabric Godmother (where I work part-time) got in some lovely, slubby linen in navy with white flecks (sadly now sold out, sorry). It had such lovely drape and body and movement, but I reminded myself that I hadn't sewn up the last lot of fabric I bought yet, so couldn't justify buying more at that point. Then a couple of weeks later I saw my colleague Claire wearing a pair of Merchant & Mills 101 Trousers made in the same linen and they looked AMAZING. Claire has incredible taste and buys fabric only when she sees something INCREDIBLY special. I decided that if Claire felt this was some good stuff, then it would be an investment to get some for myself.

For a few years now I've been interested in creating 'summer jeans': bottoms that are really comfy and that will go with so many other items in my wardrobe that they get worn ALL THE TIME during the warmer months. I felt that this almost denim-y look linen might fit the bill. 


Pattern:

There are soooo many elasticated-waist woven bottoms patterns out there now that it's almost impossible to keep track of them all. But the one that instantly appealed to me the most (apart from the Luna pants pattern by Made by Rae, which I feel is more suitable to very drape-y fabrics) is the Arden Pants pattern by Helen's Closet. I was lucky enough to receive this pattern for free shortly after it was released and I've tried it a couple of times so I had a good idea of the fit I could expect and the size I should use. 


I love the elasticated ankle views included in this pattern, but I chose to make the regular hem that I wear turned up hoping they will be suited to a wider range of outfit vibes. The construction of these trousers is very simple, but with some nice details like topstitched seams that should ensure longevity. In hindsight, I should have added some stabilisation to the pocket mouths though, because I'm pretty sure they will stretch out over time. 

The only other issue I have with these trousers is that I can't decide if the waist should sit higher up near my natural waist (which I like to look of more), or lower on my hips (which feels more comfortable but I don't like the way my belly protrudes a bit over the top!). I'm erring to the former/higher position, but I need to tighten the waist elastic to stop them from slipping down. The pattern calls for topstitching through the waistband after the elastic has been inserted. I really like the look of that, but I find it makes the elastic less effective and looser after the topstitching has been added. For future pairs, I should probably overcompensate and make the elastic too tight to begin with. Or include the step to insert a cord or tie through the waist so you can tighten them up when worn.


Thoughts:

In short: I have achieved my summer jeans! I have worn them A TON since making them (I'm wearing them right now, in fact). They look great with all sorts of casual tops, and I'm interested to see how far into autumn I can get away with wearing them before I feel too cold. I definitely plan to make another version or two of this pattern in the future, perhaps slimming them down through the hip ever so slightly. 

Friday, 24 July 2020

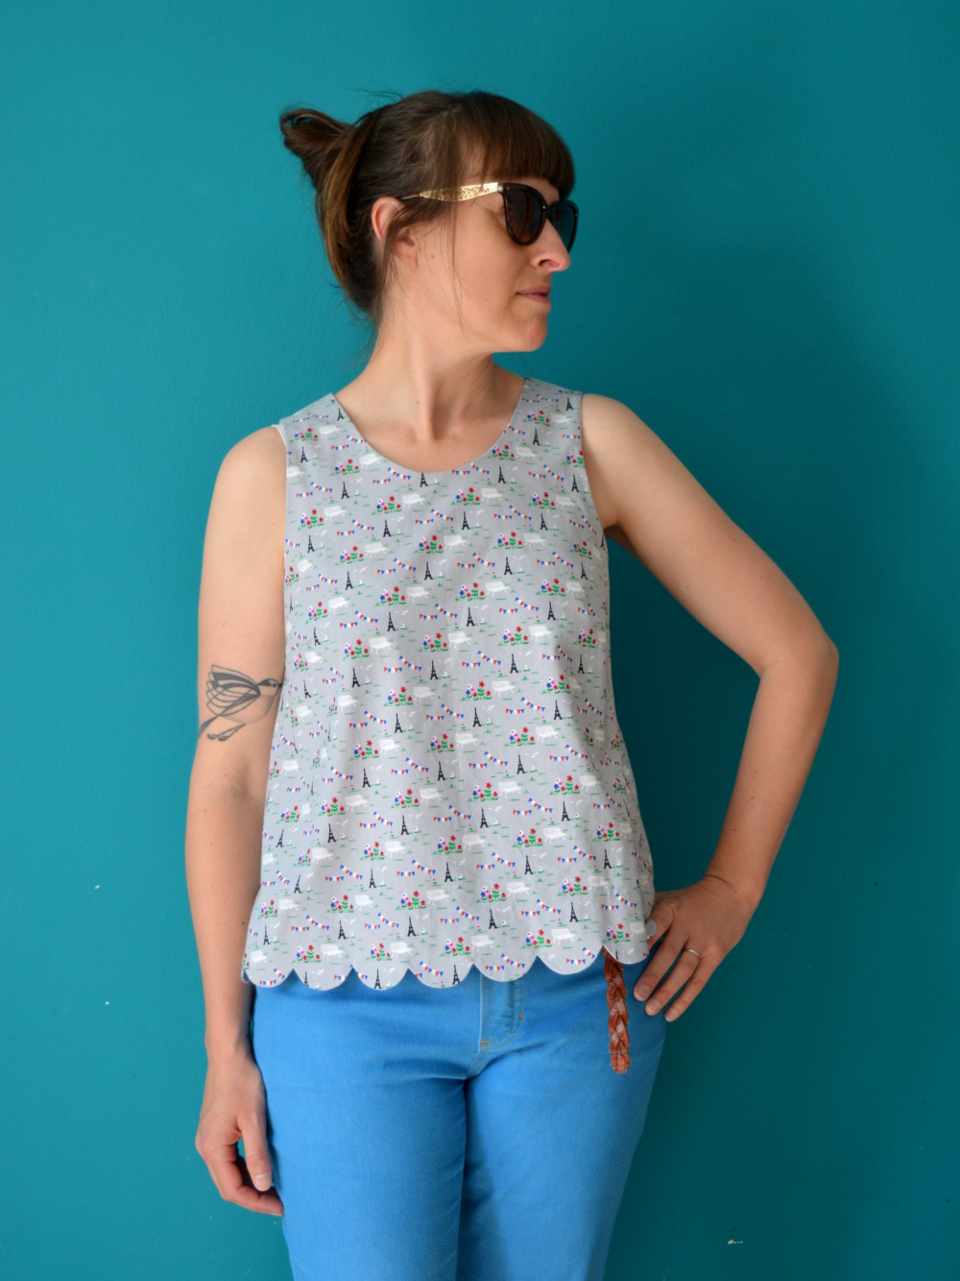
Scallop-hem Ashton Top Hack


During Me-Made-May this year I saw a lot other participants wearing lovely tops made using the Ashton Top pattern by Helen's Closet. I've always got one eye out for a great-looking woven tank pattern because they are almost as comfy to wear as a T-shirt and only require a small amount of fabric. I remembered that I already own this pattern, having been sent it for free shortly after its release (with no expectation of making or reviewing it, I may add). And with some nice pieces of woven cotton fabric in my stash itching to be used, this project was asking to be made!

(image source: Helen's Closet)

Pattern:

This pattern is a shift style, with a simple rounded neckline and hem facing. Included are two bust size options, two length options and two neck-and-armhole finishing options (bound or faced). I chose to start with the longer length and according to the size chart, my measurements made me a size 10 at the bust and size 12 at the waist and hips. 


I dutifully blended between the sizes and folded out 2cm from the length on the torso, as I always do. Because I was planning to use some fairly precious fabric, I made a quick toile (muslin). That first toile came out too big, so I started again with a size 8/10 combo which a second toile told me was much better. 


The basic pattern is lovely as it is, but I felt that it would also be a great basis for some pattern hacks. So I decided to have some fun and try making a scallop hem, which is something that I've been thinking about trying in a project for a while. To make a scallop hem, you need to create a facing, but seeing as this pattern already includes hem facings, that was one less step to take. 


I also wanted to play around with the neckline a little, so I drafted a V shape at the back (and altered my facing piece accordingly). I love the V shape detail of the Peppermint magazine peplum top, and what better way to expose a ropey, faded early-2000's star tattoo?!


Fabric:

For yonks I've been the owner of two small-ish lengths of lovely Atelier Brunette printed poplin. I put them both in my #2020makenine sewing plans (which you can see in this post) because they've been in my stash for years and really should be enjoyed out in the world. This cute little Paris print on a grey background came from M is for Make at least five years ago. I bought the end of the bolt, which I think was about 90cm. Although it's a bit cuter than anything I'd buy for myself these days, however I still really love the print and TBH I couldn't think of anything else to do with it.  


Thoughts:

I'm very pleased with how this top came out and I've worn it a couple of times since completion. Making the scallops added an extra level of challenge to the project, and I had a lot of fun working out how to make them as neat as possible (the key is A LOT of perilous clipping into the curves). I'm not sure if the V-shape is a total success: it looks nice but I'm not sure if it quite fits with the scallop hem detail. The only actual annoyance I feel with this project is that, as you can see in these pics, one of my bra straps is almost constantly visible. Next time I use this pattern, I'll probably build up that area a bit, as I'm never going to wear a strapless bra. Ultimately, it's a win. The overall fit is great and I'm so pleased I was able to find a use for this crisp poplin after so many years of hoarding it. 

Related Posts Plugin for WordPress, Blogger...