Showing posts with label Ginger jeans. Show all posts

Sunday, 15 May 2022

Leopard Print Ginger Jeans and a Realisation

It's slowly been dawning on me that I can't really wear the style of jeans that I prefer, and also feel comfortable AND have them stay on my body properly. And honestly, I think this has always been the case. What I mean by this is that, the slim/skinny legged jeans with a low-rise, hipster waistline which I love the look of just don't work for my body. I've always had a bit of a tum, even when I was in my 20s and weighed the least in my adult life. I've always found the waistline of jeans cut in to my tum uncomfortably. I got so used to undoing the top button of my jeans each time I sat down after years of doing so, but I've grown tired of that now. 

Through the power of sewing my own clothes, I tried to solve the issue by grading between two different sizes for the waist and the hips-downwards. This has never worked well because they end up too loose at the waist and often slip down a bit. 

Having gone on a journey which resulted in my workwear denim Lander pants, I came to the realisation that I need extra space around my tum only, not all around the waist. The full-tummy adjustment I did on the Lander pants worked really well, and for the first time ever I have a pair of fly-front jeans that I can sit down in without needing to undo the button of. 
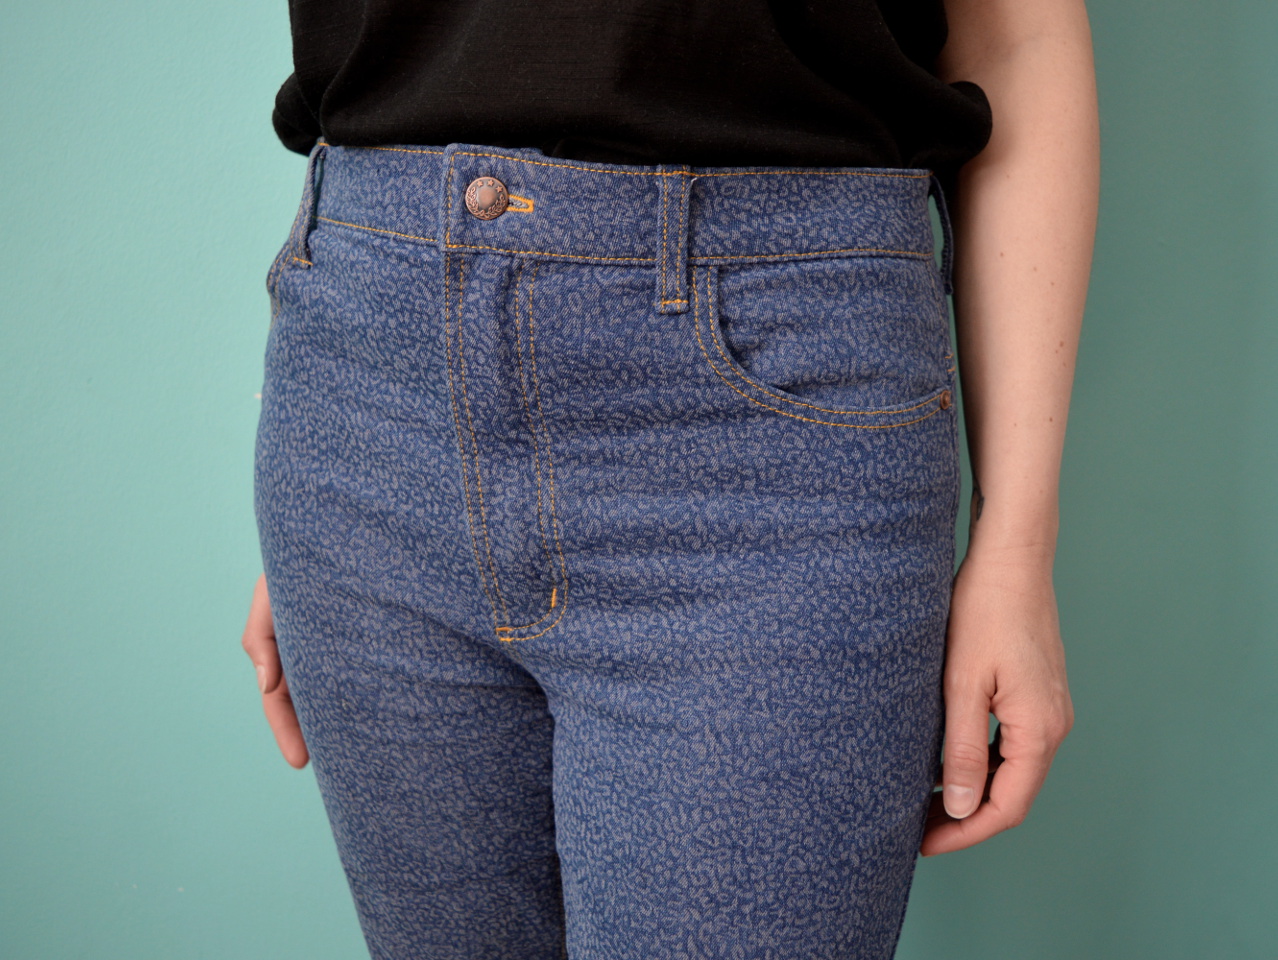
Naturally, I wondered if I could apply the same magic to a slim/skinny legged pattern, seeing as that is the type of jeans I wear most often. And what I then realised it that I don't think I can make that adjustment on a low- or even medium-rise style and expect them to stay up. 

So what I ended up doing for this project was to trace the high-rise version of the Closet Core Ginger jeans pattern (which I have previously made with low- and medium-rises) as my starting point. I already own a medium rise version which are still in action, so I was able to try those on with the button and fly undone which allowed me to assess how much addition width I'd need to properly accommodate my tum, AND where the additional width should land. As I've discovered through watching videos and reading posts about full-tummy adjustments, I knew I'd also need to add some additional height at the front. 

Because the Ginger jeans pattern calls for stretch denim, I decided not to add the entire additional width it would appear I required, because the stretch content might result in them becoming too accommodating and therefore not staying up!

As you can see from the side view (pictured above), the side seam is pretty much in the correct position: perpendicular to the ground. That's one of the main clues that tells me this adjustment worked. The other is that I can sit down without having to undo the button!!! Woo hoo!!!!

The fabric I used was a seconds/remnant from Fabric Godmother. It's a very soft stretch denim with this super-cute leopard print pattern. I like how the jeans look like pretty standard blue jeans from afar, but the little leopard print becomes visible when you look closer. It was a remnant because a fade mark had occurred along the folded edge when the fabric was on the bolt. I was easily able to avoid the fade mark when cutting out these jeans, however. 

Although I still don't love the look or feel of high-rise jeans, I do love generally how comfortable these jeans are. I can wear them all day without wanting to take them off the second I get home. And honestly I never wear my garments tucked into my jeans as I am in the photos: I did that to show the fit of this garment around the tummy. I forgot to take a photo of these jeans shown seated, but I'm wondering if this adjustment might be of particular use to some wheelchair users who would like to wear skinny jeans but find them uncomfortable around the waist. I'm pretty evangelical about this adjustment because I don't think it's one that many sewers know about. 

Now that I have this adjusted pattern, I plan to make a couple more pairs in different colours to flesh out my wardrobe a bit. Currently I own a few tops and blouses that I love and would pair well with skinny jeans, but don't look good with the two blue pairs I know own.  

Friday, 12 July 2019

Turquoise Ginger Jeans: Lounge Camouflage


It wasn't until I came to resize these images, that I realised just how similar my new jeans are to the colour of our lounge wall! However, this is the only decent spot in our flat for taking photos, plus if you'd seen how many toys I had to clear out of the way to get these pics, you'd understand why I'm not going to re-shoot them. 

Pattern:

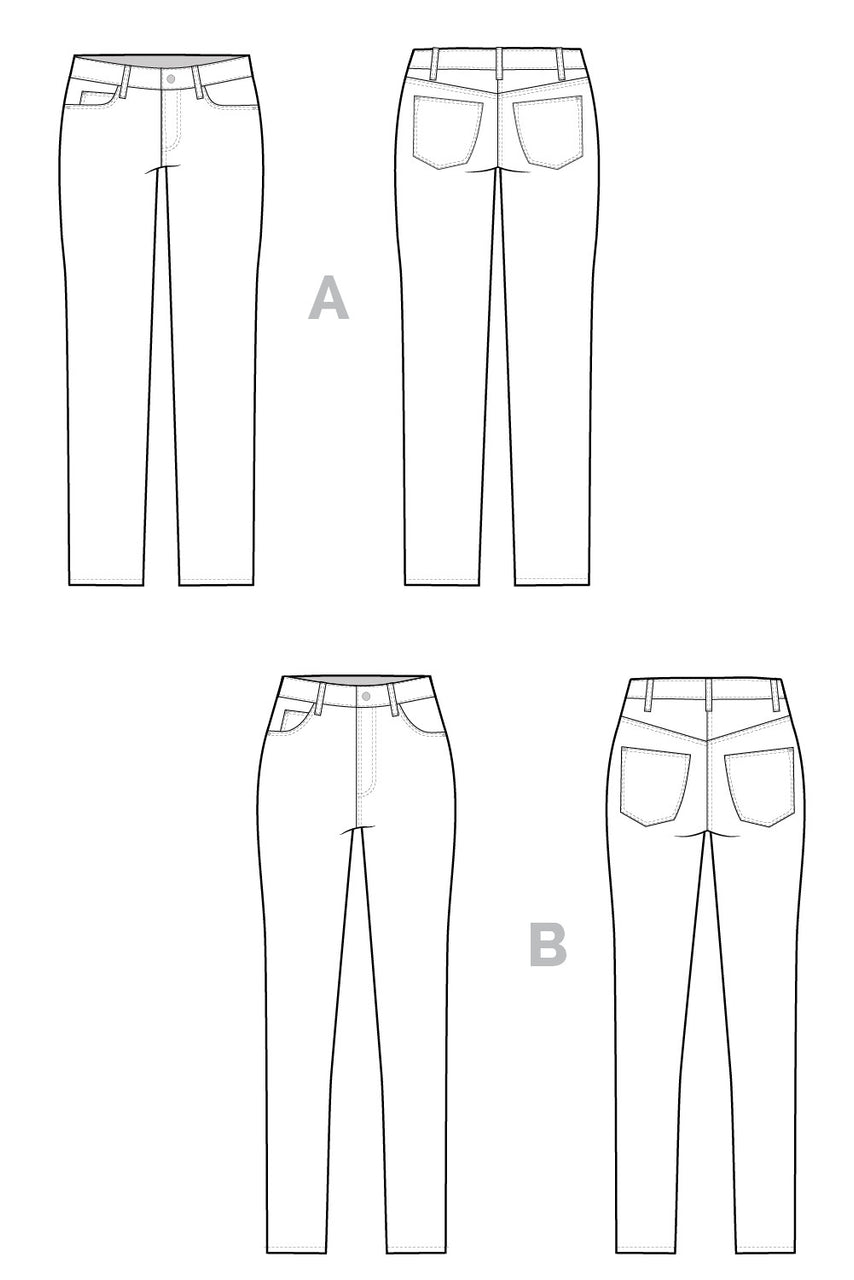
Maybes you remember my first crack at the Closet Case Patterns Ginger Skinny Jeans pattern? Well those have been worn sooooo often, that I knew another pair would be in the pipeline before long. What I have found with my first pair though, is that the low-rise option (view A) really is low. I wouldn't feel decent wearing them without a vest (AKA camisole/singlet) tucked in to them, especially if I planned to sit or bend down. That's fine for the three quarters of the year during which I wear vests, however I wanted my second pair to have year-round wearability. My feeling was that the high-rise option (view B) of the original Ginger jeans pattern would have been too high for me, and I considered buying the mid-rise version until my friend Paula told me that Closet Case had generously published a blog post with a tutorial for drafting your own mid-rise version. Let's do this!

Ginger Skinny Jeans pattern // Technical flats // Closet Case Patterns
(image source: Closet Case Patterns)

To draft a mid-rise pair, it is suggested that you start with the original high-rise option (view B), as the proportions of the pockets and such are more suitable. I chose to make the rise exactly in between the views A and B. I took some additional body measurements to find out what I measured around the waistband of my view A pair, and what I measured around where I intended my new waistband line would be. That different of measurements was very useful when following the steps in the post. I should point out that Closet Case's tutorial doesn't include shortening the fly piece, which does need to be done. 


I'm not the first to say that each time you make the Ginger jeans, or any pattern that uses a fabric with some stretch content, it's important to have a mid-way fitting sesh. Even if the fit on your last pair was perfect, each stretch denim will have slightly different properties so can't assume your next pair will also be spot on. I was relieved that, after all that pattern tweaking and the different denim, the fit of my second pair before I attached the waistband was great. After I tacked the waistband on, I tried them on again, but found them too tight at the waist, so I unpicked and reapplied the waistband,  easing in some extra length. 

One fitting note that I didn't discover until they were all finished and being worn, is that I think they are too wide around the ankle. You can see it pretty clearly in these pics. At the moment the weather is pretty warm, so I'm wearing them with the hems rolled up a bit. However, when it cools off and I want to cover my ankles up again, I'll unpick the hem and take some of that width out from the side seam. 


For the topstitching on the back pocket, I used one of the downloadable designs that you can access from the Closet Case Patterns site when you sign up for their newsletter. I transferred the design to the pocket pieces using white carbon paper and a tracing wheel, and I'm soooo happy with how they came out. I would definitely recommend the designs that use straight rather than curved lines for getting a clean result.  


Fabric and Interfacing: 

If you recognised that this turquoise denim was one of the nine pieces of stash fabric I pledged to use up in my #2019makenine plans, then you get a million points. This project is my fourth completed project for that challenge, although a lot more sewing has been happening that aren't part of those make nine plans. This fabric is some turquoise-y stretch denim that I bought from Fabric Godmother a few years ago. Since buying it, I'd fallen out of love with it, but now that it's made up into a garment that feels good to wear, I'm a fan again. The elastane/Lycra content must be pretty high, because it has a kind of synthetic-y sheen, but because of that content, it feels like I'm basically wearing leggings rather than jeans. 


I had a long debate with myself about what to use for the facing and interfacing for the waistband. Feeling comfortable, particularly round my waist is of MASSIVE importance to me, and can totally dictate whether or not a garment I've made ever gets worn. I can't remember if I used interfacing on the waistband of my first pair of Gingers, however I used a non-stretch woven cotton for the waistband facing, so that waistband basically has no give. However, due to the fact that that pair sits so low, I still find them comfortable to wear, as long as I have a belt to stop them heading south.   

But because this second pair were going to be sitting higher up, closer to my natural waistline, I wanted to ensure more give so that I wouldn't feel constricted. I decided to use the same stretch denim to face the waistband, plus I applied fusible interfacing for knits to the waistband piece itself. The result is a pleasingly stretchy waistband that definitely does not feel constricting. Howevs.... they do start to migrate down a bit whilst they are being worn. I'm wearing a belt with them to counteract this, which slightly nullifies the point of a stretchy waistband. Any thoughts?!


Oh but wait! Did you see my pocket bags?! I got to use up an awesome remnant of quilting cotton that I'd bought from Ditto in Brighton yonks ago. It's got a cute 1950s kitchen print which is kind of at odds with a pair of turquoise skinny jeans, but I think that makes me like the combo even more. 

Thoughts:

You've probably already gathered that I'm really into this me-made! I promise to dig deep and sort out the excess width around the ankles so that I'll like them even more. I find jeans making sooooo satisfying. This year's Me-Made-May challenge taught me that a pair of black skinny jeans would be a useful addition to my wardrobe. So when Autumn hits, I'll keep my eyes peeled for some great black stretch denim and use this pattern exactly as it is for those. 


Thursday, 7 February 2019

Ginger Jeans Triumph


Hi guys. I know that exclamations of pride and amazement at having sewn 'proper' jeans are nothing new in the sewing community, however, I MADE JEANS!!!!!!! Before we dig in, I just want to mention that I had major technical difficulties getting decent pictures of these jeans. And now that I'm looking at these pics, I see that my photographer, Mr SoZo, didn't account for our height difference and my legs look weirdly foreshortened. But hopefully you get the idea of what's going on with them anyhow, I'm sure as hell not taking these pics again!!

Pattern:

After a lot of back and forth, I decided to go with the Ginger skinny jeans pattern from Closet Case Patterns for my first real pair of jeans (as opposed to the denim trousers or jeggings that I've made in the past). I'd heard great things from others about the fit and the instructions, plus I liked all the extra info and support that was included in the sewalong. 


I knew straight away that I'd be making View A: the low rise, stove pipe leg version. My measurements put me as a straight size 12, and although I had heard that this pattern can come up big (particularly with very stretchy denim like mine), I couldn't bring myself to size down for fear of them ending up too small. I did decide to go ahead and scoop a bit of the crotch out straight away as this has been a really successful adjustment for me in recent trouser-type projects. I decided to do the scoop-crotch adjustment to the pattern first, rather than scooping as required once they were basted together, because the topstitching on the CB seam meant I wouldn't be able to adjust them at the basted together stage without A LOT of unpicking. The other pattern alteration I made before cutting out my fabric was to increase the amount of curve around the back of the waistband. I have a slight sway back situation, and the waistband as it was originally drafted just didn't look sufficiently curved for my needs. 


As suggested in the instructions, once the front and back were both completed and joined at the crotch seams, I basted the inside leg seams and side seams to check the fit before proceeding further. Woah, they were big. They were about a size too large through the waist and hips, and the legs were wayyyyy looser than I was aiming for. It took a couple of sessions to wrangle the fit to a point I was happy with, and made the changes back on my pattern pieces for future reference (#payingmyselfforward). 


Fabric, thread and hardwear:

I bought this dark indigo stretch denim at a sewing meetup a couple of years ago from Ditto fabrics when Ditto was selling off some stock before vacating their storage space. This is the first garment I've made using some of the stash fabric I selected for my #2019makenine plans. I've decribed it as indigo, but there's a slight greyish tone in there as well. It's soft and very stretchy and I 
really love it. I used leftover corazones quilting cotton (a Henry Alexander print I believe) for my pocket bags and waistband facing. 

I'm lucky enough to own a cone of gold top stitching thread (that I found on the street in the middle of the night in Barcelona, but that's a story for another day), but I wanted to add a pop of red as well to make these jeans a bit fancier. I used the red topstitching thread in the back pocket design (that came from the free downloadable back pocket design sheets available by signing up to the Closet Case Patterns newsletter), for the buttonhole and for the bar tacks at the fly and side seams. 


I failed to get a decent shot of it, but the jeans button I used is a copper colour with a pair of scissors design on it. I got it about 10 years ago in a slightly sneaky manner: I found it on the floor of a Zara changing room in Spain. It was meant to be the spare for a garment on sale, but I took it home for a future sewing project. The rivets are by Prym in antique copper that I bought from Fabric Godmother. I wasn't sure if I was going to bother with rivets because I was kind of viewing this pair as a wearable toile, but I'm really pleased that I did because it really elevates their whole look.

Thoughts:

Wow, jeans-making is intensive, isn't it?! But also SOOOOO satisfying. I honestly haven't enjoyed a sewing project so much in months. As is usual these days, I had to make these in instalments in the small pockets of time I managed to carve out for myself. At each point I really couldn't wait to get back to them and do another step or two. Even though this is denim has a sizeable stretch content, it still behaved really well, I just had to be careful not to stretch the raw edges too much when handling it. Plus, I LOVED doing the visible topstitching, it's so pleasing to see the finished result.


But all that time and effort that went into these jeans gave the whole project somewhat higher stakes than your average sewing project. Thankfully, the final fit is pretty good (*massive exhale of relief*). All the faffing about with the fit through the leg was totally worth it because they are exactly what I was hoping for from the thighs down. I feel that they might still be a touch loose around the hips, particularly after a few wears (they are fresh from the wash in these pics), but I bought a vintage plaited leather belt for £1 in a charity shop which keeps them in place fairly well. I'd also say that the crotch-scooping was definitely necessary, without that I think there'd be a lot more wrinkles under the bum than there currently are. 


After finishing these, I wore them for the following six days straight before putting them in the wash, so I'd definitely class these as a success. And they are the only bottoms I currently own that I don't want/need to change out of as soon as I get home. However, I do find the low rise too low rise, especially at the back. They are fine whilst I'm wearing a vest/camisole tucked in, but I predict they will feel a bit exposing at the back when it's too warm to wear them as part of an outfit without a vest. I don't think I want to go for View B, the high waist option, but I am considering buying the mid-rise version and starting with a size smaller next time. And there will definitely be a next time.
Related Posts Plugin for WordPress, Blogger...