Showing posts with label #2018makenine. Show all posts

Thursday, 20 September 2018

Swiss Dot Tova Top and a #2018makenine Wrap Up


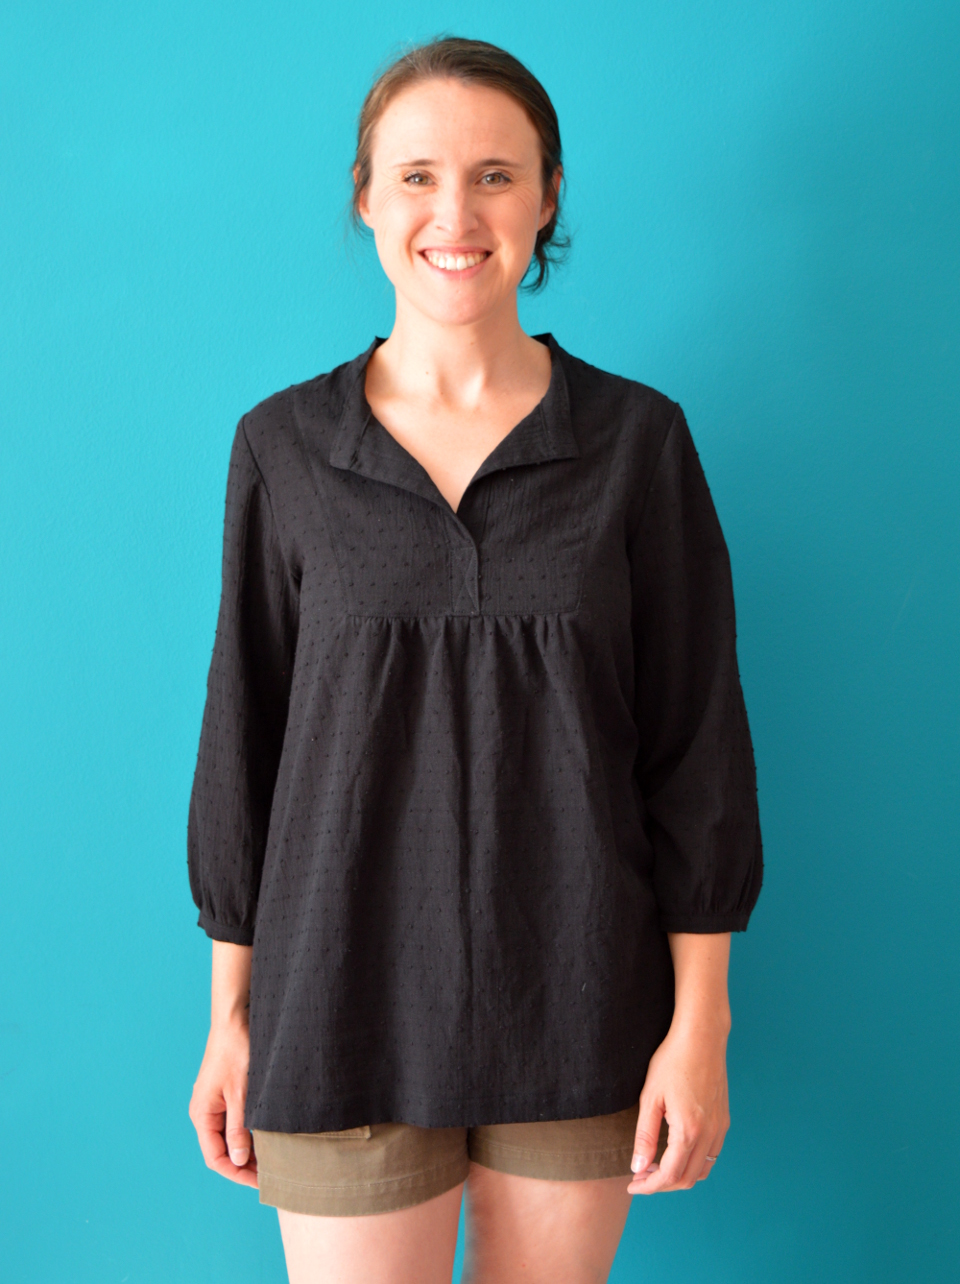
So I didn't plan to make this top. My aim for this fabric, as per my #2018makenine plan, was to make it into the Sew Liberated Matcha top. However, during a brief pause before I went ahead and bought the Matcha pattern, I checked the fabric requirements and found I was substantially short for the sleeved version that I hoped to make.


Yet I really wanted to get this fine swiss dot cotton from Fabric Godmother (the black is currently out of stock but it is still available in navyredwhitepale blue and blush) out of my stash and into my wardrobe. So I reached for my trusted, well-used and thoroughly tweaked copy of the Wiksten Tova top/dress pattern. I have lost count of how many garments I have made using this pattern to date, but I basically replicated my much-loved washed denim version (which has now been demoted to allotment wear only). 


I veered away from the denim version just a smidge with the tiny addition of this criss-cross stitching at the base of the placket (pictured above) so I can wear this top without a camisole underneath, should I desire. (And during this past summer, I have desired.) For my previous versions of this pattern I have added poppers or buttons/buttonholes to the placket to stop it gaping open too much, however I like this stitching way more as a solution. 

As you can imagine, this top instantly found itself in regular rotation in my wardrobe, as only a black version of your favourite sewing pattern could. I've worn it heaps with these Lander shorts and my Cobra corsage Luna pants, and now that the weather is turning nippy, I'm excited to try some new outfit combos with a vest layered underneath. 


Because I have already blogged about the Tova pattern multiple times, I was tempted not to bother sharing this top at all. However, this project signifies the end (kind of) of my #2018makenine plan/challenge. Let's see how that went....

My original set of plans:


And here's what became of those plans:


From the top left:

1) The cocoon coat was a major success.
2) I have yet to make the full length Lander pants as I intended, however the wearable-toile shorts version came out better than I hoped and saw MASSES of wear.
3) The Burdastyle oversized cardigan pattern plan was a flop, but this Kinder cardigan rose out from its ashes, and I wear it almost daily.
4) My version of the Ivy pinafore didn't fit exactly as I'd hoped, which was my fault for not toiling first, however I've still worn it numerous times during colder weather.
5) I made two new Dolores batwing tops and the long sleeved white/burgundy striped one in particular has been worn SO MUCH.
6) The Suzon pattern got a double airing, and both times I paired it with fancy Atelier Brunette fabric. I love both, but I thought the 3/4 sleeve one would be my favourite. However, it's the sleeveless one that has seen the most wear.
7) Even though we experienced a climate change-induced heat wave this summer that lasted several months, in the end I ran out of warm days to warrant making the Chataigne shorts this year. I got as far as tracing the pattern pieces and making a toile (see? I'm learning!), however my toile showed me I would need to go back and trace a couple of sizes smaller (I'm going to use a fabric with a little stretch), and I dragged my heels until it was too late to bother continuing. I do have the fabric, thread and zip gathered though, so I'll roll over this plan to next year.
8) The Matcha top became the Tova top (see top of this post!).
9) I went on a fitting odyssey with the Gemma tank pattern that resulted in a couple of wearable tops (and many toiles that were left in its wake!).

This was my first year of participating in the make nine challenge and creating a grid of project plans for the upcoming year. I went into it fully embracing the philosophy behind the initial idea: that it's a gentle guide to kickstarting your sewjo at the beginning of a new year, and shouldn't be viewed as a strict blueprint that you must stick to or else. Yet, I'm surprised by how many of the plans I laid out many months ago I did actually bring to fruition. I guess now would be a suitable time to admit that I did actually go back and revise my grid a couple of days after making my first after having a thorough hunt through my fabric and pattern stashes. So perhaps this revision helped me to make some really sound and suitable plans that I really wanted to stick to, months after the initial ideas. But I also like how this type of planning completely leaves room for other, more spontaneous projects ideas to jump to the top of your 'to make' list. I guess this type of planning endeavour is only going to be as strong as your initial plans, so if you know yourself, your style, your lifestyle and what suits you well, then you're more likely to have made great plans that you don't feel like abandoning six months later. I'm excited to do this again next year, and I have an idea for a slightly different approach that I'm looking forward to working on.

What about you? Have you created a make nine grid of plans before? How many of those plans did you actually end up making? What impact did it have on your creativity and/or productivity? Do you even see any worth in making such a plan at the start of a year anyhow? Enquiring minds (well, my mind at least) need to know...

Tuesday, 14 August 2018

My Gemma Tank Journey


It's difficult to explain exactly why these two basic little tops took up as much time and brain space as they did, but I'll try. It's definitely not a fault with the drafting of this pattern, however I have a theory that it's actually the simplest garments that are the hardest to fit, because when there are no frills, flounces, gathers or any other busyness, there's nowhere to hide any wonkiness! 

Pattern:

Towards the end of last summer, I was feeling a desire for some woven tank tops. My anchor La Brune top had convinced me that the world wouldn't come to a stand still if I exposed my upper arms, and actually it feels really nice to wear a sleeveless garment in hot weather (who knew?!). I spent ages going back and forth between Made by Rae's Gemma tank patternWiksten's tank pattern and the no-longer-available Tiny pocket tank pattern by Grainline Studio. By the time I selected my #2018makenine plans, I had finally fallen down on the side of the Gemma tank because I felt the bust darts are a nice addition for preventing this type of garment from looking too shapeless. 


A quick note about the bindings. One of the things that make this a speedy, simple pattern to make is that the neck and armholes are bound with bias binding rather than being finished with facings. Rae has helpfully detailed three methods for using bias binding on her blog. What she calls the 'French method' is by far my favourite, and is what I have used on both my versions that you see in this post. However, because this method flips the binding to the inside of the garment, rather than encasing the raw edge with no folding, as the other two methods do, the neck and armholes become wider, and the shoulder strap gets narrower. To combat this, I've added a little to my neck and armholes. However, my bra straps do peek out a tiny bit from time to time, so I may increase my addition to the armhole around my shoulder for future versions. 

This pattern helpfully comes with two different front pieces for different cup sizes: A/B and C/D. Although you'd never guess from looking at me with clothes on, I actually wear a D-cup bra. However, pregnancies and breast feeding have, umm, 'redistributed' my fullness and I chose to go with the front piece designed for the A/B cups. I also graded between the Small around the bust, out to the Medium for the waist and hips, which is my usual adjustment. I toiled this up in some thin cotton and the result was ok, but there was far too much fabric around the lower back area. I realised that I'd forgotten to pinch out some of the length to account for my short waisted-ness, so I did that and made another version in gingham left over from this Tova dress. I was hoping that it'd end up wearable, if not perfect, but I should have dug deep and found the patience to make a second toile in not-so-great fabric first because the gingham version did NOT end up wearable. There was still a whole load of fabric bunched up at the lower back that the short waist adjustment didn't solve. 

(image source: Made by Rae)

It was time to accept something that I'd been avoiding admitting for a while: I have a sway back issue going on. I spent a bunch of time researching sway back adjustments, and eventually came across this excellent Youtube video by Alexandra Morgan which shows three methods clearly and thoroughly. I went with the method that requires you to make a centre back seam rather than cutting out the back piece on the fold. I did this for two reasons; firstly, it made more sense to me to have a CB seam for achieving an adjustment that thoroughly deals with the sway back problem, and secondly, the next piece of fabric in my stash that I had my eye on for a Gemma tank was quite small, so I thought that cutting the back of the garment in two pieces rather than on the fold was going to be necessary anyhow. 

This time, I did managed to summon up the patience to make a toile before ruining another piece of nice fabric. I could see that the sway back adjustment had definitely improved things, but it was far from perfect. Because I didn't have anyone around to help with the tricky business of fixing a fit issue around the back, I'd had to guess the position and amount of the adjustment I was making. After that toile, I went back to the pattern and pinched a tiny bit more out of the sway back adjustment then got out the chicken fabric. 


The chicken print version:

This fabric is another of those pieces that seemed to have magically appeared in my stash, as I have no memory of how or when it got in there. Weirdly enough, I had another, larger, piece of African wax fabric with this chicken print before that I made into a dress for my best friend almost a decade ago! The previous piece was some kind of synthetic or synthetic blend (which contributed to it's demise when it met with a hot iron), but this smaller, orangey-er piece is definitely 100% cotton. 


I struggled to make the most of the print placement because of the amount I had to work with, and I promise you the back print placement looked better when it was the full length version of this garment. Anyways, seeing as I didn't take photos of any of these steps you'll have to believe me that this chicken version was definitely an improvement, fit-wise, on the previous sway-back adjusted toile. I knew that this fairly crisp fabric was stretching the limits of the suitability of cotton for this pattern, and although I seemed to finally be rid of much of the excess fabric around my lower back, every time I bent down or forward, or lifted my arms, the lower back section kept kind of 'sitting' on my upper bum and I'd have to yank it back down again. This quickly became tiresome, and I decided that the only way to salvage this chicken version as something I would actually want to wear was to hack the bottom off and make it a boxy crop top. I tell you now that I am NOT a crop top kind of woman. However, the denim sweet shorts that I've wearing a lot this summer are pretty high waisted, so I felt confident that a cropped Gemma tank would have a mate to form an outfit with. 


The feather print version:

Before I hacked the bottom off the chicken version, my mum came to visit and I got her to have a look at it on me and get her assistance. Together, we were able to take any residual lessons from it that could be gleaned before I went at it with the scissors. She got busy with the pins and worked out that just a tiny bit more was needed to be taken out in the sway back adjustment, and worked out the precise position for where it should come out. We also figured out together that my sway back adjustment was swinging the side seam backwards, and by slicing through the seam and allowing it to open up, we worked out that 1cm needed to be added to the side seam of the back piece from the hem up to nothing around the upper hip area. 


With these alterations made but my stash depleted of suitable fabric, I lay in wait for another viable piece of fabric to come my way before I could test this (hopefully final) set of changes. Those who follow me on Instagram (@sozoblog) may have seen in my feed a couple of weeks ago my beautiful little haul of fabric and notions that came home with me from a recent trip to Rouen, France. In one shop called Fabric et Moi (a blog name if ever I heard one, surely?!) I found this beautiful feature print cotton poplin (I'm guessing it's poplin) and snapped up a metre with this pattern in mind. (In the same shop I bought a small length of a similar fabric, pale pink background with a subtle gold feather print design for my daughter, convinced that she would crap herself over it. When she saw them, she preferred mine *eyes roll skyward*.) 


I managed to complete this Gemma just in time for the weather to turn and for no-sleeves to stop being an option, so I haven't had a chance to give it a proper test run. From these photos it looks like even more could be pinched out of the sway back and/or I could give myself a bit more at the side seams over the hips. However, IMO it doesn't look bad, especially from the front, and in a softer, drapier fabric like the kind used in the Made by Rae image towards the top of this post, you might not even see a need for further adjustment. Either way, I'm done with tweaking, or even thinking about, this pattern for at least six months. 


What did please me very much though, is that not only did I squeeze this top out of 1 metre of fabric along with self-made bias, but I also was able to make a pair of shorts for Frankie with the remains. I find few things more satisfying. In case you're wondering, I used the Made Everyday with Dana Kid shorts pattern, size 3 (Frankie will be 2 years old next summer, however, I find this pattern runs a bit small). I also added labels to both the tank and shorts using some cute woven ribbon with birds that was the perfect theme and colours for my fabric. I was kindly given a length of this and some other ribbons by Textile Garden a number of years ago. If you're in the market for some sweet woven ribbon, then you should head over there as they have a great selection


Wednesday, 8 August 2018

The Landers Have Landed


Most of the time, I like to blog about a sewing project soon after completion, whilst the experience of making it is still fresh in my mind. These Lander shorts, however, were tricky to get round to photographing because I've been wearing them so much, they always seem to be in the wash. I eventually got these pics taken a couple of days ago, and if you were wondering what Lander shorts look like when they've been worn almost constantly for two months, then I have your answer right here. 


Pattern:

It's not often that I fall in love with a sewing pattern the very first instant that I become aware of it. Usually, it takes seeing a number of versions pop up via blogs and Instagram before a pattern can fully win me over. However, this one I knew straight away that I had to have it. I included it in my #2018makenine plans at the very beginning of the year, but I didn't pull the trigger and buy it until May, when I was able to take advantage of the #MMMay18 celebration discount codes (I also bought the zipper expansion pack, FYI).

(image source: True Bias)

I'm deeply obsessed with the full length (view C, pictured above) version of this pattern. But with summer then just round the corner, like many other sewers, I decided to make a hopefully-wearable toile of the shorts version as my entry point.

I'd read good things about how this pattern has been drafted, and that many had found that minimal fitting was required. In general, I completely agree, however I did take things slowly and made a number of alterations that I'll share with you now, if you're interested. 


First up, I started by blending between the sizes for my waist and hips, as I so often do. I chose the size 8 for the hips, blending out to a size 10 at the waist. The pattern gives you a sizeable 1" seam allowance on the side seams so you can make any tweaks that you find necessary. At the point of fitting the side seams, the pattern instructions do say that you can't alter the waist measurement during your tweaking, because your waistband will no longer fit if you do. I didn't even look at the waistband pattern piece, much less cut it out, until I had the shorts almost completed with the side seams basted, partly because I wanted the option to alter the side seams at the waist if I needed to. 
I ended up letting my side seams out a straight 1/2" all the way down (effectively giving me an extra 2" all the way around my bootay). I then pinched out about 2cm total per dart at the back to get the waistline to lie nicely against my body (I'm beginning to suspect I have a sway back situation going on). I restitched my darts so that they were curved rather than straight and made this alteration on my pattern pieces for next time. 


The other reason why I didn't cut out my waistband out until I absolutely needed to, was because I had read that a number of people had drafted curved waistbands rather then use the straight waistband included in the pattern. I wasn't sure if that need would apply to me, but after the dart pinching, I was convinced I would also have to redraft the waistband to include a curve if I didn't want it to sit up weirdly at the back. I then hit a bit of a stumbling block; I wasn't sure exactly how much to curve it or on at what point of the waistband to do so. By chance, I saw on Instagram that Josie of Fabric Godmother was tackling the Lander pants pattern at the same time as me. We entered into a discussion and she said that she planned to add the curve just at the back, between one side seam and the other. This made total sense to me; I don't go 'in' around the belly area, so curving the waistband at the front didn't feel necessary. 


So when I finally did draft my waistband, I started by tracing off the original size 10 waistband, minus the seam allowance. Then added the extra at the side seams that I had needed, then I removed the measurement that I had had to pinch out of the back darts, and THEN I added a curve to the back area (between the side seams). I created the curve by slashing down through the waistband and overlapping the slashes at regular intervals, eyeballing the curve that I was forming. I then added the seam allowance to all the edges. It may be worth mentioning that a curved waistband has to be cut in two mirror-image pieces (a waistband and a waistband facing, if you like), rather than in one piece like the original waistband pattern piece.

The other, more minor changes I made to the pattern were: 1) to shorten the length of the hem a little, 2) make the curved topstitching at the fly at little farther out to accommodate my buttonholes (my buttons are slightly larger than the pattern recommends, and 3) to leave off the belt loops as I know I'll never wear these with a belt.


Fabric:

I'm guessing this fabric is a cotton or poly/cotton twill, and its origin and how it got into to my stash are even more of a mystery. What I do know is that this fabric was in two pieces, and has lived in my stash for at least five years. Recently, I had made some vague plans to use it to make some trousers for Frankie, possibly involving some red piping. However, I wasn't sold on that plan as I'm not a fan of kids wearing trousers from fabric that have no stretch to it, so it wasn't much of a struggle to bury that idea and use it for these shorts instead. There was just enough for these shorts if I cut the waistband facing from something else, so in the end I felt that this twill was destined to become these shorts!


I'm a fan of a contrast waistband, so I used a scrap of the koi print cotton left over from the matching shirts I recently made. I used a scrap of black and white gingham to line the pockets, and despite deploying the techniques in the instructions to cut back the pocket lining pieces to avoid them being visible, you can still see peeks of it from the outside around the edges of the pocket if you look closely enough. Next time I'll try to select a pocket lining very similar to my outer fabric.

I chose these metal buttons from my stash because, A) they were in my stash and therefore effectively free, and B), because I thought that, when combined with this khaki twill, it gave a cute nod to a  uniform-y vibe, like the original boy scout shorts that I heard in a podcast inspired Kelli from True Bias to design this pattern in the first place.


Thoughts:

I'm so glad that I took the time to complete all those tweaks and changes carefully, because I think the fit is pretty spot on. They are really comfortable to wear, despite being made from a non-stretch woven fabric, although I might take a tiny scoop out of the front crotch curve on my next pair. Although the waistband curve was eyeballed, I'm very happy with how it fits snuggly around my lower back, and unless a different fabric type or weight loss/gain force me to take the side seams in or out, I'll use the same waistband piece going forwards.  

Although I'm now itching to make a squillion pairs of the full-length Lander pants, I can definitely see another pair or two of Lander shorts getting made for next summer. I've got my eye on a couple of pieces of fabric already in my stash for them, and I'll probably change the fit of the leg slightly to make them closer fitting, hopefully more akin to the image of the Lander shorts on the True Bias website. 


These shorts have also made me entirely reconsider my stance on khaki. I would NEVER have picked this fabric out if I were shopping in a fabric shop, however I have been really surprised by how much of my existing wardrobe this colour goes with. On the back of this discovery, I even got some khaki linen/cotton from the most recent Fabric Godmother open day for another project I've got lined up for the near future. 

Not only am I excited to make the full length Landers next, but I'm also chomping at the bit to try drafting different pocket shapes and styles, have a go at the zip fly, and maybe to play with constrasting topstitching threads. Expect to see more Landers round here before the year is out. 

Wednesday, 21 February 2018

Two Dolores Batwings and #2018makenine


I'm proud to say that I've made some fantastic new additions to my wardrobe over the last few months. However, I was beginning to detect that some of them were at risk of being classified orphans, or near-orphans, (i.e., they went with little else in my current clothing selection). So I turned to my own trusty Dolores batwing pattern to whip up a couple of tops to fill the gaps. 

The stripy version (pictured above, paired my with my Cleo pinafore) was made using some lovely merlot and white striped jersey that was kindly sent to me to review by Girl Charlee. I wasn't sure what the properties of this fabric would be until I received it, and when I did I knew instantly that it would be perfect for the Dolores batwing pattern. I'd describe it as light-to-medium weight, buttery soft with an amazing drape. I love that the pairing of this fabric and the long-sleeved version of this pattern create an interesting alternative to the standard Breton top.  


Second-up is a Dolores batwing top fearturing the short-sleeved option. Because my upper arms are proportionally slightly chunkier compared to the rest of me, I cut the size 14 sleeve bands and the size 12 for the rest of it. Although with my current slightly fuller-than-normal belly (NOT pregnant, before you ask), I possibly could have done with grading out to the size 14 at the waist as well!

The fabric is some equally lovely drape-y pinstriped jersey from Fabric Godmother, this time paid for with my own money at one of their open days. It's a viscose mixed with lurex and it feels slinky and divine. The piece I bought was an end of roll, but lucky you because they have since been able to restock.


I used the leftovers to make some capri-length leggings (pattern review coming soon) and a pair of pants for Dolores-the-child-not-the-pattern. However, she has informed me that the pants don't stay up very well, in hindsight I can see that this jersey has some mechanical stretch but not fibre stretch, so these pants live in her nursery bag in case of accidents.

Which leads me on to something else... I forgot to share with you my #2018makenine selection. It's a pretty even split on Instagram between which is the 'correct' hashtag: #2018makenine or #makenine2018. Either way, it's a chance for makers to lay out and share some of their sewing/knitting/etc. plans for the year ahead. No one is going to be held to these (I already had a rethink of the first selection I posted!), and obviously it doesn't have to be the only things you make all year. It's kind of inevitable that other plans are going to muscle their way in before you (I) complete the nine, like when a new sewing gets released (e.g. Mila) or you discover a gorgeous piece of fabric that isn't suitable for your selected patterns, or you forget that you need a new swimming costume...

Anyways, despite the looseness, I think the #2018makenine compilation is a fun and worthwhile thing to make. It encourages sewers map out some well-considered projects which will hopefully therefore lead to successful and often-worn wardrobe additions.


From left to right from the top:
1) Cocoon coat, pattern by Burdastyle (completed and blogged)
2) Lander pants, pattern by True Bias (waiting until I get my belly back under control)
3) Oversized cardigan, pattern by Burdastyle (currently half cut out)
4) Ivy pinafore, pattern by Jennifer Lauren Handmade (completed, to be blogged about)
5) Dolores batwing tops, pattern by me (completed, see above!)
6) Suzon blouse, pattern by Republique Du Chiffon
7) Chataigne shorts, pattern by Deer and Doe
8) Matcha top, pattern by Sew Liberated
9) Gemma tank, pattern by Made by Rae

When it's all typed out like that it seems like a lot of sewing, doesn't it? However, as I write this, I have already completed three and a half of these projects, so I know that I haven't bitten off more than I can chew or heaped some weird and unnecessary pressure on to myself! Plus, the majority of these projects have been something I've wanted to undertake for a year or more, so I'm sure that each of these (if they fit me well), will eventually become wardrobe workhorses.

Related Posts Plugin for WordPress, Blogger...