Showing posts with label outerwear. Show all posts

Thursday, 25 May 2023

Patchwork Denim Quilted Jacket


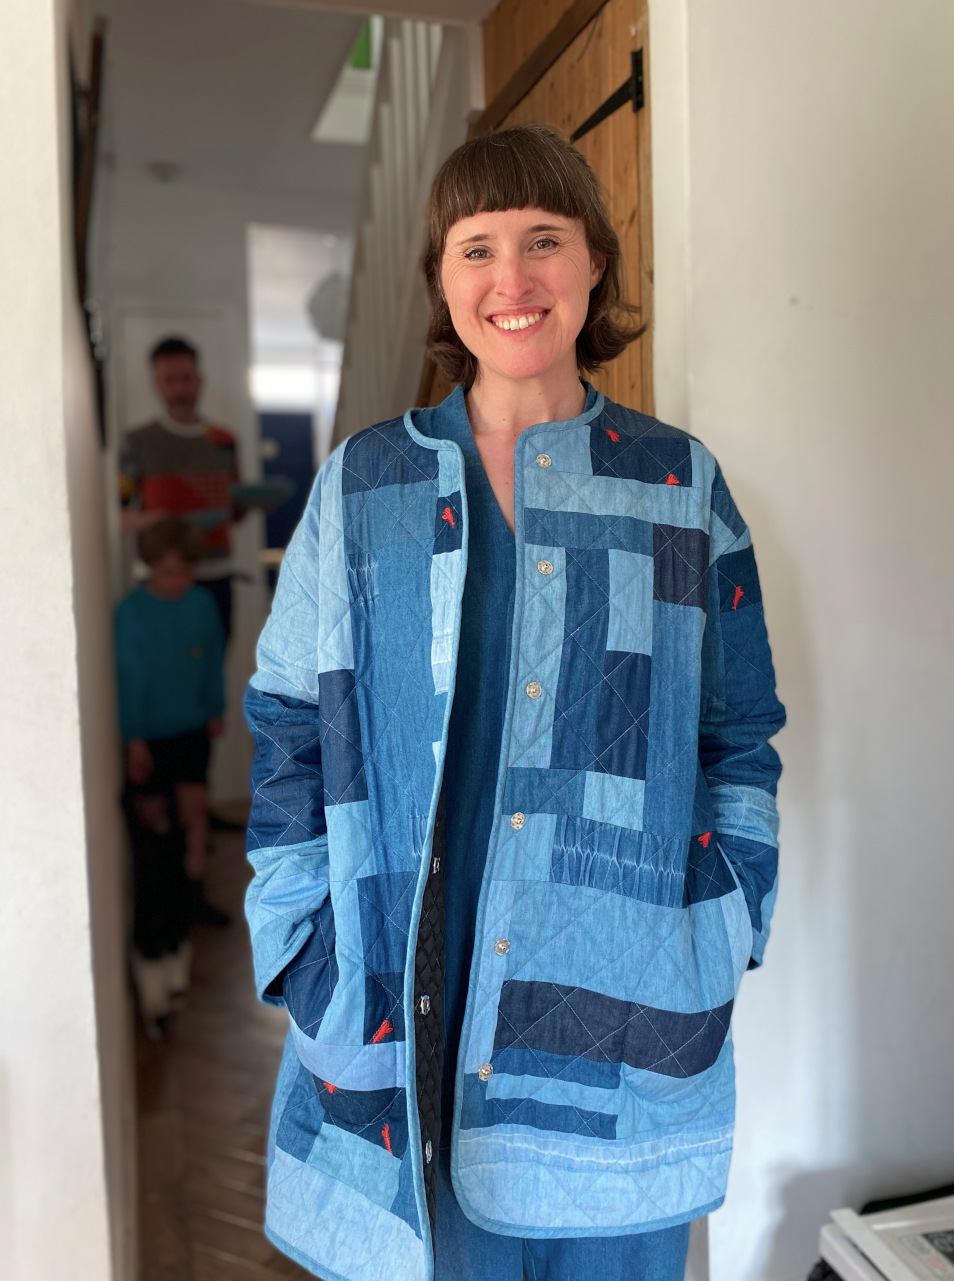
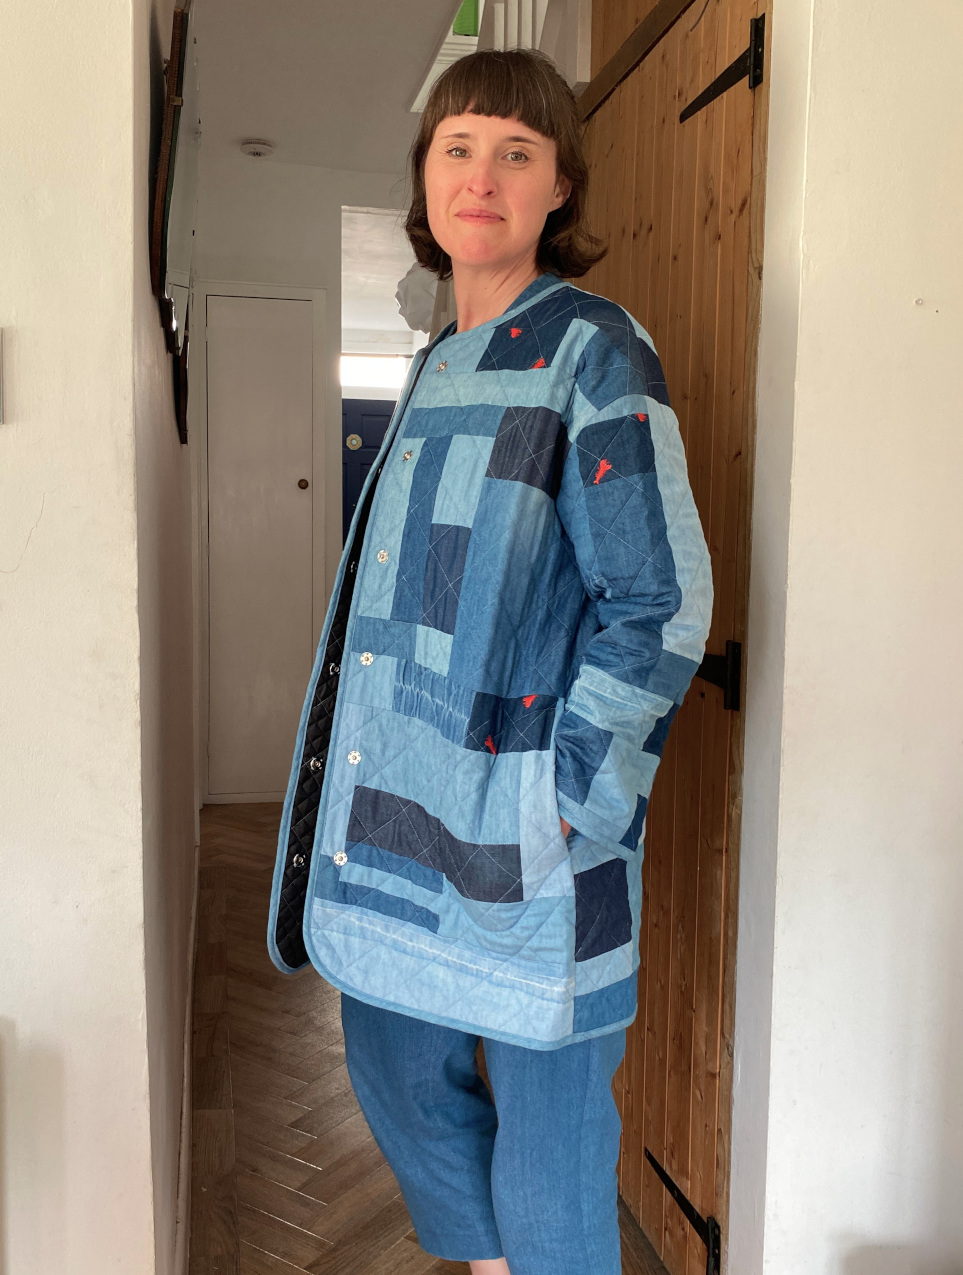
She's done! The jacket with the ridiculously long (but descriptive!) name is complete. This project has been in the works, to some degree, for about two years. That is about how long I've been consciously collecting scraps of this lightweight denim with a view to combining them somehow. 

As I've mentioned all over the place many times, I'm currently obsessed with the possibilities of combining scraps and leftovers to make clothes. Fabric scraps and leftovers from sewing projects are a fantastic resource, but they can build up so quickly. Before you know it, they are spilling out of the box you assigned them, and threaten to take over whatever sewing space you have. But pausing your garment-making activities (if, like me, that's the main thing you're into) just to bust out some little projects to use some of them up, seems like a waste of time and energy. I'm far more interested in applying creativity and resourcefulness to work them into garment projects. 


Fabric:

So I can't exactly pin-point when the idea for this specific garment was born, but when I realised that I had everything I needed to make it happen, I got started on it almost immediately. This jacket has hoovered up a large carrier bag of scraps of 4oz washed denim. Some of that 4oz denim was in the form of scraps from my previous sewing endeavours, some came from the scrap bin at work (including the washed denim with embroidered lobsters!), there were two unworn tunic-y garments, plus the legs from my daughter's woven joggers (which had, in fact, been made from another previously attempted garment projects), also all made from the same type of fabric. I just really love this soft, lightweight washed denim from Fabric Godmother (it comes in three colour ways but this is my fave), which is clear by how many previous garment projects I've made from it over the years. I'm so happy that the finished jacket includes my Tova top, which I wore A LOT during my second pregnancy (proof!). This project also sits very neatly, both in terms of  practicalities and in spirit into the Last Sewist Standing challenge. The only thing I needed to buy to make this happen was thread. 


Pattern:

I settled on the Fibre Mood Molly jacket pattern to use as the basis for this project, not least because I already own it! I chose to lengthen it so the garment would A) use up more of the denim, and B) so it would perform a slightly different function in my wardrobe than my other quilted jacket. I traced out the jacket pieces in my size, then laid them out on the remnant of pre-quilted lining that I was planning to use, and moved the pieces around to work out how much longer I could make them so they still fit. I made sure each piece would have 5cm additional space all the way round to accommodate any shrinking or distortion from the quilting process. 


Patchwork:

To create the actual patchwork, I took my scraps and leftovers and cut them into random rectangles. I took two rectangles that both had an edge a similar length, and stitched them together. Once I had a bunch of pairs, I then found another shape, or pair of shapes, to add to each pair. I kept building it up like that, until I had 'clusters' of rectangles that could be added to each other to make overall shapes that were big enough to fit the pattern pieces on. You can see some of these clusters forming in this Instagram post. At many points, I had to cut some 'custom' shapes to fill in gaps. This was where the actual garments came in particularly handy. I also made an enormous amount of bias binding from the larger of the tunic garments. I planned to bind all the seams inside, as well as round the outside edges, so I knew I'd need A LOT. Obviously I still didn't make enough initially, and had to go back and make more. 

When stitching the patchwork, I used the edge of the machine foot as the seam allowance guide, so it was probably about 7mm. I pressed all the seam allowances open so they'd sit nice and flat, but didn't bother the finish the raw edges because the were going to be hidden by the lining. 


Quilting:

As I say, the lining from my stash that I planned to use was already quilted. With the patchwork panels pinned to the roughly-cut out lining pieces, I stitched along every third row of the quilted lining, so the lining was my guide. I used a walking foot on my machine and really took my time to re-pin after every row to avoid any weirdness in the quilting. I used Gutermann rPET recycled thread for all the quilting and binding, and this project took an embarrassing number of reels to complete! I'm not super happy about that aspect of my 'more sustainable' garment project. 

Construction:

With the pieces quilted and properly cut out, I began construction of the actual garment. All seams were first stitched, then bound with my self-made binding. I also added a cute KATM label that I've been hanging onto for yonks for a special project such as this. 


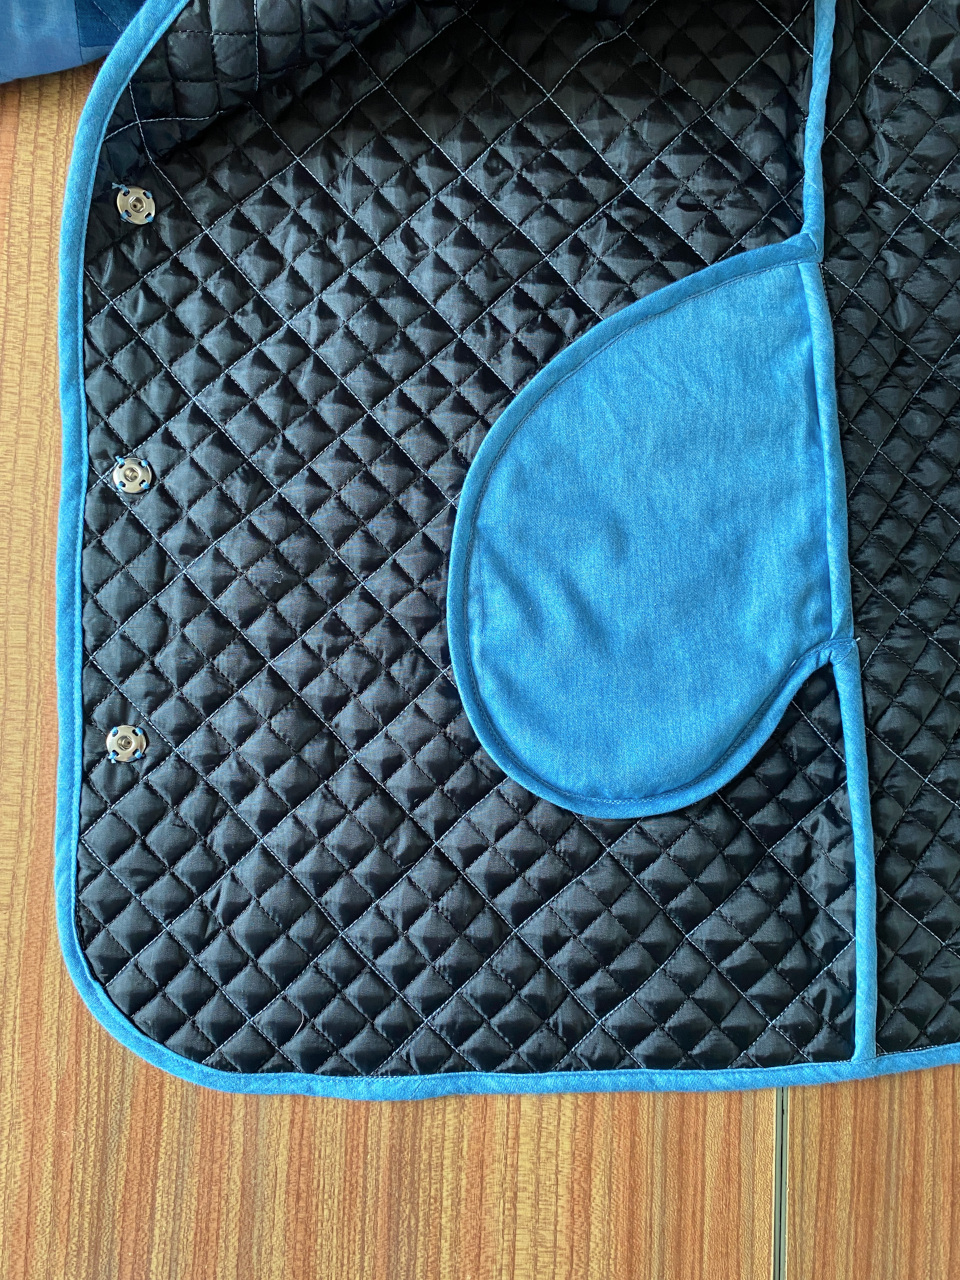
Towards the end of the jacket construction I had to make a call on pockets. The original Molly pattern has simple patch pockets, although not a particularly good-looking shape, IMO. I considered drafting and applying my own patch pockets, but I thought that might disrupt the patchwork on the front panels. Instead, I drafted in-seam pocket bags to make pockets inserted into the side seams. This was a real head-scratcher because I've never made in-seam pockets with completely bound edges before. In the end, I just went for it and it worked out pretty well. I then decided to stitch the pocket bags to the front jacket panels around the edges to keep them in place and give them more stability when in use. I really like the way their shape is visible from the outside if you know where to look. 


The last decision was about fastenings. I considered both traditional sew-on press studs and the set-in type of press studs that I used for my Tamarack jacket. An Instagram poll revealed that the majority of my followers thought the latter was the best option. However, when I went to get them out, I discovered I didn't have quite enough of the back pieces. Because I can't buy haberdashery and still remain in the heavy weight category the Last Sewist Standing challenge, I went with the traditional press studs from my stash, and I actually really like the look of the hand sewn element. 


Thoughts:

I feel triumphant having finished this project! I'm surprised by how similar the outcome is to my original vision, despite winging it the whole time. I love the look of the patchwork. It's got a real abstract, arty vibe, rather than looking like I cut up a quilt, so hopefully it won't look really dated in a year or two. The weight of the garment is also really nice: perfect for late spring and early autumn (plus any rubbish days that summer may throw at us). I also feel great about this project because it's made good use of pieces of fabric that an earlier version of me might have just chucked out. And of course I love that I didn't have to buy anything, other than thread. So. Much. Thread. 

I hope this project inspires others to have a rummage and see what scraps and leftovers they can use for garment making. Using as much of the fabric we purchase is the best way to honour the time, energy, resources and labour that went into its production. 
 

Wednesday, 23 December 2020

Ankara Tamarack Jacket


My love for the Grainline Studio Tamarack jacket pattern developed slowly. As in, it took a couple of years. If this pattern was a potential partner, they would have written me off long ago! My interest grew over time, but it took the vision of an Ankara (AKA African Wax fabric) version that finally made me commit to the plan and I begun to gather supplies. Then a couple of weeks ago the time came to give back the overlocker I'd been borrowing. I looked through my list of potential sewing projects to work out what I could make next that could be made entirely on a regular sewing machine. Although the pattern suggests rather than specifically dictate to do so, I felt that binding all the bulky seam allowances would be the best way of finishing the innards. Therefore, it seemed like a good time for the Tamarack project to rise to the top of my 'to make' list. 


Fabric: 

Last Spring, I saw a woman in a supermarket car park with a really bold puffer jacket. I can't remember exactly what it looked like, but the print reminded me of an Ankara design and my mind went straight to the potential options that were dwelling in my stash. This particularly length of Ankara fabric was brought back for me from her honeymoon in Ghana by my good friend Anna over ten years ago. She told me about the overwhelming awesomeness of the vast fabric market where she bought it, but she knows me well as she picked out the perfect print and colour way for me.  


Shortly after receiving it, I made some of the fabric into this 1950s style retro dress (pictured above). And a year or so later, whilst pregnant with my daughter, I made a dress using the Made by Rae Trillium dress pattern, then called the Washi dress pattern (pictured below). 


Historically, I have kept very few of my me-mades once I have stopped wearing them. However, I kept both of these because of how amazing this fabric it. So I harvested what I could from both, and located the final piece leftover from the original length. Even so, I had to piece the fabric together in a couple of places: around the shoulder/yoke area on both the fronts and the back pieces. I was able to pattern match pretty well, AND I was able to stitch along the joining seams during the quilting step, so I think they are effectively hidden. Finally, I pieced the scraps together to make the self-binding. There really is very little of this fabric left now!


The Tamarack pattern directs you to use the same fabric for both the inner and outer layers. Obviously that wasn't going to happen with mine due to the limited fabric, plus I wanted the ease of taking it on and off that you get with a traditional, slinky lining fabric. I got this navy viscose lining remnant from Fabric Godmother, and made bias binding from the leftovers to bind the pocket edges and all the internal seam allowances. 

The other element that I had to purchase for this project was the quilt batting/wadding. After reading the advice on the Grainline blog, I decided I wanted to source some wool batting rather than cotton for a warmer jacket, but i just couldn't find the size required (twin) in stock anywhere in the UK. As a second choice, I went with a batting made 100% from recycled plastic bottles. I flatter myself by thinking that my green-washing radar is pretty well tuned, but you wouldn't believe how thick they were laying on the 'this product basically saves the world' message in the packaging! It completely ignores how much energy is required to extract usuable polymers from that 13 discarded plastic bottles, and to turn them into quilt batting (which is then wrapped in plastic and shipped to Europe from the US). And looking at the reviews in the comments section of the website, some other customers seemed to have taken the 'I bought this and have just saved the world' perspective on board! Lols. Anyways.


Pattern:

As I say, I wasn't always sold on the style of the Tamarack jacket pattern. Chatting with Mr SoZo about this, I finally figured out that it reminds me of two things: A) the kind of jacket that an elderly Chinese farm worker woman might wear, and B) detachable lining that might be part of a Very Practical Coat. Once I'd made these stylistic links and the question was no longer bugging me, I was honestly much happier to go ahead with the project! 


As with almost all patterns I use, I made a couple of initial adjustments to this one. I blended between sizes at the side seams (my waist and hips usually fall into a size category that is one size larger than my bust), and pinched out about 2cm from the length of the torso on the front and back pieces to account for my short-waistedness. Being able to make these simple (and now automatic) adjustments is such a blessing, and would be worth learning how to sew for even if I didn't actually enjoy it!  

The trickiest part of the project was the welt pockets. When my batting arrived, it was thinner that I expected, but that was partly to my benefit as the construction of the pockets would no doubt have been more difficult if it was been thicker. I declared life too short to pattern match the welts, and once the binding was added to the edges, I think the mis-match of the welts looks fine. Due to the limited amount of fabric I was working with, I was able to match the pattern at the centre front, but couldn't align the colours of the design. 


Thoughts:

I wasn't able to collect all the relevant materials for this project until recently, and because Autumnal jacket weather had passed, I'd kind of shelved the project in my mind until the Spring. However, we've had an (alarmingly) unseasonably warm couple of days lately so I got to wear this out in the world yesterday for the first time. I still feel the elderly farm worker vibes are present, but I also believe that the bold fabric print off sets those vibes enough that it looks pretty stylish. The fit is comfortable, plus the sleeves are narrow enough that it might prove a useful layer underneath my grey Cocoon coat when the temperature really drops and I want to give my Buffalo Check coat a break. 

There have been some amazing quilted coats and jackets popping up on IG recently. If a suitable quilt appeared in a charity shop, I'd be tempted to make it into another Tamarack jacket, with the quilting stage having been done for me. And even if I don't use this particular pattern again, my eyes are definitely opened to the stylistic and thermal qualities of quilted clothing! 

Monday, 3 February 2020

Buffalo Check Coat: The Last Coat I'll Ever Make?


Well, let's be honest, it's probably not the last coat I will ever make, but right now that's how I feel. As I was starting this project, Pat (Mr SoZo) questioned, 'Didn't you say you were never going to make another coat again?', and he was right because I said exactly that during the construction of each of the five-ish fully lined coats and jackets I'd made before this one. Dreaming and planning them is fun, but I find the actually making process such a slog. However, I am relieved to be able to say that I LOVE this finished garment! Let me tell you about this coat and shower your screen with many photos of it....

Fabric:

This project was one of my #makenine2019 sewing plans, having had this lovely, soft, buffalo check coat fabric hanging out in my stash for far too long. I started this coat project towards the end of last year, but I knew it was going to be a beast of a project, so I allowed myself to take my time. It probably took close to six weeks in total. 


The fabric was originally from Fabric Godmother, bought about three years ago. It's long since out of stock, so I can't check, but I'm pretty sure it's polyester or some such synthetic fibre. I try to avoid synthetic fibres where possible these days, but because I already had it, plus a coat is less likely to get washed and therefore less likely to release micro plastics into the water system, I went ahead. This fabric is super soft, slightly fuzzy, and the perfect, bold, buffalo check. 


As you can imagine, cutting out the pieces for this project took an age. Not least because I only had about 2m of it, originally intending it for a jacket. But I was determined to make something that covered my bum because I just want to feel warm at this point. I googled 'Buffalo check coat' for advise on check placement, and found the awesome Comme des Garcons coat that is pictured below. Pattern matching at the side seams and top seams on the sleeves was pretty tricky because the fabric's fuzziness made the edges of the checks unclear, however I think the final look is pretty much spot on. I managed to get the hem and sleeve hems to finish on a check too. Oh, and there was one really hairy moment when I realised that I was missing one of my back sleeve pieces! I still don't know if I lost it, or failed to cut it out in the first place (I was cutting this out on the flat, not the fold because of the check and tight lay plan), but I managed to *just* squeeze another from the remainder of my fabric. Phew!

(image source: Comme des Garcons)

My intention for this coat was to make it warm enough to withstand the worst an English winter can throw at you at best, and warmer than my grey cocoon coat at the least. My first step to achieving this was to get the same fusible coat interfacing from the English Couture Company that I used for the cocoon coat. I've been so impressed by this stuff: the extra thickness and smoothness that it gives a coat fabric, and I recommend it to all my sewing students who are thinking of working on a coat project. I feel I should definitely mention that fusing this interfacing to this particular coat fabric did make my pieces shrink a bit. It didn't cause me any problems because the pattern was a little large for me anyway, but to avoid the risk of that happening, I'd advise block fusing the interfacing on BEFORE you cut your coat pieces out if you choose to use this stuff yourself. 

Having started construction, I swiftly found that this fabric didn't press very well. So I ended up slip-stitching every damn seam allowance down inside so that all my seams would lie nice and flat. Having used the fusible interfacing really helped with this, because I was able to slip stitch the seam allowances to the fusing rather than to the outer fabric so I didn't disturb the smoothness of the fabric from the right side. 


My second step on the path to snuggliness was to quilt the lining. I considered buying pre-quilted fabric to line it, but I already had this gorgeous, deep rust, viscose twill lining in my stash (also from Fabric Godmother, also out of stock, soz) so I decided to have a go at quilting it myself. I bought some fairly lightweight cotton batting from Little Miss Sew N Sew in Eastbourne, borrowed some spray adhesive stuff that quilters apparently use, and drew on some diagonal lines the width of a metre ruler. I was only quilting two layers, the lining and the batting, so I used a walking foot in my machine, with the batting side up. I quilted the full 1.5m before cutting out my pieces this time, and quilting that big section took what felt like most of my life. Also, note to self: do NOT use a sharpie pen to draw lines on fabric, because it's liable to bleed and will not wash off. Glad I learned that lesson on the lining! 


Pattern:

This amazing vintage pattern has been in my stash for at least seven years (most likely from eBay) and it was published in 1959! It was for a 37" bust, although I never know if vintage dress patterns refer to your full or high bust. Either way, 37" is a bit bigger than I am, but I thought I could bring it in at the side seams if necessary. As I mentioned above, the fusing shrunk the pieces slightly and the result was just the kind of fit I would look for in a coat of this type. 


As with many mid-century sewing patterns, this assumed a greater base level of sewing knowledge than patterns created today tend to. Which seems so unfair considering this was published way before YouTube. I don't know if it was me, the scant instructions or the combination of bulky outer fabric with lightweight pocket linings, but the welt pockets construction in particular was a real headache. It annoys me that there are some raw edges inside at the bottom of the welt, but from the outside they look fine. 


With a flash of maverick flair, I ended up ignoring the instructions on how to insert the lining. The pattern had you basically finish the whole outer coat (buttons, button holes, hemming and all) and then attach the lining. This seemed pretty bonkers to me, so I used the same method as my cocoon coat and the finish looks fine. 

I ummed and ahhed about using this project as an opportunity to finally get to grips with bound buttonholes. But ultimately, I felt that, with the pattern matching considerations and my bulky, fused outer fabric, I'd wimp out about go for the chunky press-stud option instead. The chunky press studs have worked so well with my cocoon coat. They make the coat so easy to put on and take off, plus after a year of heavy use, I have yet to have to restitch them (unlike the buttons of every other coat or jacket I've made), so I went on eBay and found the exact same type that I used before. 


Thoughts:

I really do love this coat. I think the fabric makes such a fantastic impact. The colours mean it goes with everything I'm likely to wear it with, however it's a bit more lively and fun than a solid black, white or grey coat would be IMO. I'm also really happy with how the buffalo check and the giant press studs give the vintage pattern a modern twist, so that it doesn't really look like a vintage garment at all. The interfacing and quilted lining have done the trick, and it is definitely warmer than my cocoon coat. I have clear 'winter' and 'spring/autumn' options now, which I'm grateful for. 


What I don't like, is that the under collar peeks out a bit, especially at the back. Oh, and that raw edge inside the pocket, but I'm trying to redefine those in my mind as the 'quirks' of a handmade garment over something made in a factory. So, on balance, I am thrilled with this garment, not least because it's finished!  


Tuesday, 13 February 2018

Cocoon Coat


I made a coat.*mic drop*. (*Picks mic back up to continue talking about this project*).


So far this winter, like last winter, I've been making do with a 70's retro, fluffy faux-fur jacket that I bought over a decade ago. It keeps my torso toasty, but my bum and thighs bear the brunt of the cold. And seeing as I'm managing to carve out quite a bit of sewing time for myself these days, I thought that now would be a good opportunity to take on a major sewing project. Enter: the coat. 

(image source: Burdastyle)

Pattern:

I spent some time sniffing around on Pinterest for coat inspiration. I realised pretty quickly that what I was interested in was something 1960's-ish in style, with a clean, crisp shape that I would hopefully get several years of wear from, with the all-important bum and thigh coverage. At some point, through a combo of Pinterest and Google, I found a Danish (I think) blogger who had made an amazing lime green/citrus yellow coat that annoyingly I can't seem to find now (I'm sorry, amazing Danish sewing blogger), and this Burdastyle pattern was that she had used. This is another fantastic-looking version that I just found whilst trying in vain once again to find the Danish one. (Forgive the dark spots on the images of my coat on the stand, it had been snowing (!) earlier that day and the coat was a bit wet when I took the photos.)


I loved the interesting seam lines that attach the grown-on sleeves, the simple rounded neckline, concealed fastenings that meant I could avoid making buttonholes, and the overall volume. Sold. 
Now, despite the simplicity of the coat design, I knew this project was going to be a job of work. My first two coat projects (my leopard coat, and blue wool coat) nearly broke me, and I was determined not to hate this experience. So I took my time; I gave myself no particular deadline (it ended up taking about three weeks) and I worked on it along side some other, simpler projects that could be made almost entirely with my overlocker. 

The PDF coat pattern consisted of a whopping 54 pages. It was a little confusing because Burdastyle have lumped a few style variations of the same basic coat into one PDF, so there are some pattern pieces and cutting lines you need to ignore, and a couple of pattern pieces you need to draft from scratch yourself. Then there's the seam allowances to add, what with it being a Burdastyle pattern and all. Man, the instructions were sparse. No step-by-step illustrations or photos with very limited explanations for each step. I would not have liked this to have been my first ever coat project. You can buy an online video via Burdastyle to talk you through the construction, but I resented the idea that I'd bought a pattern that was so lacking in detail that it was necessary to shell out an additional $19.99 for the privilege of being able to use it. I did find watching the 10 minute free taster useful though. Oh, and I may well have missed something, but I found the pattern and instructions lacking entirely when it came to creating the front lining pattern piece.  


There seems to be very few reviews of this pattern online, so I was having to guess where there may be issues. It did appear that this coat comes out BIG. In fact, the finished coat that was being made during the online video can be seen here. The woman that made it makes light of it (probably because she's employed by Burdastyle) but it's clearly come out so massive that she decided to make some changes, like adding waist elastic to bring the volume under control, and to stitch the front edges down like lapels. I find that Burdastyle patterns often come up really large anyway, so I cut out the smallest size included in the pattern, which was a full two sizes smaller than my measurements would have suggested I use. 

As I began to construct the coat, it became clear that the fit was somewhat insane. I tried on the outer shell and showed it to Pat, and ended up laughing so much I nearly wet myself. The sleeves were so large and curved that I looked like a cartoon gorilla. I spent ages pinning out a bit, stitching it, then trying on and repeat, until I got a shape and volume I was happy with. I think I pinched out a good 4cm from the bicep in the end, so that's taking 8cm of circumference from each sleeve. I also brought the side seams around the waist in a touch too. 

Aside from the sizing and reshaping, the the other ways I veered from the pattern was to interface everything (more on that in a bit) and to hand stitch down all (ALL) the seam allowances inside to help them lie flat. 


Fabric:

I've had this gorgeous ex-big-name-designer wool that came from a previous place of employment in my stash for over five years. I ended up using about 2.5m for this project, and I still have about that same amount left. This fabric was destined to be a coat, however I questioned that it was thick enough for this pattern. I had read Marilla Walker's blog post about her beautiful Honetone coat and been really impressed by how the interfacing she'd used kept her outer fabric so smooth. Luckily, she had included a link to where she bought her interfacing, and I followed suit. I fused all my wool pieces, and I'm so glad that I did. After several weeks of daily wear, my coat still holds its shape wonderfully.  


I could have continued to channel Marilla during this coat project and used quilted lining for extra warmth, however I already had this amazing spotty lining from Merchant and Mills in my stash. I bought it a couple of years ago when I visited their bricks and mortar shop in Rye. I rarely buy fabric unless I have a clear idea of which project I'm going to use it for, but I thought this was such a classy and unusual lining that I bought 2m on spec.


Thoughts:

I was aiming to make a simple, practical coat with a retro vibe, however I seem to have made a classy, modern one instead. I'm not sure it's very 'me', but I think I'm going to grow in to it, stylistically speaking. Even my mum nearly walked past me the other day when I was wearing it because she didn't recognise me. Plus, there's something else I've noticed about it. You know how people who know you sew often ask you, 'Did you make that top?' or 'Did you make those trousers?' when they see you? No one has asked if I made this coat. I'm not sure if it's because it looks shop-bought, or because it doesn't look like something I'd make.  


I also must admit that it's not the warmest coat ever made. A quilted lining would have definitely have made it warmer, but it has sufficient volume to layer up underneath and it looks great with the hot pink scarf my mum bought me. Plus, with my chosen lining, I'll be able to wear this coat from October to May (though I hope I don't have to). And yes. I do know that I need to fix the lining that's peeking out from my left sleeve. But did I mention that I made a coat?


Cost:

Pattern: $5.99 (approx. £4.33)
Fabric: free
Interfacing: £18.98 for 2.5m from English Couture (however I used less than 2m)
Lining: approx. £9 for 2m from Merchant and Mills (no longer available)
Press studs: £4.71 from this eBay seller
Total: £37.02

Friday, 4 December 2015

Woodland Stroll Cape


Remember how I said that, having finished my sailboat raincoat, I was surprised to find that I didn't hate the thought of ever making another coat or jacket again? Well, I tested that revalation by jumping into my next planned outerwear project, the Woodland stroll cape pattern (as outlined in my nippy weather sewing plans). 


Pattern:

I've had a hankering to make myself a cape for years, but struggled to find quite the right pattern for the task. As much as I like the look of most cape sewing patterns, they often seem pretty restrictive and therefore unwearable, IMO. However, the Woodland Stroll Cape sewing pattern by Liesl + Co (pictured below) seemed like it might actually allow you to do things other than stand still and gaze at stuff. Around the time I found this pattern (probably via Pinterest), I also discovered the equally awesome Tessuti New York Cape pattern which pretty similar but it has a hood. After an extensive internal debate, I went with the Woodland Stroll one because it included a lining. If I'm going to make outerwear, it had better bloody keep me at least vaguely warm! PLUS, having used a few Oliver + S patterns (the children's patterns counterpart to the Liesl + Co range) and been super impressed by their instructions, I knew that I'd be getting a little sewing lesson thrown in if I bought that one. This one lived up to my expectations, and I definitely felt cleverer after I completed this project!


I'm really pleased that I read the post by Sarah from Fabric Tragic about her fabulous (also checked) version of this pattern before I cut mine out. She drafted a front facing for hers (the pattern includes a back neck facing but has the front lining attached at the very edge of the front edges) which seemed like a wonderful idea, so I followed suit. Thanks Sarah for the tip! I'm so glad I did as it gives the whole thing more body and feels more snuggly around the neck/throat area.


Aside from the front facing, the only place I deviated from the pattern and instructions was with the buttons. The pattern calls for three buttons (or buckles) down the front but I went with four because I thought that looked nicer. I also stitched the underarm buttons on through both layers, rather than creating buttonholes as the pattern suggests. I knew I was never going to undo those underarm buttons, so making functioning buttonholes seemed a bit of a waste of time.

Fabric:

This piece of checked wool (actually, it may not be wool) has been in my stash for about four years and I am unnecessarily excited to have finally used it. It was the very end of a roll that had been donated for us to use when I worked for TRAID. It was a small piece (maybe about 1.2m), too small for making anything to sell from it, but I loved it too much to stick it in the bag with the other off-cuts to be shredded and recycled. As it was too small for any other jacket-y type pattern I encountered and too thick to be appropriate for a different type of garment to be made from it, it has hung around all this time as I lamented it dormancy (is that a word? I could easily find out I guess if I could be bothered, I'm clearly sitting in front of a computer).


Anyways, you can imagine my excitement when I realised that, with care, I would have enough of it for this cape pattern! I was able to pattern-match at the centre front and at the side seams, but it's all over the place at the shoulder seams and I couldn't give a monkeys. The fabric is soooo snuggly that wearing it feels like I'm receiving a constant, low-level hug.  

The lining, sadly, I had to buy. I didn't have anything even vaguely matching in my stash. Because the lining goes right up to the edges around the whole hem, I knew it would probably be visible from time to time, so I didn't want anything contrasting. I found this grey (acetate?) lining in Ditto fabrics in Brighton after my classes at MIY Workshop one Saturday. I was thrilled to find this lining because their selection isn't huge and it was just the right tone and it had a tiny checked print which references the outer fabric nicely.


Thoughts:

This cape has turned out better than I could have hoped for and I'm beyond happy that I finally got to deploy my beloved checked fabric piece. Before the temperature really dropped last month, I wore this pretty much every day with my fabulous mustard wrist warmers that my friend Michelle knitted for me years ago. I've already turned two of my regular students at the MIY Workshop on to this pattern as it is a fantastic outerwear sewing pattern to cut your teeth on. There are no darts, no sleeves and no collars to worry about; just buttonholes and a lining remain to freak you out/conquer! 


Cost: 

Pattern: $12.95 (about £8.60) from here as a PDF
Outer fabric: £0
Lining: £4.50 from Ditto Fabrics
Buttons: £2.60-ish from my local haberdashery, Thimbelinas (how good it that name?!)
Total: £15.70

A fairly pricey make for me, and it involved buying way more 'new' stuff than I tend to feel comfortable with, but I think it was worth it because I know the final result will get a lot of use. After four years of hard service and approx. 350,000 wears, my Captain jacket is starting to get very ratty, so this may well fill the void that otherwise my wardrobe would be about to experience. 


Wednesday, 4 November 2015

Sailboat Raincoat


I made a freaking raincoat, people! I'm more than a little amazed at myself. Not because I'm wowed by my skillz, but because I never thought I'd need to own one, much less devote hours of precious sewing time to making one.

See, the thing about me is that I really like being indoors. My main hobbies (sewing, eating and drinking) all usually take place inside. However, now that I have taken on the role of Primary Entertainments Director for a busy toddler, these days I'm finding myself outside MUCH more than I am naturally inclined.

I could have decided to hunt for a raincoat in a charity shop, however cursory investigations lead me to believe that it would be tricky to find anything that I actually liked. Plus, I adore the challenge of sewing myself the necessary attire for whatever life has up its sleeve for me (wedding dress, maternity wear, etc.). So when I finally acknowledged this new outdoor trend, it was time to plot and scheme.... 


Pattern:

Picking a pattern for a raincoat was tricky. I don't think I've owned a raincoat since I was a child and I didn't really have an opinion on what I looked for in one, stylistically speaking. What I did know was that it had to have a hood. You can't carry an umbrella whilst pushing a pushchair or chasing a scamp. For a long time I was going back and forth on this Waffle Pattern hooded duffle/swing coat pattern, and although I do love it, I decided the A-line swingy shape probably wouldn't work very well with stiff raincoat fabric

Then, whilst I was casually window-browsing through my blog sponsor Sewbox.co.uk's extensive sewing pattern selection on a train journey, I came across the Papercut Pattern's new Waver jacket pattern. I thought, 'Stop the search'! It had a hood, it was lined, it looked good with phone-and-keys-sized patch pockets, and would probably be a suitable silhouette for a stiffer fabric. Susan, who owns and runs Sewbox.co.uk, is such a lovely generous lady, so I chanced my arm and asked if she'd send me a copy to review. Bless her, she did!


I haven't sewn with a Papercut pattern before, but I am familiar with their beautiful and unusual packaging. It is a very nice thing to own in its own right, however the larger sized envelope doesn't fit in my sewing pattern storage boxes! The pattern sizing suggested I was a Small, however I decided to make the Medium so I could cram lots of layers underneath. This was NOT intended to be a clement weather garment, after all. I didn't bother to make a toile/muslin because A) I didn't have anything suitable to toile it up in to hand, and B) I just couldn't bring myself to spend more time on this project than making a coat is already about to take. The result has come up a teensy bit big (funny that...), but I'd much prefer that than it feeling a bit snug, especially around the arms.

The instructions were great, with clear illustrated diagrams. The only bit that I stumbled on, and felt could have been made clearer, was a bit where you stitch the bottom of the hem turnings to the bottom of the front facings after you've stitched the lining in. I feel I understood what they were asking me to do, but the half-made garment in front of me didn't reflect was I was meant to have to work with at those points. I still don't know if the mistake was a pattern drafting one or my own, and I do not possess sufficient patience to stop, take a photo of the issue, email it with my query to the pattern company, and wait for a response. I made a stab at it and those points look slightly fudged, but generally it worked out fine. I'd love to hear anyone else's experience of that bit.

The only real change I made to the pattern was to I add zips across the tops of the patch pockets. I figured I didn't want my pockets filling up with water during a rain storm, particularly if my phone was in there. I considered making pocket flaps, but that would throw up even more pattern matching issues than I already had (more on that below), and I liked how the red zip tape breaks up pattern on the front and matches the hood lining.


Outer fabric:

One of the reasons that I had been stalling with attempting a raincoat project was that I just didn't know what type of fabric I would need to buy, or where to buy it. I certainly didn't have anything suitable in Le Stash (always the first port of call, of course). And then one day I went to work to teach at Tilly's HQ, as I very often do, and a company called Anorak who are based in Tilly's building was having a sample sale in the foyer. I had got there a bit early so had a wander about and I found some lengths of this sailboat printed plasticised fabric for sale. I was all like 'WHAT?!', and bought two lengths (about 2.7metres in total) for £15. I have no idea what it is (I should have asked) but I'm guessing its some kind of laminated cotton or something? It's the kind of stuff that you'd use as a table cloth for picnics or if you have toddlers, or perhaps for bags, but easily thin enough to sew little trouble.

So with such a bold print, you'd think I'd spent a whole chunk of time carefully placing the pattern pieces onto it? NOPE. Not at all. The only nod to pattern matching was my attempt to align the rows of boats horizontally at the side seams. I just simply couldn't be bother to make my head hurt with it all. Remarkably, I've got near-perfect completed boats at the centre front. In the photo at the very top of this post they look wonky, but I think that was just how I was standing! They look fine IRL. For the pockets, I just made sure each one had a boat slap bang in the middle of it, and didn't fret about how that then matched, or didn't match, with the rest of the print on the front pieces.


Not knowing exactly how the hell I was going to sew it, I researched 'sewing with vinyl'. All the info seemed to be advising about using stuff much thicker and weirder than what I was about to deal with, so I popped on my walking foot onto the machine, chose a thickish sewing needle, manned up and got on with it. I even pinned the seams together rather than using clips or something, I just made sure that all the pinning happened within the seam allowances to prevent any puncher holes from showing. I didn't have any problems making buttonholes through it either. I could even press it with my iron on a low setting and sandwiched between a pressing cloth.

One thing I did do differently was topstitch down all my seam allowances. I know that the seams of wet weather gear are often taped to make them fully water proof, but I don't plan to get that wet in this thing, plus I didn't want to make the seams any stiffer. I felt that glueing the seam allowances down would get too messy, so I opted to top stitch every-damn-thing. It definitely took longer, but I like it as a detail, I think all told it looks more sturdy. I also omitted the interfacing on the front facings as I wouldn't be able to get my iron hot enough to properly fuse it on. And because I didn't want the waterproof stuff against my neck, I used a scrap of nautical stripy woven cotton for the back neck facing.

As I say, I think this stuff was probably intended for furnishings or bags rather than clothing, and although the fabric seems to be functioning pretty well in its new role, I think it'll age pretty rapidly. Every time it gets creased or scrunched up, it leaves a slight pale mark along the crease line. Time will tell what it ends up like!


Lining:

I spent some time weighing up my lining options. Do I go for a regular shiny jacket-type lining? Perhaps a flannel/brushed cotton for extra warmth? Most of Dolores's coats seem to be lined in either fleece or jersey, which seemed like a good idea to give cosiness and comfort for adult casual outerwear as well. Then I hit upon an idea: what about sweatshirt fabric? A quick internet search and one email later, and I was hooked up by Girl Charlee with 2m of red cotton sweatshirting, gratis. That may sound super cheeky, but after they provided me with some jersey and Ponte de Roma recently to blog about, they said to let them know if I ever wanted any more fabric. Well, if someone's going to tell me that...! It arrived super quickly and was just what I needed for this project.

Shortly after requesting the sweatshirting, I had a panic. What if it was too thick? I didn't want to disable my arms with a layer of stiff plastic-y bag fabric and chunky sweatshirt fabric! But when it arrived, it actually turned out to be a thinner variant of sweatshirting than I've used in the past. The listing states 'medium weight', but to be honest, I would have found it a little thin if I'd intended to make myself a cosy sweatshirt from it. However, for children's wear or lining like this, it is exactly what I would look for.


Buttons:

I bought these plastic anchor buttons from Istanbul, of all places. Pat and I went on a little holiday there with both our mums (or mams, if you're northern, and my mother-in-law is) years ago before we got married. I think the shop was actually a wholesale button seller, but they kindly agreed to sell me just eight! I like how the silver anchors echo the silver teeth of the pocket zips.

Thoughts:

Unlike the other two coats I've made (this leopard print one and this navy wool one), I experienced a strange feeling at the end of the project. Or rather, I didn't feel a predictable feeling: the desire to never make a coat ever again! I actually felt like jumping straight into another coat project. Bizarre. I won't of course, I've got far too many things on my 'nippy weather sewing projects' list that make way more sense to complete first (not that sense or logic usually influence my sewing plans). Somehow, this coat  managed to provide the satisfaction of completing a 'meaty' sewing project, but without the excessive faff and annoyance of more complicated coat patterns.


As you can see from these photos, finalising this raincoat project immediately brought out beautiful sunshine. It has remained pretty mild and dry ever since, so I have yet to 'properly' wear this out in the wilds (or the park). What I can say so far is that it feels cosy. It really feels like wearing a jacket and a sweatshirt on top of whatever else I've got on. I would definitely choose a sweatshirt fabric to line another coat or jacket, if the style was casual enough. I could also see myself using this pattern again, I love the gathered waist version.

Cost: 

Pattern: £0 (it can be bought here at Sewbox.co.uk for £14.99)
Outer fabric: £15
Lining: £0 (it can be bought here at Girl Charlee for £7.95 per metre)
Buttons: £0 (if something is from my stash and I can no longer remember how much I paid for them originally, then I'm counting it as £0!)
Total: £15 

Not bad for a raincoat! A quick internet search brought up similar (but not as awesome) for around £80. Massive thanks to Sewbox.co.uk and Girl Charlee for their generosity.

What about you? Have you ever made a raincoat or used fabric similar to this (whatever 'this' is, exactly!)? Do you relish or despise coat making?

Related Posts Plugin for WordPress, Blogger...