
Materials and equipment required.
60 cms or 1 yard of jersey or a large T-shirt
2.5 metres or 3 yards of underwear elastic
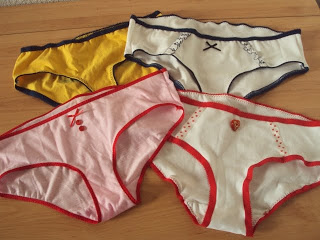
I have used fold over elastic (aka, FOE) for the undies pictured, but advice about using flat or edged elastic is below
Thread
Overlocker / serger (optional)
Sewing machine
Preparing the pattern.
The undies pattern PDF consists of 4 pages. When printing the pattern, make sure that you have do not have 'print scaling' checked so the pages print out at the correct size. When printed, measure the test square to check the size is correct. Align the pages by matching the numbered triangles to the corresponding ones. Cut off or fold back the margins and tape or glue together.
Choosing a size.
This pattern includes sizes 8 -16. These sizes are UK dress sizes, if you do not know which UK dress size you are, check out the conversion below:
UK USA EU AUS IT JAP
8 6 36 10 40 9
10 8 38 12 42 11
12 10 40 14 44 13
14 12 42 16 46 15
16 14 44 18 48 17
Please note, the pattern size you should cut may vary depending on the elasticity of your fabric. This pattern has been drafted for fabric with an elastane/lycra content, however other knits/jerseys can also be used to excellent effect. If you are using a knit/jersey fabric with no or very little elastane/lycra content (this may especially be true if using old T-shirts), you may have a better result by using the pattern size larger than you normally would pick.
Once you have selected the size you require, cut out the three pattern pieces. You will have one front pattern piece, one back pattern piece and one gusset pattern piece. All three of the pattern pieces are cut on the fold (as indicated on the pattern pieces). Position the pieces of straight of grain of your jersey/knit/T-shirt fabric (the grainline is indicated on the pattern pieces).
Construction.
As mentioned at the top of this post, head over to my 'How to Construct Undies with a Serger and FOE' post for instructions on how to sew together your cut pieces. The seam allowance on the side seams and gusset seam is 1cm / 3/8".
If you do not have a serger/overlocker:
The instructions I previously prepared used an overlocker/serger for stitching the side seams and gusset seam, but a normal sewing machine can do these steps just as well. If you will be using a normal sewing machine for all the processes of construction, then test out different stitches on a scrap of your jersey fabric to find the stitch you feel works best. Your sewing machine manual may have suggestions about what stitch type and needle would work best for jersey.
Personally, when sewing jersey, my sewing machine works best on a long but very narrow zigzag and I use a fine needle (I don’t bother buying special jersey needles). The zigzag gives a degree of stretch so the side seam doesn’t break when putting the garment on and off. The narrowness seems to prevent puckering. Some prefer to use a straight stitch and them zigzag along the edge of the seam allowance to finish the raw edge. Experiment and find what works best for you.
If you want to use flat underwear elastic not FOE (fold over elastic):
The instructions I previously made use FOE for the waist and leg holes. For that method the raw cut edge of the fabric gets trapped inside the FOE, which is then stitched on top of to secure it shut. But if you wish to use what-I-call-flat-elastic (basically any other type of underwear elastic that may well have a decorative edge like picot), that is totally do-able with this pattern.
There are two ways of using flat underwear elastic:
1) An easy, one-step way off applying flat elastic is laying it on top of the right side of the fabric slightly covering the raw edge, and then stitching on top of it (a three-step zig zag is usually used). You can see this method of applying flat underwear elastic in the picture below where I have used it around the waist at the top of the picture. This method will make the gusset width a tiny bit wider and the leg holes a tiny bit smaller (by the amount you allow the elastic to lay further than the raw edge). If you do not want the gusset to be wider, trim away a few millimetres (or imperial equivalent!) from all three pattern pieces around the edges of the leg hole.

No matter what type of elastic you choose and what method you decide to apply it with, I thoroughly recommend having a good play about on some scrap jersey fabric until you are happy with the effect you are getting.
If you like this pattern.....
I really hope you do enjoy using this pattern. This PDF pattern is the result of a few years evolution of personal pant-making. Pants/undies/knickers making can be pretty addictive because it takes a relatively short time (once you get the knack of using underwear elastic) and a relatively small amount of fabric to make a finished, wearable garment. If you do use it, please pop back to this blog and leave a comment (or a link if you have blogged about it) and let me know how you got on.
Obviously I didn't create this pattern and instructions with the intention of making money, otherwise I would be charging for it! However, if you do download it and enjoy using it, feel free to by me a coffee by way of thanks! You can donate me a coffee by clicking here...

163 comments:
Post a Comment